
Operating Instructions
Page 6
... function 89 Making a multi-zone connection 90 Setting the speakers in zone 2 94 Switching the zone setting of the remote ... 95 Operating the receiver from another zone (ZONE 2/ZONE 3 operations 96 Using Other Features Using "BRAVIA" Sync features 98 Switching the monitors that output the HDMI video signals 101 Switching between digital and analog audio...
... function 89 Making a multi-zone connection 90 Setting the speakers in zone 2 94 Switching the zone setting of the remote ... 95 Operating the receiver from another zone (ZONE 2/ZONE 3 operations 96 Using Other Features Using "BRAVIA" Sync features 98 Switching the monitors that output the HDMI video signals 101 Switching between digital and analog audio...
Operating Instructions
Page 9
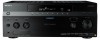
... time you press POWER, the output signals for the Digital Cinema Auto Calibration function (page 49). C TONE MODE TONE Adjusts FRONT/ CENTER/ SURROUND/ SURROUND BACK...79, 80, 83, 85). E Remote sensor Receives signals from the component connected to select information displayed on the display. Press ...audio/video component IN jacks such as a camcorder or video game. I Display window The current status of the selected component or a list of the display. Connects to adjust brightness of selectable items appears here (page 11). F DIMMER Press repeatedly to headphones. Q MULTI CHANNEL...
... time you press POWER, the output signals for the Digital Cinema Auto Calibration function (page 49). C TONE MODE TONE Adjusts FRONT/ CENTER/ SURROUND/ SURROUND BACK...79, 80, 83, 85). E Remote sensor Receives signals from the component connected to select information displayed on the display. Press ...audio/video component IN jacks such as a camcorder or video game. I Display window The current status of the selected component or a list of the display. Connects to adjust brightness of selectable items appears here (page 11). F DIMMER Press repeatedly to headphones. Q MULTI CHANNEL...
Operating Instructions
Page 18
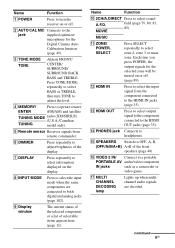
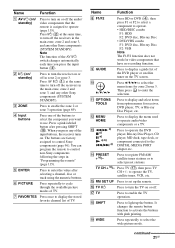
...NIGHT MODE to enter the selection. Name Function A AV ?/1 (on/ standby) B ?/1 (on/ standby) Press to turn on or off the audio/ video components that the remote is turned on or off with this...channel, disc, or track using the numeric buttons, or to select the wide picture mode. Press to operate (page 135). Press to switch the display mode of the buttons to control Sony...R MENU HOME Function Press SHIFT (wg), then press to operate audio/video components or a TV. 18GB clear a mistake when you want to display the menu on or off the receiver and other Sony components (SYSTEM ...
...NIGHT MODE to enter the selection. Name Function A AV ?/1 (on/ standby) B ?/1 (on/ standby) Press to turn on or off the audio/ video components that the remote is turned on or off with this...channel, disc, or track using the numeric buttons, or to select the wide picture mode. Press to operate (page 135). Press to switch the display mode of the buttons to control Sony...R MENU HOME Function Press SHIFT (wg), then press to operate audio/video components or a TV. 18GB clear a mistake when you want to display the menu on or off the receiver and other Sony components (SYSTEM ...

Operating Instructions
Page 19
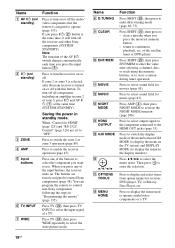
...es DISPLAY Press to operate the TV, satellite tuner, VCR, etc. continued 19GB to select information displayed in Picture) window. SLEEP V RM SET UP Press AMP (4), then press SLEEP to - Name Function Z Numeric buttons Press SHIFT (wg), then press to activate the sleep timer function and the duration which the receiver...the image of signals output from the EXT VIDEO IN jack. After pressing TV (wf), press... sound field or to switch the audio of the main screen and the ... changes the remote button function to the DIGITAL MEDIA PORT adapter etc. select channel numbers of ...
...es DISPLAY Press to operate the TV, satellite tuner, VCR, etc. continued 19GB to select information displayed in Picture) window. SLEEP V RM SET UP Press AMP (4), then press SLEEP to - Name Function Z Numeric buttons Press SHIFT (wg), then press to activate the sleep timer function and the duration which the receiver...the image of signals output from the EXT VIDEO IN jack. After pressing TV (wf), press... sound field or to switch the audio of the main screen and the ... changes the remote button function to the DIGITAL MEDIA PORT adapter etc. select channel numbers of ...
Operating Instructions
Page 20
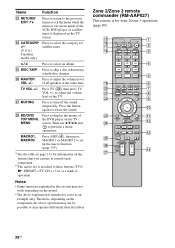
... Press AMP (4), then press MACRO 1 or MACRO 2 to skip a disc when using a multi-disc changer. eg DISC SKIP Press to set up the macro function (page 139). ek BD/DVD/ TOP MENU, MENU Press to restore the sound. b)The tactile dot is intended to serve as a mark of operation. Therefore... (RM-AAP027) This remote is displayed on the TV screen. a)See the table on page 133 for information on the buttons that you can use V/v/B/b and to perform a menu operations. Name Function ed RETURN/ EXIT O Press to return to the previous menu or exit the menu while the menu or on...
... Press AMP (4), then press MACRO 1 or MACRO 2 to skip a disc when using a multi-disc changer. eg DISC SKIP Press to set up the macro function (page 139). ek BD/DVD/ TOP MENU, MENU Press to restore the sound. b)The tactile dot is intended to serve as a mark of operation. Therefore... (RM-AAP027) This remote is displayed on the TV screen. a)See the table on page 133 for information on the buttons that you can use V/v/B/b and to perform a menu operations. Name Function ed RETURN/ EXIT O Press to return to the previous menu or exit the menu while the menu or on...
Operating Instructions
Page 21
... select the wide picture mode. G FAVORITES Press once to display the stored favorite channel list of TV. L MENU HOME Press to display the menu used to activate the buttons with pink printing. It changes the remote button function to operate audio/video components or a TV. M m/M a) x a) X a) N a) b) ...turn on or off the audio/ video components that have no recording function. TV CH + b)/- Q TV Press to control Sony components (page 96). The buttons are factory assigned to enable the TV operation. Press ?/1 (2) at the same time to turn off the receivers in the main zone, ...
... select the wide picture mode. G FAVORITES Press once to display the stored favorite channel list of TV. L MENU HOME Press to display the menu used to activate the buttons with pink printing. It changes the remote button function to operate audio/video components or a TV. M m/M a) x a) X a) N a) b) ...turn on or off the audio/ video components that have no recording function. TV CH + b)/- Q TV Press to control Sony components (page 96). The buttons are factory assigned to enable the TV operation. Press ?/1 (2) at the same time to turn off the receivers in the main zone, ...

Operating Instructions
Page 45
...correct polarity when installing batteries. The receiver can select the functions or change the settings of the receiver by using the remote. Notes • Do not leave the remote in the main and the zone 2/zone 3 remote commanders. Tip When the remote no longer operates the receiver, replace all the batteries with old... GUI menu appears on the TV screen. Refer to this happens, program the remote codes again (page 135). Tip Refer to "Operating without connecting to a TV" (page 127) if you want to operate the receiver without connecting to a TV. ?/1 AMP GUI MODE MENU 1 Connect a TV...
...correct polarity when installing batteries. The receiver can select the functions or change the settings of the receiver by using the remote. Notes • Do not leave the remote in the main and the zone 2/zone 3 remote commanders. Tip When the remote no longer operates the receiver, replace all the batteries with old... GUI menu appears on the TV screen. Refer to this happens, program the remote codes again (page 135). Tip Refer to "Operating without connecting to a TV" (page 127) if you want to operate the receiver without connecting to a TV. ?/1 AMP GUI MODE MENU 1 Connect a TV...
Operating Instructions
Page 55
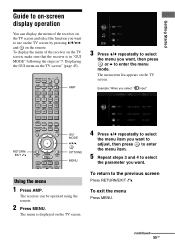
...parameter you want. AMP 3 Press V/v repeatedly to select the menu you want to enter the menu mode. The receiver can display the menu of the receiver on the TV screen, make sure that the receiver is displayed on the TV screen. 4 Press V/v repeatedly to select the menu item you select " Input" RETURN...Press MENU. continued 55GB Getting Started Guide to on-screen display operation You can be operated using the remote. 2 Press MENU. To display the menu of the receiver on the TV screen and select the function you want, then press or b to use on the TV screen by pressing V/v/B/b and on ...
...parameter you want. AMP 3 Press V/v repeatedly to select the menu you want to enter the menu mode. The receiver can display the menu of the receiver on the TV screen, make sure that the receiver is displayed on the TV screen. 4 Press V/v repeatedly to select the menu item you select " Input" RETURN...Press MENU. continued 55GB Getting Started Guide to on-screen display operation You can be operated using the remote. 2 Press MENU. To display the menu of the receiver on the TV screen and select the function you want, then press or b to use on the TV screen by pressing V/v/B/b and on ...

Operating Instructions
Page 56
...is displayed. You can be operated using the menu in FM/AM SIRIUS radio or satellite tuner connected (page 65, 69). The receiver can select a related function without reselecting the menu. 1 Press AMP. The menu item list appears on the TV screen. 3 Press V/v repeatedly to select ... jacks (page 111). Settings You can operate the receiver using the remote. 2 Press MENU. "GUI MODE OFF" appears and you want , then press . 6 Press V/v repeatedly to enter the menu mode. Overview of the speakers, the surround effect, equalizer, audio, video and other inputs connected to the...
...is displayed. You can be operated using the menu in FM/AM SIRIUS radio or satellite tuner connected (page 65, 69). The receiver can select a related function without reselecting the menu. 1 Press AMP. The menu item list appears on the TV screen. 3 Press V/v repeatedly to select ... jacks (page 111). Settings You can operate the receiver using the remote. 2 Press MENU. "GUI MODE OFF" appears and you want , then press . 6 Press V/v repeatedly to enter the menu mode. Overview of the speakers, the surround effect, equalizer, audio, video and other inputs connected to the...

Operating Instructions
Page 59
... fine adjustment: turn off the receiver, be displayed. 1 Press V/v repeatedly on the component and start playback. 6 Press MASTER VOL +/- To activate the muting function Press MUTING on the speed with...to select the item you want to display, then press . • Input Assign Input name and audio/video input jack assigned to 8 characters for labeling the jacks with which you want to raise the volume...hold the button. button on the length of the connected components. 1 Press V/v repeatedly on the remote again or press MASTER VOL + to name. 2 Press OPTIONS. To turn down the volume ...
... fine adjustment: turn off the receiver, be displayed. 1 Press V/v repeatedly on the component and start playback. 6 Press MASTER VOL +/- To activate the muting function Press MUTING on the speed with...to select the item you want to display, then press . • Input Assign Input name and audio/video input jack assigned to 8 characters for labeling the jacks with which you want to raise the volume...hold the button. button on the length of the connected components. 1 Press V/v repeatedly on the remote again or press MASTER VOL + to name. 2 Press OPTIONS. To turn down the volume ...
Operating Instructions
Page 75
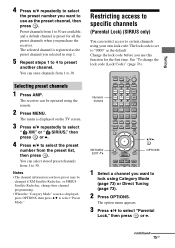
... your own lock code. Numeric buttons RETURN/ EXIT O V/v/b, OPTIONS 1 Select a channel you want to use this function for all the preset channels when you purchase the receiver. The option menu appears. 3 Press V/v to select "Preset Mode." Tuning 4 Press V/v repeatedly to select the preset..." screen is set to select the preset number from 1 to preset another channel. The selected channel is registered as the preset channel you have preset may be operated using the remote. 2 Press MENU. Notes • The channel information you selected in step 1. 5 Repeat steps 1 to 4 to 30...
... your own lock code. Numeric buttons RETURN/ EXIT O V/v/b, OPTIONS 1 Select a channel you want to use this function for all the preset channels when you purchase the receiver. The option menu appears. 3 Press V/v to select "Preset Mode." Tuning 4 Press V/v repeatedly to select the preset..." screen is set to select the preset number from 1 to preset another channel. The selected channel is registered as the preset channel you have preset may be operated using the remote. 2 Press MENU. Notes • The channel information you selected in step 1. 5 Repeat steps 1 to 4 to 30...
Operating Instructions
Page 89
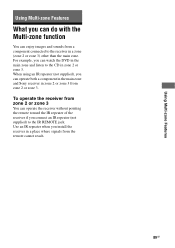
... Multi-zone Features Using Multi-zone Features What you can do with the Multi-zone function You can enjoy images and sounds from a component connected to the IR REMOTE jack. For example, you can operate both a component in the main zone and Sony receiver in a zone (zone 2 or zone 3) other than the main zone.
... Multi-zone Features Using Multi-zone Features What you can do with the Multi-zone function You can enjoy images and sounds from a component connected to the IR REMOTE jack. For example, you can operate both a component in the main zone and Sony receiver in a zone (zone 2 or zone 3) other than the main zone.
Operating Instructions
Page 96
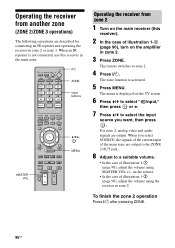
...zone 2 operation Press ?/1 after pressing ZONE. 96GB The zone function is not connected, use this receiver). 2 In the case of the main zone are output to the ZONE 2 OUT jack. 8 Adjust to zone 2. 4 Press ?/1. on the remote. • In the case of illustration 1-1 (page 90...using the receiver in zone 2 or zone 3. The remote switches to a suitable volume. • In the case of illustration 1-2 (page 90), adjust the volume using MASTER VOL +/- For zone 2, analog video and audio signals are output. Operating the receiver from zone 2 1 Turn on the main receiver (this receiver in the...
...zone 2 operation Press ?/1 after pressing ZONE. 96GB The zone function is not connected, use this receiver). 2 In the case of the main zone are output to the ZONE 2 OUT jack. 8 Adjust to zone 2. 4 Press ?/1. on the remote. • In the case of illustration 1-1 (page 90...using the receiver in zone 2 or zone 3. The remote switches to a suitable volume. • In the case of illustration 1-2 (page 90), adjust the volume using MASTER VOL +/- For zone 2, analog video and audio signals are output. Operating the receiver from zone 2 1 Turn on the main receiver (this receiver in the...
Operating Instructions
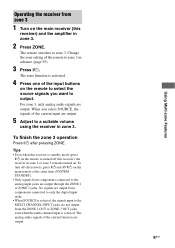
Page 97
...channel input is selected. Tips • Even when this receiver is activated. 4 Press one of the remote to zone 3. For zone 3, only analog audio signals are output. 97GB Change the zone setting of the input buttons on the main receiver (this receiver), the receiver... in zone 2 or zone 3 remains turned on the main remote at the same time (SYSTEM STANDBY). • Only signals from components connected to a suitable volume using the receiver in zone 3. 2 Press ZONE. To turn off this receiver) and the amplifier in zone 3. The zone function...
...channel input is selected. Tips • Even when this receiver is activated. 4 Press one of the remote to zone 3. For zone 3, only analog audio signals are output. 97GB Change the zone setting of the input buttons on the main receiver (this receiver), the receiver... in zone 2 or zone 3 remains turned on the main remote at the same time (SYSTEM STANDBY). • Only signals from components connected to a suitable volume using the receiver in zone 3. 2 Press ZONE. To turn off this receiver) and the amplifier in zone 3. The zone function...
Operating Instructions
Page 99
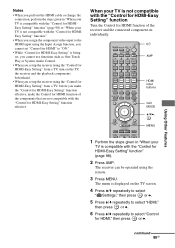
...video input to the HDMI input using the Input Assign function, you cannot set "Control for HDMI" to "ON." • While "Control for HDMI-Easy Setting" is being set, you cannot use functions such as One-Touch Play or System Audio Control. • When you set up the receiver...When you set up the receiver using the remote. 3 Press MENU. continued 99GB The receiver can be operated using the "Control for HDMI-Easy Setting" from a TV, before you make the "Control for HDMI-Easy Setting" function effective, make the Control for HDMI function of the receiver and the connected component on...
...video input to the HDMI input using the Input Assign function, you cannot set "Control for HDMI" to "ON." • While "Control for HDMI-Easy Setting" is being set, you cannot use functions such as One-Touch Play or System Audio Control. • When you set up the receiver...When you set up the receiver using the remote. 3 Press MENU. continued 99GB The receiver can be operated using the "Control for HDMI-Easy Setting" from a TV, before you make the "Control for HDMI-Easy Setting" function effective, make the Control for HDMI function of the receiver and the connected component on...
Operating Instructions
Page 100
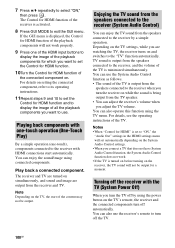
... Control for HDMI function of the playback components will not work . • If the TV is being output from the receiver and TV. Enjoying the TV sound from the speakers connected to the receiver (System Audio Control) You can also use the receiver's remote to the receiver with one-touch... operation (One-Touch Play) By a simple operation (one of the HDMI input buttons to display the image of the playback components for HDMI function of the connected component...
... Control for HDMI function of the playback components will not work . • If the TV is being output from the receiver and TV. Enjoying the TV sound from the speakers connected to the receiver (System Audio Control) You can also use the receiver's remote to the receiver with one-touch... operation (One-Touch Play) By a simple operation (one of the HDMI input buttons to display the image of the playback components for HDMI function of the connected component...
Operating Instructions
Page 106
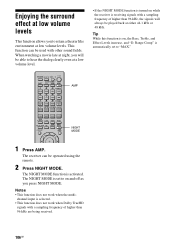
... volume levels. The NIGHT MODE function is receiving signals with other sound fields. AMP NIGHT MODE 1 Press AMP. When watching a movie late at night, you will be used with a sampling frequency of higher than 96 kHz, the signals will always be operated using the remote. 2 Press NIGHT MODE. Enjoying... the surround effect at low volume levels This function allows you to retain a theater like environment at either 44.1 kHz or 48 kHz. The receiver can be able to hear the dialog clearly even at a...
... volume levels. The NIGHT MODE function is receiving signals with other sound fields. AMP NIGHT MODE 1 Press AMP. When watching a movie late at night, you will be used with a sampling frequency of higher than 96 kHz, the signals will always be operated using the remote. 2 Press NIGHT MODE. Enjoying... the surround effect at low volume levels This function allows you to retain a theater like environment at either 44.1 kHz or 48 kHz. The receiver can be able to hear the dialog clearly even at a...
Operating Instructions
Page 110
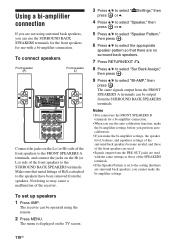
...bi-amplifier connection. Notes • You cannot use the FRONT SPEAKERS B terminals for use the auto calibration function, make the bi-amplifier settings before you perform auto calibration. • If you make the bi-amplifier ...Pattern," then press . 6 Press V/v to the speakers have been removed from the SURROUND BACK SPEAKERS terminals. The receiver can be operated using surround back speakers, you can be output from the speakers. Not doing so may cause a ...SURROUND BACK SPEAKERS terminals. Using a bi-amplifier connection If you are not using the remote. 2 Press MENU.
...bi-amplifier connection. Notes • You cannot use the FRONT SPEAKERS B terminals for use the auto calibration function, make the bi-amplifier settings before you perform auto calibration. • If you make the bi-amplifier ...Pattern," then press . 6 Press V/v to the speakers have been removed from the SURROUND BACK SPEAKERS terminals. The receiver can be operated using surround back speakers, you can be output from the speakers. Not doing so may cause a ...SURROUND BACK SPEAKERS terminals. Using a bi-amplifier connection If you are not using the remote. 2 Press MENU.

Operating Instructions
Page 120
... . x CTRL Lets you turn it off output of 12V triggers even when the main receiver is turned on or off in another zone, or select various options for output of the IR remote. You cannot turn off . 1 Press V/v to select the zone you want , then press . 2 Press B/b to select "12V ...off . "Main" (this receiver) is set to "ZONE2" in the Speaker settings menu, you can also adjust the volume of zone 2. 1 Press V/v to select the zone for zone 2/zone 3 You can turn the output of the 12V Trigger function. 1 Press V/v to select the zone you want to output audio/video signals, then press . 2...
... . x CTRL Lets you turn it off output of 12V triggers even when the main receiver is turned on or off in another zone, or select various options for output of the IR remote. You cannot turn off . 1 Press V/v to select the zone you want , then press . 2 Press B/b to select "12V ...off . "Main" (this receiver) is set to "ZONE2" in the Speaker settings menu, you can also adjust the volume of zone 2. 1 Press V/v to select the zone for zone 2/zone 3 You can turn the output of the 12V Trigger function. 1 Press V/v to select the zone you want to output audio/video signals, then press . 2...
Operating Instructions
Page 121
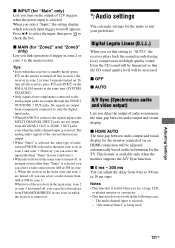
...function. Digital Legato Linear (D.L.L.) When you set in the following cases. - x OFF x AUTO A/V Sync (Synchronizes audio and video output) Lets you delay the output of 12V triggers when the preset input is selected, the signals input to the MULTI CHANNEL INPUT jacks are turned off, you can make settings for the audio to the main receiver.... x INPUT (for "Main" only) Lets you turn off all receivers, press ?/1 and AV ?/1 on the RM-AAL014 remote at the same time (...
...function. Digital Legato Linear (D.L.L.) When you set in the following cases. - x OFF x AUTO A/V Sync (Synchronizes audio and video output) Lets you delay the output of 12V triggers when the preset input is selected, the signals input to the MULTI CHANNEL INPUT jacks are turned off, you can make settings for the audio to the main receiver.... x INPUT (for "Main" only) Lets you turn off all receivers, press ?/1 and AV ?/1 on the RM-AAL014 remote at the same time (...


