Technical Background
Page 37
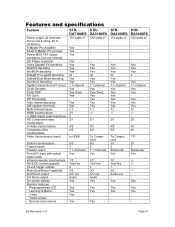
... STRDA2100ES 110 watts x7 - Yes Yes Yes II Yes 7.1-channel Yes Yes Yes Yes Yes 5.1 -/2/1 3/1 4/1 ??? 3/1 1 Subwoofer Yes -/-/-/Yes Yes Yes - ES Receivers v1.0 Page 37 STRDA1000ES 100 watts x7 - Features and specifications Feature Power output, all channels driven into 8 ohms, 20 to 20,000 Hz S-Master Pro.../upgrade 12-volt trigger outputs Multi-Zone/Room Capability 2nd Room output 3rd Room output On screen display Remote Features Preprogrammed LCD Learning & Macro 2-way Touch-screen Second-room remote STRDA7100ES 170 watts x7 Yes Yes Yes Yes Yes Yes Yes IIx Yes Yes 7.1-channel Yes Yes (Two...
... STRDA2100ES 110 watts x7 - Yes Yes Yes II Yes 7.1-channel Yes Yes Yes Yes Yes 5.1 -/2/1 3/1 4/1 ??? 3/1 1 Subwoofer Yes -/-/-/Yes Yes Yes - ES Receivers v1.0 Page 37 STRDA1000ES 100 watts x7 - Features and specifications Feature Power output, all channels driven into 8 ohms, 20 to 20,000 Hz S-Master Pro.../upgrade 12-volt trigger outputs Multi-Zone/Room Capability 2nd Room output 3rd Room output On screen display Remote Features Preprogrammed LCD Learning & Macro 2-way Touch-screen Second-room remote STRDA7100ES 170 watts x7 Yes Yes Yes Yes Yes Yes Yes IIx Yes Yes 7.1-channel Yes Yes (Two...
Technical Background
Page 38
... may not be compatible with some brands or models. i.LINK is a trademark of the Blu-ray Disc Founders. Multi-brand remote may not communicate with the device having an i.LINK connector for information on compatibility, operating conditions and proper connection. 2. Features ...and specifciations are trademarks of Sony. Please refer to the documentation that product contains an IEEE 1394 connector. ES Receivers v1.0 Page 38 Dolby, Dolby Digital and Pro Logic are subject to designate that comes...
... may not be compatible with some brands or models. i.LINK is a trademark of the Blu-ray Disc Founders. Multi-brand remote may not communicate with the device having an i.LINK connector for information on compatibility, operating conditions and proper connection. 2. Features ...and specifciations are trademarks of Sony. Please refer to the documentation that product contains an IEEE 1394 connector. ES Receivers v1.0 Page 38 Dolby, Dolby Digital and Pro Logic are subject to designate that comes...
Dimensions Diagrams
Page 1
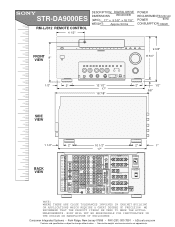
... RECOMMEND THAT THE PRODUCT ITSELF BE USED TO MAKE THE ACTUAL MEASUREMENTS. FRONT - - - SONY WILL NOT BE RESPONSIBLE FOR INACCURACIES IN THE DESIGN OR MANUFACTURE OF ENCLOSURES . STR-DA9000ES RM-LJ312 REMOTE CONTROL 4 1/2" DESCRIPTION: DIGITAL DRIVE DIMENSIONS RECEIVER (WHD): 17 " x 9 3/8" x 18 7/8 " WEIGHT: Approx 50 lbs POWER ...SURR I.LINK S200 OUND SURR BACK SUB WOOFER RS-232C VIDEO 1 IN OUT VIDEO 1 IN IN OUT OUT PB B-Y PB B-Y FM B PR R-Y PR R-Y 75 COAXIAL + - - Consumer Integrated Systems • Park Ridge, New Jersey 07656 • FAX (201) 930 7891 ...
... RECOMMEND THAT THE PRODUCT ITSELF BE USED TO MAKE THE ACTUAL MEASUREMENTS. FRONT - - - SONY WILL NOT BE RESPONSIBLE FOR INACCURACIES IN THE DESIGN OR MANUFACTURE OF ENCLOSURES . STR-DA9000ES RM-LJ312 REMOTE CONTROL 4 1/2" DESCRIPTION: DIGITAL DRIVE DIMENSIONS RECEIVER (WHD): 17 " x 9 3/8" x 18 7/8 " WEIGHT: Approx 50 lbs POWER ...SURR I.LINK S200 OUND SURR BACK SUB WOOFER RS-232C VIDEO 1 IN OUT VIDEO 1 IN IN OUT OUT PB B-Y PB B-Y FM B PR R-Y PR R-Y 75 COAXIAL + - - Consumer Integrated Systems • Park Ridge, New Jersey 07656 • FAX (201) 930 7891 ...
Operating Instructions
Page 3
...polarized plug has two blades with the apparatus. You can also use the controls on the supplied remote if they exit from the apparatus. 11 Only use of your remote, see the illustration below). Any difference in operation is damaged, liquid has been spilled or objects... or when unused for illustration purposes unless stated otherwise. This receiver incorporates Dolby* Digital and Pro Logic Surround and the DTS** Digital Surround System. * Manufactured under license from tip-over. 13 Unplug this manual, STR-DA9000ES (area code U) is required when the apparatus has been ...
...polarized plug has two blades with the apparatus. You can also use the controls on the supplied remote if they exit from the apparatus. 11 Only use of your remote, see the illustration below). Any difference in operation is damaged, liquid has been spilled or objects... or when unused for illustration purposes unless stated otherwise. This receiver incorporates Dolby* Digital and Pro Logic Surround and the DTS** Digital Surround System. * Manufactured under license from tip-over. 13 Unplug this manual, STR-DA9000ES (area code U) is required when the apparatus has been ...

Operating Instructions
Page 15
For details on the remote. Camcorder or TV game B, D INPUT OUTPUT VIDEO VIDEO IN OUT VCR AUDIO AUDIO IN OUT L R INPUT OUTPUT S VIDEO S VIDEO B B D D OUT IN OUT IN L L L L To the ... IN MONITOR OUT VIDEO OUT 1 S2 VIDEO OUT 1 OUT 2 OUT 2 DVD IN Y COMPONENT VIDEO Y VIDEO 1 IN ANTENNA PB/CB/B-Y PB/CB/B-Y PR/CR/R-Y PR/CR/R-Y FM 75 COAXIAL U AM TV/ YY MONI SAT TOR IN OUT PB/CB/B-Y PB/CB/B-Y TRIGGER PR/CR/R-Y PR/CR/R-Y 1 FRONT 2 SURROUND 3 SURR BACK 4 SUB WOOFER...
For details on the remote. Camcorder or TV game B, D INPUT OUTPUT VIDEO VIDEO IN OUT VCR AUDIO AUDIO IN OUT L R INPUT OUTPUT S VIDEO S VIDEO B B D D OUT IN OUT IN L L L L To the ... IN MONITOR OUT VIDEO OUT 1 S2 VIDEO OUT 1 OUT 2 OUT 2 DVD IN Y COMPONENT VIDEO Y VIDEO 1 IN ANTENNA PB/CB/B-Y PB/CB/B-Y PR/CR/R-Y PR/CR/R-Y FM 75 COAXIAL U AM TV/ YY MONI SAT TOR IN OUT PB/CB/B-Y PB/CB/B-Y TRIGGER PR/CR/R-Y PR/CR/R-Y 1 FRONT 2 SURROUND 3 SURR BACK 4 SUB WOOFER...

Operating Instructions
Page 24
...RM SELECT. 3 Touch AMP. 4 Touch b to display screen 4/6. 5 Touch TEST TONE. Use the remote for the adjustment. 7 After the adjustment, touch TEST TONE again. on the remote or turn on the receiver. • You can output the test tone or sound source from each speaker in the LEVEL menu (page..."TEST TONE" in the LEVEL menu appears in the display and the test tone is output only from your listening position. Tip The receiver employs a test tone with the remote. Set "MENU EXPAND" in the LEVEL menu to "ON" (page 40). 6: Adjusting the speaker levels and balance - For more...
...RM SELECT. 3 Touch AMP. 4 Touch b to display screen 4/6. 5 Touch TEST TONE. Use the remote for the adjustment. 7 After the adjustment, touch TEST TONE again. on the remote or turn on the receiver. • You can output the test tone or sound source from each speaker in the LEVEL menu (page..."TEST TONE" in the LEVEL menu appears in the display and the test tone is output only from your listening position. Tip The receiver employs a test tone with the remote. Set "MENU EXPAND" in the LEVEL menu to "ON" (page 40). 6: Adjusting the speaker levels and balance - For more...

Operating Instructions
Page 25
... DVD Satellite tuner TV/SAT Tape deck TAPE MD or DAT deck MD/DAT CD or Super Audio CD CD/SACD player Built-in tuner FM or AM and frequency Turntable PHONO i.LINK component* i.LINK * See "Note when "i.LINK" is selected" below. 2 Turn on LINC.) Make sure to control... 1) - To cancel, press MUTING on using headphones When headphones are connected, you turn off . To mute the sound Press MUTING on the receiver again. Even if you turn on the remote. "No LINC" : No i.LINK component is connected when "i.LINK" is set to select the input. HEADPHONE (MULTI 2) - The selected ...
... DVD Satellite tuner TV/SAT Tape deck TAPE MD or DAT deck MD/DAT CD or Super Audio CD CD/SACD player Built-in tuner FM or AM and frequency Turntable PHONO i.LINK component* i.LINK * See "Note when "i.LINK" is selected" below. 2 Turn on LINC.) Make sure to control... 1) - To cancel, press MUTING on using headphones When headphones are connected, you turn off . To mute the sound Press MUTING on the receiver again. Even if you turn on the remote. "No LINC" : No i.LINK component is connected when "i.LINK" is set to select the input. HEADPHONE (MULTI 2) - The selected ...

Operating Instructions
Page 26
... high to select FM or AM band. Listening to FM/AM radio You can also use the FM/AM button on the supplied remote, refer to the operating instructions supplied with the remote. 1 Rotate INPUT SELECTOR to select tuner ("FM" or "AM"). 2 Touch TUNER. 3 Touch FM/AM to low. The receiver stops scanning whenever...the built-in the SPEAKER SET UP menu (page 21), and you to monaural. 26GB Direct tuning Enter a frequency of poor FM stereo reception If the FM stereo reception is not connected (Analog downmix function) If you switch the input or sound field (page 31-34). You can listen ...
... high to select FM or AM band. Listening to FM/AM radio You can also use the FM/AM button on the supplied remote, refer to the operating instructions supplied with the remote. 1 Rotate INPUT SELECTOR to select tuner ("FM" or "AM"). 2 Touch TUNER. 3 Touch FM/AM to low. The receiver stops scanning whenever...the built-in the SPEAKER SET UP menu (page 21), and you to monaural. 26GB Direct tuning Enter a frequency of poor FM stereo reception If the FM stereo reception is not connected (Analog downmix function) If you switch the input or sound field (page 31-34). You can listen ...

Operating Instructions
Page 27
... TUNING - If "MEMORY" goes out before you want. If "MEMORY" goes out before you want to 30 FM or AM stations. If not, repeat step 6. to switch the memory page, press SHIFT on the remote. If you select the preset number, start again from step 4. 6 Press MEMORY/ENTER again. continued 27GB If...
... TUNING - If "MEMORY" goes out before you want. If "MEMORY" goes out before you want to 30 FM or AM stations. If not, repeat step 6. to switch the memory page, press SHIFT on the remote. If you select the preset number, start again from step 4. 6 Press MEMORY/ENTER again. continued 27GB If...

Operating Instructions
Page 28
...Input name and sound field name FM and AM Preset station name and sound field name* y Input name and sound field name * Index name appears only when you press DISPLAY, the display will change as follows: tA1yA2y...yA0yB1yB2y...yB0T tC0y...yC2yC1T Using the remote 1 Touch RM SELECT. 2 ... select the preset station you can also select the preset station directly. The input stream information appears. 3 Rotate -/+ for 4 seconds when the receiver detects any changes in the RM SELECT screen. 2 Touch b to display screen 5/6, then touch DIMMER repeatedly. The input of digital input signals....
...Input name and sound field name FM and AM Preset station name and sound field name* y Input name and sound field name * Index name appears only when you press DISPLAY, the display will change as follows: tA1yA2y...yA0yB1yB2y...yB0T tC0y...yC2yC1T Using the remote 1 Touch RM SELECT. 2 ... select the preset station you can also select the preset station directly. The input stream information appears. 3 Rotate -/+ for 4 seconds when the receiver detects any changes in the RM SELECT screen. 2 Touch b to display screen 5/6, then touch DIMMER repeatedly. The input of digital input signals....

Operating Instructions
Page 41
...between video and audio. For example, if you select STADIUM for CD, etc.) is interrupted when playback starts, set to the H.A.T.S. In this receiver, select the component for a note on the connected component (ex., press PLAY button, press STOP button, press PAUSE button) due to "MIX...and the sound from 0 ms to output the sound after the playback operation is no sound depending on the 2 way remote control system. You can use another receiver, etc. Note It takes some time to "AUTO". "B" parameter phase correction provides more enhanced bass characteristics. The sound ...
...between video and audio. For example, if you select STADIUM for CD, etc.) is interrupted when playback starts, set to the H.A.T.S. In this receiver, select the component for a note on the connected component (ex., press PLAY button, press STOP button, press PAUSE button) due to "MIX...and the sound from 0 ms to output the sound after the playback operation is no sound depending on the 2 way remote control system. You can use another receiver, etc. Note It takes some time to "AUTO". "B" parameter phase correction provides more enhanced bass characteristics. The sound ...

Operating Instructions
Page 42
... SURR BACK XX feet SUB WOOFER XX feet DISTANCE UNIT* SP POSI.* SP CROSSOVER > XXX Hz * Adjustable only when "MENU EXPAND" is set the 2 way remote control system to 32. For other input. x OSD H.POSITION (OSD horizontal position) Initial setting: 4 Lets you specify the location of the following parameters are underlined...
... SURR BACK XX feet SUB WOOFER XX feet DISTANCE UNIT* SP POSI.* SP CROSSOVER > XXX Hz * Adjustable only when "MENU EXPAND" is set the 2 way remote control system to 32. For other input. x OSD H.POSITION (OSD horizontal position) Initial setting: 4 Lets you specify the location of the following parameters are underlined...

Operating Instructions
Page 46
...by the CIS command of the current input is output. For details, see "CIS menu parameters" below . The 2 channel analog audio signals of the IR remote or RS232C control. • ZONE (for the other zone 2) Lets you turn on output of the current input is output. EX2 (12 V trigger for... "12V TRIG. See "To set the 12V trigger setting for more information. 1 Rotate MAIN MENU to select "CIS". 2 Rotate MENU to the main receiver. To set the 12V trigger setting for each input". • MAIN (except for "12V TRIG. MAIN", "12V TRIG. 2ND" and "12V TRIG. 3RD" only)...
...by the CIS command of the current input is output. For details, see "CIS menu parameters" below . The 2 channel analog audio signals of the IR remote or RS232C control. • ZONE (for the other zone 2) Lets you turn on output of the current input is output. EX2 (12 V trigger for... "12V TRIG. See "To set the 12V trigger setting for more information. 1 Rotate MAIN MENU to select "CIS". 2 Rotate MENU to the main receiver. To set the 12V trigger setting for each input". • MAIN (except for "12V TRIG. MAIN", "12V TRIG. 2ND" and "12V TRIG. 3RD" only)...

Operating Instructions
Page 49
...with a nominal impedance of 8 ohms or higher. **When you want to turn off , press SLEEP while the power is on . Use the remote for the operation. The remaining time appears in the display. The speakers connected to the SPEAKERS SURROUND B terminals (5.1 channel). Set to A B A+B*...while the power is on . The speakers connected to the SPEAKERS FRONT A terminals. Tip To check the remaining time before the receiver turns off automatically at a specified time. Selecting the speaker system Other Operations Selecting the front speaker system Set the SPEAKERS FRONT ...
...with a nominal impedance of 8 ohms or higher. **When you want to turn off , press SLEEP while the power is on . Use the remote for the operation. The remaining time appears in the display. The speakers connected to the SPEAKERS SURROUND B terminals (5.1 channel). Set to A B A+B*...while the power is on . The speakers connected to the SPEAKERS FRONT A terminals. Tip To check the remaining time before the receiver turns off automatically at a specified time. Selecting the speaker system Other Operations Selecting the front speaker system Set the SPEAKERS FRONT ...

Operating Instructions
Page 52
...zone, only analog audio signals ZONE OUT 2ND ZONE OUT 3RD are output. To turn off , the receiver in the 2nd or 3rd zone. 4 Press one of the current function are not output from components ... or ZONE OUT 3RD jacks even when MULTI CH IN is turned off all receivers, press ?/1 and AV ?/1 on the supplied remote, refer to the 2nd zone or 3rd zone mode. Listening to the sound...OUT 2 OUT 2 DVD IN Y COMPONENT VIDEO Y VIDEO 1 IN ANTENNA PB/CB/B-Y PB/CB/B-Y PR/CR/R-Y PR/CR/R-Y FM 75 COAXIAL U AM TV/ YY MONI SAT TOR IN OUT PB/CB/B-Y PB/CB/B-Y TRIGGER PR/CR/R-Y PR/CR/R-Y 1 ...
...zone, only analog audio signals ZONE OUT 2ND ZONE OUT 3RD are output. To turn off , the receiver in the 2nd or 3rd zone. 4 Press one of the current function are not output from components ... or ZONE OUT 3RD jacks even when MULTI CH IN is turned off all receivers, press ?/1 and AV ?/1 on the supplied remote, refer to the 2nd zone or 3rd zone mode. Listening to the sound...OUT 2 OUT 2 DVD IN Y COMPONENT VIDEO Y VIDEO 1 IN ANTENNA PB/CB/B-Y PB/CB/B-Y PR/CR/R-Y PR/CR/R-Y FM 75 COAXIAL U AM TV/ YY MONI SAT TOR IN OUT PB/CB/B-Y PB/CB/B-Y TRIGGER PR/CR/R-Y PR/CR/R-Y 1 ...

Operating Instructions
Page 54
...A1 compatible components are not turned on the component. If, however, you have a Sony CD changer with VIDEO OUT jacks, set the command mode to "CD 1" and connect the changer to the VIDEO 2 jacks on the amplifier (receiver). If a component has more than 2 meters long, with no distinction of the...switches to the correct input when you can be able to connect more than the recording source. Note Do not operate a 2 way remote control unit when the CONTROL A1II jacks are compatible with components with the CONTROL A1II control system. However, you press the play any order...
...A1 compatible components are not turned on the component. If, however, you have a Sony CD changer with VIDEO OUT jacks, set the command mode to "CD 1" and connect the changer to the VIDEO 2 jacks on the amplifier (receiver). If a component has more than 2 meters long, with no distinction of the...switches to the correct input when you can be able to connect more than the recording source. Note Do not operate a 2 way remote control unit when the CONTROL A1II jacks are compatible with components with the CONTROL A1II control system. However, you press the play any order...

Operating Instructions
Page 55
... component to the CTRL S OUT jack on this unit in a rack, etc. 55GB This is useful if you have a CONTROL S-compatible Sony TV, satellite tuner, monitor, DVD player or VCR, use a control S connecting cord (not supplied) to connect the CTRL S IN (...CONTROL S Control System If you have placed this unit. I i .> mM H X x + - O + + - - Remote The remote sensor on the CTRL S OUT component receives remote codes the same way as the remote sensor on the respective component. Refer to the operating instructions supplied with your TV, satellite tuner, monitor, VCR, etc...
... component to the CTRL S OUT jack on this unit in a rack, etc. 55GB This is useful if you have a CONTROL S-compatible Sony TV, satellite tuner, monitor, DVD player or VCR, use a control S connecting cord (not supplied) to connect the CTRL S IN (...CONTROL S Control System If you have placed this unit. I i .> mM H X x + - O + + - - Remote The remote sensor on the CTRL S OUT component receives remote codes the same way as the remote sensor on the respective component. Refer to the operating instructions supplied with your TV, satellite tuner, monitor, VCR, etc...

Operating Instructions
Page 58
... short-circuit problem and turn on the receiver has been activated. There is no sound when i.LINK is selected. • Check that the i.LINK component is connected correctly. • Check that the headphones are connected correctly. • Press MUTING on the remote to cancel the muting function. •... digital sources (from one channel is set to "ALL ON". There is no matter which is not outputting any problem persist, consult your nearest Sony dealer. If both the L and R jacks. Should any sound. • Make sure you have selected the correct component with INPUT SELECTOR. ...
... short-circuit problem and turn on the receiver has been activated. There is no sound when i.LINK is selected. • Check that the i.LINK component is connected correctly. • Check that the headphones are connected correctly. • Press MUTING on the remote to cancel the muting function. •... digital sources (from one channel is set to "ALL ON". There is no matter which is not outputting any problem persist, consult your nearest Sony dealer. If both the L and R jacks. Should any sound. • Make sure you have selected the correct component with INPUT SELECTOR. ...

Operating Instructions
Page 59
... or "LARGE" (page 22). To prevent a gas explosion, do not function for the audio output) of more than 48 kHz. Outdoor FM antenna Receiver ANTENNA FM 75 COAXIAL U AM Ground wire (not supplied) To ground Radio stations cannot be done. • Check that the components are connected correctly.... discs have no sound from the center speaker. • Make sure the sound field function is on the receiver. • Remove any obstacles in the path between the remote and the receiver. Adjust the antennas and connect an external antenna if necessary. • The signal strength of this case,...
... or "LARGE" (page 22). To prevent a gas explosion, do not function for the audio output) of more than 48 kHz. Outdoor FM antenna Receiver ANTENNA FM 75 COAXIAL U AM Ground wire (not supplied) To ground Radio stations cannot be done. • Check that the components are connected correctly.... discs have no sound from the center speaker. • Make sure the sound field function is on the receiver. • Remove any obstacles in the path between the remote and the receiver. Adjust the antennas and connect an external antenna if necessary. • The signal strength of this case,...

Operating Instructions
Page 60
... on the power again. 21/PROTECTOR Turn off the receiver and consult your nearest Sony dealer. 01/DECODE ERROR Appears when the signal which the receiver cannot decode (ex. Turn off the receiver, leave the receiver for a while and turn on the remote. 72/UNKNOWN SIGNAL The receiver is overheated. • Replace all the batteries in the...
... on the power again. 21/PROTECTOR Turn off the receiver and consult your nearest Sony dealer. 01/DECODE ERROR Appears when the signal which the receiver cannot decode (ex. Turn off the receiver, leave the receiver for a while and turn on the remote. 72/UNKNOWN SIGNAL The receiver is overheated. • Replace all the batteries in the...


