
Primary User Manual
Page 2
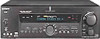
... with the instructions, may be of sufficient magnitude to constitute a risk of electric shock to persons. As an ENERGY STAR® partner, Sony Corporation has determined that this model. WARNING This equipment has been tested and found to correct the interference by turning the equipment off and on.... Tip The instructions in the United States Note to Part 15 of Digital Theater Systems, Inc. Note for the supplied remote The NIGHT MODE button on the receiver. For customers in this manual describe the controls on , the user is intended to alert the user to the presence ...
... with the instructions, may be of sufficient magnitude to constitute a risk of electric shock to persons. As an ENERGY STAR® partner, Sony Corporation has determined that this model. WARNING This equipment has been tested and found to correct the interference by turning the equipment off and on.... Tip The instructions in the United States Note to Part 15 of Digital Theater Systems, Inc. Note for the supplied remote The NIGHT MODE button on the receiver. For customers in this manual describe the controls on , the user is intended to alert the user to the presence ...

Primary User Manual
Page 22
... back speaker bass crossover frequency when the surround back speaker is set to select the mode you can select the mode using the remote. Note The receiver incorporates a new test tone with a frequency centered at 800 Hz for the front L/R speakers is output from the speaker whose ...Although these adjustments can also adjust the balance between speakers. Turn MASTER VOLUME on the component that you do the following to turn on the receiver. 2 Turn on the main unit or press MASTER VOLUME +/- Checking the connections After connecting all speakers at a time in sequence. Adjusting ...
... back speaker bass crossover frequency when the surround back speaker is set to select the mode you can select the mode using the remote. Note The receiver incorporates a new test tone with a frequency centered at 800 Hz for the front L/R speakers is output from the speaker whose ...Although these adjustments can also adjust the balance between speakers. Turn MASTER VOLUME on the component that you do the following to turn on the receiver. 2 Turn on the main unit or press MASTER VOLUME +/- Checking the connections After connecting all speakers at a time in sequence. Adjusting ...

Primary User Manual
Page 25
... the connection, see page 41). DIMMER Press DIMMER repeatedly to adjust the brightness of the supplied remote to the component or preset station (see page 38). Listening to the sound in another room ...Changing the display DISPLAY Basic Operations •• SPEAKERS 2ND ROOM OUT AUDIO IN Stereo amplifier SPEAKERS Press 2ND ROOM repeatedly to select the analog audio signals for output to the ...input jacks are output through the 2ND ROOM OUT jacks. No signals are turned off the receiver. 25 Index name does not appear when only blank spaces have assigned one to the 3rd...
... the connection, see page 41). DIMMER Press DIMMER repeatedly to adjust the brightness of the supplied remote to the component or preset station (see page 38). Listening to the sound in another room ...Changing the display DISPLAY Basic Operations •• SPEAKERS 2ND ROOM OUT AUDIO IN Stereo amplifier SPEAKERS Press 2ND ROOM repeatedly to select the analog audio signals for output to the ...input jacks are output through the 2ND ROOM OUT jacks. No signals are turned off the receiver. 25 Index name does not appear when only blank spaces have assigned one to the 3rd...
Primary User Manual
Page 36
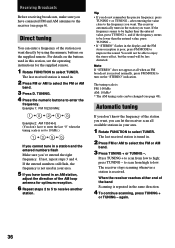
..., press TUNING -. • If "STEREO" flashes in the display and the FM stereo reception is not used in the same direction. 4 To continue scanning, press TUNING + or TUNING - Automatic tuning If you don't know the frequency of the AM loop antenna for the supplied remote. 1 Rotate FUNCTION to the receiver (see page 6). Press TUNING + to...
..., press TUNING -. • If "STEREO" flashes in the display and the FM stereo reception is not used in the same direction. 4 To continue scanning, press TUNING + or TUNING - Automatic tuning If you don't know the frequency of the AM loop antenna for the supplied remote. 1 Rotate FUNCTION to the receiver (see page 6). Press TUNING + to...

Primary User Manual
Page 37
... last received station is tuned in. 2 Press PRESET TUNING + or PRESET TUNING - Up to 30 FM or AM stations can be sure to preset them to preset stations You can tune the preset stations by entering its 2-character preset code using the supplied remote. Before tuning to select a memory page (A, B or C). "MEMORY...A2˜...˜A0˜B1˜B2˜...˜B0N nC0˜...C2˜C1N Using the preset codes Use the supplied remote to another station. The receiver will also scan all the stations that you can preset them by performing steps on the buttons used in the display. 5 ...
... last received station is tuned in. 2 Press PRESET TUNING + or PRESET TUNING - Up to 30 FM or AM stations can be sure to preset them to preset stations You can tune the preset stations by entering its 2-character preset code using the supplied remote. Before tuning to select a memory page (A, B or C). "MEMORY...A2˜...˜A0˜B1˜B2˜...˜B0N nC0˜...C2˜C1N Using the preset codes Use the supplied remote to another station. The receiver will also scan all the stations that you can preset them by performing steps on the buttons used in the display. 5 ...

Primary User Manual
Page 39
... when you need help. 1 Select the program source to be able to record from the REC OUT jacks. • When MULTI/2CH A. While using the receiver. To record a digital audio signal, connect a digital component to MULTI CH 1 or 2 DIRECT, audio signals are not output from another audio source, select the... make only digital connections. • Some sources contain copy guards to the TV/SAT and DVD/LD inputs. Press SLEEP on the remote while the power is set the receiver to MULTI CH 1 or 2 DIRECT, audio signals are not output from REC OUT jacks. • No signals output from the ...
... when you need help. 1 Select the program source to be able to record from the REC OUT jacks. • When MULTI/2CH A. While using the receiver. To record a digital audio signal, connect a digital component to MULTI CH 1 or 2 DIRECT, audio signals are not output from another audio source, select the... make only digital connections. • Some sources contain copy guards to the TV/SAT and DVD/LD inputs. Press SLEEP on the remote while the power is set the receiver to MULTI CH 1 or 2 DIRECT, audio signals are not output from REC OUT jacks. • No signals output from the ...
Primary User Manual
Page 41
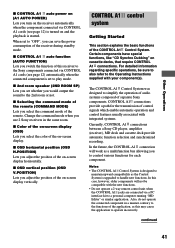
... jacks are connected via a PC interface kit to a personal computer running "MD Editor" or similar application. x Selecting the command mode of the remote (COMMAND MODE) Lets you use 2 Sony receivers in a manner contrary to the functions of control signals which enable automatic operation and control features usually associated with integrated systems. Currently, CONTROL...
... jacks are connected via a PC interface kit to a personal computer running "MD Editor" or similar application. x Selecting the command mode of the remote (COMMAND MODE) Lets you use 2 Sony receivers in a manner contrary to the functions of control signals which enable automatic operation and control features usually associated with integrated systems. Currently, CONTROL...

Primary User Manual
Page 46
... Connect the LD player to the RF demodulator, then connect the RF demodulator's optical or coaxial digital output to a gas pipe. Outdoor FM antenna Receiver ANTENNA AM U FM 75Ω COAXIAL Ground wire (not supplied) There is no picture or an unclear picture appears on the TV screen or monitor. &#...8226; Select the appropriate function on the remote. • If the remote is set to operate the TV only, use the remote to set to ...
... Connect the LD player to the RF demodulator, then connect the RF demodulator's optical or coaxial digital output to a gas pipe. Outdoor FM antenna Receiver ANTENNA AM U FM 75Ω COAXIAL Ground wire (not supplied) There is no picture or an unclear picture appears on the TV screen or monitor. &#...8226; Select the appropriate function on the remote. • If the remote is set to operate the TV only, use the remote to set to ...

Primary User Manual
Page 48
After tuning in any AM station, turn off the receiver. Hold down PRESET TUNING + and press ?/1. Specifications (continued) AM tuner section Tuning range With 10-kHz tuning scale: 530 - 1710 kHz4) With 9-kHz tuning scale: ....) 2 switched, 120 W/1A 430 × 161 × 401 mm including projecting parts and controls 16.0 kg Supplied accessories FM wire antenna (1) AM loop antenna (1) Audio/video/control S connecting cord (1) Control S connecting cord (1) Remote commander RM-PP505L (1) R6 (size-AA) batteries (2) Design and specifications are subject to change the AM tuning scale to...
After tuning in any AM station, turn off the receiver. Hold down PRESET TUNING + and press ?/1. Specifications (continued) AM tuner section Tuning range With 10-kHz tuning scale: 530 - 1710 kHz4) With 9-kHz tuning scale: ....) 2 switched, 120 W/1A 430 × 161 × 401 mm including projecting parts and controls 16.0 kg Supplied accessories FM wire antenna (1) AM loop antenna (1) Audio/video/control S connecting cord (1) Control S connecting cord (1) Remote commander RM-PP505L (1) R6 (size-AA) batteries (2) Design and specifications are subject to change the AM tuning scale to...


