

HDMI Control Guide
Page 2
...Sony components that you turn off simultaneously. Note Depending on automatically and switch to the appropriate HDMI input. • System Audio Control: While watching TV, you can select to output the sound from the TV speaker or the speakers connected to the receiver. • System Power Off: When you connect the receiver... function does not work . We recommend that are compatible with the HDMI CONTROL function with Sony's HDMI CONTROL function. • When you connect the receiver and components using other than HDMI connection. Using the HDMI CONTROL function for HDMI (High-...
...Sony components that you turn off simultaneously. Note Depending on automatically and switch to the appropriate HDMI input. • System Audio Control: While watching TV, you can select to output the sound from the TV speaker or the speakers connected to the receiver. • System Power Off: When you connect the receiver... function does not work . We recommend that are compatible with the HDMI CONTROL function with Sony's HDMI CONTROL function. • When you connect the receiver and components using other than HDMI connection. Using the HDMI CONTROL function for HDMI (High-...

HDMI Control Guide
Page 3
... details. Satellite tuner/Set-top box Audio/video signals A To enjoy TV multi channel surround sound broadcasting You can listen to TV multi channel surround sound broadcasting from the speakers connected to the DIGITAL ASSIGN function on the separate operating instructions supplied with the receiver. For details, refer to the receiver. Audio/video signals A HDMI cable (not supplied...
... details. Satellite tuner/Set-top box Audio/video signals A To enjoy TV multi channel surround sound broadcasting You can listen to TV multi channel surround sound broadcasting from the speakers connected to the DIGITAL ASSIGN function on the separate operating instructions supplied with the receiver. For details, refer to the receiver. Audio/video signals A HDMI cable (not supplied...

HDMI Control Guide
Page 4
... to enter the 4 Press V/v repeatedly to select "6-VIDEO". 4GB HDMI CONTROL function is activated. "1-LEVEL" appears on the display. 2 Press V/v repeatedly to select "CONTROL". See "To set HDMI CONTROL 1 (For remote RM-AAP016/ RM-AAP017 only) Press RECEIVER, then press MENU. "HDMI" flashes on the display.... HDMI input of the respective components. 1 Make sure that you use the HDMI CONTROL function. 3 Press menu. The RECEIVER indicator lights up and receiver operation is activated. "1-LEVEL" appears on the display. (For remote RM-AAU014/ RM-AAU015/RM-AAU017 only) Press ...
... to enter the 4 Press V/v repeatedly to select "6-VIDEO". 4GB HDMI CONTROL function is activated. "1-LEVEL" appears on the display. 2 Press V/v repeatedly to select "CONTROL". See "To set HDMI CONTROL 1 (For remote RM-AAP016/ RM-AAP017 only) Press RECEIVER, then press MENU. "HDMI" flashes on the display.... HDMI input of the respective components. 1 Make sure that you use the HDMI CONTROL function. 3 Press menu. The RECEIVER indicator lights up and receiver operation is activated. "1-LEVEL" appears on the display. (For remote RM-AAU014/ RM-AAU015/RM-AAU017 only) Press ...

HDMI Control Guide
Page 5
... by a simple operation. However, if you turn on the receiver while the TV is set to "CTRL ON", the "AUDIO" settings in the VIDEO menu will set to the receiver by simple operation You can also operate this case, the receiver and the TV switch to the appropriate HDMI input. You can... function will automatically be set automatically depending on the System Audio Control settings. • When you switch to an input other than STR-DG910 • When you connect a TV that does not have System Audio Control function, the System Audio Control function does not work. • If the TV ...
... by a simple operation. However, if you turn on the receiver while the TV is set to "CTRL ON", the "AUDIO" settings in the VIDEO menu will set to the receiver by simple operation You can also operate this case, the receiver and the TV switch to the appropriate HDMI input. You can... function will automatically be set automatically depending on the System Audio Control settings. • When you switch to an input other than STR-DG910 • When you connect a TV that does not have System Audio Control function, the System Audio Control function does not work. • If the TV ...

HDMI Control Guide
Page 6
RM-AAP016/ RM-AAP017 TV AV ?/1 RM-AAU014/ RM-AAU015/ RM-AAU017 You can also use the receiver's remote to "ON" before using the POWER button on the status, the connected components may not be turned off . Notes • Set the TV Standby ...-AAU015/RM-AAU017 only) Press TV and TV ?/1 at the same time. For details, see the operating instructions of the connected components. Turning off the receiver with the TV (System Power Off) When you turn the TV off by using the System Power Off function. For details, see the operating instructions...
RM-AAP016/ RM-AAP017 TV AV ?/1 RM-AAU014/ RM-AAU015/ RM-AAU017 You can also use the receiver's remote to "ON" before using the POWER button on the status, the connected components may not be turned off . Notes • Set the TV Standby ...-AAU015/RM-AAU017 only) Press TV and TV ?/1 at the same time. For details, see the operating instructions of the connected components. Turning off the receiver with the TV (System Power Off) When you turn the TV off by using the System Power Off function. For details, see the operating instructions...

HDMI Control Guide
Page 7
... Make sure "CONTROL" is set the "AUDIO" settings in VIDEO menu. • Make sure the connected component is compatible with the System Audio Control function. • If the TV does not have System Audio Control function, set to the sound from the TV speaker and receiver. - "AMP" if you want to ...listen to "CTRL ON" in VIDEO menu to the sound from the receiver. 7GB See the operating instructions of "Preparing for HDMI CONTROL...
... Make sure "CONTROL" is set the "AUDIO" settings in VIDEO menu. • Make sure the connected component is compatible with the System Audio Control function. • If the TV does not have System Audio Control function, set to the sound from the TV speaker and receiver. - "AMP" if you want to ...listen to "CTRL ON" in VIDEO menu to the sound from the receiver. 7GB See the operating instructions of "Preparing for HDMI CONTROL...

Operating Instructions
Page 1
Model No. STR-DG710 ©2007 Sony Corporation 2-898-637-11(2) Multi Channel AV Receiver Operating Instructions Owner's Record The model and serial numbers are located on the rear of the unit. Record the serial number in the space provided below. Refer to them whenever you call upon your Sony dealer regarding this product. Serial No.
Model No. STR-DG710 ©2007 Sony Corporation 2-898-637-11(2) Multi Channel AV Receiver Operating Instructions Owner's Record The model and serial numbers are located on the rear of the unit. Record the serial number in the space provided below. Refer to them whenever you call upon your Sony dealer regarding this product. Serial No.

Operating Instructions
Page 2
... may be connected to the grounding system of the building, as vases, on the apparatus. Increase the separation between the equipment and receiver. - However, there is provided to call CATV system installer's attention to Article 820-40 of the NEC that the cable ground ..., curtains, etc. To prevent fire, do not expose this equipment does cause harmful interference to radio or television reception, which the receiver is intended to alert the user to the presence of uninsulated "dangerous voltage" within the product's enclosure that to provide reasonable protection against...
... may be connected to the grounding system of the building, as vases, on the apparatus. Increase the separation between the equipment and receiver. - However, there is provided to call CATV system installer's attention to Article 820-40 of the NEC that the cable ground ..., curtains, etc. To prevent fire, do not expose this equipment does cause harmful interference to radio or television reception, which the receiver is intended to alert the user to the presence of uninsulated "dangerous voltage" within the product's enclosure that to provide reasonable protection against...

Operating Instructions
Page 3
...). HDMI, the HDMI logo and High-Definition Multimedia Interface are registered trademarks of DTS, Inc. This receiver incorporates Dolby* Digital and Pro Logic Surround and the DTS** Digital Surround System. * Manufactured under license from Dolby Laboratories. This...receiver you purchased is a registered trademark of the front panel. L SURROUND BACK NT A RS R SURROUND CENTER Area code Any differences in operation, according to the area code, are clearly indicated in this manual are for illustration purposes unless stated otherwise. "96/24" is used for model STR-DG710...
...). HDMI, the HDMI logo and High-Definition Multimedia Interface are registered trademarks of DTS, Inc. This receiver incorporates Dolby* Digital and Pro Logic Surround and the DTS** Digital Surround System. * Manufactured under license from Dolby Laboratories. This...receiver you purchased is a registered trademark of the front panel. L SURROUND BACK NT A RS R SURROUND CENTER Area code Any differences in operation, according to the area code, are clearly indicated in this manual are for illustration purposes unless stated otherwise. "96/24" is used for model STR-DG710...
Operating Instructions
Page 4
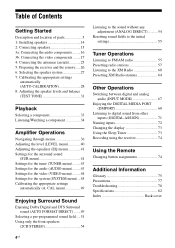
... of parts 5 1: Installing speakers 14 2: Connecting speakers 15 3a: Connecting the audio components.........16 3b: Connecting the video components ........17 4: Connecting the antennas (aerials 25 5: Preparing the receiver and the remote .....26 6: Selecting the speaker system 27 7: Calibrating the appropriate ... the surround sound (SUR menu 41 Settings for the tuner (TUNER menu).........43 Settings for the audio (AUDIO menu).........43 Settings for the video (VIDEO menu).........44 Settings for the system (SYSTEM menu) ...45 Calibrating the appropriate settings automatically (A. CAL...
... of parts 5 1: Installing speakers 14 2: Connecting speakers 15 3a: Connecting the audio components.........16 3b: Connecting the video components ........17 4: Connecting the antennas (aerials 25 5: Preparing the receiver and the remote .....26 6: Selecting the speaker system 27 7: Calibrating the appropriate ... the surround sound (SUR menu 41 Settings for the tuner (TUNER menu).........43 Settings for the audio (AUDIO menu).........43 Settings for the video (VIDEO menu).........44 Settings for the system (SYSTEM menu) ...45 Calibrating the appropriate settings automatically (A. CAL...

Operating Instructions
Page 5
...3 4 5 67 8 ?/1 SPEAKERS (OFF/A/B) AUTO CAL MIC PHONES TUNING MODE TUNING DISPLAY INPUT MODE INPUT SELECTOR MASTER VOLUME VIDEO 3 IN/PORTABLE AV IN VIDEO L AUDIO R MEMORY/ CATEGORY ENTER MODE CATEGORY 2CH A.F.D. Press to adjust the volume level of all speakers at the same time (page... front (OFF/A/B) speaker system (page 27). B SPEAKERS Press to activate the Auto Calibration function (page 29). Press or turn the receiver on (on the display (page 73). Getting Started Getting Started Description and location of selectable items appears here (page 7). C TUNING ...
...3 4 5 67 8 ?/1 SPEAKERS (OFF/A/B) AUTO CAL MIC PHONES TUNING MODE TUNING DISPLAY INPUT MODE INPUT SELECTOR MASTER VOLUME VIDEO 3 IN/PORTABLE AV IN VIDEO L AUDIO R MEMORY/ CATEGORY ENTER MODE CATEGORY 2CH A.F.D. Press to adjust the volume level of all speakers at the same time (page... front (OFF/A/B) speaker system (page 27). B SPEAKERS Press to activate the Auto Calibration function (page 29). Press or turn the receiver on (on the display (page 73). Getting Started Getting Started Description and location of selectable items appears here (page 7). C TUNING ...

Operating Instructions
Page 7
...input through the OPTICAL jack, or when INPUT MODE is set to "YES" (page 45) and the audio signal is output from the SUB WOOFER jack. PLIIx F OPT Function "; "; Lights up when the receiver is turned off or if headphones are set to "NO" (page 39) and you have made digital ...When playing a Dolby Digital format disc, be sure that INPUT MODE is set to "ANALOG" (page 67). PLII" lights up when the receiver applies Pro Logic processing to 2 channel signals in order to the speaker system used. Note Dolby Pro Logic IIx decoding does not function for DTS format signals or for...
...input through the OPTICAL jack, or when INPUT MODE is set to "YES" (page 45) and the audio signal is output from the SUB WOOFER jack. PLIIx F OPT Function "; "; Lights up when the receiver is turned off or if headphones are set to "NO" (page 39) and you have made digital ...When playing a Dolby Digital format disc, be sure that INPUT MODE is set to "ANALOG" (page 67). PLII" lights up when the receiver applies Pro Logic processing to 2 channel signals in order to the speaker system used. Note Dolby Pro Logic IIx decoding does not function for DTS format signals or for...

Operating Instructions
Page 8
... have made digital connections and that INPUT MODE is activated. Lights up when using the receiver to tune in radio stations you have preset. Name P Playback channel indicators L R C SL SR S SB Function The letters (L, C, R, etc.) indicate the channels being input through the COAXIAL jack, or when INPUT MODE is decoding DTS-ES signals...
... have made digital connections and that INPUT MODE is activated. Lights up when using the receiver to tune in radio stations you have preset. Name P Playback channel indicators L R C SL SR S SB Function The letters (L, C, R, etc.) indicate the channels being input through the COAXIAL jack, or when INPUT MODE is decoding DTS-ES signals...
Operating Instructions
Page 10
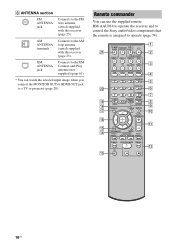
...and-Play antenna (not supplied) (page 61). * You can use the supplied remote RM-AAU014 to operate the receiver and to control the Sony audio/video components that the remote is assigned to operate (page 74). ql qk qj qh qg qf qd 2CH A.F.D. ...FM wire antenna (aerial) supplied with this receiver (page 25). AM ANTENNA terminals Connects to the AM loop antenna (aerial) supplied with this receiver (page 25). CATEGORY MODE TUNING + m H M TV X x 4 5 6 7 8 9 q; wa TV INPUT TV ?/1 SLEEP DMPORT AV ?/1 ?/1 SYSTEM STANDBY VIDEO 1 VIDEO 2 VIDEO 3 DVD SAT TV SA-CD/CD TUNER...
...and-Play antenna (not supplied) (page 61). * You can use the supplied remote RM-AAU014 to operate the receiver and to control the Sony audio/video components that the remote is assigned to operate (page 74). ql qk qj qh qg qf qd 2CH A.F.D. ...FM wire antenna (aerial) supplied with this receiver (page 25). AM ANTENNA terminals Connects to the AM loop antenna (aerial) supplied with this receiver (page 25). CATEGORY MODE TUNING + m H M TV X x 4 5 6 7 8 9 q; wa TV INPUT TV ?/1 SLEEP DMPORT AV ?/1 ?/1 SYSTEM STANDBY VIDEO 1 VIDEO 2 VIDEO 3 DVD SAT TV SA-CD/CD TUNER...

Operating Instructions
Page 11
...To turn off the receiver and other components (SYSTEM...the current scene of the receiver. Note The function of all...Sony component DMPORT DIGITAL MEDIA PORT adapter VIDEO 1 VCR (VTR mode 3) VIDEO 2 VCR (VTR mode 2) VIDEO 3 Not assigned DVD DVD player SAT Digital Satellite Receiver TV TV SA-CD/CD Super Audio...the input buttons, the receiver turns on or off the Sony audio/video components that the remote ...on/standby) Press to turn the receiver on . Press to display the menu...B, b and (P) to control Sony components as follows. Press MUTING and TV (M) at the ...
...To turn off the receiver and other components (SYSTEM...the current scene of the receiver. Note The function of all...Sony component DMPORT DIGITAL MEDIA PORT adapter VIDEO 1 VCR (VTR mode 3) VIDEO 2 VCR (VTR mode 2) VIDEO 3 Not assigned DVD DVD player SAT Digital Satellite Receiver TV TV SA-CD/CD Super Audio...the input buttons, the receiver turns on or off the Sony audio/video components that the remote ...on/standby) Press to turn the receiver on . Press to display the menu...B, b and (P) to control Sony components as follows. Press MUTING and TV (M) at the ...

Operating Instructions
Page 12
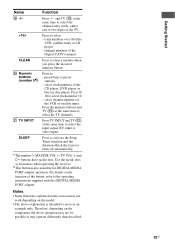
...player, or blu-ray disc player. Press MENU and TV (M) at the same time to select preset TV channels. and TV (M) at the same time to display TV's information on -screen guide of the VCR, ... B, b and (P) to - Then, press to activate the buttons with components in the forward/ reverse direction of the receiver, VCR, satellite tuner, CD player, DVD player or blu-ray disc player. Press DISPLAY and TV (M) at the same... same time to display options applicable to the previous menu. - audio settings during recording), or multiple items on the TV screen.
...player, or blu-ray disc player. Press MENU and TV (M) at the same time to select preset TV channels. and TV (M) at the same time to display TV's information on -screen guide of the VCR, ... B, b and (P) to - Then, press to activate the buttons with components in the forward/ reverse direction of the receiver, VCR, satellite tuner, CD player, DVD player or blu-ray disc player. Press DISPLAY and TV (M) at the same... same time to display options applicable to the previous menu. - audio settings during recording), or multiple items on the TV screen.
Operating Instructions
Page 13
...Digital CATV terminal. Press TV INPUT and TV (M) at the same time to select the channel entry mode, either one or two digits of the button, refer to select the input signal (TV input or video input). Use the tactile dots as an example only. Getting Started Name S -/->10/x...PORT adapter. select channel numbers of the VCR, satellite tuner or CD player. - Press to - For details on the component, the above explanation is also available for DIGITAL MEDIA PORT adapter operation. Press to activate the Sleep Timer function and the duration which the receiver turns off automatically....
...Digital CATV terminal. Press TV INPUT and TV (M) at the same time to select the channel entry mode, either one or two digits of the button, refer to select the input signal (TV input or video input). Use the tactile dots as an example only. Getting Started Name S -/->10/x...PORT adapter. select channel numbers of the VCR, satellite tuner or CD player. - Press to - For details on the component, the above explanation is also available for DIGITAL MEDIA PORT adapter operation. Press to activate the Sleep Timer function and the duration which the receiver turns off automatically....

Operating Instructions
Page 14
...channel...5.1 channel speaker system configuration You can place it wherever you to use a 6.1 channel system (6 speakers and one additional surround back speaker (6.1 channel) ...(see "Using the surround back decoding mode (SB DEC)" on page 42). Example of DVD software recorded sound in the Surround EX format if you connect one sub woofer). Enjoying a 5.1/6.1 channel... system To fully enjoy theater-like multi channel surround sound requires five speakers (two front ...
...channel...5.1 channel speaker system configuration You can place it wherever you to use a 6.1 channel system (6 speakers and one additional surround back speaker (6.1 channel) ...(see "Using the surround back decoding mode (SB DEC)" on page 42). Example of DVD software recorded sound in the Surround EX format if you connect one sub woofer). Enjoying a 5.1/6.1 channel... system To fully enjoy theater-like multi channel surround sound requires five speakers (two front ...

Operating Instructions
Page 15
... Started 2: Connecting speakers G A D F A B DVD IN VIDEO 2/BD IN OUT HDMI XM Y PB/CB PR/CR VIDEO IN VIDEO IN VIDEO OUT VIDEO IN VIDEO OUT SAT IN DVD IN VIDEO 1 IN MONITOR OUT L DVD MONITOR COMPONENT VIDEO RL L L L AUDIO OUT R IN TV R AUDIO IN SAT R AUDIO OUT AUDIO IN SUB VIDEO 1 WOOFER FRONT B R FRONT A SPEAKERS L SURROUND BACK R ... output. 15US b)When you have an additional front speaker system, connect them to standby mode automatically based on the receiver (page 27). If the auto standby function is set to on, it turns to the SPEAKERS FRONT B terminals.
... Started 2: Connecting speakers G A D F A B DVD IN VIDEO 2/BD IN OUT HDMI XM Y PB/CB PR/CR VIDEO IN VIDEO IN VIDEO OUT VIDEO IN VIDEO OUT SAT IN DVD IN VIDEO 1 IN MONITOR OUT L DVD MONITOR COMPONENT VIDEO RL L L L AUDIO OUT R IN TV R AUDIO IN SAT R AUDIO OUT AUDIO IN SUB VIDEO 1 WOOFER FRONT B R FRONT A SPEAKERS L SURROUND BACK R ... output. 15US b)When you have an additional front speaker system, connect them to standby mode automatically based on the receiver (page 27). If the auto standby function is set to on, it turns to the SPEAKERS FRONT B terminals.
Operating Instructions
Page 17
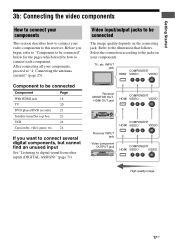
...page 25). INPUT jack COMPONENT HDMI VIDEO VIDEO Receiver MONITOR OUT, HDMI OUT jack COMPONENT HDMI VIDEO VIDEO ?/1 SPEAKERS (OFF/A/B) AUTO CAL MIC PHONES TUNING MODE TUNING DISPLAY INPUT MODE INPUT SELECTOR MASTER VOLUME VIDEO 3 IN/PORTABLE AV IN VIDEO L AUDIO R MEMORY/ CATEGORY ENTER MODE CATEGORY... 2CH A.F.D. Getting Started 3b: Connecting the video components How to connect your components This section describes how...
...page 25). INPUT jack COMPONENT HDMI VIDEO VIDEO Receiver MONITOR OUT, HDMI OUT jack COMPONENT HDMI VIDEO VIDEO ?/1 SPEAKERS (OFF/A/B) AUTO CAL MIC PHONES TUNING MODE TUNING DISPLAY INPUT MODE INPUT SELECTOR MASTER VOLUME VIDEO 3 IN/PORTABLE AV IN VIDEO L AUDIO R MEMORY/ CATEGORY ENTER MODE CATEGORY... 2CH A.F.D. Getting Started 3b: Connecting the video components How to connect your components This section describes how...


