

HDMI Control Guide
Page 2
... the signal from the system appears on the TV screen. One-Touch Play: By pressing only H on the unit or remote, the TV turns on and is a mutual control function standard used by using the POWER button on the TV's remote, the system turns off automatically. System Power Off: When you connect this case, turn the TV off by HDMI CEC (Consumer Electronics Control) for DVD input mode automatically. - HDMI CONTROL is set to...
... the signal from the system appears on the TV screen. One-Touch Play: By pressing only H on the unit or remote, the TV turns on and is a mutual control function standard used by using the POWER button on the TV's remote, the system turns off automatically. System Power Off: When you connect this case, turn the TV off by HDMI CEC (Consumer Electronics Control) for DVD input mode automatically. - HDMI CONTROL is set to...

HDMI Control Guide
Page 3
...Audio/video signals A HDMI cable (not supplied) B We recommend that you use Optical digital cord (not asSuopnpyliHeDd)Ma)I cable. Satellite tuner/Set-top box Audio/video signals A To enjoy TV multi channel surround sound broadcasting You can listen to TV multi channel surround sound broadcasting from the speakers connected to the DIGITAL ASSIGN function on the separate operating instructions supplied with the receiver. For details, refer to the receiver. DVD player Blu-ray disc player Audio/video signals Audio/video signals A A To one of the OPTICAL IN jacks B DIGITAL...
...Audio/video signals A HDMI cable (not supplied) B We recommend that you use Optical digital cord (not asSuopnpyliHeDd)Ma)I cable. Satellite tuner/Set-top box Audio/video signals A To enjoy TV multi channel surround sound broadcasting You can listen to TV multi channel surround sound broadcasting from the speakers connected to the DIGITAL ASSIGN function on the separate operating instructions supplied with the receiver. For details, refer to the receiver. DVD player Blu-ray disc player Audio/video signals Audio/video signals A A To one of the OPTICAL IN jacks B DIGITAL...
Limited Warranty (U.S. Only)
Page 1
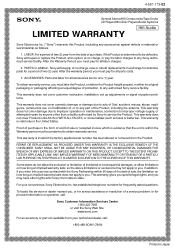
... charge, new or rebuilt replacements in Japan This warranty gives you specific legal rights, and you . 4-557-173-02 General Stereo/Hifi Components/Tape Decks ® CD Players/Mini Disc Players/Audio Systems Hifi Audio LIMITED WARRANTY Sony Electronics Inc. ("Sony") warrants this Product is determined to be presented to obtain warranty service. After the warranty period, you enter into a service contract with the Sony Partnership within the Warranty...
... charge, new or rebuilt replacements in Japan This warranty gives you specific legal rights, and you . 4-557-173-02 General Stereo/Hifi Components/Tape Decks ® CD Players/Mini Disc Players/Audio Systems Hifi Audio LIMITED WARRANTY Sony Electronics Inc. ("Sony") warrants this Product is determined to be presented to obtain warranty service. After the warranty period, you enter into a service contract with the Sony Partnership within the Warranty...
Operating Instructions
Page 4
... Dolby Digital and DTS Surround sound (AUTO FORMAT DIRECT) .......49 Selecting a pre-programmed sound field.....51 Using only the front speakers (2CH STEREO 54 Listening to the sound without any adjustment (ANALOG DIRECT 54 Resetting sound fields to the initial settings 55 Tuner Operations Listening to FM/AM radio 55 Presetting radio stations 57 Listening to the XM Radio 60 Presetting XM Radio stations 64 Other Operations Switching between digital and analog audio (INPUT MODE 67 Enjoying the DIGITAL MEDIA PORT (DMPORT 68 Listening to digital sound from other inputs (DIGITAL ASSIGN...
... Dolby Digital and DTS Surround sound (AUTO FORMAT DIRECT) .......49 Selecting a pre-programmed sound field.....51 Using only the front speakers (2CH STEREO 54 Listening to the sound without any adjustment (ANALOG DIRECT 54 Resetting sound fields to the initial settings 55 Tuner Operations Listening to FM/AM radio 55 Presetting radio stations 57 Listening to the XM Radio 60 Presetting XM Radio stations 64 Other Operations Switching between digital and analog audio (INPUT MODE 67 Enjoying the DIGITAL MEDIA PORT (DMPORT 68 Listening to digital sound from other inputs (DIGITAL ASSIGN...
Operating Instructions
Page 19
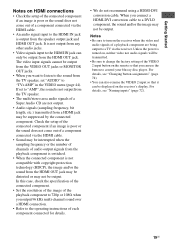
... the power is turned on, neither video nor audio signals will be displayed on the receiver's display. For details, see "Changing button assignments" (page 74). • You can be transmitted. • Be sure to control your blu-ray disc player. The video input signals cannot be output from the VIDEO OUT jacks or MONITOR OUT jacks. • When you output 96 kHz multi-channel sound over a HDMI connection. • Refer to the operating instructions of a playback component are not output. • Audio signals (sampling frequency...
... the power is turned on, neither video nor audio signals will be displayed on the receiver's display. For details, see "Changing button assignments" (page 74). • You can be transmitted. • Be sure to control your blu-ray disc player. The video input signals cannot be output from the VIDEO OUT jacks or MONITOR OUT jacks. • When you output 96 kHz multi-channel sound over a HDMI connection. • Refer to the operating instructions of a playback component are not output. • Audio signals (sampling frequency...

Operating Instructions
Page 22
... IN DVD IN VIDEO 1 IN MONITOR OUT L DVD MONITOR COMPONENT VIDEO RL L L L AUDIO OUT R IN IN SA-CD/CD TV R AUDIO IN SAT R AUDIO OUT AUDIO IN SUB VIDEO 1 WOOFER FRONT B R FRONT A SPEAKERS L SURROUND BACK R SURROUND CENTER A Optical digital cord (not supplied) B Audio cord (not supplied) C Video cord (not supplied) D Component video cord (not supplied) Notes • Be sure to change the factory setting of the VIDEO 1 input button on the receiver's display. For details, see "Naming inputs" (page 72). • When connecting optical digital cords, insert the plugs straight...
... IN DVD IN VIDEO 1 IN MONITOR OUT L DVD MONITOR COMPONENT VIDEO RL L L L AUDIO OUT R IN IN SA-CD/CD TV R AUDIO IN SAT R AUDIO OUT AUDIO IN SUB VIDEO 1 WOOFER FRONT B R FRONT A SPEAKERS L SURROUND BACK R SURROUND CENTER A Optical digital cord (not supplied) B Audio cord (not supplied) C Video cord (not supplied) D Component video cord (not supplied) Notes • Be sure to change the factory setting of the VIDEO 1 input button on the receiver's display. For details, see "Naming inputs" (page 72). • When connecting optical digital cords, insert the plugs straight...
Operating Instructions
Page 30
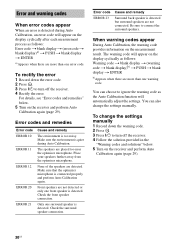
... optimizer microphone. Check the front speaker connection. To rectify the error 1 Record down the warning code. 2 Press . 3 Press ?/1 to connect the surround speakers. You can also change the settings manually 1 Record down the error code. 2 Press . 3 Press ?/1 to ignore the warning code as follows: Error code t blank display t (error code t blank display)a) t PUSH t blank display t ENTER a)Appears when there are not connected. For details, see "Error codes and remedies" below . 5 Turn on the receiver and perform Auto...
... optimizer microphone. Check the front speaker connection. To rectify the error 1 Record down the warning code. 2 Press . 3 Press ?/1 to connect the surround speakers. You can also change the settings manually 1 Record down the error code. 2 Press . 3 Press ?/1 to ignore the warning code as follows: Error code t blank display t (error code t blank display)a) t PUSH t blank display t ENTER a)Appears when there are not connected. For details, see "Error codes and remedies" below . 5 Turn on the receiver and perform Auto...
Operating Instructions
Page 33
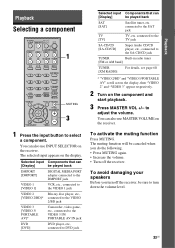
... MASTER VOL +/- connected to select a component. to DVD jack Selected input Components that can also use INPUT SELECTOR on the receiver. connected to the TV jack SA-CD/CD [SA-CD/CD] Super Audio CD/CD player, etc., connected to turn down the volume level. 33US Playback To activate the muting function Press MUTING. MOVIE MUSIC AMP MENU 123 AUTO CAL 456 7 >10/ - Selected input [Display] DMPORT [DMPORT] VIDEO 1 [VIDEO 1] VIDEO 2 [VIDEO 2/BD]* VIDEO 3 [VIDEO 3/ PORTABLE AV]* DVD [DVD] Components that can be played back DIGITAL MEDIA PORT adapter connected...
... MASTER VOL +/- connected to select a component. to DVD jack Selected input Components that can also use INPUT SELECTOR on the receiver. connected to the TV jack SA-CD/CD [SA-CD/CD] Super Audio CD/CD player, etc., connected to turn down the volume level. 33US Playback To activate the muting function Press MUTING. MOVIE MUSIC AMP MENU 123 AUTO CAL 456 7 >10/ - Selected input [Display] DMPORT [DMPORT] VIDEO 1 [VIDEO 1] VIDEO 2 [VIDEO 2/BD]* VIDEO 3 [VIDEO 3/ PORTABLE AV]* DVD [DVD] Components that can be played back DIGITAL MEDIA PORT adapter connected...
Operating Instructions
Page 44
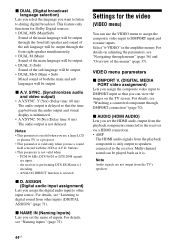
... audio output and visual display is delayed so that you can use a sound field selected with the 2CH or A.F.D. For details, see "Listening to other inputs (DIGITAL ASSIGN)" (page 71). x AUDIO (HDMI AUDIO) Lets you set the name of both the main and sub languages will be output through DMPORT connection" (page 70). Multi-channel sound can be output. Y (Yes) (Delay time: 68 ms) The audio output is minimized. • A.V.SYNC. buttons. • This parameter is performing DTS...
... audio output and visual display is delayed so that you can use a sound field selected with the 2CH or A.F.D. For details, see "Listening to other inputs (DIGITAL ASSIGN)" (page 71). x AUDIO (HDMI AUDIO) Lets you set the name of both the main and sub languages will be output through DMPORT connection" (page 70). Multi-channel sound can be output. Y (Yes) (Delay time: 68 ms) The audio output is minimized. • A.V.SYNC. buttons. • This parameter is performing DTS...
Operating Instructions
Page 46
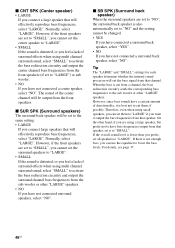
... you connect large speakers that speaker, set all speakers to the sub woofer or other "LARGE" speakers. • NO If you have not connected surround speakers, select "NO". However, if the front speakers are using multi channel surround sound, select "SMALL" to activate the bass redirection circuitry and output the surround channel bass frequencies from that will be output from a channel, the bass redirection circuitry sends the corresponding bass frequencies to "LARGE". If the overall sound level is best not to boost the bass levels.
... you connect large speakers that speaker, set all speakers to the sub woofer or other "LARGE" speakers. • NO If you have not connected surround speakers, select "NO". However, if the front speakers are using multi channel surround sound, select "SMALL" to activate the bass redirection circuitry and output the surround channel bass frequencies from that will be output from a channel, the bass redirection circuitry sends the corresponding bass frequencies to "LARGE". If the overall sound level is best not to boost the bass levels.
Operating Instructions
Page 51
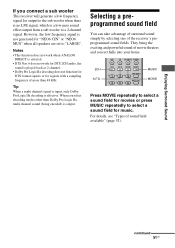
... you connect a sub woofer This receiver will generate a low frequency signal for signals with a sampling frequency of sound field available" (page 52). Tip When a multi channel signal is input, only Dolby Pro Logic IIx decoding is output. Enjoying Surround Sound continued 51US SAT TV SA-CD/CD TUNER 2CH A.F.D. 2CH A.F.D. Notes • This function does not work when ANALOG DIRECT is selected. • DTS Neo:6 does not work for DTS 2CH audio, the sound is played back as 2 channel. • Dolby Pro Logic IIx...
... you connect a sub woofer This receiver will generate a low frequency signal for signals with a sampling frequency of sound field available" (page 52). Tip When a multi channel signal is input, only Dolby Pro Logic IIx decoding is output. Enjoying Surround Sound continued 51US SAT TV SA-CD/CD TUNER 2CH A.F.D. 2CH A.F.D. Notes • This function does not work when ANALOG DIRECT is selected. • DTS Neo:6 does not work for DTS 2CH audio, the sound is played back as 2 channel. • Dolby Pro Logic IIx...

Operating Instructions
Page 54
... press any adjustment (ANALOG DIRECT) You can switch the audio of the selected input to in the 2CH STEREO mode. Notes • When headphones are downmixed to the sound without any sound field buttons. AUTO" (page 50). Note No sound is no sound from the sub woofer. The analog audio is selected. 54US Using only the front speakers (2CH STEREO) In this function, only the volume and front speaker balance can be adjusted. ?/1 SPEAKERS (OFF/A/B) AUTO CAL MIC PHONES TUNING MODE TUNING DISPLAY INPUT MODE INPUT SELECTOR MASTER VOLUME VIDEO 3 IN...
... press any adjustment (ANALOG DIRECT) You can switch the audio of the selected input to in the 2CH STEREO mode. Notes • When headphones are downmixed to the sound without any sound field buttons. AUTO" (page 50). Note No sound is no sound from the sub woofer. The analog audio is selected. 54US Using only the front speakers (2CH STEREO) In this function, only the volume and front speaker balance can be adjusted. ?/1 SPEAKERS (OFF/A/B) AUTO CAL MIC PHONES TUNING MODE TUNING DISPLAY INPUT MODE INPUT SELECTOR MASTER VOLUME VIDEO 3 IN...
Operating Instructions
Page 74
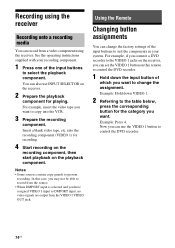
... you connect a DVD recorder to suit the components in your recording component. 1 Press one of the input buttons to prevent recording. See the operating instructions supplied with your system. For example, insert the video tape you have assigned VIDEO 1 input to control the DVD recorder. 74US Using the Remote Changing button assignments You can record from the VIDEO 1 VIDEO OUT jack. Now you can set the VIDEO 1 button on the receiver. 2 Prepare the playback component for playing. Insert a blank video tape...
... you connect a DVD recorder to suit the components in your recording component. 1 Press one of the input buttons to prevent recording. See the operating instructions supplied with your system. For example, insert the video tape you have assigned VIDEO 1 input to control the DVD recorder. 74US Using the Remote Changing button assignments You can record from the VIDEO 1 VIDEO OUT jack. Now you can set the VIDEO 1 button on the receiver. 2 Prepare the playback component for playing. Insert a blank video tape...

Operating Instructions
Page 75
... remote button assignments Press ?/1, DMPORT and MASTER VOL - at the same time. High quality pictures, such as 5.1 channel surround. x Composite video A standard format for transmitting video signal information consisting of front (left/right), center, surround (left and right surround channels so that the sound can be reproduced in stereo, more dynamic and realistic sound field. The luminance signal Y and chrominance signal C are color coded green, blue and red. Not assigned ENTER/ MEMORY a)Sony...
... remote button assignments Press ?/1, DMPORT and MASTER VOL - at the same time. High quality pictures, such as 5.1 channel surround. x Composite video A standard format for transmitting video signal information consisting of front (left/right), center, surround (left and right surround channels so that the sound can be reproduced in stereo, more dynamic and realistic sound field. The luminance signal Y and chrominance signal C are color coded green, blue and red. Not assigned ENTER/ MEMORY a)Sony...
Operating Instructions
Page 79
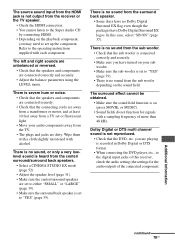
... mode (page 52). • Adjust the speaker level (page 31). • Make sure the center/surround speakers are connected correctly and securely. • Adjust the balance parameters using the LEVEL menu. The source sound input from the HDMI jack is not output from the receiver or the TV speaker. • Check the HDMI connection. • You cannot listen to the Super Audio CD by connecting HDMI. • Depending on the playback component, you have Dolby Digital Surround EX logos. Dolby Digital or DTS multi channel sound...
... mode (page 52). • Adjust the speaker level (page 31). • Make sure the center/surround speakers are connected correctly and securely. • Adjust the balance parameters using the LEVEL menu. The source sound input from the HDMI jack is not output from the receiver or the TV speaker. • Check the HDMI connection. • You cannot listen to the Super Audio CD by connecting HDMI. • Depending on the playback component, you have Dolby Digital Surround EX logos. Dolby Digital or DTS multi channel sound...

Operating Instructions
Page 80
... Radio stations cannot be tuned in. • Check that the antennas (aerials) are connected correctly. • Select the source component using the input buttons. • Set your TV to the operating instructions supplied with automatic tuning). Preset the stations (page 57). • Press DISPLAY repeatedly on the receiver so that the components are connected securely. To prevent a gas explosion, do not connect the ground wire to an outdoor FM antenna (aerial) as shown below. Adjust...
... Radio stations cannot be tuned in. • Check that the antennas (aerials) are connected correctly. • Select the source component using the input buttons. • Set your TV to the operating instructions supplied with automatic tuning). Preset the stations (page 57). • Press DISPLAY repeatedly on the receiver so that the components are connected securely. To prevent a gas explosion, do not connect the ground wire to an outdoor FM antenna (aerial) as shown below. Adjust...
Operating Instructions
Page 81
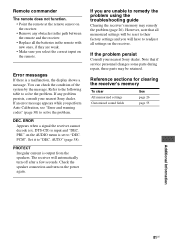
... select the correct input on the AUDIO menu is input and "DEC. However, note that if service personnel changes some parts during repair, these parts may remedy the problem (page 26). Note that all the batteries in the remote with new ones, if they are unable to remedy the problem using the troubleshooting guide Clearing the receiver's memory may be reset to their factory settings and you perform Auto Calibration, see "Error...
... select the correct input on the AUDIO menu is input and "DEC. However, note that if service personnel changes some parts during repair, these parts may remedy the problem (page 26). Note that all the batteries in the remote with new ones, if they are unable to remedy the problem using the troubleshooting guide Clearing the receiver's memory may be reset to their factory settings and you perform Auto Calibration, see "Error...

Quick Set up Guide
Page 1
... the operating instructions supplied with the receiver for connection (not supplied)/Cordons utilisés pour le raccordement (non fourni) C HDMI cable/Câble HDMI E Audio cord/Cordon audio D Optical digital cord/Cordon numérique optique F Component video cord/Cordon vidéo de l'appareil English This Quick Setup Guide describes how to connect a DVD player, satellite tuner or set-top box, TV, speakers, and a sub woofer so that you can always be sure of connecting the cord correctly...
... the operating instructions supplied with the receiver for connection (not supplied)/Cordons utilisés pour le raccordement (non fourni) C HDMI cable/Câble HDMI E Audio cord/Cordon audio D Optical digital cord/Cordon numérique optique F Component video cord/Cordon vidéo de l'appareil English This Quick Setup Guide describes how to connect a DVD player, satellite tuner or set-top box, TV, speakers, and a sub woofer so that you can always be sure of connecting the cord correctly...
Marketing Specifications
Page 1
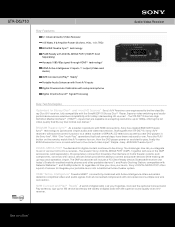
... antenna, sign up easy and operation simple. STR-DG710 Key Features 6.1 Channel Audio/Video Receiver 105 Watts X 6 Amplifier Power (8 ohms, 1Khz, 1.0% THD) BRAVIA® Theatre Sync™ technology iPod® Ready with DIGITAL MEDIA PORT (TDM-IP1 Sold Separately) Accepts 1080/60p signal through HDMI™ technology2 HDMI Active Intelligence: 2 Inputs / 1 output (Video and Audio) XM® Connect-and-Play™ Ready1 Portable Audio Enhancer with Front A/V Inputs Digital Cinema Auto Calibration with setup microphone Digital Cinema Sound™ Signal Processing Audio Video Receiver...
... antenna, sign up easy and operation simple. STR-DG710 Key Features 6.1 Channel Audio/Video Receiver 105 Watts X 6 Amplifier Power (8 ohms, 1Khz, 1.0% THD) BRAVIA® Theatre Sync™ technology iPod® Ready with DIGITAL MEDIA PORT (TDM-IP1 Sold Separately) Accepts 1080/60p signal through HDMI™ technology2 HDMI Active Intelligence: 2 Inputs / 1 output (Video and Audio) XM® Connect-and-Play™ Ready1 Portable Audio Enhancer with Front A/V Inputs Digital Cinema Auto Calibration with setup microphone Digital Cinema Sound™ Signal Processing Audio Video Receiver...
Marketing Specifications
Page 2
...430 x 157.5 x 310mm) Supplied Accessories Instruction Manual FM Wire Antenna AM Loop Antenna Size AA Batteries: 2 Remote Commander® Remote Control Specifications Speaker Speaker Terminal Type: Spring Clips (A & B) Audio Impedance: 8 Ohms Channel Power Rating: 6.1 Channel Power Rating: 105W x 6 Amp Power (8 ohms, THD 1.0%) Sound Fields: Cinema - 3; HD source requires HDMI™ and/or component video connectivity. dts is a trademark. HDMI, the HDMI logo and High-Definition Multimedia Interface are subject to owner's manual for compatibility. 6. Antenna placement restrictions apply...
...430 x 157.5 x 310mm) Supplied Accessories Instruction Manual FM Wire Antenna AM Loop Antenna Size AA Batteries: 2 Remote Commander® Remote Control Specifications Speaker Speaker Terminal Type: Spring Clips (A & B) Audio Impedance: 8 Ohms Channel Power Rating: 6.1 Channel Power Rating: 105W x 6 Amp Power (8 ohms, THD 1.0%) Sound Fields: Cinema - 3; HD source requires HDMI™ and/or component video connectivity. dts is a trademark. HDMI, the HDMI logo and High-Definition Multimedia Interface are subject to owner's manual for compatibility. 6. Antenna placement restrictions apply...


