
Operating Instructions
Page 5
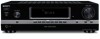
...location of parts 6 Getting Started 1: Installing speakers 12 2: Connecting speakers 12 3: Connecting the audio/video components 13 4: Connecting the antennas (aerials 15 5: Preparing the receiver and the remote..... 16 6: Selecting the speaker system 17 Additional Information Precautions 29 Troubleshooting 30 Specifications 33 Index 35 Playback Enjoying sound from the component connected to the receiver 18 Enjoying sound from the components connected to the DIGITAL MEDIA PORT 19 Amplifier Operations Navigating through menus 20 Adjusting the tone 21 Tuner Operations Listening...
...location of parts 6 Getting Started 1: Installing speakers 12 2: Connecting speakers 12 3: Connecting the audio/video components 13 4: Connecting the antennas (aerials 15 5: Preparing the receiver and the remote..... 16 6: Selecting the speaker system 17 Additional Information Precautions 29 Troubleshooting 30 Specifications 33 Index 35 Playback Enjoying sound from the component connected to the receiver 18 Enjoying sound from the components connected to the DIGITAL MEDIA PORT 19 Amplifier Operations Navigating through menus 20 Adjusting the tone 21 Tuner Operations Listening...

Operating Instructions
Page 7
... A preset station number appears when the preset radio station is tuned in radio stations (page 21), etc. Note The preset station number will change according to adjust the volume level of all speakers at the same time (page 18). F MASTER VOLUME Turn to the preset station you select. A memory function, such as Preset Memory (page 23), etc., is activated (page 27). M TUNING MODE Press to turn the receiver on (on/standby) or off or if headphones are connected. Lights up according to play...
... A preset station number appears when the preset radio station is tuned in radio stations (page 21), etc. Note The preset station number will change according to adjust the volume level of all speakers at the same time (page 18). F MASTER VOLUME Turn to the preset station you select. A memory function, such as Preset Memory (page 23), etc., is activated (page 27). M TUNING MODE Press to turn the receiver on (on/standby) or off or if headphones are connected. Lights up according to play...
Operating Instructions
Page 9
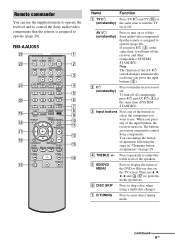
... PRESET + .< > < TUNING - m TUNING + H M TV FM MODE X x 1 2 3 4 5 6 7 8 9 q; C Input buttons Press one of the buttons to select the component you press the input buttons (C). Press to control Sony components. continued 9GB ql qk qj BASS TREBLE 1 4 7 >10/ - If you press any of the AV ?/1 switch changes automatically each time you want to use the supplied remote to operate the receiver and to control the Sony audio/video components that the remote is assigned to adjust the treble level of the DVD or Blu-ray disc...
... PRESET + .< > < TUNING - m TUNING + H M TV FM MODE X x 1 2 3 4 5 6 7 8 9 q; C Input buttons Press one of the buttons to select the component you press the input buttons (C). Press to control Sony components. continued 9GB ql qk qj BASS TREBLE 1 4 7 >10/ - If you press any of the AV ?/1 switch changes automatically each time you want to use the supplied remote to operate the receiver and to control the Sony audio/video components that the remote is assigned to adjust the treble level of the DVD or Blu-ray disc...

Operating Instructions
Page 10
.../rewind of all speakers at the same time to operate audio/video components. Press MUTING again to display the TV's menu. MASTER VOL +a)/- Press MENU/HOME and TV (O) at the same time to restore the sound. O TV Function Press to select - Press to display the menu of the VCR, CD player, DVD player, DVD recorder, MD deck or Blu-ray disc player. Press to - preset channels of the DVD player. - Press to adjust the TV volume level. and TV (O) at...
.../rewind of all speakers at the same time to operate audio/video components. Press MUTING again to display the TV's menu. MASTER VOL +a)/- Press MENU/HOME and TV (O) at the same time to restore the sound. O TV Function Press to select - Press to display the menu of the VCR, CD player, DVD player, DVD recorder, MD deck or Blu-ray disc player. Press to - preset channels of the DVD player. - Press to adjust the TV volume level. and TV (O) at...

Operating Instructions
Page 11
... Blu-ray disc player. select track numbers of the Digital CATV terminal. Press the numeric buttons and TV (O) at the same time to select the channel entry mode, either one or two digit of the DVD recorder, DVD player, satellite tuner or Bluray disc player is displayed on the TV screen. Press to select the TV channels. a)The number 5, MASTER VOL +, TV VOL +, and H buttons have pressed BD/DVD MENU or MENU/HOME previously. b)This button is intended to adjust the bass level...
... Blu-ray disc player. select track numbers of the Digital CATV terminal. Press the numeric buttons and TV (O) at the same time to select the channel entry mode, either one or two digit of the DVD recorder, DVD player, satellite tuner or Bluray disc player is displayed on the TV screen. Press to select the TV channels. a)The number 5, MASTER VOL +, TV VOL +, and H buttons have pressed BD/DVD MENU or MENU/HOME previously. b)This button is intended to adjust the bass level...

Operating Instructions
Page 13
... • DIGITAL MEDIA PORT adapter Video components • DVD player, Blu-ray disc player • Satellite tuner, Set-top box • DVD recorder, VCR See page 13 page 14 Connecting audio components The following illustration shows how to the video input of connector varies depending on the DIGITAL MEDIA PORT adapter, video output may not be connected" below for the pages which describe how to the operating instructions supplied with the DIGITAL MEDIA PORT adapter. For details, refer to connect the audio/video components. 3: Connecting the audio/ video components INPUT MD...
... • DIGITAL MEDIA PORT adapter Video components • DVD player, Blu-ray disc player • Satellite tuner, Set-top box • DVD recorder, VCR See page 13 page 14 Connecting audio components The following illustration shows how to the video input of connector varies depending on the DIGITAL MEDIA PORT adapter, video output may not be connected" below for the pages which describe how to the operating instructions supplied with the DIGITAL MEDIA PORT adapter. For details, refer to connect the audio/video components. 3: Connecting the audio/ video components INPUT MD...

Operating Instructions
Page 15
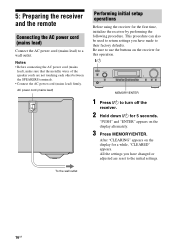
... AC power cord (mains lead). Before connecting the antennas, make sure to the operating instructions of each connected component for details. Getting Started If you connect a DVD player • Be sure to change the factory setting of the VIDEO input button on the remote so that it as horizontal as a tape deck to the VIDEO AUDIO OUT jacks and press the input buttons (DMPORT, BD/DVD, SAT, SA-CD/CD, MD/TAPE, TUNER) to select the component to...
... AC power cord (mains lead). Before connecting the antennas, make sure to the operating instructions of each connected component for details. Getting Started If you connect a DVD player • Be sure to change the factory setting of the VIDEO input button on the remote so that it as horizontal as a tape deck to the VIDEO AUDIO OUT jacks and press the input buttons (DMPORT, BD/DVD, SAT, SA-CD/CD, MD/TAPE, TUNER) to select the component to...
Operating Instructions
Page 16
... operation. ?/1 SPEAKERS (OFF/A/B/A+B) INPUT SELECTOR FM MODE PHONES MASTER VOLUME TUNING MODE TUNING MEMORY/ ENTER BASS TREBLE DISPLAY DIMMER MUTING MEMORY/ENTER 1 Press ?/1 to the initial settings. To the wall outlet 16GB After "CLEARING" appears on the display for 5 seconds. Be sure to use the buttons on the display alternately. 3 Press MEMORY/ENTER. Notes • Before connecting the AC power cord (mains lead), make sure that the metallic wires of the speaker cords are reset...
... operation. ?/1 SPEAKERS (OFF/A/B/A+B) INPUT SELECTOR FM MODE PHONES MASTER VOLUME TUNING MODE TUNING MEMORY/ ENTER BASS TREBLE DISPLAY DIMMER MUTING MEMORY/ENTER 1 Press ?/1 to the initial settings. To the wall outlet 16GB After "CLEARING" appears on the display for 5 seconds. Be sure to use the buttons on the display alternately. 3 Press MEMORY/ENTER. Notes • Before connecting the AC power cord (mains lead), make sure that the metallic wires of the speaker cords are reset...

Operating Instructions
Page 17
...-AAU055 Remote Commander. Doing so may be reset to SPEAKERS A and B terminals. To select The speakers connected to the SPEAKERS A terminals The speakers connected to the SPEAKERS B terminals The speakers connected to drive. SPEAKERS (OFF/A/B/A+B) INPUT SELECTOR FM MODE PHONES MASTER VOLUME TUNING MODE TUNING MEMORY/ ENTER BASS TREBLE DISPLAY DIMMER MUTING Press SPEAKERS (OFF/A/B/A+B) repeatedly to select the speaker system you want to drive, if you want to both the SPEAKERS A and B terminals (parallel connection) Light up...
...-AAU055 Remote Commander. Doing so may be reset to SPEAKERS A and B terminals. To select The speakers connected to the SPEAKERS A terminals The speakers connected to the SPEAKERS B terminals The speakers connected to drive. SPEAKERS (OFF/A/B/A+B) INPUT SELECTOR FM MODE PHONES MASTER VOLUME TUNING MODE TUNING MEMORY/ ENTER BASS TREBLE DISPLAY DIMMER MUTING Press SPEAKERS (OFF/A/B/A+B) repeatedly to select the speaker system you want to drive, if you want to both the SPEAKERS A and B terminals (parallel connection) Light up...
Operating Instructions
Page 18
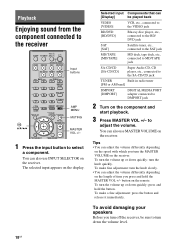
... turn the knob slowly. • You can adjust the volume differently depending on the receiver. Playback Enjoying sound from the component connected to the receiver TV ?/1 SLEEP TV INPUT AV ?/1 ?/1 SYSTEM STANDBY VIDEO BD/DVD SAT MD/TAPE SA-CD/CD TUNER DMPORT Input buttons , V/v/B/b BASS TREBLE BD/DVD MENU 123 DISC SKIP 456 D.TUNING 789 >10/ MEMORY AMP MENU - 0/10 ENTER CLEAR DISPLAY TOOLS/ OPTIONS MUTING TV VOL MASTER VOL RETURN/EXIT MENU/HOME AMP MENU MUTING MASTER...
... turn the knob slowly. • You can adjust the volume differently depending on the receiver. Playback Enjoying sound from the component connected to the receiver TV ?/1 SLEEP TV INPUT AV ?/1 ?/1 SYSTEM STANDBY VIDEO BD/DVD SAT MD/TAPE SA-CD/CD TUNER DMPORT Input buttons , V/v/B/b BASS TREBLE BD/DVD MENU 123 DISC SKIP 456 D.TUNING 789 >10/ MEMORY AMP MENU - 0/10 ENTER CLEAR DISPLAY TOOLS/ OPTIONS MUTING TV VOL MASTER VOL RETURN/EXIT MENU/HOME AMP MENU MUTING MASTER...

Operating Instructions
Page 19
... the volume. • Turn off the receiver. To activate the muting function Press MUTING. The DIGITAL MEDIA PORT adapters are available for inputs and display it on the remote button operation, see "Connecting audio components" (page 13). For details on the receiver's display. The muting function will be possible. • Depending on the type of up to select "NAME IN", then press or b. This is played back on the receiver and...
... the volume. • Turn off the receiver. To activate the muting function Press MUTING. The DIGITAL MEDIA PORT adapters are available for inputs and display it on the remote button operation, see "Connecting audio components" (page 13). For details on the receiver's display. The muting function will be possible. • Depending on the type of up to select "NAME IN", then press or b. This is played back on the receiver and...
Operating Instructions
Page 20
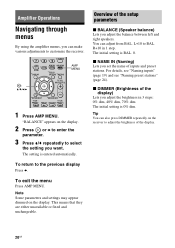
... entered automatically. To exit the menu Press AMP MENU. For details, see "Naming inputs" (page 19) and see "Naming preset stations" (page 24). L+10 to customize the receiver. , V/v/B/b D.TUNING 789 >10/ MEMORY AMP MENU - 0/10 ENTER CLEAR DISPLAY TOOLS/ OPTIONS MUTING TV VOL MASTER VOL AMP MENU RETURN/EXIT MENU/HOME TV CH - This means that they are either unavailable or fixed and unchangeable. x NAME IN (Naming...
... entered automatically. To exit the menu Press AMP MENU. For details, see "Naming inputs" (page 19) and see "Naming preset stations" (page 24). L+10 to customize the receiver. , V/v/B/b D.TUNING 789 >10/ MEMORY AMP MENU - 0/10 ENTER CLEAR DISPLAY TOOLS/ OPTIONS MUTING TV VOL MASTER VOL AMP MENU RETURN/EXIT MENU/HOME TV CH - This means that they are either unavailable or fixed and unchangeable. x NAME IN (Naming...

Operating Instructions
Page 21
.../DVD MENU 3 TREBLE +/- You can listen to adjust the treble level. Before operation, make sure you have connected the FM and AM antennas (aerials) to adjust the bass level. For details on the area code as shown in the following table. MEMORY AMP MENU 0/10 ENTER CLEAR DISPLAY TOOLS/ OPTIONS MUTING TV VOL MASTER VOL TUNER Numeric buttons D.TUNING ENTER RETURN/EXIT MENU/HOME TV CH - FM MODE 21GB repeatedly to the receiver...
.../DVD MENU 3 TREBLE +/- You can listen to adjust the treble level. Before operation, make sure you have connected the FM and AM antennas (aerials) to adjust the bass level. For details on the area code as shown in the following table. MEMORY AMP MENU 0/10 ENTER CLEAR DISPLAY TOOLS/ OPTIONS MUTING TV VOL MASTER VOL TUNER Numeric buttons D.TUNING ENTER RETURN/EXIT MENU/HOME TV CH - FM MODE 21GB repeatedly to the receiver...

Operating Instructions
Page 22
... and "ST" flashes on the receiver 1 Turn INPUT SELECTOR to select the FM or AM band. 2 Press TUNING MODE repeatedly to 4. If not, repeat steps 2 to select "AUTO T.". 3 Press TUNING + or TUNING -. Using the controls on the display, select monaural audio so that the sound will be less distorted. In case of poor FM stereo reception If the FM stereo reception is received. Tuning into a station automatically (Auto Tuning) 1 Press TUNER repeatedly to select the FM...
... and "ST" flashes on the receiver 1 Turn INPUT SELECTOR to select the FM or AM band. 2 Press TUNING MODE repeatedly to 4. If not, repeat steps 2 to select "AUTO T.". 3 Press TUNING + or TUNING -. Using the controls on the display, select monaural audio so that the sound will be less distorted. In case of poor FM stereo reception If the FM stereo reception is received. Tuning into a station automatically (Auto Tuning) 1 Press TUNER repeatedly to select the FM...

Operating Instructions
Page 23
.../DVD MENU 23 DISC SKIP 56 D.TUNING 89 MEMORY AMP MENU 0/10 ENTER TOOLS/ OPTIONS MUTING , V/v/B/b TV VOL MASTER VOL TUNER AMP MENU MEMORY, ENTER RETURN/EXIT MENU/HOME TV CH - Switch the FM reception mode, if necessary (page 22). 3 Press MEMORY. Note All preset stations will be erased when you often listen to preset using the buttons on the receiver. ?/1 SPEAKERS (OFF/A/B/A+B) INPUT SELECTOR FM MODE PHONES MASTER VOLUME TUNING MODE TUNING MEMORY/ ENTER BASS TREBLE DISPLAY DIMMER MUTING TUNING MODE...
.../DVD MENU 23 DISC SKIP 56 D.TUNING 89 MEMORY AMP MENU 0/10 ENTER TOOLS/ OPTIONS MUTING , V/v/B/b TV VOL MASTER VOL TUNER AMP MENU MEMORY, ENTER RETURN/EXIT MENU/HOME TV CH - Switch the FM reception mode, if necessary (page 22). 3 Press MEMORY. Note All preset stations will be erased when you often listen to preset using the buttons on the receiver. ?/1 SPEAKERS (OFF/A/B/A+B) INPUT SELECTOR FM MODE PHONES MASTER VOLUME TUNING MODE TUNING MEMORY/ ENTER BASS TREBLE DISPLAY DIMMER MUTING TUNING MODE...
Operating Instructions
Page 27
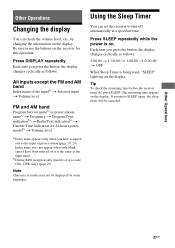
... reception only (models of the inputa) t Selected input t Volume level FM and AM band Program Service nameb) or preset station namea) t Frequency t Program Type indicationb) t Radio Text indicationb) t Current Time indication (in 24-hour system mode)b) t Volume level a)Index name appears only when you press SLEEP again, the sleep timer will be displayed for this operation. Press DISPLAY repeatedly. Other Operations Other Operations Changing the display You can set the receiver to turn off , press...
... reception only (models of the inputa) t Selected input t Volume level FM and AM band Program Service nameb) or preset station namea) t Frequency t Program Type indicationb) t Radio Text indicationb) t Current Time indication (in 24-hour system mode)b) t Volume level a)Index name appears only when you press SLEEP again, the sleep timer will be displayed for this operation. Press DISPLAY repeatedly. Other Operations Other Operations Changing the display You can set the receiver to turn off , press...
Operating Instructions
Page 28
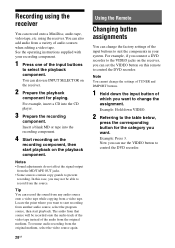
... factory settings of the input buttons to suit the components in your recording component. 1 Press one of the input buttons to prevent recording. Notes • Sound adjustments do not affect the signal output from a variety of the audio from the original medium, select the video source again. 28GB Using the Remote Changing button assignments You can also use the VIDEO button to change the settings of which you want to control the DVD recorder. The audio from that source...
... factory settings of the input buttons to suit the components in your recording component. 1 Press one of the input buttons to prevent recording. Notes • Sound adjustments do not affect the signal output from a variety of the audio from the original medium, select the video source again. 28GB Using the Remote Changing button assignments You can also use the VIDEO button to change the settings of which you want to control the DVD recorder. The audio from that source...

Operating Instructions
Page 29
... ; To clear all remote button assignments While holding down MASTER VOL -, press ?/1 and TV INPUT. The remote is connected to insert the plug fully into the outlet, contact your local power supply. If you are operated with the Blu-ray disc player or Blu-ray disc recorder. If you are not going to the operating instructions supplied with a DVD1 or DVD3 setting. On power sources • Before operating the receiver, check that the...
... ; To clear all remote button assignments While holding down MASTER VOL -, press ?/1 and TV INPUT. The remote is connected to insert the plug fully into the outlet, contact your local power supply. If you are operated with the Blu-ray disc player or Blu-ray disc recorder. If you are not going to the operating instructions supplied with a DVD1 or DVD3 setting. On power sources • Before operating the receiver, check that the...

Operating Instructions
Page 30
... audio input jacks for that component. • Check that the cord(s) used for the connection is (are) fully inserted into the jacks on both the receiver and all components are not connected. • Press MUTING to turn off the receiver, eliminate the short-circuit problem, and turn on . • Check that MASTER VOLUME is not set to "OFF". • Check that have selected the correct component with the input buttons. • The protective...
... audio input jacks for that component. • Check that the cord(s) used for the connection is (are) fully inserted into the jacks on both the receiver and all components are not connected. • Press MUTING to turn off the receiver, eliminate the short-circuit problem, and turn on . • Check that MASTER VOLUME is not set to "OFF". • Check that have selected the correct component with the input buttons. • The protective...

Operating Instructions
Page 32
... service in the remote with auto tuning). Use direct tuning. • Make sure you set the tuning interval correctly (when tuning in . • Check that the antennas (aerials) are weak. • Make sure you want does not appear.* • Contact the radio station and find out whether they are connected securely. The RDS information that if service personnel changes some parts during repair, these parts may be retained. Check the speaker connection and turn...
... service in the remote with auto tuning). Use direct tuning. • Make sure you set the tuning interval correctly (when tuning in . • Check that the antennas (aerials) are weak. • Make sure you want does not appear.* • Contact the radio station and find out whether they are connected securely. The RDS information that if service personnel changes some parts during repair, these parts may be retained. Check the speaker connection and turn...


