
Operating Instructions
Page 3
... to touch the core of time. 14)Refer all servicing to operate this manual could otherwise be treated as power-supply cord or plug is used in accordance with the apparatus. Consult the dealer or an experienced radio/TV technician for long periods of speaker cord by hand. The following instructions. 1) Disconnect the AC power cord from that any changes or modifications not expressly approved...
... to touch the core of time. 14)Refer all servicing to operate this manual could otherwise be treated as power-supply cord or plug is used in accordance with the apparatus. Consult the dealer or an experienced radio/TV technician for long periods of speaker cord by hand. The following instructions. 1) Disconnect the AC power cord from that any changes or modifications not expressly approved...

Operating Instructions
Page 5
... 13 Connections 1: Installing the speakers 13 2: Connecting the speakers 14 3: Connecting the audio/video equipment...14 4: Connecting the antennas (aerials 17 5: Connecting the AC power cord (mains lead 18 Additional Information Precautions 29 Troubleshooting 30 Specifications 32 Index 34 Preparing the Receiver Initializing the receiver 18 Selecting the speaker system 19 Adjusting the tone 19 Basic Operations Playback 20 Viewing information on the display panel 21 Recording using the receiver 22 Tuner Operations Listening to FM/AM radio 22 Presetting...
... 13 Connections 1: Installing the speakers 13 2: Connecting the speakers 14 3: Connecting the audio/video equipment...14 4: Connecting the antennas (aerials 17 5: Connecting the AC power cord (mains lead 18 Additional Information Precautions 29 Troubleshooting 30 Specifications 32 Index 34 Preparing the Receiver Initializing the receiver 18 Selecting the speaker system 19 Adjusting the tone 19 Basic Operations Playback 20 Viewing information on the display panel 21 Recording using the receiver 22 Tuner Operations Listening to FM/AM radio 22 Presetting...

Operating Instructions
Page 10
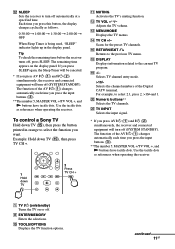
... tuner operation. Adjust the volume level of the input buttons, the receiver turns on. K MUTING Turns off the sound temporarily. Selects preset stations. RM-AAU130 wd 1 ws 2 3 wa 4 5 w; 6 7 8 ql 9 0 qk qa qj qs qh qd qf qg To control the receiver B ?/1* (on/standby) Turns the receiver on the display panel. L MASTER VOL +**/- T Numeric buttons** Presets or tune to standby mode. N TUNING +/- P RETURN/EXIT O Returns to operate Sony audio/ video equipment. The remote control is assigned to the previous menu. I AMP MENU Displays...
... tuner operation. Adjust the volume level of the input buttons, the receiver turns on. K MUTING Turns off the sound temporarily. Selects preset stations. RM-AAU130 wd 1 ws 2 3 wa 4 5 w; 6 7 8 ql 9 0 qk qa qj qs qh qd qf qg To control the receiver B ?/1* (on/standby) Turns the receiver on the display panel. L MASTER VOL +**/- T Numeric buttons** Presets or tune to standby mode. N TUNING +/- P RETURN/EXIT O Returns to operate Sony audio/ video equipment. The remote control is assigned to the previous menu. I AMP MENU Displays...
Operating Instructions
Page 11
The remaining time appears on or off. To control a Sony TV Hold down TV (O), then press TV CH +. J TOOLS/OPTIONS Displays the TV function options. continued 11GB Adjusts the TV volume. M MENU/HOME Displays the TV menus. R DISPLAY Displays information related to the previous TV menu. W TV INPUT Selects the input signal. * If you press AV ?/1 (A) and ?/1 (B) simultaneously, the receiver and connected equipment will turn off (SYSTEM STANDBY). If you press SLEEP...
The remaining time appears on or off. To control a Sony TV Hold down TV (O), then press TV CH +. J TOOLS/OPTIONS Displays the TV function options. continued 11GB Adjusts the TV volume. M MENU/HOME Displays the TV menus. R DISPLAY Displays information related to the previous TV menu. W TV INPUT Selects the input signal. * If you press AV ?/1 (A) and ?/1 (B) simultaneously, the receiver and connected equipment will turn off (SYSTEM STANDBY). If you press SLEEP...

Operating Instructions
Page 12
... turn off (SYSTEM STANDBY). To control other Sony equipment Name A AV ?/1a) E POP UP/MENU F TOP MENU H ENTER/MEMORY J TOOLS/OPTIONS M MENU/HOME N ./> Blu-ray Disc, Satellite tuner, VCR DVD player Cable TV tuner Power Power Power Menu - - Skip track - Track > 10 - Track > 10 CLEAR T Numeric buttonsb) Clear Track Clear Channel - Displayc) - - - Fast forward, rewind Play Pause Stop - Fast forward, rewind Play X Pause - Pause x P RETURN/EXIT O Q Stop Return Enter - Track MD deck, Tape deck...
... turn off (SYSTEM STANDBY). To control other Sony equipment Name A AV ?/1a) E POP UP/MENU F TOP MENU H ENTER/MEMORY J TOOLS/OPTIONS M MENU/HOME N ./> Blu-ray Disc, Satellite tuner, VCR DVD player Cable TV tuner Power Power Power Menu - - Skip track - Track > 10 - Track > 10 CLEAR T Numeric buttonsb) Clear Track Clear Channel - Displayc) - - - Fast forward, rewind Play Pause Stop - Fast forward, rewind Play X Pause - Pause x P RETURN/EXIT O Q Stop Return Enter - Track MD deck, Tape deck...

Operating Instructions
Page 14
B Portable audio A MD deck, Tape deck A Audio cord (not supplied) B Phono cord with stereo headphone jack (not supplied) * If you want to the SPEAKERS B terminals. Super Audio CD player, CD player A A Right speaker SPEAKERS B terminals* 1 10 mm (13/32") 2 4 3 A Speaker cords (not supplied) * If you must make this connection (page 22). 14GB 2: Connecting the speakers Before connecting the cords, be sure to disconnect the AC power cord (mains lead). Left speaker A 3: Connecting the audio/ video equipment Connecting the audio equipment Before connecting cords, be...
B Portable audio A MD deck, Tape deck A Audio cord (not supplied) B Phono cord with stereo headphone jack (not supplied) * If you want to the SPEAKERS B terminals. Super Audio CD player, CD player A A Right speaker SPEAKERS B terminals* 1 10 mm (13/32") 2 4 3 A Speaker cords (not supplied) * If you must make this connection (page 22). 14GB 2: Connecting the speakers Before connecting the cords, be sure to disconnect the AC power cord (mains lead). Left speaker A 3: Connecting the audio/ video equipment Connecting the audio equipment Before connecting cords, be...
Operating Instructions
Page 17
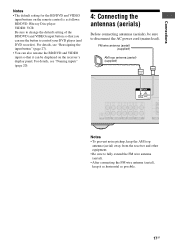
...-ray Disc player VIDEO: VCR Be sure to change the default setting of the BD/DVD (and VIDEO) input button so that it can use the button to control your DVD player (and DVD recorder). Connections Notes • The default setting for the BD/DVD and VIDEO input buttons on the receiver's display panel. For details, see "Naming inputs" (page 20). 4: Connecting the antennas (aerials) Before connecting antennas (aerials), be sure to fully extend the FM wire antenna (aerial). • After connecting the FM wire antenna...
...-ray Disc player VIDEO: VCR Be sure to change the default setting of the BD/DVD (and VIDEO) input button so that it can use the button to control your DVD player (and DVD recorder). Connections Notes • The default setting for the BD/DVD and VIDEO input buttons on the receiver's display panel. For details, see "Naming inputs" (page 20). 4: Connecting the antennas (aerials) Before connecting antennas (aerials), be sure to fully extend the FM wire antenna (aerial). • After connecting the FM wire antenna...

Operating Instructions
Page 20
... your speakers Before you turn down the volume level. , V/v/B/b AMP MENU MUTING MASTER VOL +/- 1 Turn on the connected equipment. 2 Turn on the display panel. 4 Play back the source. 5 Press MASTER VOL +/- Note When you press TUNER, "FM TUNER" or "AM TUNER" appears for inputs (except TUNER) to the equipment you want . It is more recognizable having the equipment named on the display panel. The selected input appears on the display than the jacks. 1 Press the corresponding input button...
... your speakers Before you turn down the volume level. , V/v/B/b AMP MENU MUTING MASTER VOL +/- 1 Turn on the connected equipment. 2 Turn on the display panel. 4 Play back the source. 5 Press MASTER VOL +/- Note When you press TUNER, "FM TUNER" or "AM TUNER" appears for inputs (except TUNER) to the equipment you want . It is more recognizable having the equipment named on the display panel. The selected input appears on the display than the jacks. 1 Press the corresponding input button...

Operating Instructions
Page 21
... blank spaces have assigned one to the input or preset station (page 20, 25). Basic Operations DISPLAY AMP MENU 1 Press the corresponding input button which you want to change flashes, then press V/v to select the correct character. 5 Press . The name you entered is the same as follows: Index name of the input* t Selected input t Volume level When listening to FM and AM radio Preset station name* t Frequency, band and preset number t Volume level 21GB If you...
... blank spaces have assigned one to the input or preset station (page 20, 25). Basic Operations DISPLAY AMP MENU 1 Press the corresponding input button which you want to change flashes, then press V/v to select the correct character. 5 Press . The name you entered is the same as follows: Index name of the input* t Selected input t Volume level When listening to FM and AM radio Preset station name* t Frequency, band and preset number t Volume level 21GB If you...
Operating Instructions
Page 22
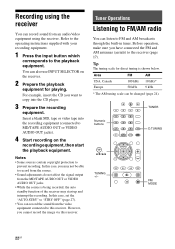
.... 1 Press the input button which corresponds to prevent recording. Tuner Operations Listening to FM/AM radio You can record the sound from the video equipment connected to FM and AM broadcasts through the built-in tuner. TUNER Numeric buttons D.TUNING , V/v/B/b TUNING +/- Before operation, make sure you want to record from the source. • Sound adjustments do not affect the signal output from the MD/TAPE AUDIO OUT or VIDEO AUDIO OUT jacks. • While...
.... 1 Press the input button which corresponds to prevent recording. Tuner Operations Listening to FM/AM radio You can record the sound from the video equipment connected to FM and AM broadcasts through the built-in tuner. TUNER Numeric buttons D.TUNING , V/v/B/b TUNING +/- Before operation, make sure you want to record from the source. • Sound adjustments do not affect the signal output from the MD/TAPE AUDIO OUT or VIDEO AUDIO OUT jacks. • While...

Operating Instructions
Page 23
... band. Tuner Operations Tuning to a station automatically (Automatic Tuning) 1 Press TUNER repeatedly to higher frequency stations and TUNING - The receiver stops scanning whenever a station is poor and "ST" flashes on the display panel, select monaural audio to the stereo mode, press FM MODE repeatedly until the "MONO" indicator lights up . TUNING + scans from lower to select the FM or AM band. 2 Press TUNING + or TUNING -. Tuning to a station directly (Direct Tuning) You can also use in use INPUT SELECTOR on the display panel. If...
... band. Tuner Operations Tuning to a station automatically (Automatic Tuning) 1 Press TUNER repeatedly to higher frequency stations and TUNING - The receiver stops scanning whenever a station is poor and "ST" flashes on the display panel, select monaural audio to the stereo mode, press FM MODE repeatedly until the "MONO" indicator lights up . TUNING + scans from lower to select the FM or AM band. 2 Press TUNING + or TUNING -. Tuning to a station directly (Direct Tuning) You can also use in use INPUT SELECTOR on the display panel. If...

Operating Instructions
Page 24
... buttons , V/v/B/b PRESET +/- Note All preset stations will be erased when you want to preset using the buttons on the receiver. ?/1 Presetting FM/AM radio stations (Preset Tuning) You can also use MEMORY/ENTER on the receiver. 2 Tune to the station that you change the AM tuning scale to 30 FM and 30 AM stations as your favorite stations as preset stations. You can also press PRESET + or PRESET - ENTER/ MEMORY AMP MENU 1 Press TUNER repeatedly to select a preset number. 24GB to select...
... buttons , V/v/B/b PRESET +/- Note All preset stations will be erased when you want to preset using the buttons on the receiver. ?/1 Presetting FM/AM radio stations (Preset Tuning) You can also use MEMORY/ENTER on the receiver. 2 Tune to the station that you change the AM tuning scale to 30 FM and 30 AM stations as your favorite stations as preset stations. You can also press PRESET + or PRESET - ENTER/ MEMORY AMP MENU 1 Press TUNER repeatedly to select a preset number. 24GB to select...
Operating Instructions
Page 25
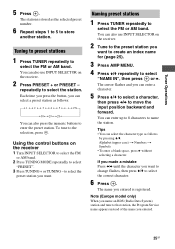
... to the selection, press . Each time you press the button, you can enter a character. 5 Press V/v to select a character, then press B/b to select "PRESET". 3 Press TUNING + or TUNING - You can also use INPUT SELECTOR on the receiver 1 Turn INPUT SELECTOR to select the FM or AM band. 2 Press TUNING MODE repeatedly to move the input position backward and forward. To tune to select the station. Naming preset stations 1 Press TUNER repeatedly to select the FM...
... to the selection, press . Each time you press the button, you can enter a character. 5 Press V/v to select a character, then press B/b to select "PRESET". 3 Press TUNING + or TUNING - You can also use INPUT SELECTOR on the receiver 1 Turn INPUT SELECTOR to select the FM or AM band. 2 Press TUNING MODE repeatedly to move the input position backward and forward. To tune to select the station. Naming preset stations 1 Press TUNER repeatedly to select the FM...

Operating Instructions
Page 26
... not work properly if the station you want, then press . This means that provides RDS services, "RDS" lights up and the Program Service name appears on the display panel. This receiver offers convenient RDS features, such as Program Service name display. When you can customize the receiver by pressing DISPLAY repeatedly (page 21). Menu Operations Using the setting menu You can check the frequency by making various adjustments with your local radio stations...
... not work properly if the station you want, then press . This means that provides RDS services, "RDS" lights up and the Program Service name appears on the display panel. This receiver offers convenient RDS features, such as Program Service name display. When you can customize the receiver by pressing DISPLAY repeatedly (page 21). Menu Operations Using the setting menu You can check the frequency by making various adjustments with your local radio stations...

Operating Instructions
Page 27
... set the receiver switch to standby mode automatically when you can change the assignment. Using the Remote Control Reassigning the input button You can use the Auto standby mode and the Sleep Timer at the same time, the Sleep Timer has priority. Example: Hold down the input button of which you use the SAT button to BAL. L+10 to control the Blu-ray Disc player. Menu Operations/Using the Remote Control continued 27GB Notes • This function does not work when TUNER input...
... set the receiver switch to standby mode automatically when you can change the assignment. Using the Remote Control Reassigning the input button You can use the Auto standby mode and the Sleep Timer at the same time, the Sleep Timer has priority. Example: Hold down the input button of which you use the SAT button to BAL. L+10 to control the Blu-ray Disc player. Menu Operations/Using the Remote Control continued 27GB Notes • This function does not work when TUNER input...

Operating Instructions
Page 28
... or BD3 setting, refer to the operating instructions supplied with a VTR 3 setting which corresponds to the default setting. 28GB Categories and the corresponding buttons Categories Press VCR (command mode 1 VTR 3)a) DVD player 2 (command mode DVD1) DVD recorder 3 (command mode DVD3)b) CD player 4 Euro Digital Satellite 5 Receiver DVR (Digital CATV 6 terminal) DSS (Digital Satellite 7 Receiver) Blu-ray Disc player 8 (command mode BD1)c) Blu-ray Disc recorder 9 (command mode BD3)c) MD deck 0/10 Tape deck -/-- a)Sony VCRs are reset to VHS...
... or BD3 setting, refer to the operating instructions supplied with a VTR 3 setting which corresponds to the default setting. 28GB Categories and the corresponding buttons Categories Press VCR (command mode 1 VTR 3)a) DVD player 2 (command mode DVD1) DVD recorder 3 (command mode DVD3)b) CD player 4 Euro Digital Satellite 5 Receiver DVR (Digital CATV 6 terminal) DSS (Digital Satellite 7 Receiver) Blu-ray Disc player 8 (command mode BD1)c) Blu-ray Disc recorder 9 (command mode BD3)c) MD deck 0/10 Tape deck -/-- a)Sony VCRs are reset to VHS...
Operating Instructions
Page 30
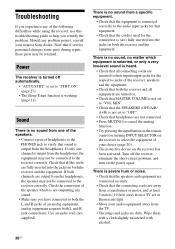
... function is set or fluorescent light. • Move your audio equipment away from the headphones. Should any of the following difficulties while using the receiver, use this troubleshooting guide to both the L and R jacks of an analog equipment, analog equipment requires both channels are output from the headphones, the equipment may not be connected to select the equipment of headphones to the PHONES jack to the receiver correctly. Sound...
... function is set or fluorescent light. • Move your audio equipment away from the headphones. Should any of the following difficulties while using the receiver, use this troubleshooting guide to both the L and R jacks of an analog equipment, analog equipment requires both channels are output from the headphones, the equipment may not be connected to select the equipment of headphones to the PHONES jack to the receiver correctly. Sound...

Operating Instructions
Page 31
... the sources. Adjust the antennas (aerials) and connect an external antenna (aerial), if necessary. • The signal strength of order. Tuner Tuner function is used). Contact the radio station and find out whether they actually provide the service in AM stations with automatic tuning. Preset the stations (page 24). • Press DISPLAY repeatedly so that the speakers and equipment are connected correctly. • Select the source equipment using the input buttons (page 20). • Copyright protection...
... the sources. Adjust the antennas (aerials) and connect an external antenna (aerial), if necessary. • The signal strength of order. Tuner Tuner function is used). Contact the radio station and find out whether they actually provide the service in AM stations with automatic tuning. Preset the stations (page 24). • Press DISPLAY repeatedly so that the speakers and equipment are connected correctly. • Select the source equipment using the input buttons (page 20). • Copyright protection...

Operating Instructions
Page 32
... the memory Reference section To clear All memorized settings See page 18 Specifications AUDIO POWER SPECIFICATIONS POWER OUTPUT AND TOTAL HARMONIC DISTORTION: (USA model only) With 8 ohm loads, both channels driven, from 250 milliwatts to the speakers, or the receiver is a malfunction, a message appears on the remote control. rated 90 watts per channel minimum RMS power, with BASS = 0 dB, TREBLE = 0 dB) Input Analog (PORTABLE IN) Sensitivity: 1 V/ 50 kilohms S/N2): 96 dB...
... the memory Reference section To clear All memorized settings See page 18 Specifications AUDIO POWER SPECIFICATIONS POWER OUTPUT AND TOTAL HARMONIC DISTORTION: (USA model only) With 8 ohm loads, both channels driven, from 250 milliwatts to the speakers, or the receiver is a malfunction, a message appears on the remote control. rated 90 watts per channel minimum RMS power, with BASS = 0 dB, TREBLE = 0 dB) Input Analog (PORTABLE IN) Sensitivity: 1 V/ 50 kilohms S/N2): 96 dB...
Marketing Specifications
Page 1
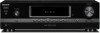
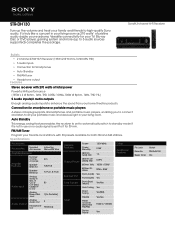
...)/ 5/- Audio Input tuner)/TV (CEC) Analog Stereo Mini Jack 1(for your TV, Blu-ray Disc or DVD player, gaming system and more (up the volume and treat your living room as 270 watts1 of amp. Sony® 2-channel Hi-Fi Receiver Bullets • 2 Channel 270W Hi-Fi Receiver (135W x2 @ 8 ohms 1kHz0.05% THD) • 5 audio inputs • Connection for Smartphones • Auto Standby • FM/AM tuner • Headphone output Features Stereo receiver with 30 presets available...
...)/ 5/- Audio Input tuner)/TV (CEC) Analog Stereo Mini Jack 1(for your TV, Blu-ray Disc or DVD player, gaming system and more (up the volume and treat your living room as 270 watts1 of amp. Sony® 2-channel Hi-Fi Receiver Bullets • 2 Channel 270W Hi-Fi Receiver (135W x2 @ 8 ohms 1kHz0.05% THD) • 5 audio inputs • Connection for Smartphones • Auto Standby • FM/AM tuner • Headphone output Features Stereo receiver with 30 presets available...


