Operating Instructions
Page 1
4-129-783-11(3) Multi Channel AV Receiver Operating Instructions STR-DH700 ©2009 Sony Corporation
4-129-783-11(3) Multi Channel AV Receiver Operating Instructions STR-DH700 ©2009 Sony Corporation

Operating Instructions
Page 3
... installation. This equipment generates, uses and can be connected to radio or television reception, which the receiver is encouraged to try to qualified service personnel. Reorient or relocate the receiving antenna. - However, there is damaged, liquid has been spilled or objects have fallen into an ...will not occur in accordance with the instructions, may not comply with the following measures: - Increase the separation between the equipment and receiver. - If this apparatus during lightning storms or when unused for help. When a cart is used, use caution when moving the ...
... installation. This equipment generates, uses and can be connected to radio or television reception, which the receiver is encouraged to try to qualified service personnel. Reorient or relocate the receiving antenna. - However, there is damaged, liquid has been spilled or objects have fallen into an ...will not occur in accordance with the instructions, may not comply with the following measures: - Increase the separation between the equipment and receiver. - If this apparatus during lightning storms or when unused for help. When a cart is used, use caution when moving the ...
Operating Instructions
Page 4
...code Any differences in this manual, models of Sony Corporation. 4US HDMI, the HDMI logo and High-Definition Multimedia Interface are trademarks of area code U is used for model STR-DH700. "BRAVIA" is shown on the remote. ...Check your model number by looking at the lower right corner of Dolby Laboratories. ** Manufactured under license under license from Dolby Laboratories. and its logo are trademarks or registered trademarks of Sony Corporation. "S-AIR" and its subsidiaries. About area codes The area code of the receiver...
...code Any differences in this manual, models of Sony Corporation. 4US HDMI, the HDMI logo and High-Definition Multimedia Interface are trademarks of area code U is used for model STR-DH700. "BRAVIA" is shown on the remote. ...Check your model number by looking at the lower right corner of Dolby Laboratories. ** Manufactured under license under license from Dolby Laboratories. and its logo are trademarks or registered trademarks of Sony Corporation. "S-AIR" and its subsidiaries. About area codes The area code of the receiver...
Operating Instructions
Page 5
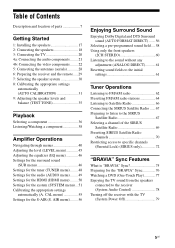
... the TV 20 4a: Connecting the audio components ........ 21 4b: Connecting the video components ........ 22 5: Connecting the antennas (aerials 28 6: Preparing the receiver and the remote..... 29 7: Selecting the speaker system 30 8: Calibrating the appropriate settings automatically (AUTO CALIBRATION 31 9: Adjusting the speaker levels and balance ... Contents Description and location of the SIRIUS Satellite Radio 69 Presetting SIRIUS Satellite Radio channels 70 Restricting access to the receiver (System Audio Control 78 Turning off the receiver with the TV (System Power Off 79 5US
... the TV 20 4a: Connecting the audio components ........ 21 4b: Connecting the video components ........ 22 5: Connecting the antennas (aerials 28 6: Preparing the receiver and the remote..... 29 7: Selecting the speaker system 30 8: Calibrating the appropriate settings automatically (AUTO CALIBRATION 31 9: Adjusting the speaker levels and balance ... Contents Description and location of the SIRIUS Satellite Radio 69 Presetting SIRIUS Satellite Radio channels 70 Restricting access to the receiver (System Audio Control 78 Turning off the receiver with the TV (System Power Off 79 5US
Operating Instructions
Page 6
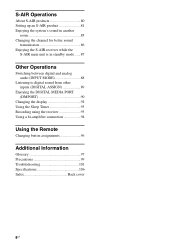
...AIR product 81 Enjoying the system's sound in another room 85 Changing the channel for better sound transmission 86 Enjoying the S-AIR receiver while the S-AIR main unit is in standby mode ......87 Other Operations Switching between digital and analog audio (INPUT MODE 88 ...DIGITAL ASSIGN 89 Enjoying the DIGITAL MEDIA PORT (DMPORT 90 Changing the display 92 Using the Sleep Timer 93 Recording using the receiver 93 Using a bi-amplifier connection 94 Using the Remote Changing button assignments 96 Additional Information Glossary 97 Precautions 99 Troubleshooting 101 Specifications...
...AIR product 81 Enjoying the system's sound in another room 85 Changing the channel for better sound transmission 86 Enjoying the S-AIR receiver while the S-AIR main unit is in standby mode ......87 Other Operations Switching between digital and analog audio (INPUT MODE 88 ...DIGITAL ASSIGN 89 Enjoying the DIGITAL MEDIA PORT (DMPORT 90 Changing the display 92 Using the Sleep Timer 93 Recording using the receiver 93 Using a bi-amplifier connection 94 Using the Remote Changing button assignments 96 Additional Information Glossary 97 Precautions 99 Troubleshooting 101 Specifications...

Operating Instructions
Page 7
... off (page 29, 38, 39, 61, 63). Press TONE MODE repeatedly to adjust the volume level of the display. Receives signals from remote commander. Turn to select BASS or TREBLE, then turn the receiver on /standby) B TONE +/- MOVIE MUSIC MASTER VOLUME DISPLAY DIMMER MUTING VIDEO 2 IN AUTO CAL MIC VIDEO L AUDIO R qh...
... off (page 29, 38, 39, 61, 63). Press TONE MODE repeatedly to adjust the volume level of the display. Receives signals from remote commander. Turn to select BASS or TREBLE, then turn the receiver on /standby) B TONE +/- MOVIE MUSIC MASTER VOLUME DISPLAY DIMMER MUTING VIDEO 2 IN AUTO CAL MIC VIDEO L AUDIO R qh...

Operating Instructions
Page 9
.... Lights up when the disc being input through the OPTICAL jack (page 88). Lights up according to indicate the current input. Lights up when the receiver recognizes a component connected via an HDMI IN jacks (page 23). Lights up when INPUT MODE is set to "AUTO" and the source signal is a digital...
.... Lights up when the disc being input through the OPTICAL jack (page 88). Lights up according to indicate the current input. Lights up when the receiver recognizes a component connected via an HDMI IN jacks (page 23). Lights up when INPUT MODE is set to "AUTO" and the source signal is a digital...
Operating Instructions
Page 10
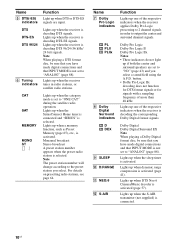
...is connected and "SIRIUS" is selected. Lights up when dynamic range compression is activated (page 41). Name E DTS(-ES) indicators Function Light up when the receiver is decoding DTS-ES signals. For details on presetting radio stations, see page 64. D DEX I SLEEP J D.RANGE K NEO:6 L S-AIR Dolby ...will change according to the preset station you have made digital connections and that INPUT MODE is activated (page 57). Lights up when the receiver is selected. button. • Dolby Pro Logic IIx decoding does not function for DTS format signals or for signals with a sampling ...
...is connected and "SIRIUS" is selected. Lights up when dynamic range compression is activated (page 41). Name E DTS(-ES) indicators Function Light up when the receiver is decoding DTS-ES signals. For details on presetting radio stations, see page 64. D DEX I SLEEP J D.RANGE K NEO:6 L S-AIR Dolby ...will change according to the preset station you have made digital connections and that INPUT MODE is activated (page 57). Lights up when the receiver is selected. button. • Dolby Pro Logic IIx decoding does not function for DTS format signals or for signals with a sampling ...
Operating Instructions
Page 11
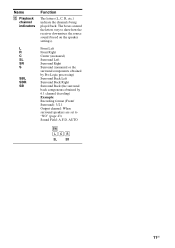
... Back (the surround back components obtained by 6.1 channel decoding) Example: Recording format (Front/ Surround): 3/2.1 Output channel: When surround speakers are set to show how the receiver downmixes the source sound (based on the speaker settings).
... Back (the surround back components obtained by 6.1 channel decoding) Example: Recording format (Front/ Surround): 3/2.1 Output channel: When surround speakers are set to show how the receiver downmixes the source sound (based on the speaker settings).

Operating Instructions
Page 12
... want to a DIGITAL MEDIA PORT adapter (page 91). B DMPORT DMPORT jack Connects to install the wireless transmitter. C ANTENNA section FM ANTENNA jack Connects to this receiver (page 23). The COAXIAL jack provides a better sound quality (page 25, 26). The image is output to a TV or a projector while the sound can be...
... want to a DIGITAL MEDIA PORT adapter (page 91). B DMPORT DMPORT jack Connects to install the wireless transmitter. C ANTENNA section FM ANTENNA jack Connects to this receiver (page 23). The COAXIAL jack provides a better sound quality (page 25, 26). The image is output to a TV or a projector while the sound can be...
Operating Instructions
Page 13
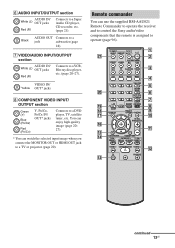
... (page 18). You can enjoy high quality image (page 20- 27). * You can use the supplied RM-AAU021 Remote Commander to operate the receiver and to control the Sony audio/video components that the remote is assigned to a TV or projector (page 20). REPLAY ADVANCE PRESET + .< > < TUNING - Remote commander You can watch...
... (page 18). You can enjoy high quality image (page 20- 27). * You can use the supplied RM-AAU021 Remote Commander to operate the receiver and to control the Sony audio/video components that the remote is assigned to a TV or projector (page 20). REPLAY ADVANCE PRESET + .< > < TUNING - Remote commander You can watch...

Operating Instructions
Page 14
... you want to adjust the volume level of the DVD or Blu-ray disc on the TV screen. Press to turn the receiver on or off the Sony audio/video components that the remote is compatible with the TV for movies and to output the sound from the speakers connected to display... "Changing button assignments" on . Name Function A TV ?/1 Press TV ?/1 and TV (M) at (on/standby) the same time to perform menu operations. To turn off the receiver and other Sony components (SYSTEM STANDBY). The buttons are factory assigned to control...
... you want to adjust the volume level of the DVD or Blu-ray disc on the TV screen. Press to turn the receiver on or off the Sony audio/video components that the remote is compatible with the TV for movies and to output the sound from the speakers connected to display... "Changing button assignments" on . Name Function A TV ?/1 Press TV ?/1 and TV (M) at (on/standby) the same time to perform menu operations. To turn off the receiver and other Sony components (SYSTEM STANDBY). The buttons are factory assigned to control...

Operating Instructions
Page 15
... VCR, satellite tuner, CD player, DVD player or Bluray disc player. M TV Press TV and the button with components in recording standby.) Press to the Sony TV. Then, use V, v, B, b and (P) to start playback of the VCR, CD player, DVD player or Blu-ray disc player. (Also starts recording with ... to pause playback or recording of the VCR, CD player, DVD player, or Blu-ray disc player. CATEGORY Press to display the menu of the receiver, VCR, satellite tuner, CD player, DVD player or Bluray disc player. SIRIUS Satellite Radio (page 69). preset stations. - FM MODE Press to enter the...
... VCR, satellite tuner, CD player, DVD player or Bluray disc player. M TV Press TV and the button with components in recording standby.) Press to the Sony TV. Then, use V, v, B, b and (P) to start playback of the VCR, CD player, DVD player or Blu-ray disc player. (Also starts recording with ... to pause playback or recording of the VCR, CD player, DVD player, or Blu-ray disc player. CATEGORY Press to display the menu of the receiver, VCR, satellite tuner, CD player, DVD player or Bluray disc player. SIRIUS Satellite Radio (page 69). preset stations. - FM MODE Press to enter the...

Operating Instructions
Page 16
...number 10. - CLEAR T Numeric buttons (number 5a)) U TV INPUT Press to activate the Sleep Timer function and the duration which the receiver turns off automatically. SLEEP Press to clear a mistake when you press the incorrect numeric button. Use the tactile dots as an example only. .../tune to input the decimal point for DIGITAL MEDIA PORT adapter operation. b)This button is intended to serve as references when operating the receiver. Name Function Sz Press to preset stations. - select track numbers of the VCR or satellite tuner. Press the numeric buttons and TV...
...number 10. - CLEAR T Numeric buttons (number 5a)) U TV INPUT Press to activate the Sleep Timer function and the duration which the receiver turns off automatically. SLEEP Press to clear a mistake when you press the incorrect numeric button. Use the tactile dots as an example only. .../tune to input the decimal point for DIGITAL MEDIA PORT adapter operation. b)This button is intended to serve as references when operating the receiver. Name Function Sz Press to preset stations. - select track numbers of the VCR or satellite tuner. Press the numeric buttons and TV...
Operating Instructions
Page 17
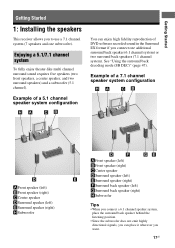
... place it wherever you want. 17US See "Using the surround back decoding mode (SB DEC)" (page 47). Getting Started Getting Started 1: Installing the speakers This receiver allows you to use a 7.1 channel system (7 speakers and one additional surround back speaker (6.1 channel system) or two surround back speakers (7.1 channel system). Example of DVD...
... place it wherever you want. 17US See "Using the surround back decoding mode (SB DEC)" (page 47). Getting Started Getting Started 1: Installing the speakers This receiver allows you to use a 7.1 channel system (7 speakers and one additional surround back speaker (6.1 channel system) or two surround back speakers (7.1 channel system). Example of DVD...

Operating Instructions
Page 21
... the plugs straight in until they click into place. • Do not bend or tie optical digital cords. Unless the power is turned on the receiver when the video and audio signals of a playback component are compatible with 32 kHz, 44.1 kHz, 48 kHz, and 96 kHz sampling frequencies. 4a: Connecting...MONITOR AUDIO OUT SA-CD/CD/CD-R TV SAT BD VIDEO 1 SUBWOOFER A Audio cord (not supplied) 21US Tips • To output the sound of the receiver. - Getting Started Notes • Be sure to turn off the TV's volume or activate the TV's muting function. • All the digital audio jacks are...
... the plugs straight in until they click into place. • Do not bend or tie optical digital cords. Unless the power is turned on the receiver when the video and audio signals of a playback component are compatible with 32 kHz, 44.1 kHz, 48 kHz, and 96 kHz sampling frequencies. 4a: Connecting...MONITOR AUDIO OUT SA-CD/CD/CD-R TV SAT BD VIDEO 1 SUBWOOFER A Audio cord (not supplied) 21US Tips • To output the sound of the receiver. - Getting Started Notes • Be sure to turn off the TV's volume or activate the TV's muting function. • All the digital audio jacks are...
Operating Instructions
Page 22
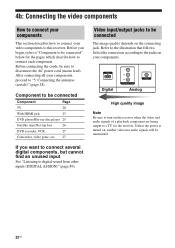
...connection according to turn on , neither video nor audio signals will be transmitted. 22US After connecting all your components. Refer to this receiver. Before you begin, refer to "Component to be connected Component Page TV 20 With HDMI jack 23 DVD player/Blu-ray disc ...ASSIGN)" (page 89). Before connecting the cords, be connected The image quality depends on your components, proceed to a TV via the receiver. 4b: Connecting the video components How to connect your components This section describes how to connect your video components to the illustration that follows...
...connection according to turn on , neither video nor audio signals will be transmitted. 22US After connecting all your components. Refer to this receiver. Before you begin, refer to "Component to be connected Component Page TV 20 With HDMI jack 23 DVD player/Blu-ray disc ...ASSIGN)" (page 89). Before connecting the cords, be connected The image quality depends on your components, proceed to a TV via the receiver. 4b: Connecting the video components How to connect your components This section describes how to connect your video components to the illustration that follows...
Operating Instructions
Page 23
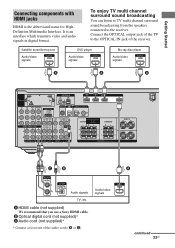
... B Optical digital cord (not supplied)* C Audio cord (not supplied)* * Connect at least one of the receiver. A HDMI cable (not supplied) We recommend that you use a Sony HDMI cable. Audio/video signals continued 23US It is the abbreviated name for HighDefinition Multimedia Interface. Connect the OPTICAL output... jack of the TV to the receiver. Getting Started Connecting components with HDMI jacks ...
... B Optical digital cord (not supplied)* C Audio cord (not supplied)* * Connect at least one of the receiver. A HDMI cable (not supplied) We recommend that you use a Sony HDMI cable. Audio/video signals continued 23US It is the abbreviated name for HighDefinition Multimedia Interface. Connect the OPTICAL output... jack of the TV to the receiver. Getting Started Connecting components with HDMI jacks ...

Operating Instructions
Page 24
This signal supports Dolby Digital, DTS, and Linear PCM. • The receiver supports xvYCC transmission. • This receiver supports the Control for details. • We do not recommend using an HDMI-DVI conversion cable. For details, see ""BRAVIA" Sync Features" (page 75). HDMI... can enjoy multi channel Linear PCM only with copyright protection technology (HDCP), the image and/or the sound from the HDMI OUT jack. In this receiver. Refer to the operating instructions of the player. • Refer to the operating instructions of the playback component to the HDMI IN jack can enjoy...
This signal supports Dolby Digital, DTS, and Linear PCM. • The receiver supports xvYCC transmission. • This receiver supports the Control for details. • We do not recommend using an HDMI-DVI conversion cable. For details, see ""BRAVIA" Sync Features" (page 75). HDMI... can enjoy multi channel Linear PCM only with copyright protection technology (HDCP), the image and/or the sound from the HDMI OUT jack. In this receiver. Refer to the operating instructions of the player. • Refer to the operating instructions of the playback component to the HDMI IN jack can enjoy...

Operating Instructions
Page 28
Notes • Be sure to change the factory setting of the VIDEO 1 input button on the receiver's display. For details, see "Naming input" (page 37). 5: Connecting the antennas (aerials) Connect the supplied AM loop antenna (aerial) and FM wire antenna (aerial). FM ... to fully extend the FM wire antenna (aerial). • After connecting the FM wire antenna (aerial), keep the AM loop antenna (aerial) away from the receiver and other components. • Be sure to disconnect the AC power cord (mains lead). Before connecting the antennas (aerials), be displayed on the remote so...
Notes • Be sure to change the factory setting of the VIDEO 1 input button on the receiver's display. For details, see "Naming input" (page 37). 5: Connecting the antennas (aerials) Connect the supplied AM loop antenna (aerial) and FM wire antenna (aerial). FM ... to fully extend the FM wire antenna (aerial). • After connecting the FM wire antenna (aerial), keep the AM loop antenna (aerial) away from the receiver and other components. • Be sure to disconnect the AC power cord (mains lead). Before connecting the antennas (aerials), be displayed on the remote so...


