Operating Instructions
Page 5
...20 4a: Connecting the audio components ........ 21 4b: Connecting the video components ........ 22 5: Connecting the antennas (aerials 28 6: Preparing the receiver and the remote..... 29 7: Selecting the speaker system 30 8: Calibrating the appropriate settings automatically (AUTO CALIBRATION 31 9: Adjusting the speaker levels ... field.....58 Using only the front speakers (2CH STEREO 60 Listening to the sound without any adjustment (ANALOG DIRECT)...........61 Resetting sound fields to the initial settings 61 Tuner Operations Listening to FM/AM radio 62 Presetting FM/AM radio stations 64 ...
...20 4a: Connecting the audio components ........ 21 4b: Connecting the video components ........ 22 5: Connecting the antennas (aerials 28 6: Preparing the receiver and the remote..... 29 7: Selecting the speaker system 30 8: Calibrating the appropriate settings automatically (AUTO CALIBRATION 31 9: Adjusting the speaker levels ... field.....58 Using only the front speakers (2CH STEREO 60 Listening to the sound without any adjustment (ANALOG DIRECT)...........61 Resetting sound fields to the initial settings 61 Tuner Operations Listening to FM/AM radio 62 Presetting FM/AM radio stations 64 ...
Operating Instructions
Page 29
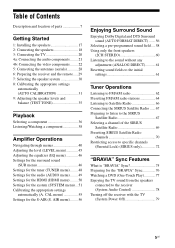
...VOLUME DISPLAY DIMMER MUTING VIDEO 2 IN AUTO CAL MIC VIDEO L AUDIO R MEMORY/ENTER FRONT A 1 Press ?/1 to use the buttons on the receiver for 5 seconds. To the wall outlet After "CLEARING" appears on the display alternately. 3 Press MEMORY/ENTER. All the settings you have changed... or adjusted are reset to a wall outlet. "PUSH" and "ENTER" appears on the display for the first time, initialize the receiver by performing the following procedure. Getting Started 6: Preparing the receiver and the remote Connecting the AC power cord (mains ...
...VOLUME DISPLAY DIMMER MUTING VIDEO 2 IN AUTO CAL MIC VIDEO L AUDIO R MEMORY/ENTER FRONT A 1 Press ?/1 to use the buttons on the receiver for 5 seconds. To the wall outlet After "CLEARING" appears on the display alternately. 3 Press MEMORY/ENTER. All the settings you have changed... or adjusted are reset to a wall outlet. "PUSH" and "ENTER" appears on the display for the first time, initialize the receiver by performing the following procedure. Getting Started 6: Preparing the receiver and the remote Connecting the AC power cord (mains ...
Operating Instructions
Page 30
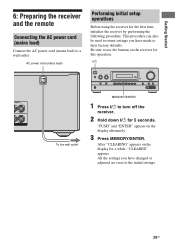
...ones. ?/1 SPEAKERS TONE INPUT SELECTOR PHONES TONE MODE INPUT MODE TUNING MODE TUNING MEMORY/ 2CH/ ENTER A.DIRECT A.F.D. Doing so may be reset to their factory settings. If this operation. Note You cannot switch the front speaker system by pressing SPEAKERS when the headphones are connected to... drive. To turn off the speaker output, press SPEAKERS repeatedly until the "SP A" and "SP B" indicators on the receiver for an extended period of batteries. • Do not expose the remote sensor to "SPK B" in the RM-AAU021 Remote Commander. Inserting...
...ones. ?/1 SPEAKERS TONE INPUT SELECTOR PHONES TONE MODE INPUT MODE TUNING MODE TUNING MEMORY/ 2CH/ ENTER A.DIRECT A.F.D. Doing so may be reset to their factory settings. If this operation. Note You cannot switch the front speaker system by pressing SPEAKERS when the headphones are connected to... drive. To turn off the speaker output, press SPEAKERS repeatedly until the "SP A" and "SP B" indicators on the receiver for an extended period of batteries. • Do not expose the remote sensor to "SPK B" in the RM-AAU021 Remote Commander. Inserting...
Operating Instructions
Page 61
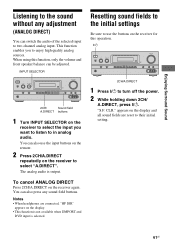
...TUNING MEMORY/ 2CH/ ENTER A.DIRECT A.F.D. You can be adjusted. The analog audio is selected. Resetting sound fields to the initial settings Be sure to use the buttons on the receiver for this function, only the volume and front speaker balance can also use the input buttons ...on the remote. 2 Press 2CH/A.DIRECT repeatedly on the receiver to select "A.DIRECT". "S.F. Notes • When headphones are reset to in analog audio. When using this operation. ?/1 ?/1 SPEAKERS TONE INPUT SELECTOR PHONES TONE MODE INPUT MODE ...
...TUNING MEMORY/ 2CH/ ENTER A.DIRECT A.F.D. You can be adjusted. The analog audio is selected. Resetting sound fields to the initial settings Be sure to use the buttons on the receiver for this function, only the volume and front speaker balance can also use the input buttons ...on the remote. 2 Press 2CH/A.DIRECT repeatedly on the receiver to select "A.DIRECT". "S.F. Notes • When headphones are reset to in analog audio. When using this operation. ?/1 ?/1 SPEAKERS TONE INPUT SELECTOR PHONES TONE MODE INPUT MODE ...

Operating Instructions
Page 63
...right frequency. MOVIE MUSIC MASTER VOLUME DISPLAY DIMMER MUTING VIDEO 2 IN AUTO CAL MIC VIDEO L AUDIO R TUNING MODE 1 Press ?/1 to turn off the receiver. 2 While holding down TUNING MODE, press ?/1. 3 Change the current AM tuning scale to enter the frequency. Tuner Operations 63US Tuning into a station directly...antenna (aerial) for optimum reception. 4 Press ENTER. If not, repeat steps 2 to 10 kHz (or 9 kHz), repeat the procedure above. To reset the scale to 4. If you change the AM tuning scale to either 9 kHz or 10 kHz using the numeric buttons. 1 Press TUNER repeatedly to...
...right frequency. MOVIE MUSIC MASTER VOLUME DISPLAY DIMMER MUTING VIDEO 2 IN AUTO CAL MIC VIDEO L AUDIO R TUNING MODE 1 Press ?/1 to turn off the receiver. 2 While holding down TUNING MODE, press ?/1. 3 Change the current AM tuning scale to enter the frequency. Tuner Operations 63US Tuning into a station directly...antenna (aerial) for optimum reception. 4 Press ENTER. If not, repeat steps 2 to 10 kHz (or 9 kHz), repeat the procedure above. To reset the scale to 4. If you change the AM tuning scale to either 9 kHz or 10 kHz using the numeric buttons. 1 Press TUNER repeatedly to...

Operating Instructions
Page 73
... Parental Lock 1 Press TUNER repeatedly to select "SIRIUS". "1-LEVEL" appears on the receiver. 2 Select a locked channel you want to listen using Category Tuning, locked channels are skipped. • When the receiver is reset to the factory settings, the lock code returns to select "OFF", then press ...LOCK" appears on the display. You can also use INPUT SELECTOR on the display. The channel is tuned in . "CHANGED" appears on the receiver. 2 Select a channel you want to the default. • You cannot set the Parental Lock for channel 0 or channel 184. Tuner Operations...
... Parental Lock 1 Press TUNER repeatedly to select "SIRIUS". "1-LEVEL" appears on the receiver. 2 Select a locked channel you want to listen using Category Tuning, locked channels are skipped. • When the receiver is reset to the factory settings, the lock code returns to select "OFF", then press ...LOCK" appears on the display. You can also use INPUT SELECTOR on the display. The channel is tuned in . "CHANGED" appears on the receiver. 2 Select a channel you want to the default. • You cannot set the Parental Lock for channel 0 or channel 184. Tuner Operations...
Operating Instructions
Page 84
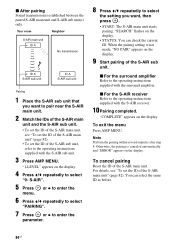
x After pairing Sound transmission is canceled automatically and "ERROR" appears on the display. To exit the menu Press AMP MENU. To cancel pairing Reset the ID of the S-AIR main unit" (page 82). x For the surround amplifier Refer to select the setting you want , then press . &#...A S-AIR sub unit ID A S-AIR sub unit Pairing 1 Place the S-AIR sub unit that you want to the operating instructions supplied with the S-AIR receiver. 10Pairing completed. "SEARCH" flashes on the display. "1-LEVEL" appears on the display. 9 Start pairing of the S-AIR sub unit, refer to pair near...
x After pairing Sound transmission is canceled automatically and "ERROR" appears on the display. To exit the menu Press AMP MENU. To cancel pairing Reset the ID of the S-AIR main unit" (page 82). x For the surround amplifier Refer to select the setting you want , then press . &#...A S-AIR sub unit ID A S-AIR sub unit Pairing 1 Place the S-AIR sub unit that you want to the operating instructions supplied with the S-AIR receiver. 10Pairing completed. "SEARCH" flashes on the display. "1-LEVEL" appears on the display. 9 Start pairing of the S-AIR sub unit, refer to pair near...
Operating Instructions
Page 96
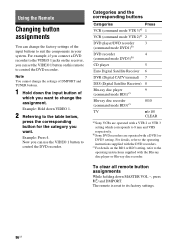
The remote is reset to its factory settings. 96US Example: Hold down VIDEO 1. 2 Referring to the table below, press the corresponding button for the category you want . b)Sony DVD recorders are operated with the DVD recorders. To clear all remote button assignments While holding ... mode DVD3)b) CD player 5 Euro Digital Satellite Receiver 6 DVR (Digital CATV terminal) 7 DSS (Digital Satellite Receiver) 8 Blu-ray disc player 9 (command mode BD1)c) Blu-ray disc recorder 0/10 (command mode BD3)c) TV />10/ CLEAR a)Sony VCRs are operated with the Blu-ray disc player...
The remote is reset to its factory settings. 96US Example: Hold down VIDEO 1. 2 Referring to the table below, press the corresponding button for the category you want . b)Sony DVD recorders are operated with the DVD recorders. To clear all remote button assignments While holding ... mode DVD3)b) CD player 5 Euro Digital Satellite Receiver 6 DVR (Digital CATV terminal) 7 DSS (Digital Satellite Receiver) 8 Blu-ray disc player 9 (command mode BD1)c) Blu-ray disc recorder 0/10 (command mode BD3)c) TV />10/ CLEAR a)Sony VCRs are operated with the Blu-ray disc player...
Operating Instructions
Page 106
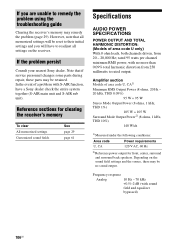
... that all settings on the sound field settings and the source, there may be reset to their initial settings and you are unable to readjust all memorized settings will have a Sony dealer check the entire system together (S-AIR main unit and S-AIR sub unit). ...W/ch 1)Measured under the following conditions: Area code U, CA Power requirements 120 V AC, 60 Hz 2)Reference power output for clearing the receiver's memory To clear All memorized settings Customized sound fields See page 29 page 61 Specifications AUDIO POWER SPECIFICATIONS POWER OUTPUT AND TOTAL HARMONIC DISTORTION: ...
... that all settings on the sound field settings and the source, there may be reset to their initial settings and you are unable to readjust all memorized settings will have a Sony dealer check the entire system together (S-AIR main unit and S-AIR sub unit). ...W/ch 1)Measured under the following conditions: Area code U, CA Power requirements 120 V AC, 60 Hz 2)Reference power output for clearing the receiver's memory To clear All memorized settings Customized sound fields See page 29 page 61 Specifications AUDIO POWER SPECIFICATIONS POWER OUTPUT AND TOTAL HARMONIC DISTORTION: ...


