Operating Instructions (HT-7000DH)
Page 3
...are trademarks or registered trademarks of the rear panel (see the illustration below). Note for the supplied remote (RM-AAP012) The 12 button on the remote is shown on the lower right portion of HDMI Licensing LLC. About This Manual • The...to the area code, are registered trademarks of : • Receiver STR-K7000 • DVD player DVP-NC85H • Speaker system - Center speaker SS-CNP900 - This receiver incorporates High-Definition Multimedia Interface (HDMITM) technology. This receiver incorporates Dolby* Digital and Pro Logic Surround and the DTS** ...
...are trademarks or registered trademarks of the rear panel (see the illustration below). Note for the supplied remote (RM-AAP012) The 12 button on the remote is shown on the lower right portion of HDMI Licensing LLC. About This Manual • The...to the area code, are registered trademarks of : • Receiver STR-K7000 • DVD player DVP-NC85H • Speaker system - Center speaker SS-CNP900 - This receiver incorporates High-Definition Multimedia Interface (HDMITM) technology. This receiver incorporates Dolby* Digital and Pro Logic Surround and the DTS** ...
Operating Instructions (HT-7000DH)
Page 4
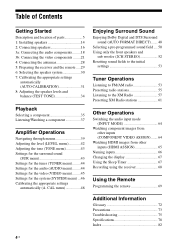
... speakers 16 3a: Connecting the audio components.........18 3b: Connecting the video components ........21 4: Connecting the antennas 28 5: Preparing the receiver and the remote .....29 6: Selecting the speaker system 30 7: Calibrating the appropriate settings automatically (AUTO CALIBRATION 31 8: Adjusting the speaker levels and balance...65 Naming inputs 66 Changing the display 67 Using the Sleep Timer 67 Recording using the receiver 68 Using the Remote Programming the remote 69 Additional Information Glossary 72 Precautions 73 Troubleshooting 75 Specifications 78 Index 82 4US
... speakers 16 3a: Connecting the audio components.........18 3b: Connecting the video components ........21 4: Connecting the antennas 28 5: Preparing the receiver and the remote .....29 6: Selecting the speaker system 30 7: Calibrating the appropriate settings automatically (AUTO CALIBRATION 31 8: Adjusting the speaker levels and balance...65 Naming inputs 66 Changing the display 67 Using the Sleep Timer 67 Recording using the receiver 68 Using the Remote Programming the remote 69 Additional Information Glossary 72 Precautions 73 Troubleshooting 75 Specifications 78 Index 82 4US

Operating Instructions (HT-7000DH)
Page 6
... S AUTO CAL MIC jack Connects to select sound fields (MOVIE, MUSIC) (page 50). J MULTI CH IN Press to select the audio directly from remote commander. Name Function R VIDEO 3 IN/ To connect a camcorder or PORTABLE AV IN video game (page 27, 35). L MOVIE, MUSIC Press to... 29). I MUTING Press to a headphone (page 75). 6US T PHONES jack Connects to mute the sound (page 35). Name Function E Remote sensor Receives signals from the components connected to the MULTI CH IN jacks (page 35). H MASTER VOLUME Turn to adjust the volume level of all speakers...
... S AUTO CAL MIC jack Connects to select sound fields (MOVIE, MUSIC) (page 50). J MULTI CH IN Press to select the audio directly from remote commander. Name Function R VIDEO 3 IN/ To connect a camcorder or PORTABLE AV IN video game (page 27, 35). L MOVIE, MUSIC Press to... 29). I MUTING Press to a headphone (page 75). 6US T PHONES jack Connects to mute the sound (page 35). Name Function E Remote sensor Receives signals from the components connected to the MULTI CH IN jacks (page 35). H MASTER VOLUME Turn to adjust the volume level of all speakers...

Operating Instructions (HT-7000DH)
Page 10
... TV CH VIDEO MENU AUTO WIDE CAL qh 3 4 5 6 7 8 9 q; You can use the supplied remote RM-AAP012 to operate the receiver and to control the Sony audio/video components that the remote is assigned to the AM loop antenna supplied with this receiver (page 28). E AUDIO INPUT/OUTPUT section AUDIO IN/ White (L) OUT jack Red (R) Connects...
... TV CH VIDEO MENU AUTO WIDE CAL qh 3 4 5 6 7 8 9 q; You can use the supplied remote RM-AAP012 to operate the receiver and to control the Sony audio/video components that the remote is assigned to the AM loop antenna supplied with this receiver (page 28). E AUDIO INPUT/OUTPUT section AUDIO IN/ White (L) OUT jack Red (R) Connects...
Operating Instructions (HT-7000DH)
Page 11
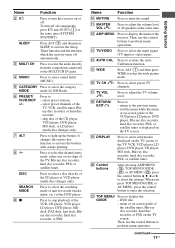
...select preset stations. - skip disc of the TV, VCR, satellite tuner, Bluray disc recorder, or hard disc recorder. - It changes the remote key function to select a disc directly of the CD player or VCD player (multi-disc changer only). DISC Press to activate the buttons ...SEARCH MODE Press to perform menu operations. Press to turn off . Press to enter the selection. return to display the menu of the receiver. continued 11US Getting Started L AMP MENU Press to the previous menu. - S DISPLAY Press to select preset TV channels. Press to select...
...select preset stations. - skip disc of the TV, VCR, satellite tuner, Bluray disc recorder, or hard disc recorder. - It changes the remote key function to select a disc directly of the CD player or VCD player (multi-disc changer only). DISC Press to activate the buttons ...SEARCH MODE Press to perform menu operations. Press to turn off . Press to enter the selection. return to display the menu of the receiver. continued 11US Getting Started L AMP MENU Press to the previous menu. - S DISPLAY Press to select preset TV channels. Press to select...

Operating Instructions (HT-7000DH)
Page 13
...the receiver. The buttons are factory assigned to use. Getting Started Name Function wh Numeric buttons Press ALT (G) and then press the numeric buttons to set up the remote. preset/tune to select track number 10. - Press 0/10 to preset stations. - You can program the remote to control non-Sony .... 13US wj Input buttons Press one of the buttons to select the component you press any of the input buttons, the receiver turns on the remote is intended to turn the TV on or off. Notes • Some functions explained in this section may operate differently than described. ...
...the receiver. The buttons are factory assigned to use. Getting Started Name Function wh Numeric buttons Press ALT (G) and then press the numeric buttons to set up the remote. preset/tune to select track number 10. - Press 0/10 to preset stations. - You can program the remote to control non-Sony .... 13US wj Input buttons Press one of the buttons to select the component you press any of the input buttons, the receiver turns on the remote is intended to turn the TV on or off. Notes • Some functions explained in this section may operate differently than described. ...

Operating Instructions (HT-7000DH)
Page 24
...cord (not supplied) B Component video cord (not supplied) If you can be displayed on the remote so that it can use the button to control your DVD recorder. For details, see "Programming the remote" (page 69). • You can also rename the VIDEO 1 input so that you connect ...a DVD recorder • Be sure to change the factory setting of the VIDEO 1 input button on the receiver's display. 2 Connecting video DVD player A B DIGITAL...
...cord (not supplied) B Component video cord (not supplied) If you can be displayed on the remote so that it can use the button to control your DVD recorder. For details, see "Programming the remote" (page 69). • You can also rename the VIDEO 1 input so that you connect ...a DVD recorder • Be sure to change the factory setting of the VIDEO 1 input button on the receiver's display. 2 Connecting video DVD player A B DIGITAL...

Operating Instructions (HT-7000DH)
Page 29
... to use the buttons on the display alternately. 3 Press MEMORY/ENTER. Getting Started 5: Preparing the receiver and the remote Connecting the AC power cord Connect the AC power cord to turn off the receiver. 2 Hold down ?/1 for 5 seconds. AC power cord Performing initial setup operations Before using the... receiver for this system so that the power cord can also be unplugged from the wall socket...
... to use the buttons on the display alternately. 3 Press MEMORY/ENTER. Getting Started 5: Preparing the receiver and the remote Connecting the AC power cord Connect the AC power cord to turn off the receiver. 2 Hold down ?/1 for 5 seconds. AC power cord Performing initial setup operations Before using the... receiver for this system so that the power cord can also be unplugged from the wall socket...

Operating Instructions (HT-7000DH)
Page 30
... new ones. 6: Selecting the speaker system You can select the front speakers you want to use the remote for about 3 months. Observe the correct polarity when installing batteries. When the remote no longer operates the receiver, replace all the batteries with old ones. • Do not mix alkaline batteries and other kinds of...
... new ones. 6: Selecting the speaker system You can select the front speakers you want to use the remote for about 3 months. Observe the correct polarity when installing batteries. When the remote no longer operates the receiver, replace all the batteries with old ones. • Do not mix alkaline batteries and other kinds of...

Operating Instructions (HT-7000DH)
Page 64
...control button b to select "COMP. Watching component images from other inputs (COMPONENT VIDEO ASSIGN) You can also use the input buttons on the remote. 2 Press INPUT MODE repeatedly on the display. 2 Press control button V/v repeatedly to select "6-VIDEO". 3 Press the control button or control... button b to enter the menu. 4 Press control button V/v repeatedly to enter your selection. 64US V. "1-LEVEL" appears on the receiver to digital audio signals when there are selected. • COAX IN Specifies the digital audio signals input to the DIGITAL COAXIAL jack. • ...
...control button b to select "COMP. Watching component images from other inputs (COMPONENT VIDEO ASSIGN) You can also use the input buttons on the remote. 2 Press INPUT MODE repeatedly on the display. 2 Press control button V/v repeatedly to select "6-VIDEO". 3 Press the control button or control... button b to enter the menu. 4 Press control button V/v repeatedly to enter your selection. 64US V. "1-LEVEL" appears on the receiver to digital audio signals when there are selected. • COAX IN Specifies the digital audio signals input to the DIGITAL COAXIAL jack. • ...
Operating Instructions (HT-7000DH)
Page 69
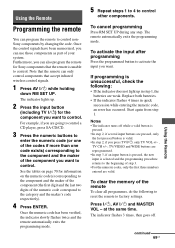
...batteries. • If the indicator flashes 4 times in step 1, the batteries are valid. Press ?/1, AV ?/1 and MASTER VOL - Note that the remote can use those components as part of your system. The indicator flashes 3 times, then goes off while a valid button is pressed. • In ...Once the control signals have been memorized, you want to control. at the same time. Using the Remote Programming the remote You can also program the remote for Sony components that the remote is selected and the programming procedure returns to the beginning of step 3. • For the numeric codes...
...batteries. • If the indicator flashes 4 times in step 1, the batteries are valid. Press ?/1, AV ?/1 and MASTER VOL - Note that the remote can use those components as part of your system. The indicator flashes 3 times, then goes off while a valid button is pressed. • In ...Once the control signals have been memorized, you want to control. at the same time. Using the Remote Programming the remote You can also program the remote for Sony components that the remote is selected and the programming procedure returns to the beginning of step 3. • For the numeric codes...

Operating Instructions (HT-7000DH)
Page 70
...603 606 To control a video CD player Maker SONY Code(s) 605 70US There is normally unable to control. Notes • The numeric codes are based on this remote may be available when used with your remote using other codes. Since the remote signal that your component will not respond to some... corresponding to the component and the maker of the component Use the numeric codes in the tables below to control non-Sony components and also Sony components that the remote is a chance, however, that a component accepts differs depending on the model and year of the component, more than...
...603 606 To control a video CD player Maker SONY Code(s) 605 70US There is normally unable to control. Notes • The numeric codes are based on this remote may be available when used with your remote using other codes. Since the remote signal that your component will not respond to some... corresponding to the component and the maker of the component Use the numeric codes in the tables below to control non-Sony components and also Sony components that the remote is a chance, however, that a component accepts differs depending on the model and year of the component, more than...

Operating Instructions (HT-7000DH)
Page 71
... a VCR Maker SONY AIWA* AKAI BLAUPUNKT...work even though you enter the code for AIWA, enter the code for Sony instead. To control a DVD player Maker SONY PANASONIC PHILIPS PIONEER TOSHIBA DENON Code(s) 401, 402, 403 406, 408 ...407 409 404 405 To control a DVD recorder Maker SONY Code(s) 403 To control a TV Maker SONY DAEWOO FISHER GOLDSTAR/LG GRUNDIG HITACHI ITT/NOKIA JVC MAGNAVOX MITSUBISHI/MGA... 538 530, 537, 539 535, 540, 541 542, 543 To control a satellite tuner or cable box Maker SONY JERROLD/G.I. PANASONIC RCA S. ATLANTA Code(s) 801, 802, 803, 804 806, 807, 808, 809, 810, 811,...
... a VCR Maker SONY AIWA* AKAI BLAUPUNKT...work even though you enter the code for AIWA, enter the code for Sony instead. To control a DVD player Maker SONY PANASONIC PHILIPS PIONEER TOSHIBA DENON Code(s) 401, 402, 403 406, 408 ...407 409 404 405 To control a DVD recorder Maker SONY Code(s) 403 To control a TV Maker SONY DAEWOO FISHER GOLDSTAR/LG GRUNDIG HITACHI ITT/NOKIA JVC MAGNAVOX MITSUBISHI/MGA... 538 530, 537, 539 535, 540, 541 542, 543 To control a satellite tuner or cable box Maker SONY JERROLD/G.I. PANASONIC RCA S. ATLANTA Code(s) 801, 802, 803, 804 806, 807, 808, 809, 810, 811,...
Operating Instructions (HT-7000DH)
Page 77
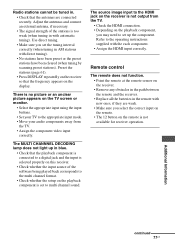
... the TV. • Assign the component video input correctly. Remote control The remote does not function. • Point the remote at the remote sensor on the receiver. • Remove any obstacles in the path between the remote and the receiver. • Replace all the batteries in the remote with new ones, if they are connected securely. Use direct...
... the TV. • Assign the component video input correctly. Remote control The remote does not function. • Point the remote at the remote sensor on the receiver. • Remove any obstacles in the path between the remote and the receiver. • Replace all the batteries in the remote with new ones, if they are connected securely. Use direct...

Operating Instructions (HT-7000DH)
Page 81
Supplied accessories FM wire antenna (1) AM loop antenna (1) Monaural audio cord (1) Speaker cords • Long (2) • Short (3) Coaxial digital cord (1) Footpads • Speakers (20) • Sub woofer (4) Remote commander RM-AAP012 (1) R6 (size-AA) batteries (2) Optimizer microphone ECM-AC2 (1) Speakers • Front speakers (2) • Center speaker (1) • Surround speakers (2) • Sub woofer (1) For details on the area code of the component you are subject to change without notice. 81US Additional Information Design and specifications are using, see page 3.
Supplied accessories FM wire antenna (1) AM loop antenna (1) Monaural audio cord (1) Speaker cords • Long (2) • Short (3) Coaxial digital cord (1) Footpads • Speakers (20) • Sub woofer (4) Remote commander RM-AAP012 (1) R6 (size-AA) batteries (2) Optimizer microphone ECM-AC2 (1) Speakers • Front speakers (2) • Center speaker (1) • Surround speakers (2) • Sub woofer (1) For details on the area code of the component you are subject to change without notice. 81US Additional Information Design and specifications are using, see page 3.


