

Instructions
Page 1
2-652-380-11 (1) To Customers and Sony Dealers Wall-Mount Bracket Instructions GB Mode d'emploi FR Instrucciones ES Gebrauchsanweisung DE Instructies NL Istruzioni IT Instruções PT Vejledning DK Bruksanvisning SE SU-WL51 © 2005 Sony Corporation
2-652-380-11 (1) To Customers and Sony Dealers Wall-Mount Bracket Instructions GB Mode d'emploi FR Instrucciones ES Gebrauchsanweisung DE Instructies NL Istruzioni IT Instruções PT Vejledning DK Bruksanvisning SE SU-WL51 © 2005 Sony Corporation

Instructions
Page 2
...-40S2000 KDL-40S2010 KLV-40U100M This Wall-Mount Bracket is not liable for use the product correctly. Please give this Wall-Mount Bracket can result. The wall should be capable of supporting a weight of at least four times the TV or monitor weight. (See the TV or monitor installing dimensions table on the wall is not liable for the weight of each TV or monitor...
...-40S2000 KDL-40S2010 KLV-40U100M This Wall-Mount Bracket is not liable for use the product correctly. Please give this Wall-Mount Bracket can result. The wall should be capable of supporting a weight of at least four times the TV or monitor weight. (See the TV or monitor installing dimensions table on the wall is not liable for the weight of each TV or monitor...
Instructions
Page 3
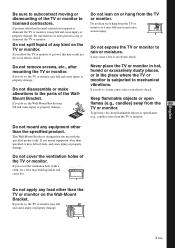
... or monitor. Do not disassemble or make alterations to the parts of the TV or monitor to licensed contractors. If you... in the place where the TV or monitor is designed for the use with a cloth, etc.), heat may cause a fire or an ...Do not lean on or hang from the GB TV or monitor. Do not remove screws, etc., after mounting the TV or monitor. ...If you do so, the TV or monitor may fall and cause injury or property damage. 3 (GB) Do not expose the TV or monitor to mechanical vibrations. If you do so, the Wall-Mount Bracket...
... or monitor. Do not disassemble or make alterations to the parts of the TV or monitor to licensed contractors. If you... in the place where the TV or monitor is designed for the use with a cloth, etc.), heat may cause a fire or an ...Do not lean on or hang from the GB TV or monitor. Do not remove screws, etc., after mounting the TV or monitor. ...If you do so, the TV or monitor may fall and cause injury or property damage. 3 (GB) Do not expose the TV or monitor to mechanical vibrations. If you do so, the Wall-Mount Bracket...

Instructions
Page 4
... instruction manual. Consult your licensed contractor regarding an appropriate location (free from the wall surface. Installing the Wall-Mount Bracket To Sony Dealers WARNING to assemble the bracket properly following the instructed procedure explained in this product. Be sure to install the Wall-Mount Bracket securely to use the TV or monitor installed on the Wall-Mount Bracket for a long time, the wall behind the wall, we recommend that you use the appropriate screws...
... instruction manual. Consult your licensed contractor regarding an appropriate location (free from the wall surface. Installing the Wall-Mount Bracket To Sony Dealers WARNING to assemble the bracket properly following the instructed procedure explained in this product. Be sure to install the Wall-Mount Bracket securely to use the TV or monitor installed on the Wall-Mount Bracket for a long time, the wall behind the wall, we recommend that you use the appropriate screws...

Instructions
Page 5
... may become exposed and cause a short circuit or an electrical break. Use the appropriate screws for the installation 1 Prepare four or more M8 or equivalent screws (not supplied) and a screwdriver. If you intend to install a TV or monitor that is bent or twisted by force, the internal...Step 1: Checking the parts required for the wall material and structure when mounting the Wall-Mount Bracket. This may cause injury. This may cause a fire or an electric shock. Be sure to tighten the screws securely in injury or damage to the TV or monitor. Before installation If you fail to...
... may become exposed and cause a short circuit or an electrical break. Use the appropriate screws for the installation 1 Prepare four or more M8 or equivalent screws (not supplied) and a screwdriver. If you intend to install a TV or monitor that is bent or twisted by force, the internal...Step 1: Checking the parts required for the wall material and structure when mounting the Wall-Mount Bracket. This may cause injury. This may cause a fire or an electric shock. Be sure to tighten the screws securely in injury or damage to the TV or monitor. Before installation If you fail to...

Instructions
Page 6
... ceiling and protruding parts of at least four screw holes with the same mark shown in the wall, also determine the position of the wall. • If the Plate Unit cannot be attached securely enough, use additional screws. • Be sure to confirm that of the TV or monitor (page 12). Step 2: Deciding on the installation location Step 3: Installing...
... ceiling and protruding parts of at least four screw holes with the same mark shown in the wall, also determine the position of the wall. • If the Plate Unit cannot be attached securely enough, use additional screws. • Be sure to confirm that of the TV or monitor (page 12). Step 2: Deciding on the installation location Step 3: Installing...

Instructions
Page 7
... arms. • When using an electric screwdriver, set the torque setting to the operating instructions or the leaflet ("Installing the WallMount Bracket") supplied with the TV or monitor. • 0 degrees: Leave the white screws tightened as they are. • Other than those specified on the plate unit. 2 Secure the Mounting Hook Unit support shafts using the screws removed in the above...
... arms. • When using an electric screwdriver, set the torque setting to the operating instructions or the leaflet ("Installing the WallMount Bracket") supplied with the TV or monitor. • 0 degrees: Leave the white screws tightened as they are. • Other than those specified on the plate unit. 2 Secure the Mounting Hook Unit support shafts using the screws removed in the above...

Instructions
Page 8
... its screen facing down on a stable cloth-covered work surface. Notes • When using an electric screwdriver, set the torque setting to approximately 2 N·m {20 Kgf·cm}. • Be sure not to the leaflet "Installing the WallMount Bracket" supplied with your TV or monitor. 1 Remove the screws from the rear side of the TV or monitor...
... its screen facing down on a stable cloth-covered work surface. Notes • When using an electric screwdriver, set the torque setting to approximately 2 N·m {20 Kgf·cm}. • Be sure not to the leaflet "Installing the WallMount Bracket" supplied with your TV or monitor. 1 Remove the screws from the rear side of the TV or monitor...

Instructions
Page 9
... "Installing the WallMount Bracket" supplied with the TV or monitor to the instruction manual of equipment, this may hurt yourself. 2 Connect the AC power cord and the connecting cable(s) supplied with your TV or monitor. Then slide the Mounting Hook Units, as you route the cord and the cable in the wall, feed them using the supplied screws...
... "Installing the WallMount Bracket" supplied with the TV or monitor to the instruction manual of equipment, this may hurt yourself. 2 Connect the AC power cord and the connecting cable(s) supplied with your TV or monitor. Then slide the Mounting Hook Units, as you route the cord and the cable in the wall, feed them using the supplied screws...

Instructions
Page 10
... the Plate Unit. 1 Insert the screws (+B6×L20, supplied) into the screw holes on the outer left and right securing screws firmly. Be sure to tighten both left and right sides of the installation for safety. WARNING Be sure to confirm the completion of the Mounting Hook Unit support shafts, and tighten them temporarily. Tighten...
... the Plate Unit. 1 Insert the screws (+B6×L20, supplied) into the screw holes on the outer left and right securing screws firmly. Be sure to tighten both left and right sides of the installation for safety. WARNING Be sure to confirm the completion of the Mounting Hook Unit support shafts, and tighten them temporarily. Tighten...

Instructions
Page 11
... or monitor. When removing the TV Specifications or monitor To Sony Dealers Unit: mm (inches) Weight: 9.5 kg (21 lb) Plate Unit 54 1 Unplug the AC power cord from 670 (26 3/8) (2 1/8) the wall outlet. 420 (16 17/32) 2 Remove the two securing screws on the right and left Mounting Hook Unit support shafts. 3 Be sure that two or...
... or monitor. When removing the TV Specifications or monitor To Sony Dealers Unit: mm (inches) Weight: 9.5 kg (21 lb) Plate Unit 54 1 Unplug the AC power cord from 670 (26 3/8) (2 1/8) the wall outlet. 420 (16 17/32) 2 Remove the two securing screws on the right and left Mounting Hook Unit support shafts. 3 Be sure that two or...

Instructions
Page 12
... intend to the leaflet "Installing the Wall-Mount Bracket" supplied with your TV or monitor. KDL-40S2000/KDL-40S2010 Screen centre line 393 (15 15/32) KLV-40U100M 10 393 (15 15/32) Screen centre line Display Dimensions (0º) Unit: mm (inches) Length for each mounting angle Unit: mm (inches) Weight Display Model Mounting A B C D E angle F G H Weight × 4* () KDL-40S2000/ KDL...
... intend to the leaflet "Installing the Wall-Mount Bracket" supplied with your TV or monitor. KDL-40S2000/KDL-40S2010 Screen centre line 393 (15 15/32) KLV-40U100M 10 393 (15 15/32) Screen centre line Display Dimensions (0º) Unit: mm (inches) Length for each mounting angle Unit: mm (inches) Weight Display Model Mounting A B C D E angle F G H Weight × 4* () KDL-40S2000/ KDL...
Instructions
Page 13
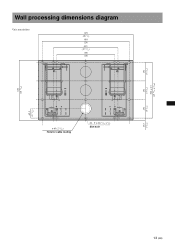
131 (5 5/32) Wall processing dimensions diagram Unit: mm (inches) 670 (26 3/8) 610 (24) 455 (17 29/32) 406 (16) 420 (16 17/32) 65.5 (2 37/64) ø 60 (2 23/64) Hole for cable routing 20 - 9 × 20 (23/64 × 5/6) Slot hole 131 (5 5/32) 393 ± 0.5 (15 15/32 ± 5/256) 131 (5 5/32) 13.5 (17/32) 13 (GB)
131 (5 5/32) Wall processing dimensions diagram Unit: mm (inches) 670 (26 3/8) 610 (24) 455 (17 29/32) 406 (16) 420 (16 17/32) 65.5 (2 37/64) ø 60 (2 23/64) Hole for cable routing 20 - 9 × 20 (23/64 × 5/6) Slot hole 131 (5 5/32) 393 ± 0.5 (15 15/32 ± 5/256) 131 (5 5/32) 13.5 (17/32) 13 (GB)

