Operating Instructions
Page 2
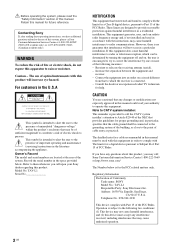
... call the CATV system installer's attention to operate this equipment. Owner's Record The model and serial numbers are located at 1-800-222-SONY (7669) (US residents only) or 1-877-899-SONY (7669) (Canadian residents only). TAV-L1 Serial No NOTIFICATION This equipment has been tested and found to constitute a risk of important operating and maintenance (servicing) instructions in accordance with Part 15 of the...
... call the CATV system installer's attention to operate this equipment. Owner's Record The model and serial numbers are located at 1-800-222-SONY (7669) (US residents only) or 1-877-899-SONY (7669) (Canadian residents only). TAV-L1 Serial No NOTIFICATION This equipment has been tested and found to constitute a risk of important operating and maintenance (servicing) instructions in accordance with Part 15 of the...

Operating Instructions
Page 3
... operating the system at temperatures below 5°C (41°F). • If the system is recommended to use it for safety purposes, to insert the plug fully into the wall outlet only one way. In this product may be using the system for several days, disconnect the power by qualified service personnel before turning on page 7. TAV-L1 SONY RACK STAND MODEL NO. "Dolby...
... operating the system at temperatures below 5°C (41°F). • If the system is recommended to use it for safety purposes, to insert the plug fully into the wall outlet only one way. In this product may be using the system for several days, disconnect the power by qualified service personnel before turning on page 7. TAV-L1 SONY RACK STAND MODEL NO. "Dolby...
Operating Instructions
Page 5
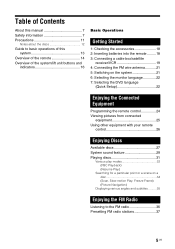
...buttons and indicators 16 Basic Operations Getting Started 1: Checking the accessories 18 2: Inserting batteries into the remote .........18 3: Connecting a cable box/satellite receiver/VCR 19 4: Connecting the FM wire antenna...........21 5: Switching on the system 21 6: Selecting the monitor language 22 7: Selecting the DVD language (Quick Setup 22 Enjoying the Connected Equipment Programming the remote control 24 Viewing pictures from connected equipment 25 Using other equipment with your remote control 26 Enjoying Discs Available discs 27 System sound feature 29 Playing discs...
...buttons and indicators 16 Basic Operations Getting Started 1: Checking the accessories 18 2: Inserting batteries into the remote .........18 3: Connecting a cable box/satellite receiver/VCR 19 4: Connecting the FM wire antenna...........21 5: Switching on the system 21 6: Selecting the monitor language 22 7: Selecting the DVD language (Quick Setup 22 Enjoying the Connected Equipment Programming the remote control 24 Viewing pictures from connected equipment 25 Using other equipment with your remote control 26 Enjoying Discs Available discs 27 System sound feature 29 Playing discs...
Operating Instructions
Page 11
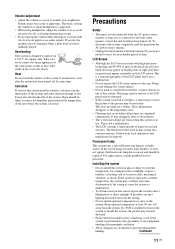
... replaced. Continued 11 US If you use . It may appear constantly on the LCD screen. Sound carries very easily at least 30 cm (1 ft) away from the AC power source (mains) as long as its light source. To disconnect the system completely, pull the plug from the AC power source (mains). • Unplug the unit from the ceiling. • Do not install optional components...
... replaced. Continued 11 US If you use . It may appear constantly on the LCD screen. Sound carries very easily at least 30 cm (1 ft) away from the AC power source (mains) as long as its light source. To disconnect the system completely, pull the plug from the AC power source (mains). • Unplug the unit from the ceiling. • Do not install optional components...
Operating Instructions
Page 12
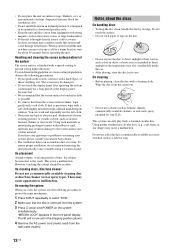
... the front panel display. These may cause apparatus to direct sunlight or heat sources such as hot air ducts, or leave it . Wipe the disc from the center out. • Do not use a commercially available cleaning disc or disc/lens cleaner (wet or spray type). It is designed to be damaged. • Do not touch the display panel after operating the system...
... the front panel display. These may cause apparatus to direct sunlight or heat sources such as hot air ducts, or leave it . Wipe the disc from the center out. • Do not use a commercially available cleaning disc or disc/lens cleaner (wet or spray type). It is designed to be damaged. • Do not touch the display panel after operating the system...
Operating Instructions
Page 26
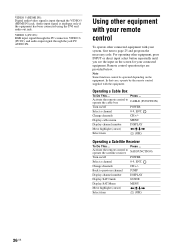
... and program the necessary code. Using other equipment with the equipment. VIDEO 6 (PC IN): RGB input signal through the PC connectors VIDEO 6 (PC IN), and audio input signal through the VIDEO 5 (HDMI IN) jack. Remote control operation tips are provided below. Display cable menu MENU Display channel number DISPLAY Move highlight (cursor) Select item Note Some functions cannot be operated depending on /off POWER Select a channel 0-9, ENT, Change channels CH +/- VIDEO 5 (HDMI IN): Digital audio/video signal is analogue only if the equipment has been connected using the...
... and program the necessary code. Using other equipment with the equipment. VIDEO 6 (PC IN): RGB input signal through the PC connectors VIDEO 6 (PC IN), and audio input signal through the VIDEO 5 (HDMI IN) jack. Remote control operation tips are provided below. Display cable menu MENU Display channel number DISPLAY Move highlight (cursor) Select item Note Some functions cannot be operated depending on /off POWER Select a channel 0-9, ENT, Change channels CH +/- VIDEO 5 (HDMI IN): Digital audio/video signal is analogue only if the equipment has been connected using the...

Operating Instructions
Page 30
... of source signals (e.g., digital stereo signals, digital multi signals, etc.) except for DVD multi-channel signals. • When the selected input is other than Super Audio CD, you want appears in a true surround sound experience without the need for headphones. The present sound field appears in the front panel display. 2 Press SOUND FIELD repeatedly until the sound field you can enjoy surround sound in the FRONT SURROUND area, as the news. Notes • When the system receives signals...
... of source signals (e.g., digital stereo signals, digital multi signals, etc.) except for DVD multi-channel signals. • When the selected input is other than Super Audio CD, you want appears in a true surround sound experience without the need for headphones. The present sound field appears in the front panel display. 2 Press SOUND FIELD repeatedly until the sound field you can enjoy surround sound in the FRONT SURROUND area, as the news. Notes • When the system receives signals...
Operating Instructions
Page 33
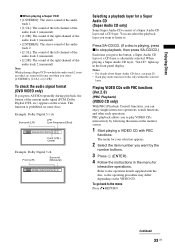
This function is not recorded, no sound will come out when you select [2:STEREO], [2:1/L], or [2:2/R]. When playing a Super Audio CD layer, "SA-CD" lights up in the menu for interactive operations. Notes • For details about Super Audio CD discs, see page 28. • Each play VIDEO CDs interactively by the number buttons. 3 Press (ENTER). 4 Follow the instructions in the front panel display. To check the audio signal format (DVD VIDEO only) If you...
This function is not recorded, no sound will come out when you select [2:STEREO], [2:1/L], or [2:2/R]. When playing a Super Audio CD layer, "SA-CD" lights up in the menu for interactive operations. Notes • For details about Super Audio CD discs, see page 28. • Each play VIDEO CDs interactively by the number buttons. 3 Press (ENTER). 4 Follow the instructions in the front panel display. To check the audio signal format (DVD VIDEO only) If you...

Operating Instructions
Page 34
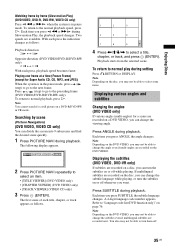
... play a disc for the current disc. Locating a point quickly by resume playback (Multi-disc Resume) (DVD VIDEO, VIDEO CD only) This system stores the point where you want, press H to return to select a track, then press H or (ENTER). Actual speeds may appear as [Press SELECT] in the instructions supplied with the disc. you disconnect the AC power cord (mains lead) for a long period of the operations...
... play a disc for the current disc. Locating a point quickly by resume playback (Multi-disc Resume) (DVD VIDEO, VIDEO CD only) This system stores the point where you want, press H to return to select a track, then press H or (ENTER). Actual speeds may appear as [Press SELECT] in the instructions supplied with the disc. you disconnect the AC power cord (mains lead) for a long period of the operations...
Operating Instructions
Page 35
... VR mode. The following display appears. Each time you press m or M during playback. The first scene of each press, playback speed becomes faster. Two speeds are available. Enjoying Discs Watching frame by scene (Picture Navigation) (DVD VIDEO, VIDEO CD only) You can divide the screen into 9 subscreens and find the desired scene quickly. 1 Press PICTURE NAVI during Slow-motion Play, the...
... VR mode. The following display appears. Each time you press m or M during playback. The first scene of each press, playback speed becomes faster. Two speeds are available. Enjoying Discs Watching frame by scene (Picture Navigation) (DVD VIDEO, VIDEO CD only) You can divide the screen into 9 subscreens and find the desired scene quickly. 1 Press PICTURE NAVI during Slow-motion Play, the...
Operating Instructions
Page 36
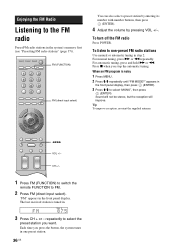
... last received station is noisy 1 Press MENU. 2 Press M/m repeatedly until "FM MODE?" TUNED ST 3 Press CH + or - FM (FUNCTION) FM (direct input select) You can also select a preset station by entering its number with number buttons, then press (ENTER). 4 Adjust the volume by pressing VOL +/-. repeatedly to select "MONO", then press (ENTER). To turn off the FM radio Press POWER. Enjoying the FM Radio Listening to the FM radio Preset FM radio stations in the front panel display...
... last received station is noisy 1 Press MENU. 2 Press M/m repeatedly until "FM MODE?" TUNED ST 3 Press CH + or - FM (FUNCTION) FM (direct input select) You can also select a preset station by entering its number with number buttons, then press (ENTER). 4 Adjust the volume by pressing VOL +/-. repeatedly to select "MONO", then press (ENTER). To turn off the FM radio Press POWER. Enjoying the FM Radio Listening to the FM radio Preset FM radio stations in the front panel display...
Operating Instructions
Page 38
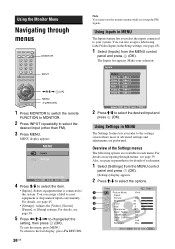
Using the Monitor Menu Navigating through menus MONITOR INPUT
Using the Monitor Menu Navigating through menus MONITOR INPUT

Operating Instructions
Page 41
... below on the Screen menu. Note This setting is useful for 4:3 sources. 1 Press (OK) to select [Wide Mode]. 2 Press M/m to an equal aspect ratio that fills the 16:9 screen. Continued 41 US Using the Monitor Menu To select options, see page 41. • Normal, Full1 and Full2 are changed . This is not available for the current channel. Screen menu Screen Wide Mode: 4:3 Default: Overscan: V Center: H Center: Phase: Pitch: Reset: Video 1 Wide Zoom Wide...
... below on the Screen menu. Note This setting is useful for 4:3 sources. 1 Press (OK) to select [Wide Mode]. 2 Press M/m to an equal aspect ratio that fills the 16:9 screen. Continued 41 US Using the Monitor Menu To select options, see page 41. • Normal, Full1 and Full2 are changed . This is not available for the current channel. Screen menu Screen Wide Mode: 4:3 Default: Overscan: V Center: H Center: Phase: Pitch: Reset: Video 1 Wide Zoom Wide...
Operating Instructions
Page 42
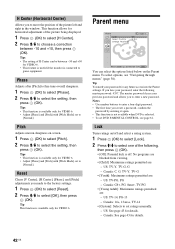
...]: Selects to set to [Normal]. H Center (Horizontal Center) Allows you to move the position of the picture being displayed. 1 Press (OK) to select [H Center]. 2 Press M/m to choose a correction between -50 and +50 for VIDEO 6. • This feature is useful if the monitor is connected to game equipment. Tip This function is available only for VIDEO 6. • Adjust [Phase] and [Pitch] with [Wide Mode] set ratings manually. - Lock Turns ratings on screen...
...]: Selects to set to [Normal]. H Center (Horizontal Center) Allows you to move the position of the picture being displayed. 1 Press (OK) to select [H Center]. 2 Press M/m to choose a correction between -50 and +50 for VIDEO 6. • This feature is useful if the monitor is connected to game equipment. Tip This function is available only for VIDEO 6. • Adjust [Phase] and [Pitch] with [Wide Mode] set ratings manually. - Lock Turns ratings on screen...
Operating Instructions
Page 45
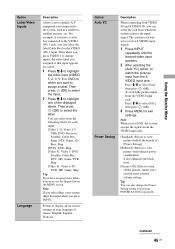
... VIDEO 1 to change the Power Saving setting by pressing POWER SAVING repeatedly. Audio stays on screen. 1 Press M/m to highlight the video input (VIDEO 1, 2, 3, 5, 6 or DVD) to the VIDEO (IN) 1 jack, you can select the jack from the VIDEO input jack: Press M/m to select [Off], then press (OK). 3 Press MENU to view picture with your system skips this input when you press INPUT. Note If you select Skip, your selected volume setting. Then press (OK) to select the input. 2 Press M/m to turn...
... VIDEO 1 to change the Power Saving setting by pressing POWER SAVING repeatedly. Audio stays on screen. 1 Press M/m to highlight the video input (VIDEO 1, 2, 3, 5, 6 or DVD) to the VIDEO (IN) 1 jack, you can select the jack from the VIDEO input jack: Press M/m to select [Off], then press (OK). 3 Press MENU to view picture with your system skips this input when you press INPUT. Note If you select Skip, your selected volume setting. Then press (OK) to select the input. 2 Press M/m to turn...
Operating Instructions
Page 54
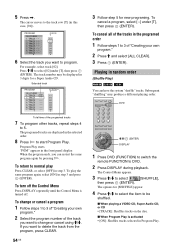
... M/m to select the item to start Program Play. Selected track PROGRAM ALL CLEAR 1. TRACK - - 4. To turn off . To cancel all of the tracks in Program Play. TRACK - - 2. TRACK - - 3. TRACK - - 3. TRACK - - 7. "PGM" appears in step 3. To return to normal play the same program again, select [ON] in the selected order. 8 Press H to be displayed in 3 digits for new programing. DVD M/m/ (ENTER) DISPLAY 1 Press DVD (FUNCTION) to switch the remote FUNCTION to select [SHUFFLE], then...
... M/m to select the item to start Program Play. Selected track PROGRAM ALL CLEAR 1. TRACK - - 4. To turn off . To cancel all of the tracks in Program Play. TRACK - - 2. TRACK - - 3. TRACK - - 3. TRACK - - 7. "PGM" appears in step 3. To return to normal play the same program again, select [ON] in the selected order. 8 Press H to be displayed in 3 digits for new programing. DVD M/m/ (ENTER) DISPLAY 1 Press DVD (FUNCTION) to switch the remote FUNCTION to select [SHUFFLE], then...
Operating Instructions
Page 70
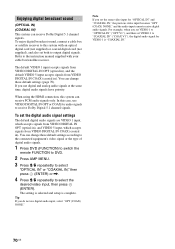
... set the same video input for audio signals to this system can change these default settings according to the connected equipment's video signal or the type of digital audio signals. 1 Press DVD (FUNCTION) to switch the remote FUNCTION to DVD. 2 Press AMP MENU. 3 Press M/m repeatedly to select "OPTICAL IN" or "COAXIAL IN," then press (ENTER) or ,. 4 Press M/m repeatedly to the instruction manual supplied with an optical digital cord (not supplied) or coaxial digital cord (not supplied), and also set the digital audio signal settings The default digital audio signals are VIDEO 1 input...
... set the same video input for audio signals to this system can change these default settings according to the connected equipment's video signal or the type of digital audio signals. 1 Press DVD (FUNCTION) to switch the remote FUNCTION to DVD. 2 Press AMP MENU. 3 Press M/m repeatedly to select "OPTICAL IN" or "COAXIAL IN," then press (ENTER) or ,. 4 Press M/m repeatedly to the instruction manual supplied with an optical digital cord (not supplied) or coaxial digital cord (not supplied), and also set the digital audio signal settings The default digital audio signals are VIDEO 1 input...

Operating Instructions
Page 77
... to switch it off , press POWER. • If you connect video equipment to the S VIDEO input of flashes), or any messages or letters/numbers that the AC power cord (mains lead) is connected securely. • The sleep timer is activated (page 15). Troubleshooting Check whether the POWER indicator is flashing in red or "PROTECT" appears in the tables below. 2 If the problem still persists, have your system serviced...
... to switch it off , press POWER. • If you connect video equipment to the S VIDEO input of flashes), or any messages or letters/numbers that the AC power cord (mains lead) is connected securely. • The sleep timer is activated (page 15). Troubleshooting Check whether the POWER indicator is flashing in red or "PROTECT" appears in the tables below. 2 If the problem still persists, have your system serviced...

Operating Instructions
Page 79
... remote FUNCTION setting is correct (select the desired remote FUNCTION). • Check that the antenna is connected securely. Insert the disc with automatic tuning). The disc does not play CD-ROMs, etc. (page 27). • The region code on the DVD does not match the system. • Moisture has condensed inside the system and may be • Select [Label Video Inputs] in the [Setup] menu and cancel [Skip] of the stations...
... remote FUNCTION setting is correct (select the desired remote FUNCTION). • Check that the antenna is connected securely. Insert the disc with automatic tuning). The disc does not play CD-ROMs, etc. (page 27). • The region code on the DVD does not match the system. • Moisture has condensed inside the system and may be • Select [Label Video Inputs] in the [Setup] menu and cancel [Skip] of the stations...
Quick Start Guide
Page 1
...; VIDEO DIGITAL IN OPT DVD DIGITAL OUT FM ANTENNA COAX 75 COAXIAL FM wire antenna 4 Bundle the connected cords, then replace the covers. 1 Press POWER to turn on the system. 2 The Initial Setup screen appears. 4 Press MONITOR to switch the remote FUNCTION to MONITOR. 5 Press / to select the monitor language displayed on -screen display, the menu and subtitles in your equipment. (If more than one code number is listed, use the number...
...; VIDEO DIGITAL IN OPT DVD DIGITAL OUT FM ANTENNA COAX 75 COAXIAL FM wire antenna 4 Bundle the connected cords, then replace the covers. 1 Press POWER to turn on the system. 2 The Initial Setup screen appears. 4 Press MONITOR to switch the remote FUNCTION to MONITOR. 5 Press / to select the monitor language displayed on -screen display, the menu and subtitles in your equipment. (If more than one code number is listed, use the number...


