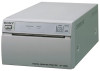
User Instructions
Page 2
... IEC/ISO Standards applicable to the equipments. 2. Operation of the FCC Rules. You are cautioned that any changes or modifications not expressly approved in this manual could increase when connected to other equipment. All interface cables used in the vicinity of patients. * Patient Vicinity R1...into different branch circuit. 2 Refer to these numbers in the space provided below. For the customers in Canada This unit has been certified according to qualified personnel only. Owner's Record The model and serial numbers are designed to provide reasonable protection against harmful ...
... IEC/ISO Standards applicable to the equipments. 2. Operation of the FCC Rules. You are cautioned that any changes or modifications not expressly approved in this manual could increase when connected to other equipment. All interface cables used in the vicinity of patients. * Patient Vicinity R1...into different branch circuit. 2 Refer to these numbers in the space provided below. For the customers in Canada This unit has been certified according to qualified personnel only. Owner's Record The model and serial numbers are designed to provide reasonable protection against harmful ...
User Instructions
Page 3
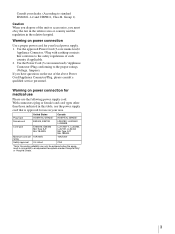
...plug or female) and cord types other than those indicated in this table, use the power supply cord that conforms to the proper ratings (Voltage, Ampere). Plug Type Female end United States HOSPITAL GRADE* E62405, E35708 Cord type E159216, E35496 Min.Type SJT Min.18 AWG Minimum cord set... be achieved when the equipment is approved for medical use Please use of the above Power Cord/Appliance Connector/Plug, please consult a qualified service personnel. Use the approved Power Cord (3-core mains lead) / Appliance Connector / Plug with earthing-contacts that is connected to an equivalent ...
...plug or female) and cord types other than those indicated in this table, use the power supply cord that conforms to the proper ratings (Voltage, Ampere). Plug Type Female end United States HOSPITAL GRADE* E62405, E35708 Cord type E159216, E35496 Min.Type SJT Min.18 AWG Minimum cord set... be achieved when the equipment is approved for medical use Please use of the above Power Cord/Appliance Connector/Plug, please consult a qualified service personnel. Use the approved Power Cord (3-core mains lead) / Appliance Connector / Plug with earthing-contacts that is connected to an equivalent ...
User Instructions
Page 4
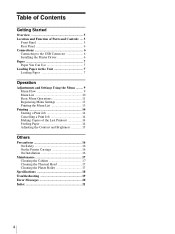
... of Parts and Controls .... 5 Front Panel 5 Rear Panel 6 Connections 6 Connecting to the USB Connector 6 Installing the Printer Driver 6 Paper 7 Paper You Can Use 7 Loading Paper in the Unit 7 Loading Paper 7 Operation Adjustments and Settings Using the Menu ......... 9 Menu Flow 9 Menu List 10 Basic Menu Operations 11 Registering Menu Settings 13 Printing the Menu List 13 Printing 14 Starting a Print Job 14 Cancelling a Print Job 14 Making Copies of the Last Printout 14 Feeding Paper 14 Adjusting...
... of Parts and Controls .... 5 Front Panel 5 Rear Panel 6 Connections 6 Connecting to the USB Connector 6 Installing the Printer Driver 6 Paper 7 Paper You Can Use 7 Loading Paper in the Unit 7 Loading Paper 7 Operation Adjustments and Settings Using the Menu ......... 9 Menu Flow 9 Menu List 10 Basic Menu Operations 11 Registering Menu Settings 13 Printing the Menu List 13 Printing 14 Starting a Print Job 14 Cancelling a Print Job 14 Making Copies of the Last Printout 14 Feeding Paper 14 Adjusting...
User Instructions
Page 5
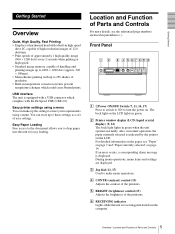
... display) (9, 14) The back light lights in normal operation, the paper currently selected is displayed. D CONTR (contrast) control (15) Adjusts the contrast of the printouts. F RECEIVING indicator Lights while the unit is equipped with the Hi-Speed USB (USB 2.0). Easy printer settings using a menu You can store up the settings to meet your requirements using a menu. Easy Paper Loading Free access to the door panel allows you to turn the power...
... display) (9, 14) The back light lights in normal operation, the paper currently selected is displayed. D CONTR (contrast) control (15) Adjusts the contrast of the printouts. F RECEIVING indicator Lights while the unit is equipped with the Hi-Speed USB (USB 2.0). Easy printer settings using a menu You can store up the settings to meet your requirements using a menu. Easy Paper Loading Free access to the door panel allows you to turn the power...
User Instructions
Page 6
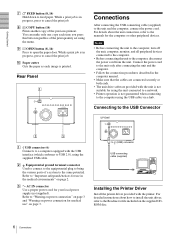
... terminal connector Used to connect to the equipotential plug to USB 2.0), using the USB cable via a hub. C - to (USB) connector USB connecting cable (supplied) Installing the Printer Driver Install the printer driver provided with the USB interface (which conforms to bring the various parts of the previous printout. For detailed instructions about the unit connection, refer to a network. • Printer operation is printed. I OPEN button (8, 14) Press to the computer, disconnect the power cord from...
... terminal connector Used to connect to the equipotential plug to USB 2.0), using the USB cable via a hub. C - to (USB) connector USB connecting cable (supplied) Installing the Printer Driver Install the printer driver provided with the USB interface (which conforms to bring the various parts of the previous printout. For detailed instructions about the unit connection, refer to a network. • Printer operation is printed. I OPEN button (8, 14) Press to the computer, disconnect the power cord from...
User Instructions
Page 7
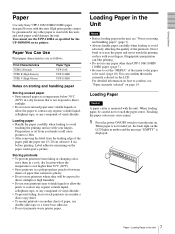
... they will be used with your fingers. When paper is not loaded yet, the back light on the LCD lights in umber and the message "EMPTY" is mounted with your fingers. Paper You Can Use Print paper characteristics are as specified for the UP-D890/890 series printer. Label adhesive remaining on page 14. Print Characteristics TYPE I (Normal) TYPE II (High Density) TYPE V (High Glossy) Paper Type UPP-110S UPP...
... they will be used with your fingers. When paper is not loaded yet, the back light on the LCD lights in umber and the message "EMPTY" is mounted with your fingers. Paper You Can Use Print paper characteristics are as specified for the UP-D890/890 series printer. Label adhesive remaining on page 14. Print Characteristics TYPE I (Normal) TYPE II (High Density) TYPE V (High Glossy) Paper Type UPP-110S UPP...

User Instructions
Page 8
... dust, dirt, etc. Printing is not possible if the paper is skewed, this could cause the paper to jam. • If you did not pull out enough paper in the paper tray. Notes • Make sure that the paper is loaded straight. Make sure that the paper is set the paper roll in step 3, press the FEED button on it is reversed. Remove label and pull out...
... dust, dirt, etc. Printing is not possible if the paper is skewed, this could cause the paper to jam. • If you did not pull out enough paper in the paper tray. Notes • Make sure that the paper is loaded straight. Make sure that the paper is set the paper roll in step 3, press the FEED button on it is reversed. Remove label and pull out...

User Instructions
Page 9
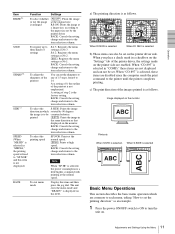
... a set up to three settings as you can make the settings for each menu item. Operation Adjustments and Settings Using the Menu You can carry out adjustments and settings to meet your individual preferences. You can store up the unit according to its intended purpose, connected equipments or your requirements. Operation 9 Adjustments and Settings Using the Menu Menu Flow The contents displayed on the LCD changes...
... a set up to three settings as you can make the settings for each menu item. Operation Adjustments and Settings Using the Menu You can carry out adjustments and settings to meet your individual preferences. You can store up the unit according to its intended purpose, connected equipments or your requirements. Operation 9 Adjustments and Settings Using the Menu Menu Flow The contents displayed on the LCD changes...
User Instructions
Page 10
... turn the jog dial. BACK: Cancels the setting change and returns to leave a margin using the FEED button, before cutting the paper. [FE: ON]: Feeds extra blank paper between 1 and 255 You can be used CO:895: UP-D895 driver conversion mode. Operation Menu List This section describes the menus displayed as contrast, information. BACK: Cancels the setting change and returns to be printed on the same sheet. To select the FE: OFF: Feeds...
... turn the jog dial. BACK: Cancels the setting change and returns to leave a margin using the FEED button, before cutting the paper. [FE: ON]: Feeds extra blank paper between 1 and 255 You can be used CO:895: UP-D895 driver conversion mode. Operation Menu List This section describes the menus displayed as contrast, information. BACK: Cancels the setting change and returns to be printed on the same sheet. To select the FE: OFF: Feeds...
User Instructions
Page 11
... the menu settings as follows. SPEED To select the (When printing speed "ME:HD" is selected in a checkbox on the "Settings" tab of the printer driver, the settings made on the monitor Printouts When S:STD is selected b) These items can also be set . When "CO:897" is displayed on . 11 Adjustments and Settings Using the Menu BACK: Cancels the setting change and returns to turn the unit on...
... the menu settings as follows. SPEED To select the (When printing speed "ME:HD" is selected in a checkbox on the "Settings" tab of the printer driver, the settings made on the monitor Printouts When S:STD is selected b) These items can also be set . When "CO:897" is displayed on . 11 Adjustments and Settings Using the Menu BACK: Cancels the setting change and returns to turn the unit on...

User Instructions
Page 12
... time after you set last is displayed. Note If about 20 seconds elapse without making any menu operation after you can select the printing direction. The unit enters the menu mode. The unit enters the mode in which is the factory setting, is displayed on the LCD lights in the LCD by turning the jog dial up or down . 12 Adjustments and Settings Using the Menu "DI...
... time after you set last is displayed. Note If about 20 seconds elapse without making any menu operation after you can select the printing direction. The unit enters the menu mode. The unit enters the mode in which is the factory setting, is displayed on the LCD lights in the LCD by turning the jog dial up or down . 12 Adjustments and Settings Using the Menu "DI...

User Instructions
Page 13
... purchase it, factory settings are registered as follows. 1 Load the settings of settings, even if you want to the normal printing mode. 13 Adjustments and Settings Using the Menu The unit retains these settings until you turn off the power. Loading the desired settings You can load the desired setting when needed. The unit starts printing the current menu settings. The display returns to the changed . Note When you changed in step...
... purchase it, factory settings are registered as follows. 1 Load the settings of settings, even if you want to the normal printing mode. 13 Adjustments and Settings Using the Menu The unit retains these settings until you turn off the power. Loading the desired settings You can load the desired setting when needed. The unit starts printing the current menu settings. The display returns to the changed . Note When you changed in step...
User Instructions
Page 14
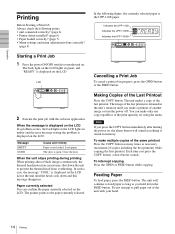
... the OPEN button or the FEED button. In the following points: • unit connected correctly? (page 6) • Printer driver installed? (page 6) • Paper loaded correctly? (page 7) • Menu settings and menu adjustments done correctly? (page 9) Starting a Print Job 1 Press the power ON/OFF switch to turn the power off. The pointer points to prevent the thermal head from overheating. To make multiple copies of the print quantity set using the menu...
... the OPEN button or the FEED button. In the following points: • unit connected correctly? (page 6) • Printer driver installed? (page 6) • Paper loaded correctly? (page 7) • Menu settings and menu adjustments done correctly? (page 9) Starting a Print Job 1 Press the power ON/OFF switch to turn the power off. The pointer points to prevent the thermal head from overheating. To make multiple copies of the print quantity set using the menu...
User Instructions
Page 15
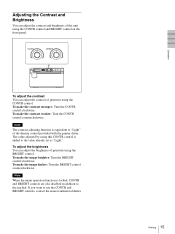
... the printer driver. To adjust the brightness You can adjust the contrast of the unit using this CONTR control is locked, CONTR and BRIGHT controls are also disabled in addition to the value already set as "Light." Note The contrast adjusting function is equivalent to use the CONTR and BRIGHT controls, contact the nearest authorized dealer. 15 Printing Operation To make the...
... the printer driver. To adjust the brightness You can adjust the contrast of the unit using this CONTR control is locked, CONTR and BRIGHT controls are also disabled in addition to the value already set as "Light." Note The contrast adjusting function is equivalent to use the CONTR and BRIGHT controls, contact the nearest authorized dealer. 15 Printing Operation To make the...

User Instructions
Page 16
Unplug the unit and have it checked by grasping the plug. On Installation • Place the unit on the rear of the unit to touch the paper cutter. Refer servicing to qualified personnel only. • Connect the power plug of the cabinet. The safety earth should be careful not to a ...) on the left in a room with a heater that tends to a warm room or when it for at least one hour. 16 Precautions When loading a paper or cleaning the unit, be properly established. If you use the unit with a power source specified in "Specifications". • Stop operation immediately if any...
Unplug the unit and have it checked by grasping the plug. On Installation • Place the unit on the rear of the unit to touch the paper cutter. Refer servicing to qualified personnel only. • Connect the power plug of the cabinet. The safety earth should be careful not to a ...) on the left in a room with a heater that tends to a warm room or when it for at least one hour. 16 Precautions When loading a paper or cleaning the unit, be properly established. If you use the unit with a power source specified in "Specifications". • Stop operation immediately if any...

User Instructions
Page 17
... is loaded in the paper tray, remove it . If the paper is displayed, and then press the jog dial. Touching the paper cutter may cause injury. 1 Press the power ON/OFF switch to ON to turn the unit on . 2 Press the OPEN button to touch the paper cutter. The unit starts cleaning the thermal head. Others Maintenance 3 Insert the cleaning sheet, with the unit. The menu item changed last is displayed. 6 Display "CLEAN...
... is loaded in the paper tray, remove it . If the paper is displayed, and then press the jog dial. Touching the paper cutter may cause injury. 1 Press the power ON/OFF switch to ON to turn the unit on . 2 Press the OPEN button to touch the paper cutter. The unit starts cleaning the thermal head. Others Maintenance 3 Insert the cleaning sheet, with the unit. The menu item changed last is displayed. 6 Display "CLEAN...
User Instructions
Page 18
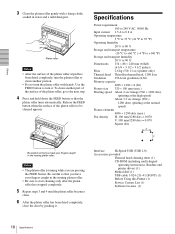
... completely, close the door by pushing it . Interface Hi-Speed USB (USB 2.0) Accessories provided Thermal head cleaning sheet (1) CD-ROM (including multi-lingual operating instructions, Readme and printer driver) (1) Media label (1) USB cable 1-824-211-41 (SONY) (1) Before Using this Printer (1) Service Contact List (1) Software License (1) 18 Specifications Specifications Power requirement 100 to 240 V AC, 50/60 Hz Input current 1.5 A to 0.8 A Operating temperature 5 °C to 35 °C (41 °F to 95...
... completely, close the door by pushing it . Interface Hi-Speed USB (USB 2.0) Accessories provided Thermal head cleaning sheet (1) CD-ROM (including multi-lingual operating instructions, Readme and printer driver) (1) Media label (1) USB cable 1-824-211-41 (SONY) (1) Before Using this Printer (1) Service Contact List (1) Software License (1) 18 Specifications Specifications Power requirement 100 to 240 V AC, 50/60 Hz Input current 1.5 A to 0.8 A Operating temperature 5 °C to 35 °C (41 °F to 95...
User Instructions
Page 19
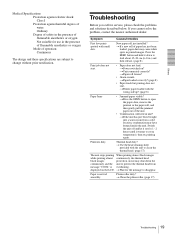
... the platen roller. (page 17) 19 Troubleshooting Printouts dirty. displayed on ? Paper is overheating. If you call for service, please check the problems and solutions described below. Symptom Causes/remedies First few prints spotted with the wrong side up? (page 8) Paper Jams • Jammed paper visible? Press the FEED button and hold it warms to prevent the thermal head from a cold location, condensation may cause...
... the platen roller. (page 17) 19 Troubleshooting Printouts dirty. displayed on ? Paper is overheating. If you call for service, please check the problems and solutions described below. Symptom Causes/remedies First few prints spotted with the wrong side up? (page 8) Paper Jams • Jammed paper visible? Press the FEED button and hold it warms to prevent the thermal head from a cold location, condensation may cause...
User Instructions
Page 20
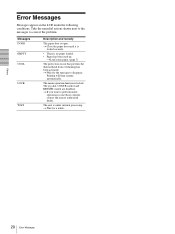
... circuit that prevents the thermal head from overheating has been activated. Others 20 Error Messages The unit is open. Messages DOOR EMPTY COOL LOCK WAIT Description and remedy The paper door is under the following conditions. Error Messages Messages appear on the LCD under internal processing. Take the remedial actions shown next to the messages to correct the problem. Printing will then resume automatically.
... circuit that prevents the thermal head from overheating has been activated. Others 20 Error Messages The unit is open. Messages DOOR EMPTY COOL LOCK WAIT Description and remedy The paper door is under the following conditions. Error Messages Messages appear on the LCD under internal processing. Take the remedial actions shown next to the messages to correct the problem. Printing will then resume automatically.
User Instructions
Page 21
... 17 cleaning the thermal head 17 Menu basic operations 11 list 10 loading the menu settings 13 menu flow 9 printing the menu list 13 storing the menu settings 13 O Overview 5 P Paper feeding 14 loading 7 notes on storing and handling 7 paper you can use 7 Precautions on installation 16 paper cutter 16 printer carriage 16 safety 16 Printer driver 6 Printing adjusting the brightness 15 adjusting the contrast 15 cancelling 14 staring a print job 14 S Specifications 18 T Troubleshooting...
... 17 cleaning the thermal head 17 Menu basic operations 11 list 10 loading the menu settings 13 menu flow 9 printing the menu list 13 storing the menu settings 13 O Overview 5 P Paper feeding 14 loading 7 notes on storing and handling 7 paper you can use 7 Precautions on installation 16 paper cutter 16 printer carriage 16 safety 16 Printer driver 6 Printing adjusting the brightness 15 adjusting the contrast 15 cancelling 14 staring a print job 14 S Specifications 18 T Troubleshooting...


