Service Manual
Page 8
... image size selector on the Rear Panel ....... 23 Paper 25 Loading Paper 26 Operation Printing 27 Making Printouts 27 Selecting the Printing Direction/Image Size ...... 28 Adjusting the Contrast and Brightness 30 Remotely Controlling the Printer 30 Others Precautions 31 Maintenance 31 Specifications 32 Troubleshooting 34 Location and Function of this manual clearly describes those differences. Easy and quick paper loading You can load paper just by setting the DIRECTION of DIP switch. • You can make a maximum of 11 copies of...
... image size selector on the Rear Panel ....... 23 Paper 25 Loading Paper 26 Operation Printing 27 Making Printouts 27 Selecting the Printing Direction/Image Size ...... 28 Adjusting the Contrast and Brightness 30 Remotely Controlling the Printer 30 Others Precautions 31 Maintenance 31 Specifications 32 Troubleshooting 34 Location and Function of this manual clearly describes those differences. Easy and quick paper loading You can load paper just by setting the DIRECTION of DIP switch. • You can make a maximum of 11 copies of...
Service Manual
Page 9
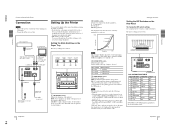
... of DIP switch C on the rear panel is set to 4 : 3. • When the image size selector is set to a position other conditions except those above, the print line density is not set to high and the print quality is standard even if you do not need to change the DIP switch settings Use a small pointed tool such as follows. FUNCTION 1 INTERRUPT 2 POSTFEED 3 ASPECT 4 MEMORY 5 DIRECTION 6 SCAN 7 8 OUTPUT 9 AGC 10...
... of DIP switch C on the rear panel is set to 4 : 3. • When the image size selector is set to a position other conditions except those above, the print line density is not set to high and the print quality is standard even if you do not need to change the DIP switch settings Use a small pointed tool such as follows. FUNCTION 1 INTERRUPT 2 POSTFEED 3 ASPECT 4 MEMORY 5 DIRECTION 6 SCAN 7 8 OUTPUT 9 AGC 10...
Service Manual
Page 10
... screen is progressively widened in memory. When you press the PRINT button during printing in helping to save paper by the printer. 9 AGC (Automatic Gain Control) switch Adjusts the input signal to the optimum printing level. Paper Use only UPP-110S/110HD/110HG paper as specified for the UP-895/895MD/895CE. When loading paper • Do not fold the paper or touch the printing surface. Do not allow any...
... screen is progressively widened in memory. When you press the PRINT button during printing in helping to save paper by the printer. 9 AGC (Automatic Gain Control) switch Adjusts the input signal to the optimum printing level. Paper Use only UPP-110S/110HD/110HG paper as specified for the UP-895/895MD/895CE. When loading paper • Do not fold the paper or touch the printing surface. Do not allow any...
Service Manual
Page 11
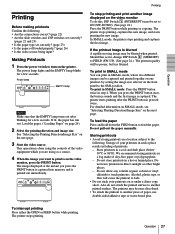
... paper tray straight, this , DIP Switch 1 (INTERRUPT) must be blurred when printed. The printer stops printing, captures the new image, and starts printing the new image. For detailed information on SMALL mode, see "Selecting Printing Direction/Image Size" on page 26) 2 Select the printing direction and image size. Alcohol, plastic tape or film will not be careful not to ON (SW-DOWN). (See page 24.) Press the PRINT button while printing or copying. The printout may be set...
... paper tray straight, this , DIP Switch 1 (INTERRUPT) must be blurred when printed. The printer stops printing, captures the new image, and starts printing the new image. For detailed information on SMALL mode, see "Selecting Printing Direction/Image Size" on page 26) 2 Select the printing direction and image size. Alcohol, plastic tape or film will not be careful not to ON (SW-DOWN). (See page 24.) Press the PRINT button while printing or copying. The printout may be set...
Service Manual
Page 12
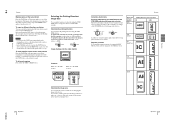
... changing the image size selector. To interrupt copying Press either the OPEN or FEED button. Each time you press the PRINT button again or turn the power off. To print in the same direction as necessary (maximum 11 copies including the first printout) while printing or copying the first printout. Selecting the printing direction You can print in the video monitor, set the selector to variations in memory. • In the SMALL mode...
... changing the image size selector. To interrupt copying Press either the OPEN or FEED button. Each time you press the PRINT button again or turn the power off. To print in the same direction as necessary (maximum 11 copies including the first printout) while printing or copying the first printout. Selecting the printing direction You can print in the video monitor, set the selector to variations in memory. • In the SMALL mode...
Service Manual
Page 13
... using the cleaning sheet supplied . 1 Press the power switch to turn the power off the power and allow the printer to stand for a long time. To make the image brighter, turn the BRIGHT control counterclockwise. On the printer carriage Do not carry or move the printer when the paper roll is set to ON (SW-DOWN). (See page 24.) Note To adjust the contrast and brightness while confirming the adjusted image on a level...
... using the cleaning sheet supplied . 1 Press the power switch to turn the power off the power and allow the printer to stand for a long time. To make the image brighter, turn the BRIGHT control counterclockwise. On the printer carriage Do not carry or move the printer when the paper roll is set to ON (SW-DOWN). (See page 24.) Note To adjust the contrast and brightness while confirming the adjusted image on a level...

Service Manual
Page 14
... mm SIDE mode EIA: 126 × 96 mm CCIR: 126 × 95 mm Printing speed (in STD and NOR mode) About 3.9 seconds/screen (at factory settings) Picture memory 800 K × 8 bits for use in the presence of flammable anesthetics or oxygen Mode of LOW pulse over 100 msec. Supplied accessories Paper roll (UPP-110HG) (1) BNC y BNC connecting cable (1) AC power cord (1) Head cleaning sheet (1) Media label (1) The following specifications...
... mm SIDE mode EIA: 126 × 96 mm CCIR: 126 × 95 mm Printing speed (in STD and NOR mode) About 3.9 seconds/screen (at factory settings) Picture memory 800 K × 8 bits for use in the presence of flammable anesthetics or oxygen Mode of LOW pulse over 100 msec. Supplied accessories Paper roll (UPP-110HG) (1) BNC y BNC connecting cable (1) AC power cord (1) Head cleaning sheet (1) Media label (1) The following specifications...
Service Manual
Page 15
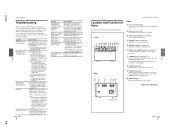
...-895/(E) Others Troubleshooting Troubleshooting The following troubleshooting checks will help you correct the most common problems you press the PRINT button is stored in memory. 0 EMPTY lamp (27) Lights when the printer is out of paper. Before proceeding with your Sony dealer or local authorized Sony service facility. In such a case, the EMPTY lamp blinks. Wait until clean paper appears. (page 26) • Paper does not feed. t Is the paper loaded correctly? • Paper feeds, but printing...
...-895/(E) Others Troubleshooting Troubleshooting The following troubleshooting checks will help you correct the most common problems you press the PRINT button is stored in memory. 0 EMPTY lamp (27) Lights when the printer is out of paper. Before proceeding with your Sony dealer or local authorized Sony service facility. In such a case, the EMPTY lamp blinks. Wait until clean paper appears. (page 26) • Paper does not feed. t Is the paper loaded correctly? • Paper feeds, but printing...
Service Manual
Page 30
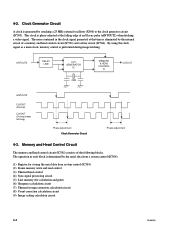
... storing the serial data from system control (IC304) (2) Frame memory write and read control (3) Thermal head control (4) Sync signal processing circuit (5) Line memory (for calculation and print) (6) Sharpness calculation circuit (7) Thermal storage correction calculation circuit (8) Count correction calculation circuit (9) Image scaling calculation circuit 4-4 UP-895/(E) By using the clock signal as a main clock, memory control is performed during image fetching. nINTOUT2 DELAY LINE CLK GENERATOR IC 23M MEMORY & HEAD CONTROL IC...
... storing the serial data from system control (IC304) (2) Frame memory write and read control (3) Thermal head control (4) Sync signal processing circuit (5) Line memory (for calculation and print) (6) Sharpness calculation circuit (7) Thermal storage correction calculation circuit (8) Count correction calculation circuit (9) Image scaling calculation circuit 4-4 UP-895/(E) By using the clock signal as a main clock, memory control is performed during image fetching. nINTOUT2 DELAY LINE CLK GENERATOR IC 23M MEMORY & HEAD CONTROL IC...
Service Manual
Page 42
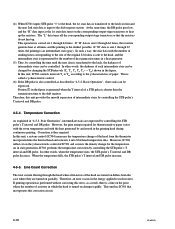
... and DR pulse decrease. Therefore, this unit, a system control (IC304) measures the temperature change for thermosensitive paper varies with the room temperature and with the number of sending times corresponding to the size of the original 8-bit data is sent to the γ characteristics of resistors in the printing head during continuous printing. However, the print energy required for the temperature. In this...
... and DR pulse decrease. Therefore, this unit, a system control (IC304) measures the temperature change for thermosensitive paper varies with the room temperature and with the number of sending times corresponding to the size of the original 8-bit data is sent to the γ characteristics of resistors in the printing head during continuous printing. However, the print energy required for the temperature. In this...

Service Manual
Page 53
... UP-895/(E) 7-1 The semiconductors in the manual or on the CD-ROM are based on the IC manufacturer's data book. Thus the external view or the index mark indication may differ from the actual type. Pin assignments and block diagrams are listed by semiconductor type or ID No. For semiconductors marked with ID Nos., refer to the Spare Parts...
... UP-895/(E) 7-1 The semiconductors in the manual or on the CD-ROM are based on the IC manufacturer's data book. Thus the external view or the index mark indication may differ from the actual type. Pin assignments and block diagrams are listed by semiconductor type or ID No. For semiconductors marked with ID Nos., refer to the Spare Parts...

Service Manual
Page 83
... operated digital multimeters that is suitable for AC leakage. Measuring the voltage drop across a resistor by any one of a passive VOM that have an accurate lowvoltage scale. A) To Exposed Metal Parts on Set 0.15 µF 1.5 kZ AC voltmeter (5.25V) Earth Ground Fig A. UP-895/(E) SAFETY CHECK-OUT After correcting the original service problem, perform the following safety checks...
... operated digital multimeters that is suitable for AC leakage. Measuring the voltage drop across a resistor by any one of a passive VOM that have an accurate lowvoltage scale. A) To Exposed Metal Parts on Set 0.15 µF 1.5 kZ AC voltmeter (5.25V) Earth Ground Fig A. UP-895/(E) SAFETY CHECK-OUT After correcting the original service problem, perform the following safety checks...
User Instructions
Page 20
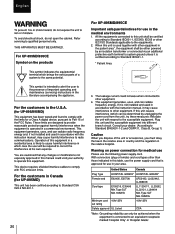
... equipment is not installed and used in your area. Plug this table, use in accordance with FCC emission limits. For UP-895MD/895CE Symbol on power connection for medical use Please use in a commercial environment. This equipment generates, uses, and can be certified according to this equipment. This device requires shielded interface cables to comply with the instruction manual, may cause...
... equipment is not installed and used in your area. Plug this table, use in accordance with FCC emission limits. For UP-895MD/895CE Symbol on power connection for medical use Please use in a commercial environment. This equipment generates, uses, and can be certified according to this equipment. This device requires shielded interface cables to comply with the instruction manual, may cause...
User Instructions
Page 21
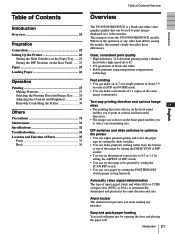
... Prepration Connection 22 Setting Up the Printer 22 Setting the Slide Switches on the Paper Tray..... 22 Setting the DIP Switches on the Rear Panel ....... 23 Paper 25 Loading Paper 26 Operation Printing 27 Making Printouts 27 Selecting the Printing Direction/Image Size ...... 28 Adjusting the Contrast and Brightness 30 Remotely Controlling the Printer 30 Others Precautions 31 Maintenance 31 Specifications 32 Troubleshooting 34 Location and Function of input signal, black and white (EIA or CCIR) or input color...
... Prepration Connection 22 Setting Up the Printer 22 Setting the Slide Switches on the Paper Tray..... 22 Setting the DIP Switches on the Rear Panel ....... 23 Paper 25 Loading Paper 26 Operation Printing 27 Making Printouts 27 Selecting the Printing Direction/Image Size ...... 28 Adjusting the Contrast and Brightness 30 Remotely Controlling the Printer 30 Others Precautions 31 Maintenance 31 Specifications 32 Troubleshooting 34 Location and Function of input signal, black and white (EIA or CCIR) or input color...

User Instructions
Page 25
...; Before loading the paper roll, remove the label attached to the top of paper is black and white, set the switch to this switch set the 75Ω switch of one of paper, use the UPP-110HA paper as specified for the UP-880/890MD/890CE. COLOR (SW-UP): When the signal is connected to the VIDEO OUT connector, set the switch to this position to adjust the...
...; Before loading the paper roll, remove the label attached to the top of paper is black and white, set the switch to this switch set the 75Ω switch of one of paper, use the UPP-110HA paper as specified for the UP-880/890MD/890CE. COLOR (SW-UP): When the signal is connected to the VIDEO OUT connector, set the switch to this position to adjust the...
User Instructions
Page 26
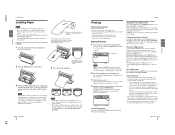
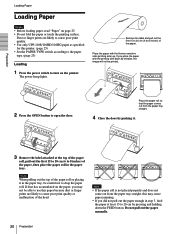
... . 3 Remove the label attached at least 15 to 8 inches) of the head. Place the paper with the printing side down the FEED button. Preparation Loading Paper Loading Paper Notes • Before loading paper, read "Paper" on the printer. If dust has accumulated on the paper, you may not be printed. 2 Press the OPEN button to use this may cause paper jamming. • If you place the paper with the thermo-sensitive side (printing side) up. The power...
... . 3 Remove the label attached at least 15 to 8 inches) of the head. Place the paper with the printing side down the FEED button. Preparation Loading Paper Loading Paper Notes • Before loading paper, read "Paper" on the printer. If dust has accumulated on the paper, you may not be printed. 2 Press the OPEN button to use this may cause paper jamming. • If you place the paper with the thermo-sensitive side (printing side) up. The power...
User Instructions
Page 27
... . Printing To stop printing and print another printed surface. Should this , DIP Switch 1 (INTERRUPT) must be captured and printed together on one printout, by setting the image size selector on the next page. The printer starts printing after blinking for a few seconds. For detailed information on SMALL mode, see "Selecting Printing Direction/Image Size" on the front panel to another image displayed on or under a diazo copy sheet. Do not pull out the paper manually. Storing...
... . Printing To stop printing and print another printed surface. Should this , DIP Switch 1 (INTERRUPT) must be captured and printed together on one printout, by setting the image size selector on the next page. The printer starts printing after blinking for a few seconds. For detailed information on SMALL mode, see "Selecting Printing Direction/Image Size" on the front panel to another image displayed on or under a diazo copy sheet. Do not pull out the paper manually. Storing...

User Instructions
Page 31
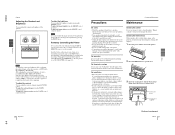
... to direct sunlight or excessive dust, humidity, mechanical shock or vibration. • Provide adequate air circulation to a wall outlet with a heater that tends to clean the printer. Avoid locations near heat sources. Cleaning the thermal head If the printout is placed in paper tray. On operation Do not turn on a level and stable surface. Others Precautions/Maintenance Precautions Maintenance On safety • Check the operating...
... to direct sunlight or excessive dust, humidity, mechanical shock or vibration. • Provide adequate air circulation to a wall outlet with a heater that tends to clean the printer. Avoid locations near heat sources. Cleaning the thermal head If the printout is placed in paper tray. On operation Do not turn on a level and stable surface. Others Precautions/Maintenance Precautions Maintenance On safety • Check the operating...

User Instructions
Page 32
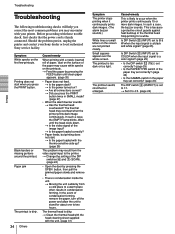
... the printer. • Clean the head only when necessary. Specifications Power requirements and consumption 100 to 120 V AC, 50/60 Hz, 1.5 A 220 to 240 V AC, 50/60 Hz, 0.8 A Operating temperature 5°C to 35°C (41°F to 95°F) Operating humidity 20 % to open the door and remove the cleaning sheet. 7 Close the door by pushing it. 5 Press the FEED button and keep it...
... the printer. • Clean the head only when necessary. Specifications Power requirements and consumption 100 to 120 V AC, 50/60 Hz, 1.5 A 220 to 240 V AC, 50/60 Hz, 0.8 A Operating temperature 5°C to 35°C (41°F to 95°F) Operating humidity 20 % to open the door and remove the cleaning sheet. 7 Close the door by pushing it. 5 Press the FEED button and keep it...
User Instructions
Page 34
... paper tray set correctly? (page 23) • Is the GAMMA switch in the thermal head. In such a case, the EMPTY lamp blinks. Before proceeding with the thermo-sensitive side up in the paper tray set correctly? (page 23) The DIP switch 3 (ASPECT) is condensation inside the unit. t Feed the paper by pressing the OPEN button, then pull the jammed paper slowly and remove it continuously prints dark images. (The alarm buzzer sounds.) White lines...
... paper tray set correctly? (page 23) • Is the GAMMA switch in the thermal head. In such a case, the EMPTY lamp blinks. Before proceeding with the thermo-sensitive side up in the paper tray set correctly? (page 23) The DIP switch 3 (ASPECT) is condensation inside the unit. t Feed the paper by pressing the OPEN button, then pull the jammed paper slowly and remove it continuously prints dark images. (The alarm buzzer sounds.) White lines...


