
VAIO User Guide
Page 8
... audio, video, computing, and communications to provide state-of the Sony® VAIO® computer. computer. Inserting the media improperly may damage the Insert the Memory Stick media with the arrow facing up and toward the slot. Front Page 8 Front 1 LCD screen 10 Memory Stick® media indicator 2 Mute button 11 Wireless switch1 3 Volume buttons 12 Bluetooth® indicator1 4 Brightness button 13 Wireless indicator1 5 Magnify screen button 14 Power indicator 6 S1 button 15 Battery indicator 7 Keyboard 16 Hard disk drive indicator 8 Touch pad 17 Optical drive...
... audio, video, computing, and communications to provide state-of the Sony® VAIO® computer. computer. Inserting the media improperly may damage the Insert the Memory Stick media with the arrow facing up and toward the slot. Front Page 8 Front 1 LCD screen 10 Memory Stick® media indicator 2 Mute button 11 Wireless switch1 3 Volume buttons 12 Bluetooth® indicator1 4 Brightness button 13 Wireless indicator1 5 Magnify screen button 14 Power indicator 6 S1 button 15 Battery indicator 7 Keyboard 16 Hard disk drive indicator 8 Touch pad 17 Optical drive...

VAIO User Guide
Page 11
The drive eject button located next to eject the optical drive tray. Bottom 1 Port replicator connector 4 RELEASE switch 2 Air vents 5 Battery bay 3 LOCK/UNLOCK switch 6 CONNECT button1 1 O n s elec ted models with Microsoft® Windows® operating system. Page 11 1 Drive eject button 4 Manual eject hole 2 Optical drive 5 Modem jack 3 Drive eject button You can use either drive eject button to the optical drive functions only with wireles s mous e func tionality.
The drive eject button located next to eject the optical drive tray. Bottom 1 Port replicator connector 4 RELEASE switch 2 Air vents 5 Battery bay 3 LOCK/UNLOCK switch 6 CONNECT button1 1 O n s elec ted models with Microsoft® Windows® operating system. Page 11 1 Drive eject button 4 Manual eject hole 2 Optical drive 5 Modem jack 3 Drive eject button You can use either drive eject button to the optical drive functions only with wireles s mous e func tionality.

VAIO User Guide
Page 14
... this key to change how you scroll the display. Scroll Lock Press this indicator is on. Wireless LAN* Turns on when the wireless LAN function is running out of power, double-blinks when the battery is read from or written to the Memory Stick media. (Do not enter Standby mode or turn off the indicator. Letters appear in lowercase if you are using battery power, blinks when the battery is enabled. Normal typing resumes when the Caps Lock indicator is on. Memory...
... this key to change how you scroll the display. Scroll Lock Press this indicator is on. Wireless LAN* Turns on when the wireless LAN function is running out of power, double-blinks when the battery is read from or written to the Memory Stick media. (Do not enter Standby mode or turn off the indicator. Letters appear in lowercase if you are using battery power, blinks when the battery is enabled. Normal typing resumes when the Caps Lock indicator is on. Memory...

VAIO User Guide
Page 21
... the Num Lock key to activate the numeric keypad. (When you do so, the Num Lock indicator light turns on.) Press the Num Lock key again to keystrokes. The 12 function keys along the top of clicking the right mouse button. It is the equivalent of the keyboard perform designated tasks. For example, in combination with each function key may vary from a menu, you to make corrections to...
... the Num Lock key to activate the numeric keypad. (When you do so, the Num Lock indicator light turns on.) Press the Num Lock key again to keystrokes. The 12 function keys along the top of clicking the right mouse button. It is the equivalent of the keyboard perform designated tasks. For example, in combination with each function key may vary from a menu, you to make corrections to...

VAIO User Guide
Page 51
... on your customized power scheme, and click OK. Select the power scheme that enables you want to open the Power Options Properties window. 3. The Save Scheme window appears. 4. The Power Options Properties window appears. See Using power saving modes for your computer. Click Apply. To use VAIO Power Management VAIO Power Management is preset to utilize your power supply efficiently, according to different devices, such as the computer screen (LCD) and the hard disk drive, in the Power schemes box.
... on your customized power scheme, and click OK. Select the power scheme that enables you want to open the Power Options Properties window. 3. The Save Scheme window appears. 4. The Power Options Properties window appears. See Using power saving modes for your computer. Click Apply. To use VAIO Power Management VAIO Power Management is preset to utilize your power supply efficiently, according to different devices, such as the computer screen (LCD) and the hard disk drive, in the Power schemes box.

VAIO User Guide
Page 63
... Internet connection for the detailed settings and devices needed to connect to the Ethernet port . 3. Click Next. To connect to an Ethernet network from the Start menu, and then clicking Networking and the Web in the port. Page 63 Follow the on -screen instructions. You can connect to a remote network using a telephone or Ethernet cable 1. Connect an Ethernet or telephone cable to All Programs, Accessories, Communications, and click New Connection Wizard. 3. From the Start menu...
... Internet connection for the detailed settings and devices needed to connect to the Ethernet port . 3. Click Next. To connect to an Ethernet network from the Start menu, and then clicking Networking and the Web in the port. Page 63 Follow the on -screen instructions. You can connect to a remote network using a telephone or Ethernet cable 1. Connect an Ethernet or telephone cable to All Programs, Accessories, Communications, and click New Connection Wizard. 3. From the Start menu...
VAIO User Guide
Page 92
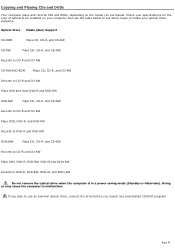
If you plan to DVD-R, DVD-RW, DVD+R, and DVD+RW Do not remove the optical drive when the computer is in a power saving mode (Standby or Hibernate). Copying and Playing CDs and DVDs Your computer plays and records CDs and DVDs, depending on your computer and use an external optical drive, connect the drive before you purchased. Optical Drive Media (disc) Support CD-ROM Plays CD, CD-R, and CD-RW...
If you plan to DVD-R, DVD-RW, DVD+R, and DVD+RW Do not remove the optical drive when the computer is in a power saving mode (Standby or Hibernate). Copying and Playing CDs and DVDs Your computer plays and records CDs and DVDs, depending on your computer and use an external optical drive, connect the drive before you purchased. Optical Drive Media (disc) Support CD-ROM Plays CD, CD-R, and CD-RW...

VAIO User Guide
Page 93
... computer's hardware devices appears. 3. The Volume Control dialog box appears. 2. To play an audio CD, you may appear, notifying you when a change occurs. Use the Volume icon. 1. Click to open the submenu. 4. Click OK. Insert the disc into the optical drive. 2. If nothing appears on -screen display may need to decrease volume. Click Start on the Taskbar Notification area. As a shortcut, you can adjust. A window with a listing of...
... computer's hardware devices appears. 3. The Volume Control dialog box appears. 2. To play an audio CD, you may appear, notifying you when a change occurs. Use the Volume icon. 1. Click to open the submenu. 4. Click OK. Insert the disc into the optical drive. 2. If nothing appears on -screen display may need to decrease volume. Click Start on the Taskbar Notification area. As a shortcut, you can adjust. A window with a listing of...

VAIO User Guide
Page 100
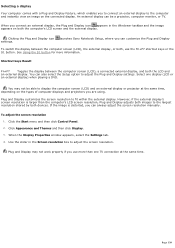
... a CD-RW/DVD-ROM drive can read most DVD-R media. This may cause the computer to the computer. Open a preinstalled DVD program, such as WinDVD software, to a TV and Selecting a display for more information. 4. Connect the external optical drive if you have audio devices connected, this may produce noise while playing. Reduce the volume before playing a DVD. Select a display. 1. Do not use one. Playing DVDs on either the computer screen (LCD) or...
... a CD-RW/DVD-ROM drive can read most DVD-R media. This may cause the computer to the computer. Open a preinstalled DVD program, such as WinDVD software, to a TV and Selecting a display for more information. 4. Connect the external optical drive if you have audio devices connected, this may produce noise while playing. Reduce the volume before playing a DVD. Select a display. 1. Do not use one. Playing DVDs on either the computer screen (LCD) or...
VAIO User Guide
Page 138
... Control Panel. 2. If the image is larger than one display (LCD or an external display) when playing a DVD. launches Sony Notebook Setup, where you can also select the Setup option to fit within the external display. You can customize the Plug and Display To switch the display between the computer screen (LCD), a connected external display, and both the LCD and an external display. However, if the external display's screen resolution is distorted, you can be able to adjust the screen...
... Control Panel. 2. If the image is larger than one display (LCD or an external display) when playing a DVD. launches Sony Notebook Setup, where you can also select the Setup option to fit within the external display. You can customize the Plug and Display To switch the display between the computer screen (LCD), a connected external display, and both the LCD and an external display. However, if the external display's screen resolution is distorted, you can be able to adjust the screen...

VAIO User Guide
Page 166
... using the STB setup: The Giga Pocket remote control cannot be able to use the Giga Pocket remote control to set Giga Pocket software to the appropriate channel-out number (channel 3, 4, etc.) or to the In jack on the port replicator. 4. To connect in STB m ode (Option 1) Option 2 1. Page 166 Contact your STB. Connect a second TV coaxial cable (optional) to the Out jack on your cable or satellite service...
... using the STB setup: The Giga Pocket remote control cannot be able to use the Giga Pocket remote control to set Giga Pocket software to the appropriate channel-out number (channel 3, 4, etc.) or to the In jack on the port replicator. 4. To connect in STB m ode (Option 1) Option 2 1. Page 166 Contact your STB. Connect a second TV coaxial cable (optional) to the Out jack on your cable or satellite service...
VAIO User Guide
Page 187
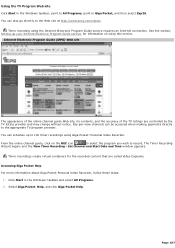
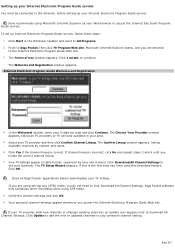
... the TV listing provider and may change without notice. Timer recording using Giga Pocket® Personal Video Recorder. See the section, Setting up to the appropriate TV program provider. Pay-per-view channels can be accessed when making payments directly to 100 timer recordings using the Internet Electronic Program Guide service requires an Internet connection. Set Channel and Start Date and Time window appears. Accessing Giga Pocket...
... the TV listing provider and may change without notice. Timer recording using Giga Pocket® Personal Video Recorder. See the section, Setting up to the appropriate TV program provider. Pay-per-view channels can be accessed when making payments directly to 100 timer recordings using the Internet Electronic Program Guide service requires an Internet connection. Set Channel and Start Date and Time window appears. Accessing Giga Pocket...
VAIO User Guide
Page 211
... channel settings appear whenever you locate the correct channel lineup. 7. Click Update to add the new or updated channels to your Web browser to access the Internet Electronic Program Guide service. Click Start in table format, organized by number and name. 6. Your TV listings appear in the Windows® taskbar and point to All Programs. 2. Sony recommends using STB mode. 8. section, enter your Internet Electronic Program Guide service. The TV Setup Wizard...
... channel settings appear whenever you locate the correct channel lineup. 7. Click Update to add the new or updated channels to your Web browser to access the Internet Electronic Program Guide service. Click Start in table format, organized by number and name. 6. Your TV listings appear in the Windows® taskbar and point to All Programs. 2. Sony recommends using STB mode. 8. section, enter your Internet Electronic Program Guide service. The TV Setup Wizard...

VAIO User Guide
Page 215
... To remove a memory module. Option 1 The following instructions illustrate how to remove the memory module located underneath the bottom panel of the computer becomes extremely hot during operation. Turn off the computer and all cables, and remove the battery if it into the open slot at least one hour for more information. Remove the memory bay cover carefully. 6. Avoid touching any other components inside the computer. 7. Remove the new memory module from its packaging, and install the memory module...
... To remove a memory module. Option 1 The following instructions illustrate how to remove the memory module located underneath the bottom panel of the computer becomes extremely hot during operation. Turn off the computer and all cables, and remove the battery if it into the open slot at least one hour for more information. Remove the memory bay cover carefully. 6. Avoid touching any other components inside the computer. 7. Remove the new memory module from its packaging, and install the memory module...

VAIO User Guide
Page 217
... lift the keyboard up and turn it is installed. Lifting the Keyboard Turning the Keyboard 7. Page 217 To remove a memory module 1. Disconnect the power cord, all attached devices. 2. The interior of keys. 6. Wait at the keyboard, and place your computer) to cool down. See Removing a battery. 3. Turn the computer over the touch pad. Rem ov ing the Bottom Screw(s) 5. Option 2 The following instructions illustrate how to loosen and remove the two...
... lift the keyboard up and turn it is installed. Lifting the Keyboard Turning the Keyboard 7. Page 217 To remove a memory module 1. Disconnect the power cord, all attached devices. 2. The interior of keys. 6. Wait at the keyboard, and place your computer) to cool down. See Removing a battery. 3. Turn the computer over the touch pad. Rem ov ing the Bottom Screw(s) 5. Option 2 The following instructions illustrate how to loosen and remove the two...

VAIO User Guide
Page 264
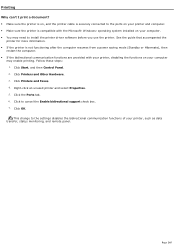
... the Ports tab. 6. Click OK. This change to install the printer driver software before you use the printer. See the guide that accompanied the printer for more information. If the printer is compatible with your printer, disabling the functions on your computer. You may need to the settings disables the bidirectional communication functions of your computer may enable printing. Click Start, and then Control Panel...
... the Ports tab. 6. Click OK. This change to install the printer driver software before you use the printer. See the guide that accompanied the printer for more information. If the printer is compatible with your printer, disabling the functions on your computer. You may need to the settings disables the bidirectional communication functions of your computer may enable printing. Click Start, and then Control Panel...
VAIO User Guide
Page 265
.... Click OK. This change to cancel the Enable bidirectional support check box. 7. Click Start, and then Control Panel. 2. Right-click an unused printer and select Properties. 5. Follow these steps: 1. Click to the settings disables the bidirectional communication functions of your printer, such as data transfer, status monitoring, and remote panel. Page 265 Click the Ports tab. 6. Click Printers and Other Hardware. 3. Click Printers...
.... Click OK. This change to cancel the Enable bidirectional support check box. 7. Click Start, and then Control Panel. 2. Right-click an unused printer and select Properties. 5. Follow these steps: 1. Click to the settings disables the bidirectional communication functions of your printer, such as data transfer, status monitoring, and remote panel. Page 265 Click the Ports tab. 6. Click Printers and Other Hardware. 3. Click Printers...

VAIO User Guide
Page 273
See Adjusting the sound and Enabling the sound for more information. Page 273 See that has its own volume control, make sure the battery is properly inserted and is properly set to mute, the volume setting may be too low, or the audio option may be set . Why can't I hear sound from my speakers? If the computer is using battery power, make sure the volume control is charged. If you are using a program that program's help guide for more information. Your speakers may be disabled.
See Adjusting the sound and Enabling the sound for more information. Page 273 See that has its own volume control, make sure the battery is properly inserted and is properly set to mute, the volume setting may be too low, or the audio option may be set . Why can't I hear sound from my speakers? If the computer is using battery power, make sure the volume control is charged. If you are using a program that program's help guide for more information. Your speakers may be disabled.
VAIO User Guide
Page 306
... THIS GUIDE WILL BE UNINTERRUPTED OR ERROR-FREE. Page 306 All other trademarks are available to any machine-readable form without written permission is prohibited. All rights reserved. This manual and the software described herein, in whole or in part without prior written approval. Important information for Canadian customers: Your new VAIO computer includes certain software versions or upgrades, and Internet services...
... THIS GUIDE WILL BE UNINTERRUPTED OR ERROR-FREE. Page 306 All other trademarks are available to any machine-readable form without written permission is prohibited. All rights reserved. This manual and the software described herein, in whole or in part without prior written approval. Important information for Canadian customers: Your new VAIO computer includes certain software versions or upgrades, and Internet services...

VAIO User Guide
Page 307
... upgrades, and Internet services or offers that are trademarks or registered trademarks of Sony. Sony, Click to DVD, DVgate Plus, Memory Stick, Memory Stick Duo, Memory Stick PRO, the Memory Stick logo, OpenMG, SonicStage, i.LINK, CLIÉ, MagicGate, Giga Pocket, PicoPlayer, VAIO Media, and VAIO are trademarks or registered trademarks of their respective owners. SONY CANNOT WARRANT THAT THE FUNCTIONS DESCRIBED IN THIS GUIDE WILL BE UNINTERRUPTED OR ERROR-FREE...
... upgrades, and Internet services or offers that are trademarks or registered trademarks of Sony. Sony, Click to DVD, DVgate Plus, Memory Stick, Memory Stick Duo, Memory Stick PRO, the Memory Stick logo, OpenMG, SonicStage, i.LINK, CLIÉ, MagicGate, Giga Pocket, PicoPlayer, VAIO Media, and VAIO are trademarks or registered trademarks of their respective owners. SONY CANNOT WARRANT THAT THE FUNCTIONS DESCRIBED IN THIS GUIDE WILL BE UNINTERRUPTED OR ERROR-FREE...


