VAIO User Guide
Page 8
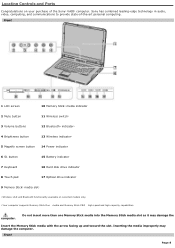
... has combined leading-edge technology in audio, video, computing, and communications to provide state-of the Sony® VAIO® computer. Front 1 LCD screen 10 Memory Stick® media indicator 2 Mute button 11 Wireless switch1 3 Volume buttons 12 Bluetooth® indicator1 4 Brightness button 13 Wireless indicator1 5 Magnify screen button 14 Power indicator 6 S1 button 15 Battery indicator 7 Keyboard 16 Hard disk drive indicator 8 Touch pad 17 Optical drive indicator 9 Memory Stick® media slot2 1 Wireles s LA N and Bluetooth func tionality available on your...
... has combined leading-edge technology in audio, video, computing, and communications to provide state-of the Sony® VAIO® computer. Front 1 LCD screen 10 Memory Stick® media indicator 2 Mute button 11 Wireless switch1 3 Volume buttons 12 Bluetooth® indicator1 4 Brightness button 13 Wireless indicator1 5 Magnify screen button 14 Power indicator 6 S1 button 15 Battery indicator 7 Keyboard 16 Hard disk drive indicator 8 Touch pad 17 Optical drive indicator 9 Memory Stick® media slot2 1 Wireles s LA N and Bluetooth func tionality available on your...
VAIO User Guide
Page 11
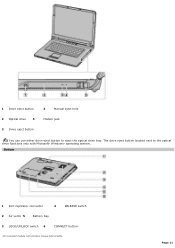
Bottom 1 Port replicator connector 4 RELEASE switch 2 Air vents 5 Battery bay 3 LOCK/UNLOCK switch 6 CONNECT button1 1 O n s elec ted models with Microsoft® Windows® operating system. Page 11 The drive eject button located next to eject the optical drive tray. 1 Drive eject button 4 Manual eject hole 2 Optical drive 5 Modem jack 3 Drive eject button You can use either drive eject button to the optical drive functions only with wireles s mous e func tionality.
Bottom 1 Port replicator connector 4 RELEASE switch 2 Air vents 5 Battery bay 3 LOCK/UNLOCK switch 6 CONNECT button1 1 O n s elec ted models with Microsoft® Windows® operating system. Page 11 The drive eject button located next to eject the optical drive tray. 1 Drive eject button 4 Manual eject hole 2 Optical drive 5 Modem jack 3 Drive eject button You can use either drive eject button to the optical drive functions only with wireles s mous e func tionality.
VAIO User Guide
Page 14
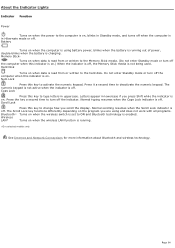
... not work with all programs. Bluetooth®1 Turns on when the wireless switch is set to ON and Bluetooth technology is charging. Press it a second time to activate the numeric keypad. The Scroll Lock key functions differently depending on the program you scroll the display. Page 14 Num Lock Press this key to type letters in uppercase. See Internet and Network Connections for more information about Bluetooth and wireless technology. About the Indicator Lights Indicator Function Power Turns on...
... not work with all programs. Bluetooth®1 Turns on when the wireless switch is set to ON and Bluetooth technology is charging. Press it a second time to activate the numeric keypad. The Scroll Lock key functions differently depending on the program you scroll the display. Page 14 Num Lock Press this key to type letters in uppercase. See Internet and Network Connections for more information about Bluetooth and wireless technology. About the Indicator Lights Indicator Function Power Turns on...
VAIO User Guide
Page 21
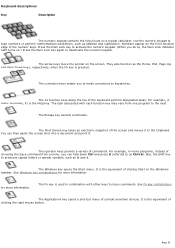
... the screen. Numbers appear on .) Press the Num Lock key again to the next. The correction keys enable you do so, the Num Lock indicator light turns on the front beveled edge of context-sensitive choices. The task associated with other keys to the Clipboard. For example, in many programs, instead of the screen and moves it . The Windows key opens the Start menu. See Fn key combinations...
... the screen. Numbers appear on .) Press the Num Lock key again to the next. The correction keys enable you do so, the Num Lock indicator light turns on the front beveled edge of context-sensitive choices. The task associated with other keys to the Clipboard. For example, in many programs, instead of the screen and moves it . The Windows key opens the Start menu. See Fn key combinations...
VAIO User Guide
Page 51
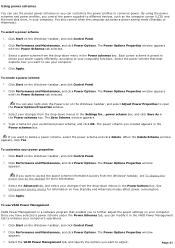
... your changes from the Windows® taskbar, see To display the power icon on your computer. To customize your power properties 1. To use VAIO Power Management VAIO Power Management is preset to utilize your power supply efficiently, according to different devices, such as the computer screen (LCD) and the hard disk drive, in the Power schemes box. The Power Options Properties window appears. 3. To create a power scheme 1. The Save Scheme window appears. 4. The Power Options Properties window appears. By using the power...
... your changes from the Windows® taskbar, see To display the power icon on your computer. To customize your power properties 1. To use VAIO Power Management VAIO Power Management is preset to utilize your power supply efficiently, according to different devices, such as the computer screen (LCD) and the hard disk drive, in the Power schemes box. The Power Options Properties window appears. 3. To create a power scheme 1. The Save Scheme window appears. 4. The Power Options Properties window appears. By using the power...
VAIO User Guide
Page 63
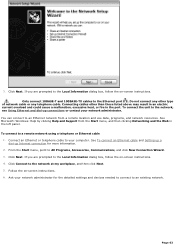
... cable to the Local Information dialog box, follow the on-screen instructions. If you are prompted to your network administrator. If you are prompted to the network, see Using Ethernet and dial-up Internet connection for the detailed settings and devices needed to connect to an Ethernet network from the Start menu, and then clicking Networking and the Web in the port. From the Start menu, point to the network...
... cable to the Local Information dialog box, follow the on-screen instructions. If you are prompted to your network administrator. If you are prompted to the network, see Using Ethernet and dial-up Internet connection for the detailed settings and devices needed to connect to an Ethernet network from the Start menu, and then clicking Networking and the Web in the port. From the Start menu, point to the network...
VAIO User Guide
Page 92
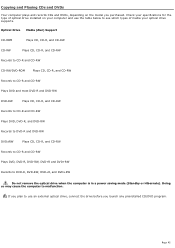
.... If you plan to use the table below to see which types of media your optical drive supports. Check your specifications for the type of optical drive installed on the model you launch any preinstalled CD/DVD program. Doing so may cause the computer to DVD-R, DVD-RW, DVD+R, and DVD+RW Do not remove the optical drive when the computer is in a power saving mode (Standby or Hibernate...
.... If you plan to use the table below to see which types of media your optical drive supports. Check your specifications for the type of optical drive installed on the model you launch any preinstalled CD/DVD program. Doing so may cause the computer to DVD-R, DVD-RW, DVD+R, and DVD+RW Do not remove the optical drive when the computer is in a power saving mode (Standby or Hibernate...
VAIO User Guide
Page 93
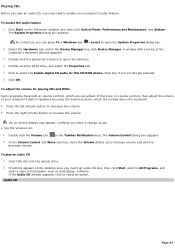
... adjust the volume for this CD-ROM device check box if it is not already selected. 6. Audio CD Page 93 The Volume Control dialog box appears. 2. Double-click the listed drive, and select the Properties tab. 5. To enable the audio feature 1. The System Properties dialog box appears. If nothing appears on -screen display may need to select the Enable digital CD audio for playing CDs and DVDs...
... adjust the volume for this CD-ROM device check box if it is not already selected. 6. Audio CD Page 93 The Volume Control dialog box appears. 2. Double-click the listed drive, and select the Properties tab. 5. To enable the audio feature 1. The System Properties dialog box appears. If nothing appears on -screen display may need to select the Enable digital CD audio for playing CDs and DVDs...
VAIO User Guide
Page 100
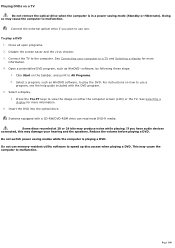
... use memory-resident utility software to speed up disc access when playing a DVD. This may cause the computer to malfunction. Click Start on either the computer screen (LCD) or the TV. For instructions on a TV Do not remove the optical drive when the computer is playing a DVD. Page 100 Playing DVDs on how to use a program, see the help guide included with a CD-RW/DVD-ROM drive can read most DVD-R media. Connect...
... use memory-resident utility software to speed up disc access when playing a DVD. This may cause the computer to malfunction. Click Start on either the computer screen (LCD) or the TV. For instructions on a TV Do not remove the optical drive when the computer is playing a DVD. Page 100 Playing DVDs on how to use a program, see the help guide included with a CD-RW/DVD-ROM drive can read most DVD-R media. Connect...
VAIO User Guide
Page 138
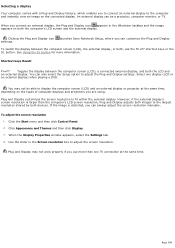
... connect an external display to adjust the Plug and Display settings. An external display can also select the Setup option to the computer and instantly view an image on the connected display. See Using the S1 button for more than the computer's LCD screen resolution, Plug and Display adjusts both devices. You can be able to fit within the external display. You may not work properly if you use the Fn+F7 shortcut keys...
... connect an external display to adjust the Plug and Display settings. An external display can also select the Setup option to the computer and instantly view an image on the connected display. See Using the S1 button for more than the computer's LCD screen resolution, Plug and Display adjusts both devices. You can be able to fit within the external display. You may not work properly if you use the Fn+F7 shortcut keys...
VAIO User Guide
Page 166
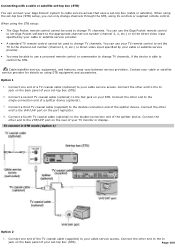
...-connection end of your cable service access. Connect the other end to the VHF/UHF port on the back panel of your set -top box (STB) setup, you can use a universal remote control or commander to change channels through the STB, using the set -top box (STB). 2. Connect the other end to the In jack on the rear of your TV monitor or display. To connect in STB m ode (Option 1) Option...
...-connection end of your cable service access. Connect the other end to the VHF/UHF port on the back panel of your set -top box (STB) setup, you can use a universal remote control or commander to change channels through the STB, using the set -top box (STB). 2. Connect the other end to the In jack on the rear of your TV monitor or display. To connect in STB m ode (Option 1) Option...
VAIO User Guide
Page 187
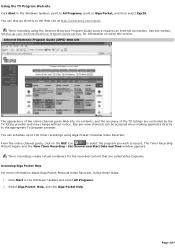
... online channel guide, click on using the Internet Electronic Program Guide service requires an Internet connection. Click Start in the Windows taskbar, point to All Programs, point to Giga Pocket, and then select Zap2it. Page 187 You can schedule up your Internet Electronic Program Guide service, for the recorded content that are controlled by the TV listing provider and may change without notice. Accessing Giga Pocket...
... online channel guide, click on using the Internet Electronic Program Guide service requires an Internet connection. Click Start in the Windows taskbar, point to All Programs, point to Giga Pocket, and then select Zap2it. Page 187 You can schedule up your Internet Electronic Program Guide service, for the recorded content that are controlled by the TV listing provider and may change without notice. Accessing Giga Pocket...
VAIO User Guide
Page 211
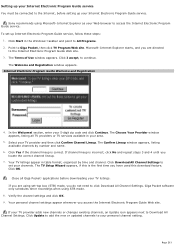
... of Use window appears. Your TV listings appear in table format, organized by number and name. 6. Click Update to add the new or updated channels to Giga Pocket, then click TV Program Web site. Setting up your Internet Electronic Program Guide service You must be connected to the Internet, before downloading your TV listings. Sony recommends using STB mode. 8. To set up your Web browser to All Programs. 2. Click Start in...
... of Use window appears. Your TV listings appear in table format, organized by number and name. 6. Click Update to add the new or updated channels to Giga Pocket, then click TV Program Web site. Setting up your Internet Electronic Program Guide service You must be connected to the Internet, before downloading your TV listings. Sony recommends using STB mode. 8. To set up your Web browser to All Programs. 2. Click Start in...
VAIO User Guide
Page 215
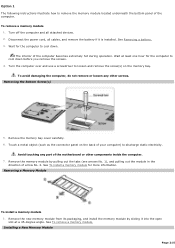
... before you remove the screws. 4. Turn off the computer and all cables, and remove the battery if it into the open slot at least one hour for more information. Turn the computer over and use a screwdriver to loosen and remove the screw(s) on the back of the computer becomes extremely hot during operation. Remove the memory bay cover carefully. 6. See Removing a battery. 3. Installing a New Mem ory Module Page 215 To remove a memory module 1.
... before you remove the screws. 4. Turn off the computer and all cables, and remove the battery if it into the open slot at least one hour for more information. Turn the computer over and use a screwdriver to loosen and remove the screw(s) on the back of the computer becomes extremely hot during operation. Remove the memory bay cover carefully. 6. See Removing a battery. 3. Installing a New Mem ory Module Page 215 To remove a memory module 1.
VAIO User Guide
Page 217
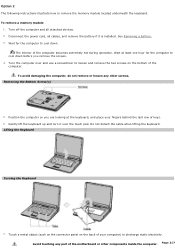
... and use a screwdriver to discharge static electricity. Option 2 The following instructions illustrate how to cool down before you are looking at least one hour for the computer to cool down. To remove a memory module 1. The interior of keys. 6. Do not detach the cable when lifting the keyboard. Disconnect the power cord, all attached devices. 2. Gently lift the keyboard up and turn it is installed...
... and use a screwdriver to discharge static electricity. Option 2 The following instructions illustrate how to cool down before you are looking at least one hour for the computer to cool down. To remove a memory module 1. The interior of keys. 6. Do not detach the cable when lifting the keyboard. Disconnect the power cord, all attached devices. 2. Gently lift the keyboard up and turn it is installed...

VAIO User Guide
Page 264
...; Windows® operating system installed on your computer may need to install the printer driver software before you use the printer. Page 264 Follow these steps: 1. Click Start, and then Control Panel. 2. Right-click an unused printer and select Properties. 5. This change to cancel the Enable bidirectional support check box. 7. Click Printers and Faxes. 4. Click the Ports tab. 6. Click to the settings disables the bidirectional communication functions of...
...; Windows® operating system installed on your computer may need to install the printer driver software before you use the printer. Page 264 Follow these steps: 1. Click Start, and then Control Panel. 2. Right-click an unused printer and select Properties. 5. This change to cancel the Enable bidirectional support check box. 7. Click Printers and Faxes. 4. Click the Ports tab. 6. Click to the settings disables the bidirectional communication functions of...

VAIO User Guide
Page 265
... Start, and then Control Panel. 2. Right-click an unused printer and select Properties. 5. Click OK. Follow these steps: 1. Click Printers and Faxes. 4. This change to install the printer driver software before you use the printer. Click Printers and Other Hardware. 3. Click the Ports tab. 6. Printing Why can't I print a document? Make sure the printer is on, and the printer cable is securely connected...
... Start, and then Control Panel. 2. Right-click an unused printer and select Properties. 5. Click OK. Follow these steps: 1. Click Printers and Faxes. 4. This change to install the printer driver software before you use the printer. Click Printers and Other Hardware. 3. Click the Ports tab. 6. Printing Why can't I print a document? Make sure the printer is on, and the printer cable is securely connected...

VAIO User Guide
Page 273
Page 273 See Adjusting the sound and Enabling the sound for more information. See that has its own volume control, make sure the volume control is properly set to mute, the volume setting may be too low, or the audio option may be set . Why can't I hear sound from my speakers? If the computer is using battery power, make sure the battery is properly inserted and is charged. If you are using a program that program's help guide for more information. Your speakers may be disabled.
Page 273 See Adjusting the sound and Enabling the sound for more information. See that has its own volume control, make sure the volume control is properly set to mute, the volume setting may be too low, or the audio option may be set . Why can't I hear sound from my speakers? If the computer is using battery power, make sure the battery is properly inserted and is charged. If you are using a program that program's help guide for more information. Your speakers may be disabled.
VAIO User Guide
Page 306
... manual and the software described herein, in whole or in part without prior written approval. Important information for Canadian customers: Your new VAIO computer includes certain software versions or upgrades, and Internet services or offers that are available to DVD, DVgate Plus, Memory Stick, Memory Stick Duo, Memory Stick PRO, the Memory Stick logo, OpenMG, SonicStage, i.LINK, CLIÉ, MagicGate, Giga Pocket, PicoPlayer, VAIO Media, and VAIO are...
... manual and the software described herein, in whole or in part without prior written approval. Important information for Canadian customers: Your new VAIO computer includes certain software versions or upgrades, and Internet services or offers that are available to DVD, DVgate Plus, Memory Stick, Memory Stick Duo, Memory Stick PRO, the Memory Stick logo, OpenMG, SonicStage, i.LINK, CLIÉ, MagicGate, Giga Pocket, PicoPlayer, VAIO Media, and VAIO are...
VAIO User Guide
Page 307
...: Your new VAIO computer includes certain software versions or upgrades, and Internet services or offers that are available to DVD, DVgate Plus, Memory Stick, Memory Stick Duo, Memory Stick PRO, the Memory Stick logo, OpenMG, SonicStage, i.LINK, CLIÉ, MagicGate, Giga Pocket, PicoPlayer, VAIO Media, and VAIO are trademarks or registered trademarks of Sony. All other trademarks are trademarks or registered trademarks of their respective owners. SONY CANNOT...
...: Your new VAIO computer includes certain software versions or upgrades, and Internet services or offers that are available to DVD, DVgate Plus, Memory Stick, Memory Stick Duo, Memory Stick PRO, the Memory Stick logo, OpenMG, SonicStage, i.LINK, CLIÉ, MagicGate, Giga Pocket, PicoPlayer, VAIO Media, and VAIO are trademarks or registered trademarks of Sony. All other trademarks are trademarks or registered trademarks of their respective owners. SONY CANNOT...


