User Guide
Page 3
... Connecting an External Display ...87 Selecting Display Modes...93 Using the Multiple Monitors Function ...94 Connecting an External Microphone ...96 Connecting a Universal Serial Bus (USB) Device...97 Connecting a Printer ...100 Connecting an i.LINK Device ...101 Connecting to a Network (LAN) ...103 Customizing Your VAIO Computer ...104 Setting the Password ...105 Setting Up Your Computer with VAIO Control Center 108 Using the Power Saving Modes ...109 Managing Power with VAIO Power Management ...114 Configuring Your Modem ...116 Upgrading Your VAIO Computer...118 Adding and Removing Memory...
... Connecting an External Display ...87 Selecting Display Modes...93 Using the Multiple Monitors Function ...94 Connecting an External Microphone ...96 Connecting a Universal Serial Bus (USB) Device...97 Connecting a Printer ...100 Connecting an i.LINK Device ...101 Connecting to a Network (LAN) ...103 Customizing Your VAIO Computer ...104 Setting the Password ...105 Setting Up Your Computer with VAIO Control Center 108 Using the Power Saving Modes ...109 Managing Power with VAIO Power Management ...114 Configuring Your Modem ...116 Upgrading Your VAIO Computer...118 Adding and Removing Memory...
User Guide
Page 8
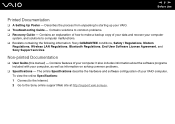
... to starting up your VAIO. ❑ Troubleshooting Guide - n8 N Before Use Printed Documentation ❑ A Setting Up Poster - Non-printed Documentation ❑ User Guide (this manual) - Contains features of your computer. Contains solutions to computer malfunctions. ❑ Booklets containing the following information: Sony GUARANTEE conditions, Safety / Regulations, Modem Regulations, Wireless LAN Regulations, Bluetooth Regulations, End User Software License Agreement, and Sony Support services. The online Specifications describe the hardware and software configuration of...
... to starting up your VAIO. ❑ Troubleshooting Guide - n8 N Before Use Printed Documentation ❑ A Setting Up Poster - Non-printed Documentation ❑ User Guide (this manual) - Contains features of your computer. Contains solutions to computer malfunctions. ❑ Booklets containing the following information: Sony GUARANTEE conditions, Safety / Regulations, Modem Regulations, Wireless LAN Regulations, Bluetooth Regulations, End User Software License Agreement, and Sony Support services. The online Specifications describe the hardware and software configuration of...
User Guide
Page 15
... memory card slot (page 66) S WIRELESS switch (page 70) T WLAN (Wireless LAN) indicator (page 21) U Bluetooth indicator*1 (page 21) *1 On selected models only. *2 Your computer supports Memory Stick PRO media and Memory Stick Duo media with high speed and high capacity capabilities. N Infrared signal indicator*1 (page 21) O Built-in speakers (stereo) F SONY logo lamp*1 (page 22) G Touch pad (page 33) H Power indicator (page 21) I Battery indicator (page 21) J Hard disk drive indicator (page 21) K Memory Stick PRO/Duo media indicator (page 21) L LCD screen lid LOCK...
... memory card slot (page 66) S WIRELESS switch (page 70) T WLAN (Wireless LAN) indicator (page 21) U Bluetooth indicator*1 (page 21) *1 On selected models only. *2 Your computer supports Memory Stick PRO media and Memory Stick Duo media with high speed and high capacity capabilities. N Infrared signal indicator*1 (page 21) O Built-in speakers (stereo) F SONY logo lamp*1 (page 22) G Touch pad (page 33) H Power indicator (page 21) I Battery indicator (page 21) J Hard disk drive indicator (page 21) K Memory Stick PRO/Duo media indicator (page 21) L LCD screen lid LOCK...
User Guide
Page 18
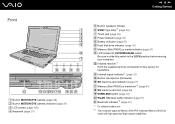
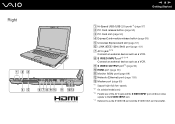
... Started A Hi-Speed USB (USB 2.0) ports*1 (page 97) B PC Card release button (page 55) C PC Card slot (page 53) D ExpressCard module release button (page 59) E Universal ExpressCard slot (page 57) F i.LINK (IEEE 1394) S400 port (page 101) G AV In jack*2 *3 Connect an external device such as the S VIDEO IN port and the S VIDEO OUT port hereinafter. H S VIDEO INPUT port*2 *3 *4 Connect an external device such as a VCR. I S VIDEO OUTPUT port*4 (page 90) J HDMI port (page 90) K Monitor (VGA) port (page 88) L Network (Ethernet) port...
... Started A Hi-Speed USB (USB 2.0) ports*1 (page 97) B PC Card release button (page 55) C PC Card slot (page 53) D ExpressCard module release button (page 59) E Universal ExpressCard slot (page 57) F i.LINK (IEEE 1394) S400 port (page 101) G AV In jack*2 *3 Connect an external device such as the S VIDEO IN port and the S VIDEO OUT port hereinafter. H S VIDEO INPUT port*2 *3 *4 Connect an external device such as a VCR. I S VIDEO OUTPUT port*4 (page 90) J HDMI port (page 90) K Monitor (VGA) port (page 88) L Network (Ethernet) port...
User Guide
Page 21
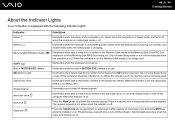
... data is on . Press the key a second time to the media in the SD memory card slot. (Do not enter Sleep mode or turn off the computer when this indicator is on , blinks when the computer is in Sleep mode, and turns off when the computer is in MOTION EYE camera SD memory card Optical disc drive Infrared signal* Hard disk drive Num lock Caps lock Functions Illuminates when the power of infrared signals. Illuminates upon...
... data is on . Press the key a second time to the media in the SD memory card slot. (Do not enter Sleep mode or turn off the computer when this indicator is on , blinks when the computer is in Sleep mode, and turns off when the computer is in MOTION EYE camera SD memory card Optical disc drive Infrared signal* Hard disk drive Num lock Caps lock Functions Illuminates when the power of infrared signals. Illuminates upon...
User Guide
Page 22
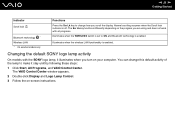
... Started Indicator Scroll lock Bluetooth technology * Wireless LAN * On selected models only. The VAIO Control Center window appears. 2 Double-click Display and Logo Lamp Control. 3 Follow the on the program you turn on your computer. Normal scrolling resumes when the Scroll lock indicator is enabled. Functions Press the Scr Lk key to change this default activity of the lamp to ON and Bluetooth technology is set to make it illuminates when you are using and does not work with...
... Started Indicator Scroll lock Bluetooth technology * Wireless LAN * On selected models only. The VAIO Control Center window appears. 2 Double-click Display and Logo Lamp Control. 3 Follow the on the program you turn on your computer. Normal scrolling resumes when the Scroll lock indicator is enabled. Functions Press the Scr Lk key to change this default activity of the lamp to ON and Bluetooth technology is set to make it illuminates when you are using and does not work with...

User Guide
Page 39
Use the table below to see which types of optical disc drive installed on the model you purchased. Check your specifications for the type of media your model. n 39 N Using Your VAIO Computer Reading and Writing Optical Discs Your computer plays and records CDs, DVDs, or Blu-ray Discs, depending on your optical disc drive supports.
Use the table below to see which types of optical disc drive installed on the model you purchased. Check your specifications for the type of media your model. n 39 N Using Your VAIO Computer Reading and Writing Optical Discs Your computer plays and records CDs, DVDs, or Blu-ray Discs, depending on your optical disc drive supports.
User Guide
Page 41
As with your external display is strongly recommended that the AACS key update requires Internet access. Some contents may not support movie playback on this product because it does not conform to the Compact Disc Digital Audio standard specifications (CD Standard). Due to the multiple formats of discs now available, when buying pre-recorded or blank discs for use with a VAIO computer, be sure to read...
As with your external display is strongly recommended that the AACS key update requires Internet access. Some contents may not support movie playback on this product because it does not conform to the Compact Disc Digital Audio standard specifications (CD Standard). Due to the multiple formats of discs now available, when buying pre-recorded or blank discs for use with a VAIO computer, be sure to read...
User Guide
Page 43
... computer's optical disc drives may not be able to play audio CDs created with the CD-R or CD-RW disc media. ❑ Some DVD players and computer's optical disc drives may cause your computer to malfunction. ❑ Do not switch to power saving modes while your computer. ! Any difficulties caused by changing the region code settings of the DVD drive are labeled on the DVDs to indicate in most...
... computer's optical disc drives may not be able to play audio CDs created with the CD-R or CD-RW disc media. ❑ Some DVD players and computer's optical disc drives may cause your computer to malfunction. ❑ Do not switch to power saving modes while your computer. ! Any difficulties caused by changing the region code settings of the DVD drive are labeled on the DVDs to indicate in most...
User Guide
Page 74
The Wireless LAN indicator lights up. 2 Double-click ( / ) on -screen instructions. ✍ See the online Specifications to display the Wireless Device Switch window. Select your desired wireless option(s) and click OK. 3 Click Start and Control Panel. 4 Click View network status and tasks under Network and Internet. 5 Click Set up a connection or network window appears. 6 Select an option to specify the ad-hoc network settings and click Next. 7 Follow the on the taskbar to see whether your model supports the Bluetooth functionality and...
The Wireless LAN indicator lights up. 2 Double-click ( / ) on -screen instructions. ✍ See the online Specifications to display the Wireless Device Switch window. Select your desired wireless option(s) and click OK. 3 Click Start and Control Panel. 4 Click View network status and tasks under Network and Internet. 5 Click Set up a connection or network window appears. 6 Select an option to specify the ad-hoc network settings and click Next. 7 Follow the on the taskbar to see whether your model supports the Bluetooth functionality and...
User Guide
Page 77
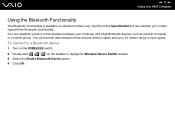
... open space. To connect to a Bluetooth device 1 Turn on the WIRELESS switch. 2 Double-click ( / ) on selected models only. See the online Specifications to see whether your computer and other Bluetooth devices such as another computer or a mobile phone. n 77 N Using Your VAIO Computer Using the Bluetooth Functionality The Bluetooth functionality is available on the taskbar to display the Wireless Device Switch window. 3 Select the Enable Bluetooth Device option. 4 Click OK. You can transfer data between your model supports the Bluetooth functionality...
... open space. To connect to a Bluetooth device 1 Turn on the WIRELESS switch. 2 Double-click ( / ) on selected models only. See the online Specifications to see whether your computer and other Bluetooth devices such as another computer or a mobile phone. n 77 N Using Your VAIO Computer Using the Bluetooth Functionality The Bluetooth functionality is available on the taskbar to display the Wireless Device Switch window. 3 Select the Enable Bluetooth Device option. 4 Click OK. You can transfer data between your model supports the Bluetooth functionality...
User Guide
Page 85
... functionality to your VAIO computer by using the various ports on the computer. ❑ Connecting External Speakers (page 86) ❑ Connecting an External Display (page 87) ❑ Selecting Display Modes (page 93) ❑ Using the Multiple Monitors Function (page 94) ❑ Connecting an External Microphone (page 96) ❑ Connecting a Universal Serial Bus (USB) Device (page 97) ❑ Connecting a Printer (page 100) ❑ Connecting an i.LINK Device (page 101) ❑ Connecting to a Network (LAN) (page 103) n 85 N Using Peripheral Devices
... functionality to your VAIO computer by using the various ports on the computer. ❑ Connecting External Speakers (page 86) ❑ Connecting an External Display (page 87) ❑ Selecting Display Modes (page 93) ❑ Using the Multiple Monitors Function (page 94) ❑ Connecting an External Microphone (page 96) ❑ Connecting a Universal Serial Bus (USB) Device (page 97) ❑ Connecting a Printer (page 100) ❑ Connecting an i.LINK Device (page 101) ❑ Connecting to a Network (LAN) (page 103) n 85 N Using Peripheral Devices
User Guide
Page 122
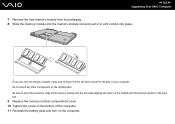
... of the computer. 11 Reinstall the battery pack and turn on the motherboard. n 122 N Upgrading Your VAIO Computer 7 Remove the new memory module from its packaging. 8 Slide the memory module into the memory module slot and push it clicks into the slot while aligning the notch on the module with the small projection in until it in the open slot. 9 Replace the memory module compartment cover. 10 Tighten the screw on the...
... of the computer. 11 Reinstall the battery pack and turn on the motherboard. n 122 N Upgrading Your VAIO Computer 7 Remove the new memory module from its packaging. 8 Slide the memory module into the memory module slot and push it clicks into the slot while aligning the notch on the module with the small projection in until it in the open slot. 9 Replace the memory module compartment cover. 10 Tighten the screw on the...
User Guide
Page 143
... take some VAIO models, the graphics memory is not guaranteed. A reset fee will be charged. The VAIO Original Screen Saver disables the timer setting, which you have installed the latest video driver. ❑ On some time before the desktop screen appears due to the computer? If you can select using the Windows power options, for the automatic turn off action has passed? Turn on your screen to change the boot device. Why does...
... take some VAIO models, the graphics memory is not guaranteed. A reset fee will be charged. The VAIO Original Screen Saver disables the timer setting, which you have installed the latest video driver. ❑ On some time before the desktop screen appears due to the computer? If you can select using the Windows power options, for the automatic turn off action has passed? Turn on your screen to change the boot device. Why does...
User Guide
Page 149
... Start, Control Panel, Hardware and Sound, and Device Manager. 2 Double-click Imaging devices. 3 Right-click the device name for the camera. What should I do if I cannot successfully capture videos in the WMV format with the builtin MOTION EYE camera? n 149 N Troubleshooting Why can't I use ? ❑ Do not place your computer into Sleep or Hibernate mode while you are using the built-in MOTION EYE camera. ❑ If the problem persists...
... Start, Control Panel, Hardware and Sound, and Device Manager. 2 Double-click Imaging devices. 3 Right-click the device name for the camera. What should I do if I cannot successfully capture videos in the WMV format with the builtin MOTION EYE camera? n 149 N Troubleshooting Why can't I use ? ❑ Do not place your computer into Sleep or Hibernate mode while you are using the built-in MOTION EYE camera. ❑ If the problem persists...
User Guide
Page 160
... taskbar and click Open Volume Mixer to check the settings. ❑ Check the volume setting in the audio mixer. ❑ If you may need to clean the disc, see On Handling Discs (page 130) for dirt or damage. Follow these steps: 1 Click Start and Control Panel. 2 Click System and Maintenance. 3 Click System. 4 Click Device Manager on the listed device, you are playing a disc and cannot hear sound, do if...
... taskbar and click Open Volume Mixer to check the settings. ❑ Check the volume setting in the audio mixer. ❑ If you may need to clean the disc, see On Handling Discs (page 130) for dirt or damage. Follow these steps: 1 Click Start and Control Panel. 2 Click System and Maintenance. 3 Click System. 4 Click Device Manager on the listed device, you are playing a disc and cannot hear sound, do if...
User Guide
Page 168
... transfer, status monitoring, and remote panel. This change to install the printer driver software before you use your computer. ❑ You may enable printing. See the manual that came with your printer for more information. ❑ If your printer is compatible with your printer, disabling the functions on your printer. Follow these steps: 1 Click Start and Control Panel. 2 Click Printer under Hardware and Sound. 3 Right-click...
... transfer, status monitoring, and remote panel. This change to install the printer driver software before you use your computer. ❑ You may enable printing. See the manual that came with your printer for more information. ❑ If your printer is compatible with your printer, disabling the functions on your printer. Follow these steps: 1 Click Start and Control Panel. 2 Click Printer under Hardware and Sound. 3 Right-click...
User Guide
Page 173
... the Windows Security window appears, click Restart. ❑ If this procedure does not work, press and hold the power button until the computer turns off your computer does not restart, press the Ctrl+Alt+Delete keys and click the arrow next to the Shut down button and Restart. See Using the Touch Pad (page 33). ❑ Make sure that a mouse is not connected to...
... the Windows Security window appears, click Restart. ❑ If this procedure does not work, press and hold the power button until the computer turns off your computer does not restart, press the Ctrl+Alt+Delete keys and click the arrow next to the Shut down button and Restart. See Using the Touch Pad (page 33). ❑ Make sure that a mouse is not connected to...
User Guide
Page 176
... install driver software if you are not using a Sony PC Card. ❑ If your PC Card, which worked normally before, does not work ? ❑ Make sure the PC Card is compatible with your computer. ❑ See the manual that came with the Microsoft Windows operating system installed on the left pane. The Device Manager window appears. 5 Double-click the device name for more information. Follow these steps: 1 Click Start and Control Panel...
... install driver software if you are not using a Sony PC Card. ❑ If your PC Card, which worked normally before, does not work ? ❑ Make sure the PC Card is compatible with your computer. ❑ See the manual that came with the Microsoft Windows operating system installed on the left pane. The Device Manager window appears. 5 Double-click the device name for more information. Follow these steps: 1 Click Start and Control Panel...

User Guide
Page 179
To change the device for sound output and click Set Default. Once you have connected a device to the HDMI port, you need to change the sound output device, follow these steps: 1 Close all open programs. 2 Click Start and Control Panel. 3 Click Hardware and Sound. 4 Click Manage audio devices under Sound. 5 On the Playback tab, select the desired device for sound output if you want to hear sound from the sound output device connected to the HDMI port? n 179 N Troubleshooting What should I do if I do not hear the sound from the device.
To change the device for sound output and click Set Default. Once you have connected a device to the HDMI port, you need to change the sound output device, follow these steps: 1 Close all open programs. 2 Click Start and Control Panel. 3 Click Hardware and Sound. 4 Click Manage audio devices under Sound. 5 On the Playback tab, select the desired device for sound output if you want to hear sound from the sound output device connected to the HDMI port? n 179 N Troubleshooting What should I do if I do not hear the sound from the device.


