User Guide
Page 4
n4 N Precautions ...124 On Handling the LCD Screen ...125 On Using the Power Source ...126 On Handling Your Computer...127 On Using the Built-in MOTION EYE Camera...129 On Handling Floppy ...
n4 N Precautions ...124 On Handling the LCD Screen ...125 On Using the Power Source ...126 On Handling Your Computer...127 On Using the Built-in MOTION EYE Camera...129 On Handling Floppy ...
User Guide
Page 15
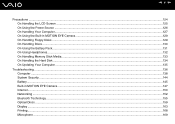
... receiver*1 Point the supplied remote commander to the LOCK position before moving your computer. N Infrared signal indicator*1 (page 21) O Built-in speakers (stereo) F SONY logo lamp*1 (page 22) G Touch pad (page 33) H Power indicator (page 21) I Battery indicator (page 21) J Hard disk drive indicator (page...slide this switch to this sensor for operations. Front A Built-in MOTION EYE camera (page 36) B Built-in MOTION EYE camera indicator (page 21) C LCD screen (page 125) D Keyboard (page 31) n 15 N Getting Started E Built-in microphone (monaural) P SD memory card indicator (page 21) Q...
... receiver*1 Point the supplied remote commander to the LOCK position before moving your computer. N Infrared signal indicator*1 (page 21) O Built-in speakers (stereo) F SONY logo lamp*1 (page 22) G Touch pad (page 33) H Power indicator (page 21) I Battery indicator (page 21) J Hard disk drive indicator (page...slide this switch to this sensor for operations. Front A Built-in MOTION EYE camera (page 36) B Built-in MOTION EYE camera indicator (page 21) C LCD screen (page 125) D Keyboard (page 31) n 15 N Getting Started E Built-in microphone (monaural) P SD memory card indicator (page 21) Q...
User Guide
Page 24
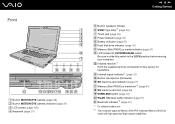
Installing the Battery Pack To install the battery pack 1 Turn off the computer and close the LCD screen lid. 2 Slide the battery lock switch (1) inward. 3 Slide the battery pack into the battery compartment until it clicks into place. n 24 N Getting Started 4 Slide the battery lock switch (1) to the LOCK position to secure the battery pack on the computer. Using the Battery Pack The battery pack supplied with your computer is not fully charged at the time of purchase.
Installing the Battery Pack To install the battery pack 1 Turn off the computer and close the LCD screen lid. 2 Slide the battery lock switch (1) inward. 3 Slide the battery pack into the battery compartment until it clicks into place. n 24 N Getting Started 4 Slide the battery lock switch (1) to the LOCK position to secure the battery pack on the computer. Using the Battery Pack The battery pack supplied with your computer is not fully charged at the time of purchase.
User Guide
Page 28
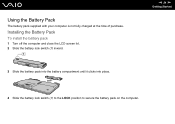
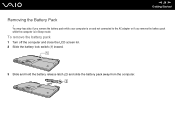
You may lose data if you remove the battery pack while your computer is on and not connected to the AC adapter or if you remove the battery pack while the computer is in Sleep mode. To remove the battery pack 1 Turn off the computer and close the LCD screen lid. 2 Slide the battery lock switch (1) inward. 3 Slide and hold the battery release latch (2) and slide the battery pack away from the computer. n 28 N Getting Started Removing the Battery Pack !
You may lose data if you remove the battery pack while your computer is on and not connected to the AC adapter or if you remove the battery pack while the computer is in Sleep mode. To remove the battery pack 1 Turn off the computer and close the LCD screen lid. 2 Slide the battery lock switch (1) inward. 3 Slide and hold the battery release latch (2) and slide the battery pack away from the computer. n 28 N Getting Started Removing the Battery Pack !
User Guide
Page 31
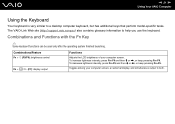
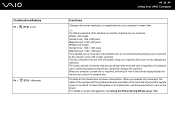
The VAIO-Link Web site (http://support.vaio.sony.eu) also contains glossary information to a desktop computer keyboard, but has additional keys that perform model-specific tasks. Combinations/Feature Fn + 8 (F5/F6): brightness control Fn + /T (F7): display output Functions Adjusts the LCD brightness of your computer screen. Combinations and Functions with the Fn...
The VAIO-Link Web site (http://support.vaio.sony.eu) also contains glossary information to a desktop computer keyboard, but has additional keys that perform model-specific tasks. Combinations/Feature Fn + 8 (F5/F6): brightness control Fn + /T (F7): display output Functions Adjusts the LCD brightness of your computer screen. Combinations and Functions with the Fn...
User Guide
Page 32
... your computer's screen view. ✍ The default resolutions of the system and the peripheral devices are as follows: WXGA+ LCD models Standard view: 1440 x 900 pixels Magnified view: 1024 x 600 pixels WUXGA LCD models Standard view: 1920 x 1200 pixels Magnified view: 1280 x 768 pixels The magnified view is not as clear as...
... your computer's screen view. ✍ The default resolutions of the system and the peripheral devices are as follows: WXGA+ LCD models Standard view: 1440 x 900 pixels Magnified view: 1024 x 600 pixels WUXGA LCD models Standard view: 1920 x 1200 pixels Magnified view: 1280 x 768 pixels The magnified view is not as clear as...
User Guide
Page 92
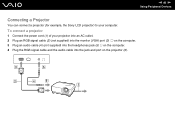
n 92 N Using Peripheral Devices Connecting a Projector You can connect a projector (for example, the Sony LCD projector) to your projector into an AC outlet. 2 Plug an RGB signal cable (2) (not supplied) into the monitor (VGA) port (3) a on the computer. 3 Plug an audio cable (4) (not supplied) into the headphones jack (5) i on the computer. 4 Plug the RGB signal cable and the audio cable into the jack and port on the projector (6). To connect a projector 1 Connect the power cord (1) of your computer.
n 92 N Using Peripheral Devices Connecting a Projector You can connect a projector (for example, the Sony LCD projector) to your projector into an AC outlet. 2 Plug an RGB signal cable (2) (not supplied) into the monitor (VGA) port (3) a on the computer. 3 Plug an audio cable (4) (not supplied) into the headphones jack (5) i on the computer. 4 Plug the RGB signal cable and the audio cable into the jack and port on the projector (6). To connect a projector 1 Connect the power cord (1) of your computer.

User Guide
Page 109
... automatically enter Hibernate mode if the remaining battery charge becomes short, regardless of the computer when it is on in use a battery pack as the LCD screen or the hard disk drive. In addition to the normal operating mode, which allows you to recharge the battery pack or shut down your...
... automatically enter Hibernate mode if the remaining battery charge becomes short, regardless of the computer when it is on in use a battery pack as the LCD screen or the hard disk drive. In addition to the normal operating mode, which allows you to recharge the battery pack or shut down your...
User Guide
Page 110
... press and hold the power button for a long period of Hibernate mode. Going back to place the computer into Hibernate mode or turn off the LCD screen and places the storage device(s) and the CPU into a low power consumption mode. The umber power light flashes during this mode. ! If the battery...
... press and hold the power button for a long period of Hibernate mode. Going back to place the computer into Hibernate mode or turn off the LCD screen and places the storage device(s) and the CPU into a low power consumption mode. The umber power light flashes during this mode. ! If the battery...
User Guide
Page 124
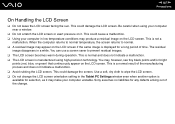
n 124 N Precautions Precautions This section describes safety guidelines and precautions to help you protect your VAIO computer from potential damage. ❑ On Handling the LCD Screen (page 125) ❑ On Using the Power Source (page 126) ❑ On Handling Your Computer (page 127) ❑ On Using the Built-in MOTION ...
n 124 N Precautions Precautions This section describes safety guidelines and precautions to help you protect your VAIO computer from potential damage. ❑ On Handling the LCD Screen (page 125) ❑ On Using the Power Source (page 126) ❑ On Handling Your Computer (page 127) ❑ On Using the Built-in MOTION ...
User Guide
Page 125
... if the same image is available for any defects arising out of the manufacturing process and does not indicate a malfunction. ❑ Avoid rubbing the LCD screen. Sony assumes no liabilities for selection, as it . Be careful when using high-precision technology. This could cause a malfunction. ❑ Using your computer in a while. When...
... if the same image is available for any defects arising out of the manufacturing process and does not indicate a malfunction. ❑ Avoid rubbing the LCD screen. Sony assumes no liabilities for selection, as it . Be careful when using high-precision technology. This could cause a malfunction. ❑ Using your computer in a while. When...
User Guide
Page 147
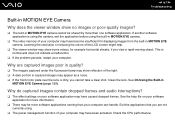
... performance. Exit the applications that you are captured images poor in quality? ❑ The images captured under the fluorescent lamp may show reflection of the LCD screen might help file on your software application may appear as a noise. ❑ If the front mirror plate over the lens is normal and does...
... performance. Exit the applications that you are captured images poor in quality? ❑ The images captured under the fluorescent lamp may show reflection of the LCD screen might help file on your software application may appear as a noise. ❑ If the front mirror plate over the lens is normal and does...
User Guide
Page 163
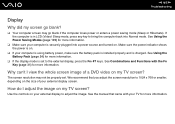
If the computer is in LCD (Video) Sleep mode, press any key to adjust the image. See Combinations and Functions with your TV for more information. How do I view the whole ...
If the computer is in LCD (Video) Sleep mode, press any key to adjust the image. See Combinations and Functions with your TV for more information. How do I view the whole ...
User Guide
Page 165
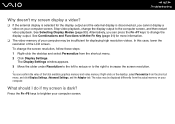
... keys to increase the screen resolution. ! See Selecting Display Modes (page 93). Right-click on your computer. In this case, lower the resolution of the LCD screen. The Display Settings window appears. 3 Move the slider under Resolution to the left to reduce or to the right to brighten your computer screen.
... keys to increase the screen resolution. ! See Selecting Display Modes (page 93). Right-click on your computer. In this case, lower the resolution of the LCD screen. The Display Settings window appears. 3 Move the slider under Resolution to the left to reduce or to the right to brighten your computer screen.
User Guide
Page 166
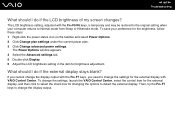
...select the control item for the external display, and then click to Normal mode from Sleep or Hibernate mode. What should I do if the LCD brightness of my screen changes? If you cannot change the display output with the Fn+F5/F6 keys, is temporary and may be restored to... the original setting when your preference for changing the options to change the settings for brightness adjustment. To change the display output. The LCD brightness setting, adjusted with the Fn+F7 keys, you need to detect the external display. To save your computer returns to select the check...
...select the control item for the external display, and then click to Normal mode from Sleep or Hibernate mode. What should I do if the LCD brightness of my screen changes? If you cannot change the display output with the Fn+F5/F6 keys, is temporary and may be restored to... the original setting when your preference for changing the options to change the settings for brightness adjustment. To change the display output. The LCD brightness setting, adjusted with the Fn+F7 keys, you need to detect the external display. To save your computer returns to select the check...


