User Guide
Page 4
n4 N Precautions ...124 On Handling the LCD Screen ...125 On Using the Power Source ...126 On Handling Your Computer...127 On Using the Built-in MOTION EYE Camera...129 On Handling Floppy Disks ......
n4 N Precautions ...124 On Handling the LCD Screen ...125 On Using the Power Source ...126 On Handling Your Computer...127 On Using the Built-in MOTION EYE Camera...129 On Handling Floppy Disks ......
User Guide
Page 6
...this manual, the software, or other information contained herein or the use thereof. Sony Corporation reserves the right to make any modification to any incidental, consequential, or special damages, whether based on -screen User Guide. This manual and the software described herein, in whole or in ...part, may look slightly different from those of your purchase of this Sony VAIO® computer, and welcome to the on tort, contract...
...this manual, the software, or other information contained herein or the use thereof. Sony Corporation reserves the right to make any modification to any incidental, consequential, or special damages, whether based on -screen User Guide. This manual and the software described herein, in whole or in ...part, may look slightly different from those of your purchase of this Sony VAIO® computer, and welcome to the on tort, contract...
User Guide
Page 12
...'s tilting feature to the proper position. You can reduce eye strain and muscle fatigue by adjusting the tilt of the monitor. Make sure the display screen is at a comfortable viewing distance.
...'s tilting feature to the proper position. You can reduce eye strain and muscle fatigue by adjusting the tilt of the monitor. Make sure the display screen is at a comfortable viewing distance.
User Guide
Page 15
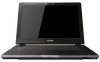
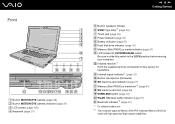
Front A Built-in MOTION EYE camera (page 36) B Built-in MOTION EYE camera indicator (page 21) C LCD screen (page 125) D Keyboard (page 31) n 15 N Getting Started E Built-in microphone (monaural) P SD memory card indicator (page 21) Q Memory Stick PRO/Duo ...capabilities. M Infrared receiver*1 Point the supplied remote commander to the LOCK position before moving your computer. N Infrared signal indicator*1 (page 21) O Built-in speakers (stereo) F SONY logo lamp*1 (page 22) G Touch pad (page 33) H Power indicator (page 21) I Battery indicator (page 21) J Hard disk drive indicator (page 21) K...
Front A Built-in MOTION EYE camera (page 36) B Built-in MOTION EYE camera indicator (page 21) C LCD screen (page 125) D Keyboard (page 31) n 15 N Getting Started E Built-in microphone (monaural) P SD memory card indicator (page 21) Q Memory Stick PRO/Duo ...capabilities. M Infrared receiver*1 Point the supplied remote commander to the LOCK position before moving your computer. N Infrared signal indicator*1 (page 21) O Built-in speakers (stereo) F SONY logo lamp*1 (page 22) G Touch pad (page 33) H Power indicator (page 21) I Battery indicator (page 21) J Hard disk drive indicator (page 21) K...
User Guide
Page 22
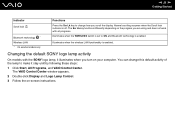
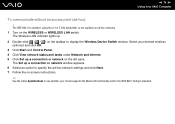
... default activity of the lamp to ON and Bluetooth technology is enabled. You can change how you are using and does not work with the SONY logo lamp, it stay unlit by following these steps: 1 Click Start, All Programs, and VAIO Control Center. Normal scrolling resumes when the Scroll lock... indicator is enabled. Changing the default SONY logo lamp activity On models with all programs. Illuminates when the WIRELESS switch is set to make it illuminates when you turn on...
... default activity of the lamp to ON and Bluetooth technology is enabled. You can change how you are using and does not work with the SONY logo lamp, it stay unlit by following these steps: 1 Click Start, All Programs, and VAIO Control Center. Normal scrolling resumes when the Scroll lock... indicator is enabled. Changing the default SONY logo lamp activity On models with all programs. Illuminates when the WIRELESS switch is set to make it illuminates when you turn on...
User Guide
Page 24
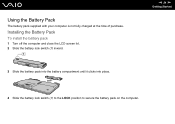
n 24 N Getting Started 4 Slide the battery lock switch (1) to the LOCK position to secure the battery pack on the computer. Installing the Battery Pack To install the battery pack 1 Turn off the computer and close the LCD screen lid. 2 Slide the battery lock switch (1) inward. 3 Slide the battery pack into the battery compartment until it clicks into place. Using the Battery Pack The battery pack supplied with your computer is not fully charged at the time of purchase.
n 24 N Getting Started 4 Slide the battery lock switch (1) to the LOCK position to secure the battery pack on the computer. Installing the Battery Pack To install the battery pack 1 Turn off the computer and close the LCD screen lid. 2 Slide the battery lock switch (1) inward. 3 Slide the battery pack into the battery compartment until it clicks into place. Using the Battery Pack The battery pack supplied with your computer is not fully charged at the time of purchase.
User Guide
Page 28
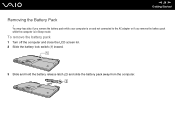
n 28 N Getting Started Removing the Battery Pack ! You may lose data if you remove the battery pack while your computer is on and not connected to the AC adapter or if you remove the battery pack while the computer is in Sleep mode. To remove the battery pack 1 Turn off the computer and close the LCD screen lid. 2 Slide the battery lock switch (1) inward. 3 Slide and hold the battery release latch (2) and slide the battery pack away from the computer.
n 28 N Getting Started Removing the Battery Pack ! You may lose data if you remove the battery pack while your computer is on and not connected to the AC adapter or if you remove the battery pack while the computer is in Sleep mode. To remove the battery pack 1 Turn off the computer and close the LCD screen lid. 2 Slide the battery lock switch (1) inward. 3 Slide and hold the battery release latch (2) and slide the battery pack away from the computer.
User Guide
Page 31
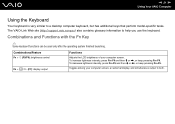
... Fn+F5 and then m or Combinations/Feature Fn + 8 (F5/F6): brightness control Fn + /T (F7): display output Functions Adjusts the LCD brightness of your computer screen. To increase lightness intensity, press Fn+F6 and then M or ,, or keep pressing Fn+F6. Combinations and Functions with the Fn Key ✍ Some keyboard... Computer Using the Keyboard Your keyboard is very similar to help you use the keyboard. The VAIO-Link Web site (http://support.vaio.sony.eu) also contains glossary information to a desktop computer keyboard, but has additional keys that perform model-specific tasks.
... Fn+F5 and then m or Combinations/Feature Fn + 8 (F5/F6): brightness control Fn + /T (F7): display output Functions Adjusts the LCD brightness of your computer screen. To increase lightness intensity, press Fn+F6 and then M or ,, or keep pressing Fn+F6. Combinations and Functions with the Fn Key ✍ Some keyboard... Computer Using the Keyboard Your keyboard is very similar to help you use the keyboard. The VAIO-Link Web site (http://support.vaio.sony.eu) also contains glossary information to a desktop computer keyboard, but has additional keys that perform model-specific tasks.
User Guide
Page 32
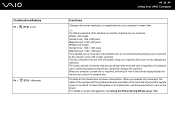
... (page 109). Provides for the lowest level of the standard view and the magnified view are written to the computer screen with graphic images as it magnifies the screen view by applying a lower resolution to the hard disk drive and the system power is turned off. To return the...state, use the power button to the external display disables the function and restores the standard view. This key combination may change when the screen view is magnified or the standard view is implemented by changing the resolution. The location and size of the system and the peripheral devices...
... (page 109). Provides for the lowest level of the standard view and the magnified view are written to the computer screen with graphic images as it magnifies the screen view by applying a lower resolution to the hard disk drive and the system power is turned off. To return the...state, use the power button to the external display disables the function and restores the standard view. This key combination may change when the screen view is magnified or the standard view is implemented by changing the resolution. The location and size of the system and the peripheral devices...
User Guide
Page 33
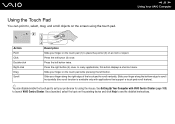
... Computer Action Description Point Slide your finger on an item or object. Right-click Press the right button (4) once. Drag Slide your finger on the screen using the mouse. See Setting Up Your Computer with applications that support a touch pad scroll feature). ✍ You can point to see the detailed instructions...
... Computer Action Description Point Slide your finger on an item or object. Right-click Press the right button (4) once. Drag Slide your finger on the screen using the mouse. See Setting Up Your Computer with applications that support a touch pad scroll feature). ✍ You can point to see the detailed instructions...
User Guide
Page 42
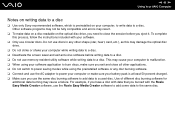
n 42 N Using Your VAIO Computer Notes on writing data to a disc ❑ Use only Sony recommended software, which is at least 50 percent charged. ❑ Make sure you eject it. Do not use discs in any disc burning software. ❑ ... instructions included with the Roxio Easy Media Creator software, use the Roxio Easy Media Creator software to add some data to a disc. ❑ Deactivate the screen saver and exit anti-virus software before you use circular discs. To complete this may result. ❑ To make sure your software. ❑ Only use...
n 42 N Using Your VAIO Computer Notes on writing data to a disc ❑ Use only Sony recommended software, which is at least 50 percent charged. ❑ Make sure you eject it. Do not use discs in any disc burning software. ❑ ... instructions included with the Roxio Easy Media Creator software, use the Roxio Easy Media Creator software to add some data to a disc. ❑ Deactivate the screen saver and exit anti-virus software before you use circular discs. To complete this may result. ❑ To make sure your software. ❑ Only use...
User Guide
Page 44
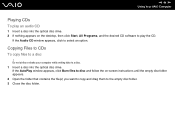
If the AutoPlay window appears, click Burn files to disc and follow the on-screen instructions until the empty disc folder appears. 2 Open the folder that contains the file(s) you want to copy and drag them to a disc. 1 Insert a disc ...
If the AutoPlay window appears, click Burn files to disc and follow the on-screen instructions until the empty disc folder appears. 2 Open the folder that contains the file(s) you want to copy and drag them to a disc. 1 Insert a disc ...
User Guide
Page 49
H Teletext TV program mode buttons Red button Press to jump to the green shortcut link in teletext TV program mode. Green button Press to jump to the red shortcut link in teletext TV program mode. I APPLICATION SELECT button Press to switch among open the Media Center Start menu. N Directional arrow buttons Press the M, m, Yellow button Press to jump to the blue shortcut link in teletext TV program mode. M More button Press to view additional options that are available for your area. n 49 N Using Your VAIO Computer E Guide button Press to view the TV program guide for Media ...
H Teletext TV program mode buttons Red button Press to jump to the green shortcut link in teletext TV program mode. Green button Press to jump to the red shortcut link in teletext TV program mode. I APPLICATION SELECT button Press to switch among open the Media Center Start menu. N Directional arrow buttons Press the M, m, Yellow button Press to jump to the blue shortcut link in teletext TV program mode. M More button Press to view additional options that are available for your area. n 49 N Using Your VAIO Computer E Guide button Press to view the TV program guide for Media ...
User Guide
Page 52
In the Optional Setup window, click Configure tuners, TV signal, and Guide, and follow the on -screen instructions. Note that scheduled timer recordings are cancelled. When you want to change TV input signal (TV Signal or TV Signal Type) or change location, ... information is lost and that in the Tasks section and then click TV. To configure the TV tuner, click Custom setup and follow the on -screen instructions.
In the Optional Setup window, click Configure tuners, TV signal, and Guide, and follow the on -screen instructions. Note that scheduled timer recordings are cancelled. When you want to change TV input signal (TV Signal or TV Signal Type) or change location, ... information is lost and that in the Tasks section and then click TV. To configure the TV tuner, click Custom setup and follow the on -screen instructions.
User Guide
Page 69
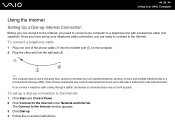
..., and may result in excess electrical current and could cause a malfunction in the internal modem. Some of the phone cable (1) into the modem port on -screen instructions. n 69 N Using Your VAIO Computer Using the Internet Setting Up a Dial-up Internet Connection Before you can connect to the Internet, you need to...
..., and may result in excess electrical current and could cause a malfunction in the internal modem. Some of the phone cable (1) into the modem port on -screen instructions. n 69 N Using Your VAIO Computer Using the Internet Setting Up a Dial-up Internet Connection Before you can connect to the Internet, you need to...
User Guide
Page 74
The Set up a connection or network on -screen instructions. ✍ See the online Specifications to see whether your model supports the Bluetooth functionality and/or the IEEE 802.11a/b/g/n standard. The IEEE 802....
The Set up a connection or network on -screen instructions. ✍ See the online Specifications to see whether your model supports the Bluetooth functionality and/or the IEEE 802.11a/b/g/n standard. The IEEE 802....
User Guide
Page 87
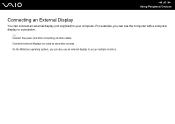
Connected external displays are used as secondary screens. On the Windows operating system, you can also use the computer with a computer display or a projector. ✍ Connect the power cord after connecting all other cables. For example, you can use an external display to your computer. n 87 N Using Peripheral Devices Connecting an External Display You can connect an external display (not supplied) to set up multiple monitors.
Connected external displays are used as secondary screens. On the Windows operating system, you can also use the computer with a computer display or a projector. ✍ Connect the power cord after connecting all other cables. For example, you can use an external display to your computer. n 87 N Using Peripheral Devices Connecting an External Display You can connect an external display (not supplied) to set up multiple monitors.
User Guide
Page 93
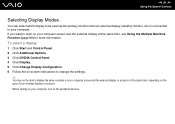
...Click Start and Control Panel. 2 Click Additional Options. 3 Click NVIDIA Control Panel. 4 Click Display. 5 Click Change Display Configuration. 6 Follow the on-screen instructions to change the settings. ✍ You may not be used as the primary monitor when an external display (desktop monitor, etc.) is connected to ...your computer. If you want to display the same contents on your computer screen and the external display or projector at the same time, see Using the Multiple Monitors Function (page 94) for more information. Before ...
...Click Start and Control Panel. 2 Click Additional Options. 3 Click NVIDIA Control Panel. 4 Click Display. 5 Click Change Display Configuration. 6 Follow the on-screen instructions to change the settings. ✍ You may not be used as the primary monitor when an external display (desktop monitor, etc.) is connected to ...your computer. If you want to display the same contents on your computer screen and the external display or projector at the same time, see Using the Multiple Monitors Function (page 94) for more information. Before ...
User Guide
Page 94
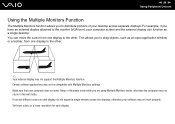
... Using the Multiple Monitors Function The Multiple Monitors function allows you set different colors on each display. If you to distribute portions of your computer screen and the external display can move the cursor from one display to the other . ✍ Your external display may not return to drag objects, such...
... Using the Multiple Monitors Function The Multiple Monitors function allows you set different colors on each display. If you to distribute portions of your computer screen and the external display can move the cursor from one display to the other . ✍ Your external display may not return to drag objects, such...
User Guide
Page 95
... each display and customize the Multiple Monitors mode. n 95 N Using Peripheral Devices To select the Multiple Monitors mode 1 Click Start and Control Panel. 2 Click Adjust screen resolution under Appearance and Personalization. At the confirmation prompt, click Yes. ✍ You can set the display colors and resolution for changing the assignment. For...
... each display and customize the Multiple Monitors mode. n 95 N Using Peripheral Devices To select the Multiple Monitors mode 1 Click Start and Control Panel. 2 Click Adjust screen resolution under Appearance and Personalization. At the confirmation prompt, click Yes. ✍ You can set the display colors and resolution for changing the assignment. For...

