
User Guide
Page 3
...Connecting External Speakers ...95 Connecting an External Display ...96 Selecting Display Modes...101 Using the Multiple Monitors Function ...102 Connecting an External Microphone ...104 Connecting a Universal Serial Bus (USB) Device...105 Connecting a Printer ...108 Connecting an i.LINK Device ...109 Connecting to a Network (LAN) ...111 Customizing Your VAIO Computer ...112 Setting the Password ...113 Setting Up Your Computer with VAIO Control Center 116 Using the Power Saving Modes ...117 Managing Power with VAIO Power Management ...122 Upgrading Your VAIO Computer...123 Adding and Removing...
...Connecting External Speakers ...95 Connecting an External Display ...96 Selecting Display Modes...101 Using the Multiple Monitors Function ...102 Connecting an External Microphone ...104 Connecting a Universal Serial Bus (USB) Device...105 Connecting a Printer ...108 Connecting an i.LINK Device ...109 Connecting to a Network (LAN) ...111 Customizing Your VAIO Computer ...112 Setting the Password ...113 Setting Up Your Computer with VAIO Control Center 116 Using the Power Saving Modes ...117 Managing Power with VAIO Power Management ...122 Upgrading Your VAIO Computer...123 Adding and Removing...

User Guide
Page 8
...2 Click Manuals & Specifications. 3 Click VAIO Recovery Center User Guide. ❑ RAID Guide (Selected models only) - Provides information about using RAID systems. To access this on -screen guide: 1 Click Start and Help and Support. 2 Click Manuals & Specifications. 3 Click Media Center User Guide. Provides information about using Windows Media Center. Provides information about restoring individual software programs, software drivers, and drive partition(s) or your entire hard disk drive to the original factory installed settings. To access this on-screen guide: 1 Click Start and...
...2 Click Manuals & Specifications. 3 Click VAIO Recovery Center User Guide. ❑ RAID Guide (Selected models only) - Provides information about using RAID systems. To access this on -screen guide: 1 Click Start and Help and Support. 2 Click Manuals & Specifications. 3 Click Media Center User Guide. Provides information about using Windows Media Center. Provides information about restoring individual software programs, software drivers, and drive partition(s) or your entire hard disk drive to the original factory installed settings. To access this on-screen guide: 1 Click Start and...

User Guide
Page 9
... Support, click Start and Help and Support. ❑ Manuals & Specifications Here you will find the on how to back up and restore your operating system, system software, and your personal data. ❑ Wireless & Networking Learn about wireless connections including Bluetooth Wireless technology and Wireless LAN. n9 N Before Use Help and Support Help and Support is easy to access and provides a single location for information and technical assistance for your computer. ❑ VAIO Support Access...
... Support, click Start and Help and Support. ❑ Manuals & Specifications Here you will find the on how to back up and restore your operating system, system software, and your personal data. ❑ Wireless & Networking Learn about wireless connections including Bluetooth Wireless technology and Wireless LAN. n9 N Before Use Help and Support Help and Support is easy to access and provides a single location for information and technical assistance for your computer. ❑ VAIO Support Access...
User Guide
Page 21
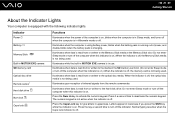
... activate the numeric keypad. Indicator Power 1 Battery e Memory Stick Built-in MOTION EYE camera SD memory card Optical disc drive Remote sensor* Hard disk drive Num lock Caps lock Functions Illuminates when the power of the computer is on . Press it a second time to the media in the SD memory card slot. (Do not enter Sleep mode or turn off the indicator. Normal typing resumes when the Caps lock indicator is equipped with the following indicator lights. n 21 N Getting Started About the Indicator Lights...
... activate the numeric keypad. Indicator Power 1 Battery e Memory Stick Built-in MOTION EYE camera SD memory card Optical disc drive Remote sensor* Hard disk drive Num lock Caps lock Functions Illuminates when the power of the computer is on . Press it a second time to the media in the SD memory card slot. (Do not enter Sleep mode or turn off the indicator. Normal typing resumes when the Caps lock indicator is equipped with the following indicator lights. n 21 N Getting Started About the Indicator Lights...

User Guide
Page 30
... after the operating system finished launching. Combinations/Feature Fn + 8 (F5/F6): brightness control Fn + /T (F7): display output Fn + (F10): zoom Fn + (F12): Hibernate Functions Adjusts the LCD brightness of your computer screen. To decrease lighting intensity, press Fn+F5 and then m or n 30 N Using Your VAIO Computer Using the Keyboard Your keyboard is very similar to a desktop computer keyboard, but has additional keys that perform model-specific tasks. To...
... after the operating system finished launching. Combinations/Feature Fn + 8 (F5/F6): brightness control Fn + /T (F7): display output Fn + (F10): zoom Fn + (F12): Hibernate Functions Adjusts the LCD brightness of your computer screen. To decrease lighting intensity, press Fn+F5 and then m or n 30 N Using Your VAIO Computer Using the Keyboard Your keyboard is very similar to a desktop computer keyboard, but has additional keys that perform model-specific tasks. To...
User Guide
Page 37
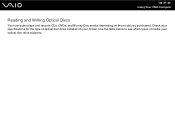
Use the table below to see which types of media your specifications for the type of optical disc drive installed on the model you purchased. n 37 N Using Your VAIO Computer Reading and Writing Optical Discs Your computer plays and records CDs, DVDs, and Blu-ray Disc media, depending on your model. Check your optical disc drive supports.
Use the table below to see which types of media your specifications for the type of optical disc drive installed on the model you purchased. n 37 N Using Your VAIO Computer Reading and Writing Optical Discs Your computer plays and records CDs, DVDs, and Blu-ray Disc media, depending on your model. Check your optical disc drive supports.

User Guide
Page 44
... Disc media 1 Connect the AC adapter to the computer. 2 Insert a Blu-ray Disc media into the optical disc drive. 3 If nothing appears on the desktop, then click Start, All Programs, and the desired Blu-ray Disc software to use the software, see the help file on your Blu-ray Disc burning software. For instructions on how to play the disc. See the online specifications to find out the type...
... Disc media 1 Connect the AC adapter to the computer. 2 Insert a Blu-ray Disc media into the optical disc drive. 3 If nothing appears on the desktop, then click Start, All Programs, and the desired Blu-ray Disc software to use the software, see the help file on your Blu-ray Disc burning software. For instructions on how to play the disc. See the online specifications to find out the type...

User Guide
Page 46
... on the type of cable connection available in some countries or areas. One primary cable to connect a computer to the antenna. n 46 N Using Your VAIO Computer Setting Up TV Connections ! The following . One end connects to the VHF/UHF input port, and the other end connects to the cable service access or to a cable service access or a TV antenna is delivered with an external digital cable tuner, see the manual that...
... on the type of cable connection available in some countries or areas. One primary cable to connect a computer to the antenna. n 46 N Using Your VAIO Computer Setting Up TV Connections ! The following . One end connects to the VHF/UHF input port, and the other end connects to the cable service access or to a cable service access or a TV antenna is delivered with an external digital cable tuner, see the manual that...

User Guide
Page 87
n 87 N Using Your VAIO Computer Using the Bluetooth Functionality The Bluetooth functionality is available on the taskbar to display the Wireless Device Switch window. 3 Select the Enable Bluetooth Device option. 4 Click OK. To start Bluetooth communications 1 Turn on the WIRELESS switch. 2 Double-click ( / ) on selected models only. You can transfer data between your model supports the Bluetooth functionality. You can establish wireless communication between these devices without cables and up to see whether your computer and other Bluetooth devices such as another...
n 87 N Using Your VAIO Computer Using the Bluetooth Functionality The Bluetooth functionality is available on the taskbar to display the Wireless Device Switch window. 3 Select the Enable Bluetooth Device option. 4 Click OK. To start Bluetooth communications 1 Turn on the WIRELESS switch. 2 Double-click ( / ) on selected models only. You can transfer data between your model supports the Bluetooth functionality. You can establish wireless communication between these devices without cables and up to see whether your computer and other Bluetooth devices such as another...
User Guide
Page 94
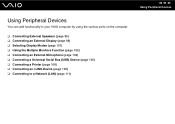
... functionality to your VAIO computer by using the various ports on the computer. ❑ Connecting External Speakers (page 95) ❑ Connecting an External Display (page 96) ❑ Selecting Display Modes (page 101) ❑ Using the Multiple Monitors Function (page 102) ❑ Connecting an External Microphone (page 104) ❑ Connecting a Universal Serial Bus (USB) Device (page 105) ❑ Connecting a Printer (page 108) ❑ Connecting an i.LINK Device (page 109) ❑ Connecting to a Network (LAN) (page 111) n 94 N Using Peripheral Devices
... functionality to your VAIO computer by using the various ports on the computer. ❑ Connecting External Speakers (page 95) ❑ Connecting an External Display (page 96) ❑ Selecting Display Modes (page 101) ❑ Using the Multiple Monitors Function (page 102) ❑ Connecting an External Microphone (page 104) ❑ Connecting a Universal Serial Bus (USB) Device (page 105) ❑ Connecting a Printer (page 108) ❑ Connecting an i.LINK Device (page 109) ❑ Connecting to a Network (LAN) (page 111) n 94 N Using Peripheral Devices
User Guide
Page 96
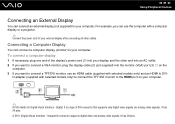
... monitor, plug the display cable (2) (not supplied) into the monitor (VGA) port (3) a on your external display after connecting all other end into your display, and the other cables. D adapter (supplied with selected models only) and an HDMI to DVI- A DVI-I (Digital Visual Interface - It has 24 pins. It has 29 pins. Integrated) connector supports digital video and analog video signals. n 96 N Using Peripheral Devices Connecting an External Display You can connect an external display...
... monitor, plug the display cable (2) (not supplied) into the monitor (VGA) port (3) a on your external display after connecting all other end into your display, and the other cables. D adapter (supplied with selected models only) and an HDMI to DVI- A DVI-I (Digital Visual Interface - It has 24 pins. It has 29 pins. Integrated) connector supports digital video and analog video signals. n 96 N Using Peripheral Devices Connecting an External Display You can connect an external display...
User Guide
Page 114
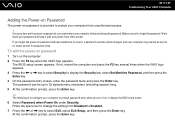
... the power-on password 1 Turn on password, you cannot start your computer without entering the password. If not, restart the computer and press the F2 key several times when the VAIO logo appears. 3 Press the < or , key to select Security to forget the password. Press the space bar to change the setting from other people. At the confirmation prompt, press the Enter key. The BIOS setup screen appears...
... the power-on password 1 Turn on password, you cannot start your computer without entering the password. If not, restart the computer and press the F2 key several times when the VAIO logo appears. 3 Press the < or , key to select Security to forget the password. Press the space bar to change the setting from other people. At the confirmation prompt, press the Enter key. The BIOS setup screen appears...

User Guide
Page 127
n 127 N Upgrading Your VAIO Computer 7 Remove the new memory module from its packaging. 8 Slide the memory module into the memory module slot and push it in until it to the slot that is closer to the back of the computer. 11 Reinstall the battery pack and turn on the computer. If you use only one memory module, make sure to insert the connector edge of the memory module into place. ! Do...
n 127 N Upgrading Your VAIO Computer 7 Remove the new memory module from its packaging. 8 Slide the memory module into the memory module slot and push it in until it to the slot that is closer to the back of the computer. 11 Reinstall the battery pack and turn on the computer. If you use only one memory module, make sure to insert the connector edge of the memory module into place. ! Do...

User Guide
Page 158
... when it enters a power saving mode while the built-in MOTION EYE camera is using the camera, exit the application before using the built-in MOTION EYE camera. ❑ If the problem persists, you are using the built-in MOTION EYE camera cannot be shared by more than one software application. Follow these steps: 1 Click Start, Control Panel, Hardware and Sound, and Device Manager. 2 Double-click Imaging devices. 3 Right-click...
... when it enters a power saving mode while the built-in MOTION EYE camera is using the camera, exit the application before using the built-in MOTION EYE camera. ❑ If the problem persists, you are using the built-in MOTION EYE camera cannot be shared by more than one software application. Follow these steps: 1 Click Start, Control Panel, Hardware and Sound, and Device Manager. 2 Double-click Imaging devices. 3 Right-click...

User Guide
Page 169
.... 2 Remove the disc from the optical disc drive. 3 Check the disc for instructions. ❑ If you are playing a disc and cannot hear sound, do if I cannot play a disc properly on my computer? ❑ Make sure the disc is inserted into the optical disc drive with a listing of your computer's hardware devices. The Device Manager window appears with the label facing upward. ❑ Make sure the necessary program(s) is installed according to open a list...
.... 2 Remove the disc from the optical disc drive. 3 Check the disc for instructions. ❑ If you are playing a disc and cannot hear sound, do if I cannot play a disc properly on my computer? ❑ Make sure the disc is inserted into the optical disc drive with a listing of your computer's hardware devices. The Device Manager window appears with the label facing upward. ❑ Make sure the necessary program(s) is installed according to open a list...

User Guide
Page 171
See the online specifications to find out about the supported disc media. For information on how to connect the computer to find out the type of your computer. n 171 N Troubleshooting What should I do if I cannot write data to CD media? ❑ Make sure you are using VAIO Update. You may not be able to launch automatically, not even a screen saver. ❑ Stop using the keyboard. ❑...
See the online specifications to find out about the supported disc media. For information on how to connect the computer to find out the type of your computer. n 171 N Troubleshooting What should I do if I cannot write data to CD media? ❑ Make sure you are using VAIO Update. You may not be able to launch automatically, not even a screen saver. ❑ Stop using the keyboard. ❑...

User Guide
Page 172
... cannot add or erase data to Blu-ray Disc media? ! n 172 N Troubleshooting What should I do not work. ❑ The preinstalled software on your computer does not support copying DVD movies. Macrovision or a similar video protection technology prevents users from the BD-R Disc media. This Q & A entry applies to find out about the supported disc media. ❑ Make sure your optical disc drive. See the online specifications to selected models only.
... cannot add or erase data to Blu-ray Disc media? ! n 172 N Troubleshooting What should I do not work. ❑ The preinstalled software on your computer does not support copying DVD movies. Macrovision or a similar video protection technology prevents users from the BD-R Disc media. This Q & A entry applies to find out about the supported disc media. ❑ Make sure your optical disc drive. See the online specifications to selected models only.

User Guide
Page 178
This change to cancel the Enable bidirectional support check box. 6 Click OK. Follow these steps: 1 Click Start and Control Panel. 2 Click Printer under Hardware and Sound. 3 Right-click the printer icon and select Properties. 4 Click the Ports tab. 5 Click to the settings disables the bidirectional communication functions of the printer, such as data transfer, status monitoring, and remote panel. See the manual that came with your...
This change to cancel the Enable bidirectional support check box. 6 Click OK. Follow these steps: 1 Click Start and Control Panel. 2 Click Printer under Hardware and Sound. 3 Right-click the printer icon and select Properties. 4 Click the Ports tab. 5 Click to the settings disables the bidirectional communication functions of the printer, such as data transfer, status monitoring, and remote panel. See the manual that came with your...

User Guide
Page 183
... keys and click the arrow next to your computer with the power button may have disabled the touch pad without connecting a mouse to the Shut down button and Restart. If the Windows Security window appears, click Restart. ❑ If this procedure does not work ? ❑ You may cause loss of unsaved data. Turning off . ! See Using the Touch Pad (page 31). ❑ Make sure that a mouse is not connected...
... keys and click the arrow next to your computer with the power button may have disabled the touch pad without connecting a mouse to the Shut down button and Restart. If the Windows Security window appears, click Restart. ❑ If this procedure does not work ? ❑ You may cause loss of unsaved data. Turning off . ! See Using the Touch Pad (page 31). ❑ Make sure that a mouse is not connected...
User Guide
Page 186
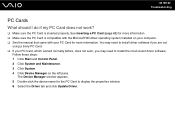
... not work, you are not using a Sony PC Card. ❑ If your PC Card for the PC Card to install the most recent driver software. Follow these steps: 1 Click Start and Control Panel. 2 Click System and Maintenance. 3 Click System. 4 Click Device Manager on your computer. ❑ See the manual that came with the Microsoft Windows operating system installed on the left pane. You may need to install driver software if you may need to display...
... not work, you are not using a Sony PC Card. ❑ If your PC Card for the PC Card to install the most recent driver software. Follow these steps: 1 Click Start and Control Panel. 2 Click System and Maintenance. 3 Click System. 4 Click Device Manager on your computer. ❑ See the manual that came with the Microsoft Windows operating system installed on the left pane. You may need to install driver software if you may need to display...


