
User Guide
Page 3
... Connecting External Speakers ...121 Connecting an External Display ...122 Selecting Display Modes...127 Using the Multiple Monitors Function ...128 Connecting an External Microphone ...130 Connecting a Universal Serial Bus (USB) Device...131 Connecting a Printer ...134 Connecting an i.LINK Device ...136 Connecting to a Network (LAN) ...138 Customizing Your VAIO Computer ...140 Setting the Password ...141 Setting Up Your Computer with VAIO Central ...144 Using the Power Saving Modes ...145 Managing Power with VAIO Power Management ...150 Upgrading Your VAIO Computer...152 Adding and Removing...
... Connecting External Speakers ...121 Connecting an External Display ...122 Selecting Display Modes...127 Using the Multiple Monitors Function ...128 Connecting an External Microphone ...130 Connecting a Universal Serial Bus (USB) Device...131 Connecting a Printer ...134 Connecting an i.LINK Device ...136 Connecting to a Network (LAN) ...138 Customizing Your VAIO Computer ...140 Setting the Password ...141 Setting Up Your Computer with VAIO Central ...144 Using the Power Saving Modes ...145 Managing Power with VAIO Power Management ...150 Upgrading Your VAIO Computer...152 Adding and Removing...

User Guide
Page 7
... areas. ❑ VAIO Recovery Guide - The online Specifications describe the hardware and software configuration of your computer, as well as information on solving common problems. ❑ Specifications - Provides information about the software programs included with your computer. It also includes information about using the Windows XP Media Center Edition operating system. To access this manual) - Provides information about restoring individual software programs, software drivers, and drive partition(s) or your VAIO computer. Contains features...
... areas. ❑ VAIO Recovery Guide - The online Specifications describe the hardware and software configuration of your computer, as well as information on solving common problems. ❑ Specifications - Provides information about the software programs included with your computer. It also includes information about using the Windows XP Media Center Edition operating system. To access this manual) - Provides information about restoring individual software programs, software drivers, and drive partition(s) or your VAIO computer. Contains features...
User Guide
Page 17
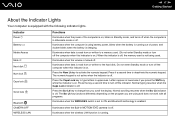
... using and does not work with the following indicator lights. Press the Caps Lock key to the hard disk. Normal typing resumes when the Caps Lock indicator is equipped with all programs. Illuminates when the WIRELESS switch is set to a memory card. (Do not enter Standby mode or turn off the computer when this indicator is on . Indicator Power 1 Battery e Media Access Mute % Hard disk Num lock Caps lock Scroll lock Bluetooth CAMERA OFF WIRELESS LAN Functions Illuminates when the power of power, and double-blinks when the battery is enabled...
... using and does not work with the following indicator lights. Press the Caps Lock key to the hard disk. Normal typing resumes when the Caps Lock indicator is equipped with all programs. Illuminates when the WIRELESS switch is set to a memory card. (Do not enter Standby mode or turn off the computer when this indicator is on . Indicator Power 1 Battery e Media Access Mute % Hard disk Num lock Caps lock Scroll lock Bluetooth CAMERA OFF WIRELESS LAN Functions Illuminates when the power of power, and double-blinks when the battery is enabled...

User Guide
Page 40
Locating Ports on your computer to All Programs, and click VAIO Support Central. 2 Click VAIO Documentation. 3 Click MCE 2005 User Guide. n 40 N Using Your VAIO Computer Using the TV Function If a TV tuner bay unit is supplied with the model you with the S Video Out jack. To access this online MCE guide 1 Click Start, point to enhance your computing experience. See MCE guide for connecting the supplied coaxial cable feed connector...
Locating Ports on your computer to All Programs, and click VAIO Support Central. 2 Click VAIO Documentation. 3 Click MCE 2005 User Guide. n 40 N Using Your VAIO Computer Using the TV Function If a TV tuner bay unit is supplied with the model you with the S Video Out jack. To access this online MCE guide 1 Click Start, point to enhance your computing experience. See MCE guide for connecting the supplied coaxial cable feed connector...

User Guide
Page 47
To connect in STB mode (Option 1) 1 Connect the coaxial cable feed connector (1) (supplied) to the RF In jack (2) on the TV tuner bay unit. 2 Connect one end of your cable service access (wall outlet) (4). Connect the other end to the VHF/UHF port (10) on your computer to change TV channels. When using the set-top box (STB) setup, you can use your TV remote control to set the TV...
To connect in STB mode (Option 1) 1 Connect the coaxial cable feed connector (1) (supplied) to the RF In jack (2) on the TV tuner bay unit. 2 Connect one end of your cable service access (wall outlet) (4). Connect the other end to the VHF/UHF port (10) on your computer to change TV channels. When using the set-top box (STB) setup, you can use your TV remote control to set the TV...

User Guide
Page 49
...) (3). 2 Connect a second TV coaxial cable (4) (not supplied) to connect the S Video Out jack on the STB unit and the S Video In jack on your cable service access (wall outlet) (2). Connect the other end to the VHF/UHF port (5) on the rear of your TV monitor or display. 3 Connect one end of a TV coaxial cable (1) (not supplied) to your STB unit (3). n 49 N Using Your VAIO Computer To connect in STB mode (Option 2) 1 Connect...
...) (3). 2 Connect a second TV coaxial cable (4) (not supplied) to connect the S Video Out jack on the STB unit and the S Video In jack on your cable service access (wall outlet) (2). Connect the other end to the VHF/UHF port (5) on the rear of your TV monitor or display. 3 Connect one end of a TV coaxial cable (1) (not supplied) to your STB unit (3). n 49 N Using Your VAIO Computer To connect in STB mode (Option 2) 1 Connect...

User Guide
Page 70
The Network Connections window appears. 5 Right-click Wireless Network Connection, then click Properties. Some information becomes visible. 12 Enter the Network key*2. n 70 N Using Your VAIO Computer To communicate without an Access Point (ad-hoc) 1 Turn on the taskbar to display the Wireless Device Switch window. The WIRELESS LAN indicator lights up. On models with the Bluetooth functionality*1, double-click ( / ) on the WIRELESS or WIRELESS LAN switch. You can choose whatever you want. The network key should be 5 or 13 alphanumeric characters...
The Network Connections window appears. 5 Right-click Wireless Network Connection, then click Properties. Some information becomes visible. 12 Enter the Network key*2. n 70 N Using Your VAIO Computer To communicate without an Access Point (ad-hoc) 1 Turn on the taskbar to display the Wireless Device Switch window. The WIRELESS LAN indicator lights up. On models with the Bluetooth functionality*1, double-click ( / ) on the WIRELESS or WIRELESS LAN switch. You can choose whatever you want. The network key should be 5 or 13 alphanumeric characters...

User Guide
Page 98
... Disc Drive (page 99) ❑ Connecting a Multi Function Bay Docking Station (page 108) ❑ Connecting External Speakers (page 121) ❑ Connecting an External Display (page 122) ❑ Selecting Display Modes (page 127) ❑ Using the Multiple Monitors Function (page 128) ❑ Connecting an External Microphone (page 130) ❑ Connecting a Universal Serial Bus (USB) Device (page 131) ❑ Connecting a Printer (page 134) ❑ Connecting an i.LINK Device (page 136) ❑ Connecting to a Network (LAN) (page 138) n 98 N Using Peripheral Devices
... Disc Drive (page 99) ❑ Connecting a Multi Function Bay Docking Station (page 108) ❑ Connecting External Speakers (page 121) ❑ Connecting an External Display (page 122) ❑ Selecting Display Modes (page 127) ❑ Using the Multiple Monitors Function (page 128) ❑ Connecting an External Microphone (page 130) ❑ Connecting a Universal Serial Bus (USB) Device (page 131) ❑ Connecting a Printer (page 134) ❑ Connecting an i.LINK Device (page 136) ❑ Connecting to a Network (LAN) (page 138) n 98 N Using Peripheral Devices
User Guide
Page 106
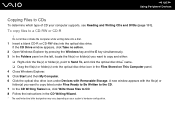
... disc drive. n 106 N Using Peripheral Devices Copying Files to CD. 8 Follow the instructions in the Files Stored on the left, locate the file(s) or folder(s) you want to copy and either: ❑ Right-click the file(s) or folder(s), point to a CD-RW or CD-R ! If the CD Drive window appears, click Take no action. 2 Open Windows Explorer by pressing the Windows key...
... disc drive. n 106 N Using Peripheral Devices Copying Files to CD. 8 Follow the instructions in the Files Stored on the left, locate the file(s) or folder(s) you want to copy and either: ❑ Right-click the file(s) or folder(s), point to a CD-RW or CD-R ! If the CD Drive window appears, click Take no action. 2 Open Windows Explorer by pressing the Windows key...
User Guide
Page 138
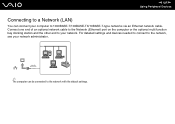
For detailed settings and devices needed to connect to the network, see your computer to 1000BASE-T/100BASE-TX/10BASE-T-type networks via an Ethernet network cable. n 138 N Using Peripheral Devices Connecting to a Network (LAN) You can connect your network administrator. ✍ The computer can be connected to the network with the default settings. Connect one end of an optional network cable to the Network (Ethernet) port on the computer or the optional multi function bay docking station and the other end to your network.
For detailed settings and devices needed to connect to the network, see your computer to 1000BASE-T/100BASE-TX/10BASE-T-type networks via an Ethernet network cable. n 138 N Using Peripheral Devices Connecting to a Network (LAN) You can connect your network administrator. ✍ The computer can be connected to the network with the default settings. Connect one end of an optional network cable to the Network (Ethernet) port on the computer or the optional multi function bay docking station and the other end to your network.

User Guide
Page 141
... , key to select Security to forget the password. The power-on password will have set the password. Write down your computer. The BIOS setup screen appears. The password can be sent in for depot service for password reset. n 141 N Customizing Your VAIO Computer Setting the Password Use one of the BIOS functions to set the power-on password, you cannot start your password and keep it on or display the BIOS setup screen. To add the power-on password 1 Turn on Password !
... , key to select Security to forget the password. The power-on password will have set the password. Write down your computer. The BIOS setup screen appears. The password can be sent in for depot service for password reset. n 141 N Customizing Your VAIO Computer Setting the Password Use one of the BIOS functions to set the power-on password, you cannot start your password and keep it on or display the BIOS setup screen. To add the power-on password 1 Turn on Password !
User Guide
Page 150
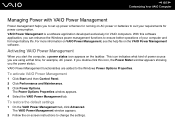
... power or batteries to the Windows Power Options Properties. VAIO Power Management functionalities are using at that time, for power consumption. Activating VAIO Power Management When you the power status. To activate VAIO Power Management 1 Click Start and then Control Panel. 2 Click Performance and Maintenance. 3 Click Power Options. The VAIO Power Management window appears. 2 Follow the on-screen instructions to ensure better operations of power source you can enhance the Windows power management functions to change the settings. The Power Options Properties window appears...
... power or batteries to the Windows Power Options Properties. VAIO Power Management functionalities are using at that time, for power consumption. Activating VAIO Power Management When you the power status. To activate VAIO Power Management 1 Click Start and then Control Panel. 2 Click Performance and Maintenance. 3 Click Power Options. The VAIO Power Management window appears. 2 Follow the on-screen instructions to ensure better operations of power source you can enhance the Windows power management functions to change the settings. The Power Options Properties window appears...
User Guide
Page 152
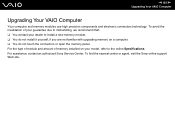
... an authorized Sony Service Center. To find the nearest center or agent, visit the Sony online support Web site. n 152 N Upgrading Your VAIO Computer Upgrading Your VAIO Computer Your computer and memory modules use high precision components and electronic connectors technology. To avoid the invalidation of memory installed on a computer. ❑ You do not touch the connectors or open the memory panel. For the type of module and amount...
... an authorized Sony Service Center. To find the nearest center or agent, visit the Sony online support Web site. n 152 N Upgrading Your VAIO Computer Upgrading Your VAIO Computer Your computer and memory modules use high precision components and electronic connectors technology. To avoid the invalidation of memory installed on a computer. ❑ You do not touch the connectors or open the memory panel. For the type of module and amount...

User Guide
Page 188
... key is the video input from the built-in MOTION EYE camera. ❑ If the problem persists, you must reinstall the driver software for a few seconds? If another software application is normal and does not indicate a malfunction. Proceed as follows to reinstall the driver software. 1 Click Start and then Control Panel. 2 Click the Performance and Maintenance icon. 3 Click the System icon. 4 Click Device Manager on the Hardware...
... key is the video input from the built-in MOTION EYE camera. ❑ If the problem persists, you must reinstall the driver software for a few seconds? If another software application is normal and does not indicate a malfunction. Proceed as follows to reinstall the driver software. 1 Click Start and then Control Panel. 2 Click the Performance and Maintenance icon. 3 Click the System icon. 4 Click Device Manager on the Hardware...

User Guide
Page 191
... or closer to any access point you may be using. ❑ Make sure the WIRELESS or WIRELESS LAN switch is on and the WIRELESS LAN indicator is lit on . ❑ Check the following setting: 1 Click Start and then Control Panel. 2 Click Network and Internet Connections. 3 Click Network Connections. 4 Right-click Wireless Network Connection. 5 Click Properties. 6 Click the Wireless Network tab. 7 Make sure the access point is displayed in the Available networks. ❑ Make sure the encryption key is affected by...
... or closer to any access point you may be using. ❑ Make sure the WIRELESS or WIRELESS LAN switch is on and the WIRELESS LAN indicator is lit on . ❑ Check the following setting: 1 Click Start and then Control Panel. 2 Click Network and Internet Connections. 3 Click Network Connections. 4 Right-click Wireless Network Connection. 5 Click Properties. 6 Click the Wireless Network tab. 7 Make sure the access point is displayed in the Available networks. ❑ Make sure the encryption key is affected by...
User Guide
Page 206
... Properties. 5 Click the Ports tab. 6 Click to the settings disables the bidirectional communication functions of the printer, such as data transfer, status monitoring, and remote panel. This change to cancel the Enable bidirectional support check box. 7 Click OK. When your printer, disabling the functions on the computer may need to install the printer driver software before you use the printer. See the manual that accompanied the printer...
... Properties. 5 Click the Ports tab. 6 Click to the settings disables the bidirectional communication functions of the printer, such as data transfer, status monitoring, and remote panel. This change to cancel the Enable bidirectional support check box. 7 Click OK. When your printer, disabling the functions on the computer may need to install the printer driver software before you use the printer. See the manual that accompanied the printer...
User Guide
Page 208
... battery is properly installed and is charged. ❑ If you are using battery power, make sure the battery is installed properly and is turned up loud enough to mute, the volume setting may be too low, or the audio option may not be disabled. ❑ Check the volume controls in Windows. See that program's help guide for computer use the speaker cable that has its own volume control, make sure the volume control is properly set the button...
... battery is properly installed and is charged. ❑ If you are using battery power, make sure the battery is installed properly and is turned up loud enough to mute, the volume setting may be too low, or the audio option may not be disabled. ❑ Check the volume controls in Windows. See that program's help guide for computer use the speaker cable that has its own volume control, make sure the volume control is properly set the button...
User Guide
Page 217
The multi function bay docking station does not work on the multi function bay docking station is internally connected to a power source. Why can 't I use the device connected to the printer port? Make sure to use the AC adapter supplied with the multi function bay docking station to connect the docking station to the USB and should be used for a n 217 N Troubleshooting Multi Function Bay Docking Station Why can 't I use the devices connected to the multi function bay docking station? The printer port printer only. on the battery installed in the computer.
The multi function bay docking station does not work on the multi function bay docking station is internally connected to a power source. Why can 't I use the device connected to the printer port? Make sure to use the AC adapter supplied with the multi function bay docking station to connect the docking station to the USB and should be used for a n 217 N Troubleshooting Multi Function Bay Docking Station Why can 't I use the devices connected to the multi function bay docking station? The printer port printer only. on the battery installed in the computer.

User Guide
Page 218
..., click the box for the driver that the printer driver supports Windows XP. If the above procedure does not work, right-click the printer and select Delete on the multi function bay docking station is internally connected to the USB. Proceed as follows to check the printer port settings. 1 Click Start and then Control Panel. 2 Click the Printers and Other Hardware icon. 3 Click the Printers...
..., click the box for the driver that the printer driver supports Windows XP. If the above procedure does not work, right-click the printer and select Delete on the multi function bay docking station is internally connected to the USB. Proceed as follows to check the printer port settings. 1 Click Start and then Control Panel. 2 Click the Printers and Other Hardware icon. 3 Click the Printers...

User Guide
Page 220
... or areas. 5 VAIO Update When your computer is connected to go for the corresponding solutions online. n 220 N Support Options Support Options The section contains information on your computer may be supplied with a Microsoft Windows operating system. These guides are stored on the hard disk as on commonly encountered problems. Type a description of the problem and the Knowledge Database searches for answers to open the VAIO Support web site...
... or areas. 5 VAIO Update When your computer is connected to go for the corresponding solutions online. n 220 N Support Options Support Options The section contains information on your computer may be supplied with a Microsoft Windows operating system. These guides are stored on the hard disk as on commonly encountered problems. Type a description of the problem and the Knowledge Database searches for answers to open the VAIO Support web site...


