User Manual
Page 3
... Monitors Function ...98 Connecting an External Microphone ...100 Connecting a Universal Serial Bus (USB) Device...102 Connecting a Printer ...105 Connecting an i.LINK Device ...107 Connecting to a Network (LAN) ...109 Customizing Your VAIO Computer ...110 Setting the Password ...111 Using Fingerprint Authentication ...121 Using Trusted Platform Module (TPM)...129 Setting Up Your Computer with VAIO Central ...134 Using the Power Saving Modes ...135 Managing Power with VAIO Power Management ...140 Protecting the Hard Disk ...142 Upgrading Your VAIO Computer...143 Adding and Removing Memory...
... Monitors Function ...98 Connecting an External Microphone ...100 Connecting a Universal Serial Bus (USB) Device...102 Connecting a Printer ...105 Connecting an i.LINK Device ...107 Connecting to a Network (LAN) ...109 Customizing Your VAIO Computer ...110 Setting the Password ...111 Using Fingerprint Authentication ...121 Using Trusted Platform Module (TPM)...129 Setting Up Your Computer with VAIO Central ...134 Using the Power Saving Modes ...135 Managing Power with VAIO Power Management ...140 Protecting the Hard Disk ...142 Upgrading Your VAIO Computer...143 Adding and Removing Memory...

User Manual
Page 7
....sony.com/ES/VAIO/BR/ for customers in Brazil ❑ VAIO Recovery Guide - To view the online Specifications: 1 Connect to the Internet. 2 Go to All Programs, and click VAIO Support Central. 2 Click VAIO Documentation. 3 Click VAIO Recovery Guide. ❑ SmartWi™ Connection Utility Help (Selected models only) - To access this on solving common problems. ❑ Specifications - It also includes information about setting up Bluetooth, wireless LAN, and wireless WAN functionalities. n7 N Before Use Non-printed Documentation ❑ User Guide...
....sony.com/ES/VAIO/BR/ for customers in Brazil ❑ VAIO Recovery Guide - To view the online Specifications: 1 Connect to the Internet. 2 Go to All Programs, and click VAIO Support Central. 2 Click VAIO Documentation. 3 Click VAIO Recovery Guide. ❑ SmartWi™ Connection Utility Help (Selected models only) - To access this on solving common problems. ❑ Specifications - It also includes information about setting up Bluetooth, wireless LAN, and wireless WAN functionalities. n7 N Before Use Non-printed Documentation ❑ User Guide...
User Manual
Page 18
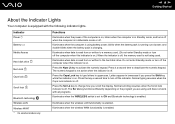
Indicator Power 1 Battery e Media Access Hard disk drive Num lock Caps lock Scroll lock Bluetooth technology Wireless LAN Wireless WAN* * On selected models only. Illuminates when the computer is using and does not work with the following indicator lights. The Scr Lk key functions differently depending on the program you are using battery power, blinks when the battery pack is running out of the computer is on, blinks when the computer is in Standby mode, and turns off . Functions Illuminates when the power of...
Indicator Power 1 Battery e Media Access Hard disk drive Num lock Caps lock Scroll lock Bluetooth technology Wireless LAN Wireless WAN* * On selected models only. Illuminates when the computer is using and does not work with the following indicator lights. The Scr Lk key functions differently depending on the program you are using battery power, blinks when the battery pack is running out of the computer is on, blinks when the computer is in Standby mode, and turns off . Functions Illuminates when the power of...
User Manual
Page 29
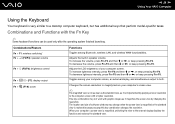
Combinations/Feature Fn + F1: wireless switching* Fn + 2 (F3/F4): speaker volume Fn + 8 (F5/F6): brightness control Fn + /T (F7): display output Fn + (F10): zoom Functions Toggles among Bluetooth, wireless LAN, and wireless WAN functionalities. n 29 N Using Your VAIO Computer Using the Keyboard Your keyboard is very similar to a desktop computer keyboard, but has additional keys that perform model-specific tasks. Adjusts the built-in speaker volume. To decrease the volume, press Fn+F3 and then m or...
Combinations/Feature Fn + F1: wireless switching* Fn + 2 (F3/F4): speaker volume Fn + 8 (F5/F6): brightness control Fn + /T (F7): display output Fn + (F10): zoom Functions Toggles among Bluetooth, wireless LAN, and wireless WAN functionalities. n 29 N Using Your VAIO Computer Using the Keyboard Your keyboard is very similar to a desktop computer keyboard, but has additional keys that perform model-specific tasks. Adjusts the built-in speaker volume. To decrease the volume, press Fn+F3 and then m or...
User Manual
Page 55
... desired wireless option(s) and click OK. 3 Click Start and then Control Panel. 4 Click Network and Internet Connections. 5 Click Network Connections. button. n 55 N Using Your VAIO Computer To communicate without an access point (ad-hoc) ! The Wireless Network Connection Properties window appears. 7 Select the Wireless Networks tab. 8 Click the Add... The Wireless network properties window appears. 9 Follow the on the taskbar to display the Wireless Device Switch window. The Wireless LAN indicator lights up. 2 Double-click ( / ) on -screen instructions. You cannot select the 5 GHz...
... desired wireless option(s) and click OK. 3 Click Start and then Control Panel. 4 Click Network and Internet Connections. 5 Click Network Connections. button. n 55 N Using Your VAIO Computer To communicate without an access point (ad-hoc) ! The Wireless Network Connection Properties window appears. 7 Select the Wireless Networks tab. 8 Click the Add... The Wireless network properties window appears. 9 Follow the on the taskbar to display the Wireless Device Switch window. The Wireless LAN indicator lights up. 2 Double-click ( / ) on -screen instructions. You cannot select the 5 GHz...
User Manual
Page 57
... manual that came with your desired wireless option(s) and click OK. 4 Click Start and then Control Panel. 5 Click Network and Internet Connections. 6 Click Network Connections. 7 In the right panel under LAN or High-Speed Internet, double-click Wireless Network Connection. To disconnect from A to a wireless network 1 Make sure an access point is case sensitive and must enter a passphrase. The Wireless LAN indicator lights up to 64 characters long using numbers from 0 to 9 and letters from a wireless network Turn off the wireless LAN functionality while accessing...
... manual that came with your desired wireless option(s) and click OK. 4 Click Start and then Control Panel. 5 Click Network and Internet Connections. 6 Click Network Connections. 7 In the right panel under LAN or High-Speed Internet, double-click Wireless Network Connection. To disconnect from A to a wireless network 1 Make sure an access point is case sensitive and must enter a passphrase. The Wireless LAN indicator lights up to 64 characters long using numbers from 0 to 9 and letters from a wireless network Turn off the wireless LAN functionality while accessing...

User Manual
Page 58
... phone. To connect to a Bluetooth device 1 Turn on the WIRELESS switch. 2 Double-click ( / ) on how to display the Wireless Device Switch window. 3 Select the Enable Bluetooth Device option. 4 Click OK. You can establish wireless communication between these devices without cables and up to 33 feet (10 meters) range in open space. ❑ Wireless WAN models See the SmartWi Connection Utility Help for setting up Bluetooth functionality. For instructions on the taskbar to access the SmartWi Connection Utility Help, see Non...
... phone. To connect to a Bluetooth device 1 Turn on the WIRELESS switch. 2 Double-click ( / ) on how to display the Wireless Device Switch window. 3 Select the Enable Bluetooth Device option. 4 Click OK. You can establish wireless communication between these devices without cables and up to 33 feet (10 meters) range in open space. ❑ Wireless WAN models See the SmartWi Connection Utility Help for setting up Bluetooth functionality. For instructions on the taskbar to access the SmartWi Connection Utility Help, see Non...
User Manual
Page 66
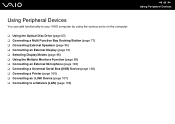
... Disc Drive (page 67) ❑ Connecting a Multi Function Bay Docking Station (page 77) ❑ Connecting External Speakers (page 90) ❑ Connecting an External Display (page 91) ❑ Selecting Display Modes (page 96) ❑ Using the Multiple Monitors Function (page 98) ❑ Connecting an External Microphone (page 100) ❑ Connecting a Universal Serial Bus (USB) Device (page 102) ❑ Connecting a Printer (page 105) ❑ Connecting an i.LINK Device (page 107) ❑ Connecting to a Network (LAN) (page 109) n 66 N Using Peripheral Devices
... Disc Drive (page 67) ❑ Connecting a Multi Function Bay Docking Station (page 77) ❑ Connecting External Speakers (page 90) ❑ Connecting an External Display (page 91) ❑ Selecting Display Modes (page 96) ❑ Using the Multiple Monitors Function (page 98) ❑ Connecting an External Microphone (page 100) ❑ Connecting a Universal Serial Bus (USB) Device (page 102) ❑ Connecting a Printer (page 105) ❑ Connecting an i.LINK Device (page 107) ❑ Connecting to a Network (LAN) (page 109) n 66 N Using Peripheral Devices

User Manual
Page 71
... or prohibit analog video output at high bit rates. USING NON-COMPLIANT DISCS CAN CAUSE FATAL DAMAGE TO YOUR VAIO PC OR CREATE SOFTWARE CONFLICTS AND CAUSE SYSTEM HANGING. A DualDisc is a two sided disc product which mates DVD recorded material on one side with your external display is not possible. Due to the multiple formats of VAIO CD drives with discs that conform to...
... or prohibit analog video output at high bit rates. USING NON-COMPLIANT DISCS CAN CAUSE FATAL DAMAGE TO YOUR VAIO PC OR CREATE SOFTWARE CONFLICTS AND CAUSE SYSTEM HANGING. A DualDisc is a two sided disc product which mates DVD recorded material on one side with your external display is not possible. Due to the multiple formats of VAIO CD drives with discs that conform to...
User Manual
Page 75
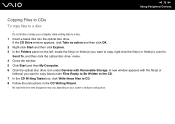
... vary, depending on the left, locate the file(s) or folder(s) you want to copy, right-click the file(s) or folder(s), point to Send To, and then click the optical disc drive* name. 4 Close the window. 5 Click Start and then My Computer. 6 Click the optical disc drive icon under Devices with Removable Storage. n 75 N Using Peripheral Devices Copying Files to CDs To...
... vary, depending on the left, locate the file(s) or folder(s) you want to copy, right-click the file(s) or folder(s), point to Send To, and then click the optical disc drive* name. 4 Close the window. 5 Click Start and then My Computer. 6 Click the optical disc drive icon under Devices with Removable Storage. n 75 N Using Peripheral Devices Copying Files to CDs To...

User Manual
Page 92
... - You can connect a computer display (monitor) either directly to your model includes, see the online Specifications. To find which video controller your computer or via the optional multi function bay docking station. Digital. n 92 N Using Peripheral Devices Connecting a Computer Display You can use a TFT/DVI monitor only when a model with the ATI video controller is attached to the multi function bay docking station. It is a type of the display's power cord (1) into...
... - You can connect a computer display (monitor) either directly to your model includes, see the online Specifications. To find which video controller your computer or via the optional multi function bay docking station. Digital. n 92 N Using Peripheral Devices Connecting a Computer Display You can use a TFT/DVI monitor only when a model with the ATI video controller is attached to the multi function bay docking station. It is a type of the display's power cord (1) into...

User Manual
Page 99
... N Using Peripheral Devices To select the Multiple Monitors mode ! To find which video controller your computer is not accessible when the computer is attached to change the settings. Models with the Intel Graphics Media Accelerator 1 Right-click on the desktop to display the context menu. 2 Click the menu item for graphic properties. 3 Follow the on -screen instructions to the multi function bay docking station. Models with the ATI video controller...
... N Using Peripheral Devices To select the Multiple Monitors mode ! To find which video controller your computer is not accessible when the computer is attached to change the settings. Models with the Intel Graphics Media Accelerator 1 Right-click on the desktop to display the context menu. 2 Click the menu item for graphic properties. 3 Follow the on -screen instructions to the multi function bay docking station. Models with the ATI video controller...
User Manual
Page 112
... service for password reset. ✍ If you have set the power-on password: machine password and user password. If you forget the power-on password and need assistance to reset it safe and private from unauthorized access. Once you have set the machine password. ! The user password is provided for other people. There are two types of the BIOS setup options, as well as to start your computer without entering the password. For more information, see Using...
... service for password reset. ✍ If you have set the power-on password: machine password and user password. If you forget the power-on password and need assistance to reset it safe and private from unauthorized access. Once you have set the machine password. ! The user password is provided for other people. There are two types of the BIOS setup options, as well as to start your computer without entering the password. For more information, see Using...

User Manual
Page 133
... rights on Security Platform. ! n 133 N Customizing Your VAIO Computer To install the Infineon TPM Professional Package Read the Readme.txt in the C:\infineon\Readme folder. Then, double-click C:\Infineon\setup.exe to write down the passwords and keep them safe and private from other people. You need to restore any defects arising out of your own risk.
... rights on Security Platform. ! n 133 N Customizing Your VAIO Computer To install the Infineon TPM Professional Package Read the Readme.txt in the C:\infineon\Readme folder. Then, double-click C:\Infineon\setup.exe to write down the passwords and keep them safe and private from other people. You need to restore any defects arising out of your own risk.
User Manual
Page 169
... Sony online support Web site. If you have forgotten the BIOS password, contact an authorized Sony Service Center to reset it. The optimal graphic performance in this case is enabled, it may take time before my computer starts? ❑ If Norton Internet Security's Personal Firewall is active, it will be charged. n 169 N Troubleshooting What should I do if I do if my game software does not work...
... Sony online support Web site. If you have forgotten the BIOS password, contact an authorized Sony Service Center to reset it. The optimal graphic performance in this case is enabled, it may take time before my computer starts? ❑ If Norton Internet Security's Personal Firewall is active, it will be charged. n 169 N Troubleshooting What should I do if I do if my game software does not work...

User Manual
Page 188
... CD-RW discs. Canceling the Enable CD recording on this drive check box. 5 Click OK. ! Follow these steps to change the settings: 1 Click Start and then My Computer. 2 Right-click the optical disc drive icon and select Properties. 3 Click the Recording tab. 4 Click to DVD-RAM media using Windows functions? ! You cannot add data to DVD-RAM discs with data already written by the Roxio DigitalMedia software due...
... CD-RW discs. Canceling the Enable CD recording on this drive check box. 5 Click OK. ! Follow these steps to change the settings: 1 Click Start and then My Computer. 2 Right-click the optical disc drive icon and select Properties. 3 Click the Recording tab. 4 Click to DVD-RAM media using Windows functions? ! You cannot add data to DVD-RAM discs with data already written by the Roxio DigitalMedia software due...
User Manual
Page 189
... if my screen is charged. Press the Fn+F6 keys to the external display, press the Fn+F7 keys. Make sure the power indicator shows the power is on . See Selecting Display Modes (page 96). Alternatively, you cannot display a video on your computer is using battery power, make sure the battery pack is installed properly and is dark? In this case, lower the resolution of your computer screen. n 189 N Troubleshooting Display Why did...
... if my screen is charged. Press the Fn+F6 keys to the external display, press the Fn+F7 keys. Make sure the power indicator shows the power is on . See Selecting Display Modes (page 96). Alternatively, you cannot display a video on your computer is using battery power, make sure the battery pack is installed properly and is dark? In this case, lower the resolution of your computer screen. n 189 N Troubleshooting Display Why did...

User Manual
Page 193
.... ❑ Make sure your printer is connected to an AC power source. This change to cancel the Enable bidirectional support check box. 7 Click OK. Follow these steps: 1 Click Start and then Control Panel. 2 Click Printers and Other Hardware. 3 Click Printers and Faxes. 4 Right-click the printer icon and select Properties. 5 Click the Ports tab. 6 Click to the settings disables the bidirectional communication functions of...
.... ❑ Make sure your printer is connected to an AC power source. This change to cancel the Enable bidirectional support check box. 7 Click OK. Follow these steps: 1 Click Start and then Control Panel. 2 Click Printers and Other Hardware. 3 Click Printers and Faxes. 4 Right-click the printer icon and select Properties. 5 Click the Ports tab. 6 Click to the settings disables the bidirectional communication functions of...
User Manual
Page 203
... use the AC adapter supplied with the ATI video controller is enabled only when a model with the multi function bay docking station to connect the docking station to the multi function bay docking station. on the battery pack installed in your computer. The DVI-D port is attached to a power source. Be sure to use the devices connected to the multi function bay docking station? n 203 N Troubleshooting Multi Function Bay...
... use the AC adapter supplied with the ATI video controller is enabled only when a model with the multi function bay docking station to connect the docking station to the multi function bay docking station. on the battery pack installed in your computer. The DVI-D port is attached to a power source. Be sure to use the devices connected to the multi function bay docking station? n 203 N Troubleshooting Multi Function Bay...

User Manual
Page 204
... select Delete on the multi function bay docking station is internally connected to the USB. If another check box is selected. Ask the manufacturer of your printer for the driver that supports Windows XP. ❑ The printer port on the window in step 4 above to check the printer port settings: 1 Click Start and then Control Panel. 2 Click Printers and Other Hardware. 3 Click Printers and Faxes...
... select Delete on the multi function bay docking station is internally connected to the USB. If another check box is selected. Ask the manufacturer of your printer for the driver that supports Windows XP. ❑ The printer port on the window in step 4 above to check the printer port settings: 1 Click Start and then Control Panel. 2 Click Printers and Other Hardware. 3 Click Printers and Faxes...


