User Manual
Page 2
... and Ports...11 About the Indicator Lights ...18 Connecting a Power Source ...19 Using the Battery Pack ...21 Shutting Down Your Computer Safely ...27 Using Your VAIO Computer ...28 Using the Keyboard ...29 Using the Pointing Device ...31 Using Special-function Buttons ...34 Using the Multi Function Bay ...35 Using the ExpressCard...
... and Ports...11 About the Indicator Lights ...18 Connecting a Power Source ...19 Using the Battery Pack ...21 Shutting Down Your Computer Safely ...27 Using Your VAIO Computer ...28 Using the Keyboard ...29 Using the Pointing Device ...31 Using Special-function Buttons ...34 Using the Multi Function Bay ...35 Using the ExpressCard...
User Manual
Page 3
... External Microphone ...100 Connecting a Universal Serial Bus (USB) Device...102 Connecting a Printer ...105 Connecting an i.LINK Device ...107 Connecting to a Network (LAN) ...109 Customizing Your VAIO Computer ...110 Setting the Password ...111 Using Fingerprint Authentication ...121 Using Trusted Platform Module (TPM)...129 Setting Up Your Computer with...
... External Microphone ...100 Connecting a Universal Serial Bus (USB) Device...102 Connecting a Printer ...105 Connecting an i.LINK Device ...107 Connecting to a Network (LAN) ...109 Customizing Your VAIO Computer ...110 Setting the Password ...111 Using Fingerprint Authentication ...121 Using Trusted Platform Module (TPM)...129 Setting Up Your Computer with...
User Manual
Page 6
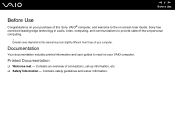
... information. n6 N Before Use Before Use Congratulations on your purchase of this manual may look slightly different from those of your VAIO computer. Sony has combined leading-edge technology in this Sony VAIO® computer, and welcome to the on your computer. External views illustrated in audio, video, computing, and communications to read on...
... information. n6 N Before Use Before Use Congratulations on your purchase of this manual may look slightly different from those of your VAIO computer. Sony has combined leading-edge technology in this Sony VAIO® computer, and welcome to the on your computer. External views illustrated in audio, video, computing, and communications to read on...

User Manual
Page 7
... view the online Specifications: 1 Connect to the Internet. 2 Go to the Sony online support Web site at the following URLs: http://esupport.sony.com/EN/VAIO/ for customers in USA http://www.sony.ca/support for customers in Canada http://esupport.sony.com/ES/VAIO/ for customers in Spanish speaking Latin American countries or areas http...
... view the online Specifications: 1 Connect to the Internet. 2 Go to the Sony online support Web site at the following URLs: http://esupport.sony.com/EN/VAIO/ for customers in USA http://www.sony.ca/support for customers in Canada http://esupport.sony.com/ES/VAIO/ for customers in Spanish speaking Latin American countries or areas http...
User Manual
Page 10
... 27) n 10 N Getting Started Getting Started This section describes how to start up your computer with your computer. Be sure to get started using your VAIO computer. !
... 27) n 10 N Getting Started Getting Started This section describes how to start up your computer with your computer. Be sure to get started using your VAIO computer. !
User Manual
Page 28
Using Your VAIO Computer This section describes how to get the most out of using your VAIO computer. ❑ Using the Keyboard (page 29) ❑ Using the Pointing Device (page 31) ❑ Using Special-function Buttons (page 34) ❑ Using the Multi Function Bay (page 35) ❑ Using the ExpressCard Module (page 39) ❑ Using the Memory Stick Media (page 42) ❑ Using Other Memory Cards (page 46) ❑ Using the Internet (page 49) ❑ Using Wireless LAN (WLAN) (page 51) ❑ Using the Bluetooth Functionality (page 58) n 28 N Using Your VAIO Computer
Using Your VAIO Computer This section describes how to get the most out of using your VAIO computer. ❑ Using the Keyboard (page 29) ❑ Using the Pointing Device (page 31) ❑ Using Special-function Buttons (page 34) ❑ Using the Multi Function Bay (page 35) ❑ Using the ExpressCard Module (page 39) ❑ Using the Memory Stick Media (page 42) ❑ Using Other Memory Cards (page 46) ❑ Using the Internet (page 49) ❑ Using Wireless LAN (WLAN) (page 51) ❑ Using the Bluetooth Functionality (page 58) n 28 N Using Your VAIO Computer
User Manual
Page 29
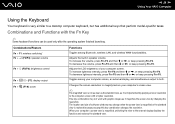
... Fn + 8 (F5/F6): brightness control Fn + /T (F7): display output Fn + (F10): zoom Functions Toggles among Bluetooth, wireless LAN, and wireless WAN functionalities. n 29 N Using Your VAIO Computer Using the Keyboard Your keyboard is very similar to a desktop computer keyboard, but has additional keys that perform model-specific tasks. Adjusts the built...
... Fn + 8 (F5/F6): brightness control Fn + /T (F7): display output Fn + (F10): zoom Functions Toggles among Bluetooth, wireless LAN, and wireless WAN functionalities. n 29 N Using Your VAIO Computer Using the Keyboard Your keyboard is very similar to a desktop computer keyboard, but has additional keys that perform model-specific tasks. Adjusts the built...
User Manual
Page 30
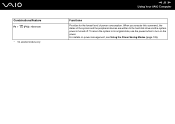
To return the system to its original state, use the power button to the hard disk drive and the system power is turned off. Combinations/Feature Fn + (F12): Hibernate * On selected models only. When you execute this command, the states of power consumption. For details on the power. n 30 N Using Your VAIO Computer Functions Provides for the lowest level of the system and the peripheral devices are written to turn on power management, see Using the Power Saving Modes (page 135).
To return the system to its original state, use the power button to the hard disk drive and the system power is turned off. Combinations/Feature Fn + (F12): Hibernate * On selected models only. When you execute this command, the states of power consumption. For details on the power. n 30 N Using Your VAIO Computer Functions Provides for the lowest level of the system and the peripheral devices are written to turn on power management, see Using the Power Saving Modes (page 135).
User Manual
Page 31
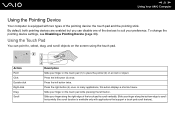
... right edge of the touch pad to scroll horizontally (the scroll function is equipped with applications that support a touch pad scroll feature). n 31 N Using Your VAIO Computer Using the Pointing Device Your computer is available only with two types of the devices to suit your finger on the touch pad (1) to...
... right edge of the touch pad to scroll horizontally (the scroll function is equipped with applications that support a touch pad scroll feature). n 31 N Using Your VAIO Computer Using the Pointing Device Your computer is available only with two types of the devices to suit your finger on the touch pad (1) to...
User Manual
Page 32
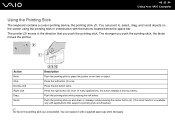
... and down or sideways while pressing the center button (4). (The scroll function is a consumable. In many applications, this action displays a shortcut menu. n 32 N Using Your VAIO Computer Using the Pointing Stick The keyboard contains a cursor-pointing device, the pointing stick (1). Click Press the left button twice. Action Description Point Push the...
... and down or sideways while pressing the center button (4). (The scroll function is a consumable. In many applications, this action displays a shortcut menu. n 32 N Using Your VAIO Computer Using the Pointing Stick The keyboard contains a cursor-pointing device, the pointing stick (1). Click Press the left button twice. Action Description Point Push the...
User Manual
Page 33
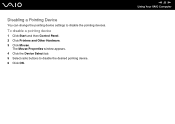
n 33 N Using Your VAIO Computer To disable a pointing device 1 Click Start and then Control Panel. 2 Click Printers and Other Hardware. 3 Click Mouse. The Mouse Properties window appears. 4 Click the Device Select tab. 5 Select radio buttons to disable the pointing devices. Disabling a Pointing Device You can change the pointing device settings to disable the desired pointing device. 6 Click OK.
n 33 N Using Your VAIO Computer To disable a pointing device 1 Click Start and then Control Panel. 2 Click Printers and Other Hardware. 3 Click Mouse. The Mouse Properties window appears. 4 Click the Device Select tab. 5 Select radio buttons to disable the pointing devices. Disabling a Pointing Device You can change the pointing device settings to disable the desired pointing device. 6 Click OK.
User Manual
Page 34
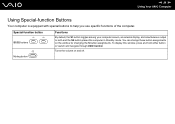
... volume on the window for changing the S button assignments. To display this window, press and hold either button or launch and navigate through VAIO Central. n 34 N Using Your VAIO Computer Using Special-function Buttons Your computer is equipped with special buttons to both and the S2 button places the computer in Standby...
... volume on the window for changing the S button assignments. To display this window, press and hold either button or launch and navigate through VAIO Central. n 34 N Using Your VAIO Computer Using Special-function Buttons Your computer is equipped with special buttons to both and the S2 button places the computer in Standby...
User Manual
Page 35
Additionally, you can purchase an optional bay unit and install it in the computer. n 35 N Using Your VAIO Computer Using the Multi Function Bay Your computer is delivered with a component bay, called multi function bay, for installing your dealer about the latest information. ...
Additionally, you can purchase an optional bay unit and install it in the computer. n 35 N Using Your VAIO Computer Using the Multi Function Bay Your computer is delivered with a component bay, called multi function bay, for installing your dealer about the latest information. ...
User Manual
Page 36
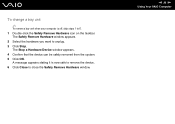
The Safely Remove Hardware window appears. 2 Select the hardware you want to 6. 1 Double-click the Safely Remove Hardware icon on the taskbar. To change a bay unit ✍ To remove a bay unit when your computer is now safe to remove the device. 6 Click Close to close the Safely Remove Hardware window. The Stop a Hardware Device window appears. 4 Confirm that the device can be safely removed from the system. 5 Click OK. A message appears stating it is off, skip steps 1 to unplug. 3 Click Stop. n 36 N Using Your VAIO Computer
The Safely Remove Hardware window appears. 2 Select the hardware you want to 6. 1 Double-click the Safely Remove Hardware icon on the taskbar. To change a bay unit ✍ To remove a bay unit when your computer is now safe to remove the device. 6 Click Close to close the Safely Remove Hardware window. The Stop a Hardware Device window appears. 4 Confirm that the device can be safely removed from the system. 5 Click OK. A message appears stating it is off, skip steps 1 to unplug. 3 Click Stop. n 36 N Using Your VAIO Computer
User Manual
Page 37
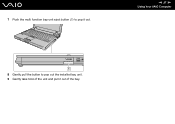
n 37 N Using Your VAIO Computer 8 Gently pull the button to pop it out of the bay. 7 Push the multi function bay unit eject button (1) to pop out the installed bay unit. 9 Gently take hold of the unit and pull it out.
n 37 N Using Your VAIO Computer 8 Gently pull the button to pop it out of the bay. 7 Push the multi function bay unit eject button (1) to pop out the installed bay unit. 9 Gently take hold of the unit and pull it out.
User Manual
Page 38
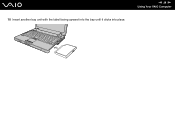
10 Insert another bay unit with the label facing upward into the bay until it clicks into place. n 38 N Using Your VAIO Computer
10 Insert another bay unit with the label facing upward into the bay until it clicks into place. n 38 N Using Your VAIO Computer
User Manual
Page 39
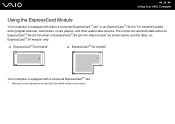
...™/34 module* ❑ ExpressCard™/54 module* Your computer is equipped with a Universal ExpressCard™ slot*. * Referred to as shown below; n 39 N Using Your VAIO Computer Using the ExpressCard Module Your computer is equipped with either an ExpressCard™/34 (34 mm wide) or ExpressCard™/54 (54 mm wide...
...™/34 module* ❑ ExpressCard™/54 module* Your computer is equipped with a Universal ExpressCard™ slot*. * Referred to as shown below; n 39 N Using Your VAIO Computer Using the ExpressCard Module Your computer is equipped with either an ExpressCard™/34 (34 mm wide) or ExpressCard™/54 (54 mm wide...
User Manual
Page 40
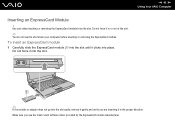
n 40 N Using Your VAIO Computer Inserting an ExpressCard Module ! Do not force it into the slot. ✍ If the module or adapter does not go into place. To insert ...
n 40 N Using Your VAIO Computer Inserting an ExpressCard Module ! Do not force it into the slot. ✍ If the module or adapter does not go into place. To insert ...
User Manual
Page 41
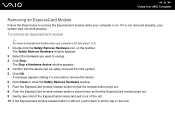
... properly, your system may not work properly. The Safely Remove Hardware window appears. 2 Select the hardware you want to unplug. 3 Click Stop. n 41 N Using Your VAIO Computer Removing an ExpressCard Module Follow the steps below to remove the ExpressCard module while your computer is on the taskbar. If it is still...
... properly, your system may not work properly. The Safely Remove Hardware window appears. 2 Select the hardware you want to unplug. 3 Click Stop. n 41 N Using Your VAIO Computer Removing an ExpressCard Module Follow the steps below to remove the ExpressCard module while your computer is on the taskbar. If it is still...
User Manual
Page 42
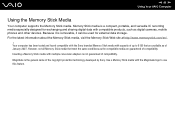
.... Use a Memory Stick media with compatible products, such as of compatibility. Your computer has been tested and found compatible with the Sony branded Memory Stick media with multiple conversion adapters is a compact, portable, and versatile IC recording media especially designed for external data storage.... However, not all Memory Stick media that are guaranteed of January 2007. n 42 N Using Your VAIO Computer Using the Memory Stick Media Your computer supports the Memory Stick media. Memory Stick media is not guaranteed of the copyright ...
.... Use a Memory Stick media with compatible products, such as of compatibility. Your computer has been tested and found compatible with the Sony branded Memory Stick media with multiple conversion adapters is a compact, portable, and versatile IC recording media especially designed for external data storage.... However, not all Memory Stick media that are guaranteed of January 2007. n 42 N Using Your VAIO Computer Using the Memory Stick Media Your computer supports the Memory Stick media. Memory Stick media is not guaranteed of the copyright ...

