

User Guide
Page 3
... an External Display ...76 Selecting Display Modes...80 Using the Multiple Monitors Function ...81 Connecting an External Microphone ...83 Connecting a Universal Serial Bus (USB) Device...84 Connecting a Printer ...87 Connecting an i.LINK Device ...88 Connecting to a Network (LAN) ...90 Customizing Your VAIO Computer ...91 Setting the Password ...92 Using Fingerprint Authentication ...99 Setting Up Your Computer with VAIO Control Center 107 Using the Power Saving Modes ...109 Managing Power with VAIO Power Management ...114 Upgrading Your VAIO Computer...115 Adding and Removing Memory...116
... an External Display ...76 Selecting Display Modes...80 Using the Multiple Monitors Function ...81 Connecting an External Microphone ...83 Connecting a Universal Serial Bus (USB) Device...84 Connecting a Printer ...87 Connecting an i.LINK Device ...88 Connecting to a Network (LAN) ...90 Customizing Your VAIO Computer ...91 Setting the Password ...92 Using Fingerprint Authentication ...99 Setting Up Your Computer with VAIO Control Center 107 Using the Power Saving Modes ...109 Managing Power with VAIO Power Management ...114 Upgrading Your VAIO Computer...115 Adding and Removing Memory...116

User Guide
Page 7
... ❑ User Guide (this manual by clicking their respective URLs beginning with your computer, as well as information on your VAIO computer. It also includes information about the software programs included with http://, your computer. To view the online specifications: 1 Connect to the Internet. 2 Go to use Instant Mode. Printed Documentation ❑ Welcome mat - Provides a guide to the Sony online support Web site...
... ❑ User Guide (this manual by clicking their respective URLs beginning with your computer, as well as information on your VAIO computer. It also includes information about the software programs included with http://, your computer. To view the online specifications: 1 Connect to the Internet. 2 Go to use Instant Mode. Printed Documentation ❑ Welcome mat - Provides a guide to the Sony online support Web site...

User Guide
Page 8
To access this on-screen guide: 1 Click Start and Help and Support. 2 Click Manuals & Specifications. 3 Click VAIO Recovery Center User Guide. Provides information about restoring individual software programs, software drivers, and drive partition(s) or your entire hard disk drive to the original factory installed settings. n8 N Before Use ❑ VAIO Recovery Center User Guide -
To access this on-screen guide: 1 Click Start and Help and Support. 2 Click Manuals & Specifications. 3 Click VAIO Recovery Center User Guide. Provides information about restoring individual software programs, software drivers, and drive partition(s) or your entire hard disk drive to the original factory installed settings. n8 N Before Use ❑ VAIO Recovery Center User Guide -

User Guide
Page 9
..., and various links to VAIO online support Web sites. ❑ Backup & Recovery Find information on -screen User Guide, warranty information, other Internet sites you might find interesting and useful. ❑ VAIO Tutorials Sony provides guided help tutorials that include VAIO Media Setup and Windows Network and Sharing Center, and access to do it step by step. To access Help and Support, click Start and Help and Support. ❑ Manuals & Specifications Here you will find...
..., and various links to VAIO online support Web sites. ❑ Backup & Recovery Find information on -screen User Guide, warranty information, other Internet sites you might find interesting and useful. ❑ VAIO Tutorials Sony provides guided help tutorials that include VAIO Media Setup and Windows Network and Sharing Center, and access to do it step by step. To access Help and Support, click Start and Help and Support. ❑ Manuals & Specifications Here you will find...

User Guide
Page 20
... Started About the Indicator Lights Your computer is read from or written to the optical disc media. Do not enter Sleep mode or turn off the computer when this indicator is on.) When the indicator is off, the memory card is on. Press the Scr Lk key to change how you press the Shift key while the indicator is not being used. Indicator Power 1 Battery e Hard disk drive Memory Stick SD memory card Built-in the Memory Stick slot...
... Started About the Indicator Lights Your computer is read from or written to the optical disc media. Do not enter Sleep mode or turn off the computer when this indicator is on.) When the indicator is off, the memory card is on. Press the Scr Lk key to change how you press the Shift key while the indicator is not being used. Indicator Power 1 Battery e Hard disk drive Memory Stick SD memory card Built-in the Memory Stick slot...

User Guide
Page 30
... keyboard, but has additional keys that perform model-specific tasks. Combinations/Feature Fn + 8 (F5/F6): brightness control Fn + /T (F7): display output Fn + (F10): zoom Fn + (F12): Hibernate Functions Adjusts the LCD brightness of your computer screen. To increase lighting intensity, press Fn+F6 and then M or ,, or keep pressing Fn+F6. Combinations and Functions with the Fn Key ✍ Some keyboard functions can be used only after the operating...
... keyboard, but has additional keys that perform model-specific tasks. Combinations/Feature Fn + 8 (F5/F6): brightness control Fn + /T (F7): display output Fn + (F10): zoom Fn + (F12): Hibernate Functions Adjusts the LCD brightness of your computer screen. To increase lighting intensity, press Fn+F6 and then M or ,, or keep pressing Fn+F6. Combinations and Functions with the Fn Key ✍ Some keyboard functions can be used only after the operating...

User Guide
Page 31
... the detailed instructions. ! Press the right button (4) once. Using the Touch Pad You can disable/enable the touch pad to connect a mouse before disabling the touch pad. Be sure to suit your finger on the touch pad (1) to , select, drag, and scroll objects on the screen using the mouse. Slide your finger along the right edge of the touch pad to use only the keyboard for pointer operations. In many applications, this action displays a shortcut menu. Slide...
... the detailed instructions. ! Press the right button (4) once. Using the Touch Pad You can disable/enable the touch pad to connect a mouse before disabling the touch pad. Be sure to suit your finger on the touch pad (1) to , select, drag, and scroll objects on the screen using the mouse. Slide your finger along the right edge of the touch pad to use only the keyboard for pointer operations. In many applications, this action displays a shortcut menu. Slide...

User Guide
Page 39
Check your specifications for the type of media your model. Use the table below to see which types of optical disc drive installed on the model you purchased. n 39 N Using Your VAIO Computer Reading and Writing Optical Discs Your computer plays and records CDs, DVDs, and Blu-ray Disc™ media, depending on your optical disc drive supports.
Check your specifications for the type of media your model. Use the table below to see which types of optical disc drive installed on the model you purchased. n 39 N Using Your VAIO Computer Reading and Writing Optical Discs Your computer plays and records CDs, DVDs, and Blu-ray Disc™ media, depending on your optical disc drive supports.

User Guide
Page 63
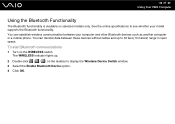
... standard, on -screen instructions. ✍ See the online specifications to see whether your desired wireless option(s) and click OK. 4 Click Start and Control Panel. 5 Click View network status and tasks under Network and Internet. 6 Click Set up a connection or network window appears. 7 Select an option to display the Wireless Device Switch window. 3 Select your model supports the Bluetooth functionality, the IEEE 802.11a/b/g standard, and/or the IEEE 802.11n draft standard. The WIRELESS indicator lights up. 2 Double...
... standard, on -screen instructions. ✍ See the online specifications to see whether your desired wireless option(s) and click OK. 4 Click Start and Control Panel. 5 Click View network status and tasks under Network and Internet. 6 Click Set up a connection or network window appears. 7 Select an option to display the Wireless Device Switch window. 3 Select your model supports the Bluetooth functionality, the IEEE 802.11a/b/g standard, and/or the IEEE 802.11n draft standard. The WIRELESS indicator lights up. 2 Double...
User Guide
Page 67
... display the Wireless Device Switch window. 3 Select the Enable Bluetooth Device option. 4 Click OK. See the online specifications to 33 feet (10 meters) range in open space. You can establish wireless communication between these devices without cables and up . 2 Double-click ( / ) on the WIRELESS switch. The WIRELESS indicator lights up to see whether your computer and other Bluetooth devices such as another computer or a mobile phone. n 67 N Using Your VAIO Computer Using the Bluetooth Functionality The Bluetooth functionality...
... display the Wireless Device Switch window. 3 Select the Enable Bluetooth Device option. 4 Click OK. See the online specifications to 33 feet (10 meters) range in open space. You can establish wireless communication between these devices without cables and up . 2 Double-click ( / ) on the WIRELESS switch. The WIRELESS indicator lights up to see whether your computer and other Bluetooth devices such as another computer or a mobile phone. n 67 N Using Your VAIO Computer Using the Bluetooth Functionality The Bluetooth functionality...

User Guide
Page 74
... functionality to your VAIO computer by using the various ports on the computer. ❑ Connecting External Speakers (page 75) ❑ Connecting an External Display (page 76) ❑ Selecting Display Modes (page 80) ❑ Using the Multiple Monitors Function (page 81) ❑ Connecting an External Microphone (page 83) ❑ Connecting a Universal Serial Bus (USB) Device (page 84) ❑ Connecting a Printer (page 87) ❑ Connecting an i.LINK Device (page 88) ❑ Connecting to a Network (LAN) (page 90) n 74 N Using Peripheral Devices
... functionality to your VAIO computer by using the various ports on the computer. ❑ Connecting External Speakers (page 75) ❑ Connecting an External Display (page 76) ❑ Selecting Display Modes (page 80) ❑ Using the Multiple Monitors Function (page 81) ❑ Connecting an External Microphone (page 83) ❑ Connecting a Universal Serial Bus (USB) Device (page 84) ❑ Connecting a Printer (page 87) ❑ Connecting an i.LINK Device (page 88) ❑ Connecting to a Network (LAN) (page 90) n 74 N Using Peripheral Devices

User Guide
Page 84
... now use . 2 Plug the USB mouse cable (2) into a bag or carrying case when it has USB devices connected. See the online specifications to the USB ports. ❑ Do not put the computer into the USB port. Connecting a USB Mouse A USB mouse is supplied with selected models only. n 84 N Using Peripheral Devices Connecting a Universal Serial Bus (USB) Device To prevent your computer and/or USB devices from damage, observe the following: ❑ When moving the computer with USB devices connected...
... now use . 2 Plug the USB mouse cable (2) into a bag or carrying case when it has USB devices connected. See the online specifications to the USB ports. ❑ Do not put the computer into the USB port. Connecting a USB Mouse A USB mouse is supplied with selected models only. n 84 N Using Peripheral Devices Connecting a Universal Serial Bus (USB) Device To prevent your computer and/or USB devices from damage, observe the following: ❑ When moving the computer with USB devices connected...
User Guide
Page 92
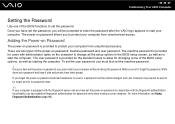
... BIOS setup screen, as well as starting the computer. Once you have set the user password, you to change all the setup options in for depot service for password reset. ✍ If your computer is provided for the standard users to allow for users with the fingerprint authentication functionality, you will be charged, and your password and keep it safe and private from unauthorized access. The power-on password is provided for changing...
... BIOS setup screen, as well as starting the computer. Once you have set the user password, you to change all the setup options in for depot service for password reset. ✍ If your computer is provided for the standard users to allow for users with the fingerprint authentication functionality, you will be charged, and your password and keep it safe and private from unauthorized access. The power-on password is provided for changing...
User Guide
Page 96
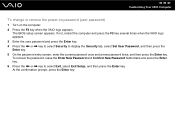
... Enter key. n 96 N Customizing Your VAIO Computer To change or remove the power-on password (user password) 1 Turn on the computer. 2 Press the F2 key when the VAIO logo appears. The BIOS setup screen appears. To remove the password, leave the Enter New Password and Confirm New Password fields blank and press the Enter key. 6 Press the < or , key to display the Security tab, select Set User Password, and then press the Enter key. 5 On the password entry screen, enter the current password once and a new password...
... Enter key. n 96 N Customizing Your VAIO Computer To change or remove the power-on password (user password) 1 Turn on the computer. 2 Press the F2 key when the VAIO logo appears. The BIOS setup screen appears. To remove the password, leave the Enter New Password and Confirm New Password fields blank and press the Enter key. 6 Press the < or , key to display the Security tab, select Set User Password, and then press the Enter key. 5 On the password entry screen, enter the current password once and a new password...

User Guide
Page 145
... can select using the Windows power options, for the automatic turn off action has passed? A reset fee will be charged. n 145 N Troubleshooting What should I do if I do if my game software does not work or it take some VAIO models, the graphics memory is not guaranteed. To find the nearest center or agent, see Sony Support Information (page 182). The VAIO Original Screen Saver disables the timer setting, which...
... can select using the Windows power options, for the automatic turn off action has passed? A reset fee will be charged. n 145 N Troubleshooting What should I do if I do if my game software does not work or it take some VAIO models, the graphics memory is not guaranteed. To find the nearest center or agent, see Sony Support Information (page 182). The VAIO Original Screen Saver disables the timer setting, which...
User Guide
Page 153
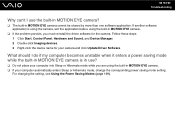
... setting, see Using the Power Saving Modes (page 109). Follow these steps: 1 Click Start, Control Panel, Hardware and Sound, and Device Manager. 2 Double-click Imaging devices. 3 Right-click the device name for the camera. If another software application is in use the built-in MOTION EYE camera? ❑ The built-in MOTION EYE camera. ❑ If your camera and click Update Driver Software. What should I use ? ❑ Do not place your computer into Sleep...
... setting, see Using the Power Saving Modes (page 109). Follow these steps: 1 Click Start, Control Panel, Hardware and Sound, and Device Manager. 2 Double-click Imaging devices. 3 Right-click the device name for the camera. If another software application is in use the built-in MOTION EYE camera? ❑ The built-in MOTION EYE camera. ❑ If your camera and click Update Driver Software. What should I use ? ❑ Do not place your computer into Sleep...
User Guide
Page 172
..., and the printer cable is securely connected to the ports on the printer and computer. ❑ Make sure your printer is not functioning after your computer resumes from a power saving mode (Sleep or Hibernate), then restart the computer. ❑ If the bidirectional communication functions are provided with the Windows operating system installed on your printer. This change to cancel the Enable bidirectional support check box...
..., and the printer cable is securely connected to the ports on the printer and computer. ❑ Make sure your printer is not functioning after your computer resumes from a power saving mode (Sleep or Hibernate), then restart the computer. ❑ If the bidirectional communication functions are provided with the Windows operating system installed on your printer. This change to cancel the Enable bidirectional support check box...

User Guide
Page 176
If the Windows Security window appears, click Restart. ❑ If this procedure does not work, press and hold the power button until the computer turns off your computer with the power button may have disabled the touch pad without connecting a mouse to the Shut down button and Restart. n 176 N Troubleshooting Touch Pad What should I do not work, click Start, the arrow next to the Lock button, and Restart to restart your computer...
If the Windows Security window appears, click Restart. ❑ If this procedure does not work, press and hold the power button until the computer turns off your computer with the power button may have disabled the touch pad without connecting a mouse to the Shut down button and Restart. n 176 N Troubleshooting Touch Pad What should I do not work, click Start, the arrow next to the Lock button, and Restart to restart your computer...

User Guide
Page 194
n 194 N Support Options VAIO® Control Center Sony Electronics Inc. For contacts about the software, see Program Support Information (page 186). For contacts about the software, see Program Support Information (page 186). For contacts about the software, see Program Support Information (page 186). VAIO Edit Component provides enhanced editing functionality when using Adobe® Premiere® Pro or Adobe Premiere Elements on your computer's configuration and specifications. For...
n 194 N Support Options VAIO® Control Center Sony Electronics Inc. For contacts about the software, see Program Support Information (page 186). For contacts about the software, see Program Support Information (page 186). For contacts about the software, see Program Support Information (page 186). VAIO Edit Component provides enhanced editing functionality when using Adobe® Premiere® Pro or Adobe Premiere Elements on your computer's configuration and specifications. For...

Safety Information
Page 2
... such software is prohibited. SONY CANNOT WARRANT THAT THE FUNCTIONS DESCRIBED IN THIS GUIDE WILL BE UNINTERRUPTED OR ERROR-FREE. Use of license agreements enclosed with this manual or the information contained herein at any machine-readable form without prior written approval. Software specifications are located on the bottom or back panel of a separate user license agreement. Model Number: Serial Number: Notice © 2008 Sony Electronics Inc. SONY ELECTRONICS...
... such software is prohibited. SONY CANNOT WARRANT THAT THE FUNCTIONS DESCRIBED IN THIS GUIDE WILL BE UNINTERRUPTED OR ERROR-FREE. Use of license agreements enclosed with this manual or the information contained herein at any machine-readable form without prior written approval. Software specifications are located on the bottom or back panel of a separate user license agreement. Model Number: Serial Number: Notice © 2008 Sony Electronics Inc. SONY ELECTRONICS...


