
User Guide
Page 3
... Devices...56 Connecting a Port Replicator ...57 Connecting External Speakers ...61 Connecting an External Display ...62 Selecting Display Modes...68 Using the Multiple Monitors Function ...69 Connecting an External Microphone ...71 Connecting a Universal Serial Bus (USB) Device...72 Connecting a Printer ...75 Connecting an i.LINK Device ...77 Connecting to a Network (LAN) ...79 Customizing Your VAIO Computer ...81 Setting the Password ...82 Setting Up Your Computer with VAIO Central ...85 Using the Power Saving Modes ...86 Managing Power with VAIO Power Management ...91 Upgrading Your VAIO...
... Devices...56 Connecting a Port Replicator ...57 Connecting External Speakers ...61 Connecting an External Display ...62 Selecting Display Modes...68 Using the Multiple Monitors Function ...69 Connecting an External Microphone ...71 Connecting a Universal Serial Bus (USB) Device...72 Connecting a Printer ...75 Connecting an i.LINK Device ...77 Connecting to a Network (LAN) ...79 Customizing Your VAIO Computer ...81 Setting the Password ...82 Setting Up Your Computer with VAIO Central ...85 Using the Power Saving Modes ...86 Managing Power with VAIO Power Management ...91 Upgrading Your VAIO...

User Guide
Page 7
... VAIO Support Central. 2 Click VAIO Documentation. 3 Click Recovery Guide. To access this manual) - Provides information about the software programs included with your computer. The online Specifications describe the hardware and software configuration of your computer, as well as information on solving common problems. ❑ Specifications - It also includes information about restoring individual software programs, software drivers, and drive partition(s) or your VAIO computer. Contains features of your entire hard disk drive to the original factory installed settings...
... VAIO Support Central. 2 Click VAIO Documentation. 3 Click Recovery Guide. To access this manual) - Provides information about the software programs included with your computer. The online Specifications describe the hardware and software configuration of your computer, as well as information on solving common problems. ❑ Specifications - It also includes information about restoring individual software programs, software drivers, and drive partition(s) or your VAIO computer. Contains features of your entire hard disk drive to the original factory installed settings...
User Guide
Page 18
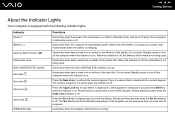
... Caps Lock indicator is in MOTION EYE camera Hard disk Num lock Caps lock Scroll lock WIRELESS LAN Functions Illuminates when the power to the computer is on the program you are using battery power, blinks when the battery is running out of power, and double-blinks when the battery is running. n 18 N Getting Started About the Indicator Lights Your computer is read from or written to the optical disc. Indicator Power 1 Battery e Memory Stick Pro/Duo Optical disc drive Built-in use...
... Caps Lock indicator is in MOTION EYE camera Hard disk Num lock Caps lock Scroll lock WIRELESS LAN Functions Illuminates when the power to the computer is on the program you are using battery power, blinks when the battery is running out of power, and double-blinks when the battery is running. n 18 N Getting Started About the Indicator Lights Your computer is read from or written to the optical disc. Indicator Power 1 Battery e Memory Stick Pro/Duo Optical disc drive Built-in use...

User Guide
Page 33
... Audio standard specifications (CD Standard). For inquiries about disc formats, contact the individual publisher of the pre-recorded disc or the manufacturer of VAIO CD drives with discs that the audio side (non-DVD side) of optical disc drive installed on the model you purchased. Check your specifications for use with your computer's optical disc drives. DVD+R, DVD+RW and DVD+R DL (Double Layer)* CD-RW/DVD-ROM CD, CD-R, CD-RW, DVD, most DVD-R, DVD...
... Audio standard specifications (CD Standard). For inquiries about disc formats, contact the individual publisher of the pre-recorded disc or the manufacturer of VAIO CD drives with discs that the audio side (non-DVD side) of optical disc drive installed on the model you purchased. Check your specifications for use with your computer's optical disc drives. DVD+R, DVD+RW and DVD+R DL (Double Layer)* CD-RW/DVD-ROM CD, CD-R, CD-RW, DVD, most DVD-R, DVD...

User Guide
Page 35
... to change it to make the new setting effective. ❑ If the computer has Wireless LAN and Wireless LAN is activated, playing DVDs may damage your residence area is different from the label on the DVD disc or on the packaging, you have exceeded this number, the drive's DVD region code is permanently assigned and you can play the disc on this DVD in audio and video. When you have audio devices connected...
... to change it to make the new setting effective. ❑ If the computer has Wireless LAN and Wireless LAN is activated, playing DVDs may damage your residence area is different from the label on the DVD disc or on the packaging, you have exceeded this number, the drive's DVD region code is permanently assigned and you can play the disc on this DVD in audio and video. When you have audio devices connected...

User Guide
Page 37
To copy files to a CD-RW or CD-R ! A new window appears with Removable Storage. If the CD Drive window appears, click Take no action. 2 Open Windows Explorer by pressing the Windows key and the E key simultaneously. 3 In the Folders panel on the left, locate the file(s) or folder(s) you want to copy listed under Files Ready to Be Written to the CD. 7 In the...
To copy files to a CD-RW or CD-R ! A new window appears with Removable Storage. If the CD Drive window appears, click Take no action. 2 Open Windows Explorer by pressing the Windows key and the E key simultaneously. 3 In the Folders panel on the left, locate the file(s) or folder(s) you want to copy listed under Files Ready to Be Written to the CD. 7 In the...

User Guide
Page 49
.... 9 Select Open from the Network Authentication drop-down box. 10 Select WEP from the Data Encryption drop-down box. 11 Deselect the The key is provided for me automatically option button. Select the Enable 2.4 GHz Wireless LAN check box and click OK. 2 Click Start and then Control Panel. 3 Click Network and Internet Connections. 4 Click Network Connections. n 49 N Using Your VAIO Computer To communicate without an Access Point (ad-hoc) 1 Turn on...
.... 9 Select Open from the Network Authentication drop-down box. 10 Select WEP from the Data Encryption drop-down box. 11 Deselect the The key is provided for me automatically option button. Select the Enable 2.4 GHz Wireless LAN check box and click OK. 2 Click Start and then Control Panel. 3 Click Network and Internet Connections. 4 Click Network Connections. n 49 N Using Your VAIO Computer To communicate without an Access Point (ad-hoc) 1 Turn on...

User Guide
Page 56
... using the various ports on the computer. ❑ Connecting a Port Replicator (page 57) ❑ Connecting External Speakers (page 61) ❑ Connecting an External Display (page 62) ❑ Selecting Display Modes (page 68) ❑ Using the Multiple Monitors Function (page 69) ❑ Connecting an External Microphone (page 71) ❑ Connecting a Universal Serial Bus (USB) Device (page 72) ❑ Connecting a Printer (page 75) ❑ Connecting an i.LINK Device (page 77) ❑ Connecting to a Network (LAN) (page 79) n 56 N Using Peripheral Devices
... using the various ports on the computer. ❑ Connecting a Port Replicator (page 57) ❑ Connecting External Speakers (page 61) ❑ Connecting an External Display (page 62) ❑ Selecting Display Modes (page 68) ❑ Using the Multiple Monitors Function (page 69) ❑ Connecting an External Microphone (page 71) ❑ Connecting a Universal Serial Bus (USB) Device (page 72) ❑ Connecting a Printer (page 75) ❑ Connecting an i.LINK Device (page 77) ❑ Connecting to a Network (LAN) (page 79) n 56 N Using Peripheral Devices
User Guide
Page 62
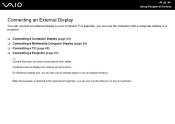
... multiple monitors. ! When the computer is attached to your computer. n 62 N Using Peripheral Devices Connecting an External Display You can use the computer with a computer display or a projector. ❑ Connecting a Computer Display (page 63) ❑ Connecting a Multimedia Computer Display (page 64) ❑ Connecting a TV (page 65) ❑ Connecting a Projector (page 67) ✍ Connect the power cord after connecting all other cables. For example, you can connect an external display to the optional port...
... multiple monitors. ! When the computer is attached to your computer. n 62 N Using Peripheral Devices Connecting an External Display You can use the computer with a computer display or a projector. ❑ Connecting a Computer Display (page 63) ❑ Connecting a Multimedia Computer Display (page 64) ❑ Connecting a TV (page 65) ❑ Connecting a Projector (page 67) ✍ Connect the power cord after connecting all other cables. For example, you can connect an external display to the optional port...

User Guide
Page 79
... of an optional network cable to the Network (Ethernet) port on the port replicator. For detailed settings and devices needed to connect to the network, see your network. n 79 N Using Peripheral Devices Connecting to a Network (LAN) You can only use the Network (Ethernet) port on the computer or the (optional) port replicator and the other end to your network administrator. ✍ The computer can be connected to the network with the default settings. When the computer is...
... of an optional network cable to the Network (Ethernet) port on the port replicator. For detailed settings and devices needed to connect to the network, see your network. n 79 N Using Peripheral Devices Connecting to a Network (LAN) You can only use the Network (Ethernet) port on the computer or the (optional) port replicator and the other end to your network administrator. ✍ The computer can be connected to the network with the default settings. When the computer is...

User Guide
Page 83
... Enter key. To add the power-on password 1 Turn on or display the BIOS setup screen. 5 Select Password When Power ON under Security. Make sure not to display the Security tab, select Set Machine Password, and then press the Enter key. 4 On the password entry screen, enter the password twice and press the Enter key. The password can be sent in for depot service for password reset. Press the space bar to reset, a password reset fee will be charged, and your password...
... Enter key. To add the power-on password 1 Turn on or display the BIOS setup screen. 5 Select Password When Power ON under Security. Make sure not to display the Security tab, select Set Machine Password, and then press the Enter key. 4 On the password entry screen, enter the password twice and press the Enter key. The password can be sent in for depot service for password reset. Press the space bar to reset, a password reset fee will be charged, and your password...

User Guide
Page 91
... the on-screen instructions to the Windows Power Options Properties. Activating VAIO Power Management When you start the computer, a power status icon appears on the VAIO Power Management software. VAIO Power Management is a software application developed exclusively for example, AC power. VAIO Power Management functionalities are using at that time, for VAIO computers. To activate VAIO Power Management 1 Click Start and then Control Panel. 2 Click Performance and Maintenance. 3 Click Power Options. This icon indicates what kind of your requirements for longer battery life. With...
... the on-screen instructions to the Windows Power Options Properties. Activating VAIO Power Management When you start the computer, a power status icon appears on the VAIO Power Management software. VAIO Power Management is a software application developed exclusively for example, AC power. VAIO Power Management functionalities are using at that time, for VAIO computers. To activate VAIO Power Management 1 Click Start and then Control Panel. 2 Click Performance and Maintenance. 3 Click Power Options. This icon indicates what kind of your requirements for longer battery life. With...

User Guide
Page 93
For assistance, contact an authorized Sony Service Center. For the type of module and amount of your guarantee due to mishandling, we recommend that: ❑ You contact your model, refer to install a new memory module. ❑ You do not touch the connectors or open the memory panel. n 93 N Upgrading Your VAIO Computer Upgrading Your VAIO Computer Your computer and memory modules use high precision components and electronic connectors technology. To find...
For assistance, contact an authorized Sony Service Center. For the type of module and amount of your guarantee due to mishandling, we recommend that: ❑ You contact your model, refer to install a new memory module. ❑ You do not touch the connectors or open the memory panel. n 93 N Upgrading Your VAIO Computer Upgrading Your VAIO Computer Your computer and memory modules use high precision components and electronic connectors technology. To find...

User Guide
Page 128
... EYE camera. ❑ If the problem persists, you must reinstall the driver software for the camera. Proceed as follows to reinstall the driver software. 1 Click Start and then Control Panel. 2 Click the Performance and Maintenance icon. 3 Click the System icon. 4 Click Device Manager on the Hardware tab. 5 Double-click Imaging devices. 6 Right-click Sony Visual Communication Camera VGP-VCC1 and click Update Driver. If another software application is using the camera, exit...
... EYE camera. ❑ If the problem persists, you must reinstall the driver software for the camera. Proceed as follows to reinstall the driver software. 1 Click Start and then Control Panel. 2 Click the Performance and Maintenance icon. 3 Click the System icon. 4 Click Device Manager on the Hardware tab. 5 Double-click Imaging devices. 6 Right-click Sony Visual Communication Camera VGP-VCC1 and click Update Driver. If another software application is using the camera, exit...

User Guide
Page 131
n 131 N Troubleshooting Networking Why can't my computer connect to the access point is on. ❑ Check the following setting: 1 Click Start and then Control Panel. 2 Click Network and Internet Connections. 3 Click Network Connections. 4 Right-click Wireless Network Connection. 5 Click Properties. 6 Click the Wireless Network tab. 7 Make sure the access point is displayed in the Available networks. ❑ Make sure the encryption key is affected by distance and obstructions. You may need to move the computer away...
n 131 N Troubleshooting Networking Why can't my computer connect to the access point is on. ❑ Check the following setting: 1 Click Start and then Control Panel. 2 Click Network and Internet Connections. 3 Click Network Connections. 4 Right-click Wireless Network Connection. 5 Click Properties. 6 Click the Wireless Network tab. 7 Make sure the access point is displayed in the Available networks. ❑ Make sure the encryption key is affected by distance and obstructions. You may need to move the computer away...
User Guide
Page 137
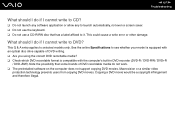
... should I do not work. ❑ The preinstalled software on the computer does not support copying DVD movies. Macrovision or a similar video protection technology prevents users from copying DVD movies. This could cause a write error or other damage. See the online Specifications to see whether your model is compatible with the computer's built-in DVD recorder (DVD-R / DVD-RW / DVD+R / DVD+RW). n 137 N Troubleshooting What should I do...
... should I do not work. ❑ The preinstalled software on the computer does not support copying DVD movies. Macrovision or a similar video protection technology prevents users from copying DVD movies. This could cause a write error or other damage. See the online Specifications to see whether your model is compatible with the computer's built-in DVD recorder (DVD-R / DVD-RW / DVD+R / DVD+RW). n 137 N Troubleshooting What should I do...
User Guide
Page 141
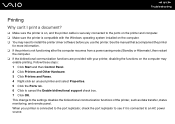
... connected to the settings disables the bidirectional communication functions of the printer, such as data transfer, status monitoring, and remote panel. This change to an AC power source. Follow these steps: 1 Click Start and then Control Panel. 2 Click Printers and Other Hardware. 3 Click Printers and Faxes. 4 Right-click an unused printer and select Properties. 5 Click the Ports tab. 6 Click to cancel the Enable bidirectional support...
... connected to the settings disables the bidirectional communication functions of the printer, such as data transfer, status monitoring, and remote panel. This change to an AC power source. Follow these steps: 1 Click Start and then Control Panel. 2 Click Printers and Other Hardware. 3 Click Printers and Faxes. 4 Right-click an unused printer and select Properties. 5 Click the Ports tab. 6 Click to cancel the Enable bidirectional support...
User Guide
Page 144
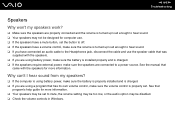
... speakers may be disabled. ❑ Check the volume controls in Windows. Why can't I hear sound from my speakers? ❑ If the computer is using battery power, make sure the battery is properly installed and is charged. ❑ If you are using battery power, make sure the battery is installed properly and is charged. ❑ If the speakers require external power, make sure the volume control is turned up loud enough to hear sound. ❑ If you...
... speakers may be disabled. ❑ Check the volume controls in Windows. Why can't I hear sound from my speakers? ❑ If the computer is using battery power, make sure the battery is properly installed and is charged. ❑ If you are using battery power, make sure the battery is installed properly and is charged. ❑ If the speakers require external power, make sure the volume control is turned up loud enough to hear sound. ❑ If you...

User Guide
Page 145
... the touch pad does not work? ❑ Try restarting the computer. The Windows Task Manager window appears. 2 Press and release the Alt key to highlight the menu bar, and press the , key to select Shut Down. 3 Press the Enter key. 4 Press the R key to restart the computer If you are still experiencing problems, make sure another mouse is not installed. ❑ You may have disabled the touch pad without connecting a mouse...
... the touch pad does not work? ❑ Try restarting the computer. The Windows Task Manager window appears. 2 Press and release the Alt key to highlight the menu bar, and press the , key to select Shut Down. 3 Press the Enter key. 4 Press the R key to restart the computer If you are still experiencing problems, make sure another mouse is not installed. ❑ You may have disabled the touch pad without connecting a mouse...

User Guide
Page 153
... connected to the Internet, VAIO Update automatically notifies you can visit Microsoft customer support at: http://support.microsoft.com/directory/. 4 Sony Computing Support This service provides instant access to information on commonly encountered problems. Type a description of the problem and the Knowledge Database searches for the corresponding solutions online. These guides are stored on the hard disk as on your computer may be supplied with a Microsoft Windows operating...
... connected to the Internet, VAIO Update automatically notifies you can visit Microsoft customer support at: http://support.microsoft.com/directory/. 4 Sony Computing Support This service provides instant access to information on commonly encountered problems. Type a description of the problem and the Knowledge Database searches for the corresponding solutions online. These guides are stored on the hard disk as on your computer may be supplied with a Microsoft Windows operating...


