
User Guide
Page 3
... Connecting External Speakers ...75 Connecting an External Display ...76 Selecting Display Modes...81 Using the Multiple Monitors Function ...83 Connecting an External Microphone ...85 Connecting a Universal Serial Bus (USB) Device...86 Connecting a Printer ...89 Connecting an i.LINK Device ...90 Connecting to a Network (LAN) ...92 Customizing Your VAIO Computer ...93 Setting the Password ...94...
... Connecting External Speakers ...75 Connecting an External Display ...76 Selecting Display Modes...81 Using the Multiple Monitors Function ...83 Connecting an External Microphone ...85 Connecting a Universal Serial Bus (USB) Device...86 Connecting a Printer ...89 Connecting an i.LINK Device ...90 Connecting to a Network (LAN) ...92 Customizing Your VAIO Computer ...93 Setting the Password ...94...

User Guide
Page 4
... Troubleshooting ...125 Computer ...127 System Security ...134 Battery...135 Built-in MOTION EYE Camera...137 Internet ...140 Networking ...142 Bluetooth Technology ...145 Optical Discs ...149 Display ...153 Printing ...158 Microphone ...159
... Troubleshooting ...125 Computer ...127 System Security ...134 Battery...135 Built-in MOTION EYE Camera...137 Internet ...140 Networking ...142 Bluetooth Technology ...145 Optical Discs ...149 Display ...153 Printing ...158 Microphone ...159
User Guide
Page 11
... the tilt of the monitor. Adjust the brightness level of the computer's display - Choose a location where windows and lights do not cause glare and reflection on the display. When using an external display, set the display at eye level or slightly lower when you are sitting in front of ...the display to find the best position. n 11 N Before Use ❑ Viewing angle of the display as well. ❑ Lighting - Use the display's tilting feature to the proper position. Use indirect lighting to your comfort and work ...
... the tilt of the monitor. Adjust the brightness level of the computer's display - Choose a location where windows and lights do not cause glare and reflection on the display. When using an external display, set the display at eye level or slightly lower when you are sitting in front of ...the display to find the best position. n 11 N Before Use ❑ Viewing angle of the display as well. ❑ Lighting - Use the display's tilting feature to the proper position. Use indirect lighting to your comfort and work ...

User Guide
Page 19
... Lk key to type letters in uppercase. The Scr Lk key functions differently depending on . Indicator Power 1 Battery e Built-in lowercase if you scroll the display. Press the Caps Lock key to activate the numeric keypad. n 19 N Getting Started About the Indicator Lights Your computer is equipped with all programs. Illuminates...
... Lk key to type letters in uppercase. The Scr Lk key functions differently depending on . Indicator Power 1 Battery e Built-in lowercase if you scroll the display. Press the Caps Lock key to activate the numeric keypad. n 19 N Getting Started About the Indicator Lights Your computer is equipped with all programs. Illuminates...

User Guide
Page 30
... finished launching. To decrease lighting intensity, press Fn+F5 and then m or Combinations/Feature Fn + % (F2): speaker switch Fn + 8 (F5/F6): brightness control Fn + /T (F7): display output Fn + (F10): zoom Functions Turns on and off the built-in speakers and the headphones. Adjusts the LCD brightness of your computer screen. n 30...
... finished launching. To decrease lighting intensity, press Fn+F5 and then m or Combinations/Feature Fn + % (F2): speaker switch Fn + 8 (F5/F6): brightness control Fn + /T (F7): display output Fn + (F10): zoom Functions Turns on and off the built-in speakers and the headphones. Adjusts the LCD brightness of your computer screen. n 30...

User Guide
Page 32
In many applications, this action displays a shortcut menu. Press the left button twice. Be sure to ... an item or object. If you disable the touch pad without connecting a mouse, you will be able to launch VAIO Control Center. See Setting Up Your Computer with applications that support a touch pad scroll feature). ✍ You can ... select, drag, and scroll objects on the touch pad while pressing the left button. n 32 N Using Your VAIO Computer Action Description Point Click Slide your finger on the screen using the mouse. Double-click Right-click Drag Scroll ...
In many applications, this action displays a shortcut menu. Press the left button twice. Be sure to ... an item or object. If you disable the touch pad without connecting a mouse, you will be able to launch VAIO Control Center. See Setting Up Your Computer with applications that support a touch pad scroll feature). ✍ You can ... select, drag, and scroll objects on the touch pad while pressing the left button. n 32 N Using Your VAIO Computer Action Description Point Click Slide your finger on the screen using the mouse. Double-click Right-click Drag Scroll ...

User Guide
Page 33
... Buttons Your computer is on the hard disk drive. In such a case, you can change the assignment in the window for more information on VAIO Control Center for more information. Starts or pauses playback of a CD disc, DVD disc, or Blu-ray Disc™ * media or a ...or launch and navigate through VAIO Control Center. Special-function button S1 button AV MODE button Stop button Play/Pause button u Functions By default, the S1 button launches Internet Explorer. ✍ The default button assignment may be off or in Hibernate mode. To display this window, press and ...
... Buttons Your computer is on the hard disk drive. In such a case, you can change the assignment in the window for more information on VAIO Control Center for more information. Starts or pauses playback of a CD disc, DVD disc, or Blu-ray Disc™ * media or a ...or launch and navigate through VAIO Control Center. Special-function button S1 button AV MODE button Stop button Play/Pause button u Functions By default, the S1 button launches Internet Explorer. ✍ The default button assignment may be off or in Hibernate mode. To display this window, press and ...

User Guide
Page 35
...; The built-in MOTION EYE camera. When capturing an image in MOTION EYE camera adds video functionality to start VAIO Camera Capture Utility. n 35 N Using Your VAIO Computer Using the Built-in MOTION EYE Camera Your computer is equipped with the Microsoft Windows MovieMaker software. It decreases... the frame rate and slows down the shutter speed to allow the camera to display the Properties window and select the Low...
...; The built-in MOTION EYE camera. When capturing an image in MOTION EYE camera adds video functionality to start VAIO Camera Capture Utility. n 35 N Using Your VAIO Computer Using the Built-in MOTION EYE Camera Your computer is equipped with the Microsoft Windows MovieMaker software. It decreases... the frame rate and slows down the shutter speed to allow the camera to display the Properties window and select the Low...

User Guide
Page 40
...buying pre-recorded or blank discs for use with a VAIO computer, be sure to read the notices on the disc packaging carefully to check both playback and recording compatibility with your external display is not supported. ! Sony does NOT guarantee the compatibility of the recordable disc. ... requires Internet access. For inquiries about disc formats, contact the individual publisher of the pre-recorded disc or the manufacturer of VAIO CD drives with the High-bandwidth Digital Content Protection (HDCP) standard, you need to the Compact Disc Digital Audio standard specifications...
...buying pre-recorded or blank discs for use with a VAIO computer, be sure to read the notices on the disc packaging carefully to check both playback and recording compatibility with your external display is not supported. ! Sony does NOT guarantee the compatibility of the recordable disc. ... requires Internet access. For inquiries about disc formats, contact the individual publisher of the pre-recorded disc or the manufacturer of VAIO CD drives with the High-bandwidth Digital Content Protection (HDCP) standard, you need to the Compact Disc Digital Audio standard specifications...

User Guide
Page 51
... double-click the Memory Stick media icon. ! Do not insert more than one Memory Stick media into the slot until it smoothly. n 51 N Using Your VAIO Computer Inserting a Memory Stick Media To insert a Memory Stick media 1 Locate the Memory Stick slot. 2 Hold the Memory Stick media with the arrow pointing in... files saved in the correct direction as you cannot insert it clicks into the slot. To view the contents of the Memory Stick media is displayed. To avoid damaging your computer or the Memory Stick media, do not force the Memory Stick media into the slot if you insert it into...
... double-click the Memory Stick media icon. ! Do not insert more than one Memory Stick media into the slot until it smoothly. n 51 N Using Your VAIO Computer Inserting a Memory Stick Media To insert a Memory Stick media 1 Locate the Memory Stick slot. 2 Hold the Memory Stick media with the arrow pointing in... files saved in the correct direction as you cannot insert it clicks into the slot. To view the contents of the Memory Stick media is displayed. To avoid damaging your computer or the Memory Stick media, do not force the Memory Stick media into the slot if you insert it into...
User Guide
Page 63
... 5 Click View network status and tasks under Network and Internet. 6 Click Set up a connection or network window appears. 7 Select an option to display the Wireless Device Switch window. 3 Select your model supports the Bluetooth functionality, the IEEE 802.11a/b/g standard, and/or the draft form of the ... settings and click Next. 8 Follow the on the left pane. n 63 N Using Your VAIO Computer To communicate without an access point (ad-hoc) ! The IEEE 802.11n standard, using the 2.4 or 5 GHz bandwidth, is used for the IEEE 802.11a standard, on the WIRELESS or WIRELESS LAN switch....
... 5 Click View network status and tasks under Network and Internet. 6 Click Set up a connection or network window appears. 7 Select an option to display the Wireless Device Switch window. 3 Select your model supports the Bluetooth functionality, the IEEE 802.11a/b/g standard, and/or the draft form of the ... settings and click Next. 8 Follow the on the left pane. n 63 N Using Your VAIO Computer To communicate without an access point (ad-hoc) ! The IEEE 802.11n standard, using the 2.4 or 5 GHz bandwidth, is used for the IEEE 802.11a standard, on the WIRELESS or WIRELESS LAN switch....

User Guide
Page 65
...IEEE 802.11a/b/g standard, and/or the draft form of the IEEE 802.11n standard. The Wireless LAN indicator lights up . n 65 N Using Your VAIO Computer To connect to see whether your access point for more information. 2 Turn on the taskbar and select Connect to a network. 6 Select the desired.... ✍ See the online Specifications to a wireless network 1 Make sure an access point is set up . 3 Double-click ( / ) on the taskbar to display the Wireless Device Switch window. 4 Select your desired wireless option(s) and click OK. 5 Right-click or on the WIRELESS or WIRELESS LAN switch.
...IEEE 802.11a/b/g standard, and/or the draft form of the IEEE 802.11n standard. The Wireless LAN indicator lights up . n 65 N Using Your VAIO Computer To connect to see whether your access point for more information. 2 Turn on the taskbar and select Connect to a network. 6 Select the desired.... ✍ See the online Specifications to a wireless network 1 Make sure an access point is set up . 3 Double-click ( / ) on the taskbar to display the Wireless Device Switch window. 4 Select your desired wireless option(s) and click OK. 5 Right-click or on the WIRELESS or WIRELESS LAN switch.

User Guide
Page 67
... communications 1 Turn on the WIRELESS switch. 2 Double-click ( / ) on selected models only. n 67 N Using Your VAIO Computer Using the Bluetooth Functionality The Bluetooth functionality is available on the taskbar to 33 feet (10 meters) range in open space....You can transfer data between your model supports the Bluetooth functionality. You can establish wireless communication between these devices without cables and up to display the Wireless Device Switch window. 3 Select the Enable Bluetooth Device option. 4 Click OK. See the online Specifications to see whether your ...
... communications 1 Turn on the WIRELESS switch. 2 Double-click ( / ) on selected models only. n 67 N Using Your VAIO Computer Using the Bluetooth Functionality The Bluetooth functionality is available on the taskbar to 33 feet (10 meters) range in open space....You can transfer data between your model supports the Bluetooth functionality. You can establish wireless communication between these devices without cables and up to display the Wireless Device Switch window. 3 Select the Enable Bluetooth Device option. 4 Click OK. See the online Specifications to see whether your ...
User Guide
Page 74
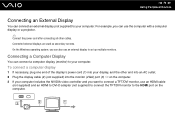
Using Peripheral Devices You can add functionality to your VAIO computer by using the various ports on the computer. ❑ Connecting External Speakers (page 75) ❑ Connecting an External Display (page 76) ❑ Selecting Display Modes (page 81) ❑ Using the Multiple Monitors Function (page 83) ❑ Connecting an External Microphone (page 85) ❑...
Using Peripheral Devices You can add functionality to your VAIO computer by using the various ports on the computer. ❑ Connecting External Speakers (page 75) ❑ Connecting an External Display (page 76) ❑ Selecting Display Modes (page 81) ❑ Using the Multiple Monitors Function (page 83) ❑ Connecting an External Microphone (page 85) ❑...
User Guide
Page 76
... the computer. 3 If your computer includes the NVIDIA video controller and you can use the computer with a computer display or a projector. ✍ Connect the power cord after connecting all other end into an AC outlet. 2 Plug the...computer. Connecting a Computer Display You can connect an external display (not supplied) to your computer. To connect a computer display 1 If necessary, plug one end of the display's power cord (1) into your display, and the other cables. n 76 N Using Peripheral Devices Connecting an External Display You can connect a computer display (monitor) to your ...
... the computer. 3 If your computer includes the NVIDIA video controller and you can use the computer with a computer display or a projector. ✍ Connect the power cord after connecting all other end into an AC outlet. 2 Plug the...computer. Connecting a Computer Display You can connect an external display (not supplied) to your computer. To connect a computer display 1 If necessary, plug one end of the display's power cord (1) into your display, and the other cables. n 76 N Using Peripheral Devices Connecting an External Display You can connect a computer display (monitor) to your ...

User Guide
Page 77
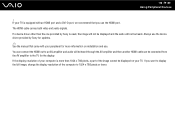
n 77 N Using Peripheral Devices Connecting a Multimedia Computer Display You can connect a multimedia computer display that includes built-in speakers and a microphone to your multimedia computer display (1) into an AC outlet. 2 Plug the display cable (2) (not supplied) into the monitor (VGA) port (3) a on the computer. 3 Plug the speaker cable (4) into the headphones jack (5) i on the computer. 4 Plug the microphone cable (6) into the microphone jack (7) m on the computer. To connect a multimedia computer display 1 Plug the power cord of your computer.
n 77 N Using Peripheral Devices Connecting a Multimedia Computer Display You can connect a multimedia computer display that includes built-in speakers and a microphone to your multimedia computer display (1) into an AC outlet. 2 Plug the display cable (2) (not supplied) into the monitor (VGA) port (3) a on the computer. 3 Plug the speaker cable (4) into the headphones jack (5) i on the computer. 4 Plug the microphone cable (6) into the microphone jack (7) m on the computer. To connect a multimedia computer display 1 Plug the power cord of your computer.
User Guide
Page 79
... is more information on your peripheral for more than 1024 x 768 pixels, a part of the computer to the TV for the display. If you use the device driver provided by Sony is equipped with your TV. n 79 N Using Peripheral Devices ! If your TV is used, the image will not be...a device driver other than the one provided by Sony for updates. ✍ See the manual that came with an HDMI port and a DVI-D port, we recommend that you want to display the full image, change the display resolution of the image cannot be displayed on installation and use. The HDMI cable carries both...
... is more information on your peripheral for more than 1024 x 768 pixels, a part of the computer to the TV for the display. If you use the device driver provided by Sony is equipped with your TV. n 79 N Using Peripheral Devices ! If your TV is used, the image will not be...a device driver other than the one provided by Sony for updates. ✍ See the manual that came with an HDMI port and a DVI-D port, we recommend that you want to display the full image, change the display resolution of the image cannot be displayed on installation and use. The HDMI cable carries both...
User Guide
Page 81
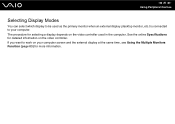
The procedure for more information. See the online Specifications for detailed information on the video controller used as the primary monitor when an external display (desktop monitor, etc.) is connected to your computer screen and the external display at the same time, see Using the Multiple Monitors Function (page 83) for selecting a display depends on the video controller. If you want to work on your computer. n 81 N Using Peripheral Devices Selecting Display Modes You can select which display to be used in the computer.
The procedure for more information. See the online Specifications for detailed information on the video controller used as the primary monitor when an external display (desktop monitor, etc.) is connected to your computer screen and the external display at the same time, see Using the Multiple Monitors Function (page 83) for selecting a display depends on the video controller. If you want to work on your computer. n 81 N Using Peripheral Devices Selecting Display Modes You can select which display to be used in the computer.

User Guide
Page 82
... Models with the NVIDIA video controller 1 Click Start and Control Panel. 2 Click Additional Options. 3 Click NVIDIA Control Panel. 4 Click Display. 5 Click Change Display Configuration. 6 Follow the on-screen instructions to change the settings. ✍ You may not be able to... same time, depending on the type of your external display or projector. n 82 N Using Peripheral Devices To select a display Models with the Intel Graphics Media Accelerator 1 Right-click on the type of your external display or projector. The Display Settings window appears. 3 Follow the on-screen instructions...
... Models with the NVIDIA video controller 1 Click Start and Control Panel. 2 Click Additional Options. 3 Click NVIDIA Control Panel. 4 Click Display. 5 Click Change Display Configuration. 6 Follow the on-screen instructions to change the settings. ✍ You may not be able to... same time, depending on the type of your external display or projector. n 82 N Using Peripheral Devices To select a display Models with the Intel Graphics Media Accelerator 1 Right-click on the type of your external display or projector. The Display Settings window appears. 3 Follow the on-screen instructions...

User Guide
Page 83
...function. otherwise your software may not return to Normal mode. You can function as an open application window or a toolbar, from one display to the other . otherwise the computer may not work properly. If you are using Multiple Monitors mode; Set fewer colors or a ...Function The Multiple Monitors function allows you have an external display connected to the monitor (VGA) port, your computer screen and the external display can move the cursor from one display to the other . ✍ Your external display may not be compatible with Multiple Monitors settings. For ...
...function. otherwise your software may not return to Normal mode. You can function as an open application window or a toolbar, from one display to the other . otherwise the computer may not work properly. If you are using Multiple Monitors mode; Set fewer colors or a ...Function The Multiple Monitors function allows you have an external display connected to the monitor (VGA) port, your computer screen and the external display can move the cursor from one display to the other . ✍ Your external display may not be compatible with Multiple Monitors settings. For ...


