
User Guide
Page 3
...75 Connecting External Speakers ...76 Connecting an External Display ...77 Selecting Display Modes...82 Using the Multiple Monitors Function ...84 Connecting an External Microphone ...86 Connecting a Universal Serial Bus (USB) Device...87 Connecting a Printer ...90 Connecting an i.LINK Device ...91 Connecting to a Network (LAN) ...93 Customizing Your VAIO Computer ...94 Setting the Password ...95 Setting Up Your Computer with VAIO Control Center 98 Using the Power Saving Modes ...99 Managing Power with VAIO Power Management ...104 Upgrading Your VAIO Computer...105 Adding and Removing Memory...
...75 Connecting External Speakers ...76 Connecting an External Display ...77 Selecting Display Modes...82 Using the Multiple Monitors Function ...84 Connecting an External Microphone ...86 Connecting a Universal Serial Bus (USB) Device...87 Connecting a Printer ...90 Connecting an i.LINK Device ...91 Connecting to a Network (LAN) ...93 Customizing Your VAIO Computer ...94 Setting the Password ...95 Setting Up Your Computer with VAIO Control Center 98 Using the Power Saving Modes ...99 Managing Power with VAIO Power Management ...104 Upgrading Your VAIO Computer...105 Adding and Removing Memory...

User Guide
Page 8
Provides information about restoring individual software programs, software drivers, and drive partition(s) or your entire hard disk drive to the original factory installed settings. To access this on-screen guide: 1 Click Start and Help and Support. 2 Click Manuals & Specifications. 3 Click VAIO Recovery Center User Guide. n8 N Before Use ❑ VAIO Recovery Center User Guide -
Provides information about restoring individual software programs, software drivers, and drive partition(s) or your entire hard disk drive to the original factory installed settings. To access this on-screen guide: 1 Click Start and Help and Support. 2 Click Manuals & Specifications. 3 Click VAIO Recovery Center User Guide. n8 N Before Use ❑ VAIO Recovery Center User Guide -

User Guide
Page 9
... Support Help and Support is easy to access and provides a single location for information and technical assistance for your computer running efficiently with updates and maintenance programs from the following categories to back up and restore your operating system, system software, and your personal data. ❑ Wireless & Networking Learn about wireless connections including Bluetooth Wireless technology and Wireless LAN. To access Help and Support, click Start and Help and Support. ❑ Manuals & Specifications...
... Support Help and Support is easy to access and provides a single location for information and technical assistance for your computer running efficiently with updates and maintenance programs from the following categories to back up and restore your operating system, system software, and your personal data. ❑ Wireless & Networking Learn about wireless connections including Bluetooth Wireless technology and Wireless LAN. To access Help and Support, click Start and Help and Support. ❑ Manuals & Specifications...

User Guide
Page 20
... is charging. Do not enter Sleep mode or turn off the indicator. Normal scrolling resumes when the Scroll lock indicator is in use. Indicator Power 1 Battery e Built-in MOTION EYE camera Media Access Optical disc drive Hard disk drive Num lock Caps lock Scroll lock Bluetooth technology * Functions Illuminates when the power of power, and double-blinks when the battery pack is read from or written to the optical disc media. Illuminates when data is read from or written to a memory card. (Do not enter Sleep mode or turn off...
... is charging. Do not enter Sleep mode or turn off the indicator. Normal scrolling resumes when the Scroll lock indicator is in use. Indicator Power 1 Battery e Built-in MOTION EYE camera Media Access Optical disc drive Hard disk drive Num lock Caps lock Scroll lock Bluetooth technology * Functions Illuminates when the power of power, and double-blinks when the battery pack is read from or written to the optical disc media. Illuminates when data is read from or written to a memory card. (Do not enter Sleep mode or turn off...

User Guide
Page 33
... the right edge of the touch pad to scroll vertically. If you disable the touch pad without connecting a mouse, you will be able to use only the keyboard for the detailed instructions. ! Press the left button twice. Press the right button (4) once. Using the Touch Pad You can disable/enable the touch pad to suit your preference for using the touch pad. In many applications, this action displays a shortcut menu. Slide your finger on an...
... the right edge of the touch pad to scroll vertically. If you disable the touch pad without connecting a mouse, you will be able to use only the keyboard for the detailed instructions. ! Press the left button twice. Press the right button (4) once. Using the Touch Pad You can disable/enable the touch pad to suit your preference for using the touch pad. In many applications, this action displays a shortcut menu. Slide your finger on an...

User Guide
Page 39
n 39 N Using Your VAIO Computer Reading and Writing Optical Discs Your computer plays and records CDs, DVDs, and Blu-ray Disc media, depending on your optical disc drive supports. Check your specifications for the type of media your model. Use the table below to see which types of optical disc drive installed on the model you purchased.
n 39 N Using Your VAIO Computer Reading and Writing Optical Discs Your computer plays and records CDs, DVDs, and Blu-ray Disc media, depending on your optical disc drive supports. Check your specifications for the type of media your model. Use the table below to see which types of optical disc drive installed on the model you purchased.

User Guide
Page 46
... on your software. For instructions on how to use the software, see the help file on your Blu-ray Disc burning software. The Blu-ray Disc writing function is available on selected models only. See the online specifications to find out the type of your optical disc drive, and then Reading and Writing Optical Discs (page 39) to find out about the supported disc media. See the...
... on your software. For instructions on how to use the software, see the help file on your Blu-ray Disc burning software. The Blu-ray Disc writing function is available on selected models only. See the online specifications to find out the type of your optical disc drive, and then Reading and Writing Optical Discs (page 39) to find out about the supported disc media. See the...

User Guide
Page 64
... access point (ad-hoc) ! You cannot select the 5 GHz bandwidth, which is not available on ad-hoc networks. 1 Turn on the left pane. The Set up a connection or network on the WIRELESS or WIRELESS LAN switch. The Wireless LAN indicator lights up. 2 Double-click ( / ) on the taskbar to see whether your desired wireless option(s) and click OK. 4 Click Start and Control Panel. 5 Click View network status and tasks under Network and Internet...
... access point (ad-hoc) ! You cannot select the 5 GHz bandwidth, which is not available on ad-hoc networks. 1 Turn on the left pane. The Set up a connection or network on the WIRELESS or WIRELESS LAN switch. The Wireless LAN indicator lights up. 2 Double-click ( / ) on the taskbar to see whether your desired wireless option(s) and click OK. 4 Click Start and Control Panel. 5 Click View network status and tasks under Network and Internet...

User Guide
Page 68
... between your model supports the Bluetooth functionality. You can establish wireless communication between these devices without cables and up to see whether your computer and other Bluetooth devices such as another computer or a mobile phone. To start Bluetooth communications 1 Turn on the WIRELESS switch. 2 Double-click ( / ) on selected models only. n 68 N Using Your VAIO Computer Using the Bluetooth Functionality The Bluetooth functionality is available on the taskbar to display the Wireless Device Switch window. 3 Select the Enable Bluetooth Device option. 4 Click...
... between your model supports the Bluetooth functionality. You can establish wireless communication between these devices without cables and up to see whether your computer and other Bluetooth devices such as another computer or a mobile phone. To start Bluetooth communications 1 Turn on the WIRELESS switch. 2 Double-click ( / ) on selected models only. n 68 N Using Your VAIO Computer Using the Bluetooth Functionality The Bluetooth functionality is available on the taskbar to display the Wireless Device Switch window. 3 Select the Enable Bluetooth Device option. 4 Click...
User Guide
Page 75
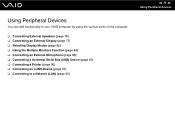
... functionality to your VAIO computer by using the various ports on the computer. ❑ Connecting External Speakers (page 76) ❑ Connecting an External Display (page 77) ❑ Selecting Display Modes (page 82) ❑ Using the Multiple Monitors Function (page 84) ❑ Connecting an External Microphone (page 86) ❑ Connecting a Universal Serial Bus (USB) Device (page 87) ❑ Connecting a Printer (page 90) ❑ Connecting an i.LINK Device (page 91) ❑ Connecting to a Network (LAN) (page 93) n 75 N Using Peripheral Devices
... functionality to your VAIO computer by using the various ports on the computer. ❑ Connecting External Speakers (page 76) ❑ Connecting an External Display (page 77) ❑ Selecting Display Modes (page 82) ❑ Using the Multiple Monitors Function (page 84) ❑ Connecting an External Microphone (page 86) ❑ Connecting a Universal Serial Bus (USB) Device (page 87) ❑ Connecting a Printer (page 90) ❑ Connecting an i.LINK Device (page 91) ❑ Connecting to a Network (LAN) (page 93) n 75 N Using Peripheral Devices
User Guide
Page 77
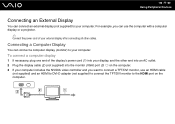
... display cable (2) (not supplied) into your computer. n 77 N Using Peripheral Devices Connecting an External Display You can connect an external display (not supplied) to the HDMI port on the computer. 3 If your computer includes the NVIDIA video controller and you want to connect a TFT/DVI monitor, use an HDMI cable (not supplied) and an HDMI to DVI-D adapter (not supplied) to connect the TFT/DVI monitor to your computer. Connecting a Computer Display You can connect a computer display (monitor...
... display cable (2) (not supplied) into your computer. n 77 N Using Peripheral Devices Connecting an External Display You can connect an external display (not supplied) to the HDMI port on the computer. 3 If your computer includes the NVIDIA video controller and you want to connect a TFT/DVI monitor, use an HDMI cable (not supplied) and an HDMI to DVI-D adapter (not supplied) to connect the TFT/DVI monitor to your computer. Connecting a Computer Display You can connect a computer display (monitor...
User Guide
Page 79
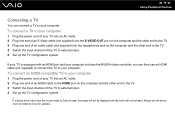
... one end of an audio cable (not supplied) into an AC outlet. 2 Plug one provided by Sony for updates. n 79 N Using Peripheral Devices Connecting a TV You can then use the device driver provided by Sony is equipped with an HDMI port and your computer includes the NVIDIA video controller, you can connect a TV to your computer. To connect a TV to your computer 1 Plug the power cord of your...
... one end of an audio cable (not supplied) into an AC outlet. 2 Plug one provided by Sony for updates. n 79 N Using Peripheral Devices Connecting a TV You can then use the device driver provided by Sony is equipped with an HDMI port and your computer includes the NVIDIA video controller, you can connect a TV to your computer. To connect a TV to your computer 1 Plug the power cord of your...

User Guide
Page 85
... specifications. n 85 N Using Peripheral Devices To select the Multiple Monitors mode ! At the confirmation prompt, click Yes. The Display Settings window appears. 3 Right-click the number 2 monitor and select Attached. 4 Click OK. For details on the desktop and select Personalize. 2 Click Display Settings. Models with the NVIDIA video controller 1 Click Start and Control Panel. 2 Click Adjust screen resolution under Appearance and Personalization. To change the S1 button assignment to display the window for each display...
... specifications. n 85 N Using Peripheral Devices To select the Multiple Monitors mode ! At the confirmation prompt, click Yes. The Display Settings window appears. 3 Right-click the number 2 monitor and select Attached. 4 Click OK. For details on the desktop and select Personalize. 2 Click Display Settings. Models with the NVIDIA video controller 1 Click Start and Control Panel. 2 Click Adjust screen resolution under Appearance and Personalization. To change the S1 button assignment to display the window for each display...

User Guide
Page 141
... MOTION EYE camera. ❑ If your computer automatically enters Sleep or Hibernate mode, change the corresponding power saving mode setting. Follow these steps: 1 Click Start, Control Panel, Hardware and Sound, and Device Manager. 2 Double-click Imaging devices. 3 Right-click the device name for your computer into Sleep or Hibernate mode while you must reinstall the driver software for the camera. What should I use ? ❑ Do not place your camera and click Update Driver Software. n 141 N Troubleshooting Why can...
... MOTION EYE camera. ❑ If your computer automatically enters Sleep or Hibernate mode, change the corresponding power saving mode setting. Follow these steps: 1 Click Start, Control Panel, Hardware and Sound, and Device Manager. 2 Double-click Imaging devices. 3 Right-click the device name for your computer into Sleep or Hibernate mode while you must reinstall the driver software for the camera. What should I use ? ❑ Do not place your camera and click Update Driver Software. n 141 N Troubleshooting Why can...

User Guide
Page 154
... specifications to find out the type of DVD recordable media do not work. ❑ The preinstalled software on how to connect the computer to find out about the supported disc media. Macrovision or a similar video protection technology prevents users from copying DVD movies. n 154 N Troubleshooting What should I do if I cannot write data to DVD media? ❑ Make sure you are using the correct DVD recordable media. ❑ Check which DVD recordable format...
... specifications to find out the type of DVD recordable media do not work. ❑ The preinstalled software on how to connect the computer to find out about the supported disc media. Macrovision or a similar video protection technology prevents users from copying DVD movies. n 154 N Troubleshooting What should I do if I cannot write data to DVD media? ❑ Make sure you are using the correct DVD recordable media. ❑ Check which DVD recordable format...

User Guide
Page 155
The DVD±RW/±R DL/RAM drive does not support it. ❑ BD-R Disc media are not rewritable. You cannot add or erase data to selected models only. This Q & A entry applies to or from the BD-R Disc media. See the online specifications to find out about the supported disc media. ❑ Make sure your optical disc drive, and then Reading and Writing Optical Discs (page 39) to Blu-ray Disc media? ! n 155 N Troubleshooting Why can't I write data to find out the type of your optical disc drive supports the Blu-ray Disc writing function.
The DVD±RW/±R DL/RAM drive does not support it. ❑ BD-R Disc media are not rewritable. You cannot add or erase data to selected models only. This Q & A entry applies to or from the BD-R Disc media. See the online specifications to find out about the supported disc media. ❑ Make sure your optical disc drive, and then Reading and Writing Optical Discs (page 39) to Blu-ray Disc media? ! n 155 N Troubleshooting Why can't I write data to find out the type of your optical disc drive supports the Blu-ray Disc writing function.

User Guide
Page 161
... Start and Control Panel. 2 Click Printer under Hardware and Sound. 3 Right-click the printer icon and select Properties. 4 Click the Ports tab. 5 Click to install the printer driver software before you use your computer may need to cancel the Enable bidirectional support check box. 6 Click OK. This change to the settings disables the bidirectional communication functions of the printer, such as data transfer, status monitoring, and remote panel. See...
... Start and Control Panel. 2 Click Printer under Hardware and Sound. 3 Right-click the printer icon and select Properties. 4 Click the Ports tab. 5 Click to install the printer driver software before you use your computer may need to cancel the Enable bidirectional support check box. 6 Click OK. This change to the settings disables the bidirectional communication functions of the printer, such as data transfer, status monitoring, and remote panel. See...

User Guide
Page 170
... have connected a device to the HDMI port, you need to change the sound output device, follow these steps: 1 Follow steps 1 to the HDMI port? ! To change the device for sound output if you still hear no sound from the sound output device, follow these steps: 1 Close all open programs. 2 Click Start and Control Panel. 3 Click Hardware and Sound. 4 Click Manage audio devices under Sound. 5 On the Playback tab, select the desired device for sound output and click Set Default. ❑...
... have connected a device to the HDMI port, you need to change the sound output device, follow these steps: 1 Follow steps 1 to the HDMI port? ! To change the device for sound output if you still hear no sound from the sound output device, follow these steps: 1 Close all open programs. 2 Click Start and Control Panel. 3 Click Hardware and Sound. 4 Click Manage audio devices under Sound. 5 On the Playback tab, select the desired device for sound output and click Set Default. ❑...

Help - Hard Disk Drive Replacement Instructions
Page 1
... instructions: o Hold parts by the edges, away from 9:00 am to guide you through the replacement process. CAUTION: Make sure the computer is turned off and AC Adaptor is not responsible for technical support from exposed circuitry when possible. VGN-FZxx Series Hard Disk Drive Replacement Instructions IMPORTANT! Remove jewelry before you as this promotes static build-up. 9 The appearance of the computer under these instructions. * Sony...
... instructions: o Hold parts by the edges, away from 9:00 am to guide you through the replacement process. CAUTION: Make sure the computer is turned off and AC Adaptor is not responsible for technical support from exposed circuitry when possible. VGN-FZxx Series Hard Disk Drive Replacement Instructions IMPORTANT! Remove jewelry before you as this promotes static build-up. 9 The appearance of the computer under these instructions. * Sony...
Safety
Page 2
... make any time without notice. This manual and the software described herein, in whole or in a secure location. SONY ELECTRONICS INC. Use of such software is governed by third parties. For customers in part without written permission is prohibited. Reproduction in whole or in USA and Canada Pour les utilisateurs aux Etats-Unis et au Canada Owner's Record The model number...
... make any time without notice. This manual and the software described herein, in whole or in a secure location. SONY ELECTRONICS INC. Use of such software is governed by third parties. For customers in part without written permission is prohibited. Reproduction in whole or in USA and Canada Pour les utilisateurs aux Etats-Unis et au Canada Owner's Record The model number...


