
User Guide
Page 9
...from the following categories to find interesting and useful. ❑ VAIO Tutorials Sony provides guided help tutorials that help in the form of VAIO tutorials, an escalation page containing support and contact information, and various links to VAIO online support Web sites. ❑ Backup & Recovery Find ...provides a single location for information and technical assistance for you or show you need. Run utilities that include VAIO Media Setup and Windows Network and Sharing Center, and access to wireless tutorials. ❑ Security Keep your data safe and your computer. ❑...
...from the following categories to find interesting and useful. ❑ VAIO Tutorials Sony provides guided help tutorials that help in the form of VAIO tutorials, an escalation page containing support and contact information, and various links to VAIO online support Web sites. ❑ Backup & Recovery Find ...provides a single location for information and technical assistance for you or show you need. Run utilities that include VAIO Media Setup and Windows Network and Sharing Center, and access to wireless tutorials. ❑ Security Keep your data safe and your computer. ❑...
User Guide
Page 12
..., set the display at eye level or slightly lower when you are sitting in front of the display as well. ❑ Lighting - Choose a location where windows and lights do not cause glare and reflection on the display. Use the display's tilting feature to your comfort and work efficiency. ❑ Positioning an...
..., set the display at eye level or slightly lower when you are sitting in front of the display as well. ❑ Lighting - Choose a location where windows and lights do not cause glare and reflection on the display. Use the display's tilting feature to your comfort and work efficiency. ❑ Positioning an...

User Guide
Page 31
... increase lighting intensity, press Fn+F6 and then M or ,, or keep pressing Fn+F6. Adjusts the LCD brightness of your computer screen. n 31 N Using Your VAIO Computer Using the Keyboard Your keyboard is very similar to a desktop computer keyboard, but has additional keys that perform model-specific tasks.
... increase lighting intensity, press Fn+F6 and then M or ,, or keep pressing Fn+F6. Adjusts the LCD brightness of your computer screen. n 31 N Using Your VAIO Computer Using the Keyboard Your keyboard is very similar to a desktop computer keyboard, but has additional keys that perform model-specific tasks.

User Guide
Page 34
Next track button > Functions By default, the S1 button turns the volume on VAIO Control Center for the S1 button assignment. In such a case, you can change the assignment in the window for more information on Instant Mode. See the printed Instant Mode booklet for changing the S1 button assignment.... playback of a CD, DVD, or Blu-ray Disc™ * media or a music/video file stored on the hard disk drive without launching Windows. Plays the next chapter/file during video playback or the next song/file during audio playback. See the printed Instant Mode booklet for selecting the...
Next track button > Functions By default, the S1 button turns the volume on VAIO Control Center for the S1 button assignment. In such a case, you can change the assignment in the window for more information on Instant Mode. See the printed Instant Mode booklet for changing the S1 button assignment.... playback of a CD, DVD, or Blu-ray Disc™ * media or a music/video file stored on the hard disk drive without launching Windows. Plays the next chapter/file during video playback or the next song/file during audio playback. See the printed Instant Mode booklet for selecting the...

User Guide
Page 36
... decreases the frame rate and slows down the shutter speed to allow the camera to instant messaging software and video editing software. The viewer window may show some noise, for a video conference using the built-in MOTION EYE camera. You cannot operate the built-in MOTION EYE camera.... When capturing an image in a dark place, click Start, All Programs, VAIO Camera Capture Utility, and VAIO Camera Capture Utility to display the Properties window and select the Low Light check box. n 36 N Using Your VAIO Computer Using the Built-in MOTION EYE Camera Your computer is normal and does ...
... decreases the frame rate and slows down the shutter speed to allow the camera to instant messaging software and video editing software. The viewer window may show some noise, for a video conference using the built-in MOTION EYE camera. You cannot operate the built-in MOTION EYE camera.... When capturing an image in a dark place, click Start, All Programs, VAIO Camera Capture Utility, and VAIO Camera Capture Utility to display the Properties window and select the Low Light check box. n 36 N Using Your VAIO Computer Using the Built-in MOTION EYE Camera Your computer is normal and does ...

User Guide
Page 44
If the Audio CD window appears, click to a disc. 1 Insert a disc into the optical disc drive. 2 If nothing appears on -screen instructions until the empty disc folder...copy and drag them to a disc ! Do not strike or shake your computer while writing data to select an option. If the AutoPlay window appears, click Burn files to disc and follow the on the desktop, then click Start, All Programs, and the desired CD software to... disc drive. Copying Files to CDs To copy files to the empty disc folder. 3 Close the disc folder. n 44 N Using Your VAIO Computer Playing CDs To play the CD.
If the Audio CD window appears, click to a disc. 1 Insert a disc into the optical disc drive. 2 If nothing appears on -screen instructions until the empty disc folder...copy and drag them to a disc ! Do not strike or shake your computer while writing data to select an option. If the AutoPlay window appears, click Burn files to disc and follow the on the desktop, then click Start, All Programs, and the desired CD software to... disc drive. Copying Files to CDs To copy files to the empty disc folder. 3 Close the disc folder. n 44 N Using Your VAIO Computer Playing CDs To play the CD.
User Guide
Page 49
...The Safely Remove Hardware window appears. 2 Select the hardware you want to remove the ExpressCard module while your computer is off, skip steps 1 to pop it out. 9 Gently take hold of the ExpressCard module and pull it out of the slot. n 49 N Using Your VAIO Computer Removing an ...ExpressCard Module Follow the steps below to unplug. 3 Click Stop. To remove an ExpressCard module ✍ To remove an ExpressCard module when your system may not work properly. The Stop a Hardware device window appears. 4 Confirm that the device can...
...The Safely Remove Hardware window appears. 2 Select the hardware you want to remove the ExpressCard module while your computer is off, skip steps 1 to pop it out. 9 Gently take hold of the ExpressCard module and pull it out of the slot. n 49 N Using Your VAIO Computer Removing an ...ExpressCard Module Follow the steps below to unplug. 3 Click Stop. To remove an ExpressCard module ✍ To remove an ExpressCard module when your system may not work properly. The Stop a Hardware device window appears. 4 Confirm that the device can...

User Guide
Page 52
... you cannot insert it clicks into the slot. If nothing appears on the Memory Stick media 1 Click Start and Computer to open the Computer window. 2 Double-click the Memory Stick media icon to hold the Memory Stick media with the arrow facing upward and pointing toward the Memory Stick ... Start, Computer, and double-click the Memory Stick media icon. ! Do not insert more than one Memory Stick media into place. n 52 N Using Your VAIO Computer Inserting a Memory Stick Media To insert a Memory Stick media 1 Locate the Memory Stick slot. 2 Hold the Memory Stick media with the arrow pointing in...
... you cannot insert it clicks into the slot. If nothing appears on the Memory Stick media 1 Click Start and Computer to open the Computer window. 2 Double-click the Memory Stick media icon to hold the Memory Stick media with the arrow facing upward and pointing toward the Memory Stick ... Start, Computer, and double-click the Memory Stick media icon. ! Do not insert more than one Memory Stick media into place. n 52 N Using Your VAIO Computer Inserting a Memory Stick Media To insert a Memory Stick media 1 Locate the Memory Stick slot. 2 Hold the Memory Stick media with the arrow pointing in...
User Guide
Page 53
If you select Quick Format in the factory default setting and is designed to open the Computer window. 3 Right-click the Memory Stick media icon and select Format. 4 Click Restore device defaults. ! Be sure to use . Do not remove the Memory Stick media ... and supports the Memory Stick media when formatting the media. Formatting the Memory Stick media erases the entire data on the media. n 53 N Using Your VAIO Computer To format a Memory Stick media The Memory Stick media has been formatted in Format options. 5 Click Start.
If you select Quick Format in the factory default setting and is designed to open the Computer window. 3 Right-click the Memory Stick media icon and select Format. 4 Click Restore device defaults. ! Be sure to use . Do not remove the Memory Stick media ... and supports the Memory Stick media when formatting the media. Formatting the Memory Stick media erases the entire data on the media. n 53 N Using Your VAIO Computer To format a Memory Stick media The Memory Stick media has been formatted in Format options. 5 Click Start.

User Guide
Page 60
The Connect to the Internet under Network and Internet. n 60 N Using Your VAIO Computer To set up a dial-up connection to the Internet 1 Click Start and Control Panel. 2 Click Connect to the Internet window appears. 3 Click Dial-up. 4 Follow the on-screen instructions.
The Connect to the Internet under Network and Internet. n 60 N Using Your VAIO Computer To set up a dial-up connection to the Internet 1 Click Start and Control Panel. 2 Click Connect to the Internet window appears. 3 Click Dial-up. 4 Follow the on-screen instructions.

User Guide
Page 64
...used for the IEEE 802.11a standard, on the WIRELESS or WIRELESS LAN switch. n 64 N Using Your VAIO Computer To communicate without an access point (ad-hoc) ! You cannot select the 5 GHz bandwidth, which is not available on ad-hoc networks. 1 Turn on ad-hoc networks. The Set up... Panel. 5 Click View network status and tasks under Network and Internet. 6 Click Set up a connection or network window appears. 7 Select an option to display the Wireless Device Switch window. 3 Select your model supports the Bluetooth functionality, the IEEE 802.11a/b/g standard, and/or the IEEE 802.11n ...
...used for the IEEE 802.11a standard, on the WIRELESS or WIRELESS LAN switch. n 64 N Using Your VAIO Computer To communicate without an access point (ad-hoc) ! You cannot select the 5 GHz bandwidth, which is not available on ad-hoc networks. 1 Turn on ad-hoc networks. The Set up... Panel. 5 Click View network status and tasks under Network and Internet. 6 Click Set up a connection or network window appears. 7 Select an option to display the Wireless Device Switch window. 3 Select your model supports the Bluetooth functionality, the IEEE 802.11a/b/g standard, and/or the IEEE 802.11n ...

User Guide
Page 66
...and 63 alphanumeric characters long or up to 64 characters long using numbers from 0 to 9 and letters from A to display the Wireless Device Switch window. 4 Select your model supports the Bluetooth functionality, the IEEE 802.11a/b/g standard, and/or the IEEE 802.11n draft standard. The Wireless LAN ... is case sensitive and must enter a passphrase. The passphrase is set up . 3 Double-click ( / ) on the taskbar to F. n 66 N Using Your VAIO Computer To connect to see whether your desired wireless option(s) and click OK. 5 Right-click or on the WIRELESS or WIRELESS LAN switch.
...and 63 alphanumeric characters long or up to 64 characters long using numbers from 0 to 9 and letters from A to display the Wireless Device Switch window. 4 Select your model supports the Bluetooth functionality, the IEEE 802.11a/b/g standard, and/or the IEEE 802.11n draft standard. The Wireless LAN ... is case sensitive and must enter a passphrase. The passphrase is set up . 3 Double-click ( / ) on the taskbar to F. n 66 N Using Your VAIO Computer To connect to see whether your desired wireless option(s) and click OK. 5 Right-click or on the WIRELESS or WIRELESS LAN switch.

User Guide
Page 68
See the online specifications to display the Wireless Device Switch window. 3 Select the Enable Bluetooth Device option. 4 Click OK. To start Bluetooth communications 1 Turn on the WIRELESS switch. 2 Double-click ( / ) on selected models only. You can ... and up to 33 feet (10 meters) range in open space. You can transfer data between your model supports the Bluetooth functionality. n 68 N Using Your VAIO Computer Using the Bluetooth Functionality The Bluetooth functionality is available on the taskbar to see whether your computer and other Bluetooth devices such as another...
See the online specifications to display the Wireless Device Switch window. 3 Select the Enable Bluetooth Device option. 4 Click OK. To start Bluetooth communications 1 Turn on the WIRELESS switch. 2 Double-click ( / ) on selected models only. You can ... and up to 33 feet (10 meters) range in open space. You can transfer data between your model supports the Bluetooth functionality. n 68 N Using Your VAIO Computer Using the Bluetooth Functionality The Bluetooth functionality is available on the taskbar to see whether your computer and other Bluetooth devices such as another...

User Guide
Page 72
Stopping Bluetooth Communications To stop Bluetooth communications Turn off the Bluetooth device that is communicating with another Bluetooth device To communicate with your computer. To open Windows Help and Support, click Start and Help and Support. n 72 N Using Your VAIO Computer To communicate with another Bluetooth device, you need first to set up and using the Bluetooth functionality, search for Bluetooth information using Windows Help and Support. For setting up the Bluetooth functionality.
Stopping Bluetooth Communications To stop Bluetooth communications Turn off the Bluetooth device that is communicating with another Bluetooth device To communicate with your computer. To open Windows Help and Support, click Start and Help and Support. n 72 N Using Your VAIO Computer To communicate with another Bluetooth device, you need first to set up and using the Bluetooth functionality, search for Bluetooth information using Windows Help and Support. For setting up the Bluetooth functionality.

User Guide
Page 73
... and click Next. 8 Click Finish. The headset icon appears on the Devices tab in the Bluetooth Devices window. 9 Follow the on using instant messaging software. The Add Bluetooth Device Wizard window appears. 5 Click to select the My device is set up and ready to turn on the Devices tab.... The Bluetooth Devices window appears. 4 Click Add on the Bluetooth headset. 2 Press and hold the volume buttons for the headset appears. n 73 N Using Your VAIO Computer Using the Bluetooth Headset The Bluetooth headset (not supplied) will come in ...
... and click Next. 8 Click Finish. The headset icon appears on the Devices tab in the Bluetooth Devices window. 9 Follow the on using instant messaging software. The Add Bluetooth Device Wizard window appears. 5 Click to select the My device is set up and ready to turn on the Devices tab.... The Bluetooth Devices window appears. 4 Click Add on the Bluetooth headset. 2 Press and hold the volume buttons for the headset appears. n 73 N Using Your VAIO Computer Using the Bluetooth Headset The Bluetooth headset (not supplied) will come in ...

User Guide
Page 74
To disconnect the headset from your computer 1 Click Start, Control Panel, Hardware and Sound, and Bluetooth Devices. The Bluetooth Devices window appears. 2 Select the headset icon and select Disconnect. 3 Click OK. n 74 N Using Your VAIO Computer
To disconnect the headset from your computer 1 Click Start, Control Panel, Hardware and Sound, and Bluetooth Devices. The Bluetooth Devices window appears. 2 Select the headset icon and select Disconnect. 3 Click OK. n 74 N Using Your VAIO Computer

User Guide
Page 83
... on the type of your computer screen and the external display or projector at the same time, depending on the external display. The Display Settings window appears. 3 Follow the on-screen instructions to change the settings. ✍ You may not be able to display the same contents on your external display...
... on the type of your computer screen and the external display or projector at the same time, depending on the external display. The Display Settings window appears. 3 Follow the on-screen instructions to change the settings. ✍ You may not be able to display the same contents on your external display...
User Guide
Page 84
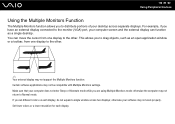
If you set different colors on each display. Set fewer colors or a lower resolution for each display, do not expand a single window across separate displays. This allows you to drag objects, such as a single desktop. Make sure that your software may not support the Multiple... if you have an external display connected to the monitor (VGA) port, your desktop across two displays; You can function as an open application window or a toolbar, from one display to the other . Certain software applications may not return to Normal mode. otherwise the computer may not be compatible...
If you set different colors on each display. Set fewer colors or a lower resolution for each display, do not expand a single window across separate displays. This allows you to drag objects, such as a single desktop. Make sure that your software may not support the Multiple... if you have an external display connected to the monitor (VGA) port, your desktop across two displays; You can function as an open application window or a toolbar, from one display to the other . Certain software applications may not return to Normal mode. otherwise the computer may not be compatible...

User Guide
Page 85
... Monitors mode ! Models with the S1 button. To change the S1 button assignment to display the window for each display and customize the Multiple Monitors mode. The Display Settings window appears. 3 Right-click the number 2 monitor and select Attached. 4 Click OK. For details on...-screen instructions to change the settings. ✍ You can set the display colors and resolution for changing the assignment. The Display Settings window appears. 3 Follow the on the S1 button, see the online specifications. Additionally, you can also change the S1 button assignment, press...
... Monitors mode ! Models with the S1 button. To change the S1 button assignment to display the window for each display and customize the Multiple Monitors mode. The Display Settings window appears. 3 Right-click the number 2 monitor and select Attached. 4 Click OK. For details on...-screen instructions to change the settings. ✍ You can set the display colors and resolution for changing the assignment. The Display Settings window appears. 3 Follow the on the S1 button, see the online specifications. Additionally, you can also change the S1 button assignment, press...

User Guide
Page 89
.... 3 Select the floppy disk drive you want to malfunction. The Stop a Hardware device window appears. 5 Confirm that the floppy disk drive can disconnect a USB floppy disk drive when your computer is on the taskbar. To disconnect a USB floppy disk ... all programs accessing the floppy disk drive. 2 Double-click the Safely Remove Hardware icon on or off , skip steps 1 to close the Safely Remove Hardware window. 9 Disconnect the floppy disk drive from the system. 6 Click OK.
.... 3 Select the floppy disk drive you want to malfunction. The Stop a Hardware device window appears. 5 Confirm that the floppy disk drive can disconnect a USB floppy disk drive when your computer is on the taskbar. To disconnect a USB floppy disk ... all programs accessing the floppy disk drive. 2 Double-click the Safely Remove Hardware icon on or off , skip steps 1 to close the Safely Remove Hardware window. 9 Disconnect the floppy disk drive from the system. 6 Click OK.


