
User Guide
Page 2
n2 N Contents Before Use ...6 Documentation ...7 Ergonomic Considerations ...11 Getting Started ...13 Locating Controls and Ports...14 About the Indicator Lights ...19 Connecting a Power Source ...20 Using the Battery Pack ...21 Shutting Down Your Computer Safely ...25 Using Your VAIO Computer ...26 Using the Keyboard ...27 Using the Touch Pad ...29 Using Special-function Buttons ...30 Using the Optical Disc Drive ...31 Using the ExpressCard Module ...40 Using the Memory Stick Media ...43 Using Other Memory Cards ...50 Using the Internet...53 Using Wireless LAN (WLAN) ...55
n2 N Contents Before Use ...6 Documentation ...7 Ergonomic Considerations ...11 Getting Started ...13 Locating Controls and Ports...14 About the Indicator Lights ...19 Connecting a Power Source ...20 Using the Battery Pack ...21 Shutting Down Your Computer Safely ...25 Using Your VAIO Computer ...26 Using the Keyboard ...27 Using the Touch Pad ...29 Using Special-function Buttons ...30 Using the Optical Disc Drive ...31 Using the ExpressCard Module ...40 Using the Memory Stick Media ...43 Using Other Memory Cards ...50 Using the Internet...53 Using Wireless LAN (WLAN) ...55

User Guide
Page 8
To access this on-screen guide: 1 Click Start and Help and Support. 2 Click Manuals & Specifications. 3 Click VAIO Recovery Center User Guide. n8 N Before Use ❑ VAIO Recovery Center User Guide - Provides information about restoring individual software programs, software drivers, and drive partition(s) or your entire hard disk drive to the original factory installed settings.
To access this on-screen guide: 1 Click Start and Help and Support. 2 Click Manuals & Specifications. 3 Click VAIO Recovery Center User Guide. n8 N Before Use ❑ VAIO Recovery Center User Guide - Provides information about restoring individual software programs, software drivers, and drive partition(s) or your entire hard disk drive to the original factory installed settings.

User Guide
Page 13
Before starting your computer for example, a printer, an external hard disk drive, a scanner, and so on) at a time, following the manufacturers' instructions. ❑ Locating Controls and Ports (page 14) ❑ About the Indicator Lights (page 19) ❑ ... other hardware that did not originally come with only the supplied accessories connected and set up your system. Be sure to get started using your VAIO computer. ! n 13 N Getting Started Getting Started This section describes how to start up your computer with your computer.
Before starting your computer for example, a printer, an external hard disk drive, a scanner, and so on) at a time, following the manufacturers' instructions. ❑ Locating Controls and Ports (page 14) ❑ About the Indicator Lights (page 19) ❑ ... other hardware that did not originally come with only the supplied accessories connected and set up your system. Be sure to get started using your VAIO computer. ! n 13 N Getting Started Getting Started This section describes how to start up your computer with your computer.
User Guide
Page 14
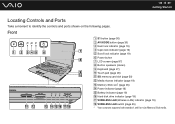
... memory card slot (page 50) L Media Access indicator (page 19) M Memory Stick slot* (page 45) N Power indicator (page 19) O Battery indicator (page 19) P Hard disk drive indicator (page 19) Q WIRELESS LAN (Wireless LAN) indicator (page 19) R WIRELESS LAN switch (page 55) * Your computer supports both standard- and...
... memory card slot (page 50) L Media Access indicator (page 19) M Memory Stick slot* (page 45) N Power indicator (page 19) O Battery indicator (page 19) P Hard disk drive indicator (page 19) Q WIRELESS LAN (Wireless LAN) indicator (page 19) R WIRELESS LAN switch (page 55) * Your computer supports both standard- and...
User Guide
Page 17
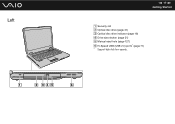
speeds. Left n 17 N Getting Started A Security slot B Optical disc drive (page 31) C Optical disc drive indicator (page 19) D Drive eject button (page 31) E Manual eject hole (page 127) F Hi-Speed USB (USB 2.0) ports* (page 71) * Support high-/full-/low-
speeds. Left n 17 N Getting Started A Security slot B Optical disc drive (page 31) C Optical disc drive indicator (page 19) D Drive eject button (page 31) E Manual eject hole (page 127) F Hi-Speed USB (USB 2.0) ports* (page 71) * Support high-/full-/low-

User Guide
Page 19
Indicator Power 1 Battery e Media Access Optical disc drive Hard disk drive Num lock Caps lock Scroll lock Wireless LAN Functions Illuminates when the power of power, and double-blinks when the battery pack is charging. When ... not active when the indicator is using and does not work with the following indicator lights. Press the Caps Lock key to the hard disk drive. n 19 N Getting Started About the Indicator Lights Your computer is equipped with all programs. Illuminates when the wireless LAN functionality is enabled. Illuminates when the...
Indicator Power 1 Battery e Media Access Optical disc drive Hard disk drive Num lock Caps lock Scroll lock Wireless LAN Functions Illuminates when the power of power, and double-blinks when the battery pack is charging. When ... not active when the indicator is using and does not work with the following indicator lights. Press the Caps Lock key to the hard disk drive. n 19 N Getting Started About the Indicator Lights Your computer is equipped with all programs. Illuminates when the wireless LAN functionality is enabled. Illuminates when the...

User Guide
Page 26
Using Your VAIO Computer This section describes how to get the most out of using your VAIO computer. ❑ Using the Keyboard (page 27) ❑ Using the Touch Pad (page 29) ❑ Using Special-function Buttons (page 30) ❑ Using the Optical Disc Drive (page 31) ❑ Using the ExpressCard Module (page 40) ❑ Using the Memory Stick Media (page 43) ❑ Using Other Memory Cards (page 50) ❑ Using the Internet (page 53) ❑ Using Wireless LAN (WLAN) (page 55) n 26 N Using Your VAIO Computer
Using Your VAIO Computer This section describes how to get the most out of using your VAIO computer. ❑ Using the Keyboard (page 27) ❑ Using the Touch Pad (page 29) ❑ Using Special-function Buttons (page 30) ❑ Using the Optical Disc Drive (page 31) ❑ Using the ExpressCard Module (page 40) ❑ Using the Memory Stick Media (page 43) ❑ Using Other Memory Cards (page 50) ❑ Using the Internet (page 53) ❑ Using Wireless LAN (WLAN) (page 55) n 26 N Using Your VAIO Computer

User Guide
Page 28
For details on the power. When you execute this command, the states of power consumption. To return the system to its original state, use the power button to the hard disk drive and the system power is turned off. Combinations/Feature Fn + (F12): Hibernate n 28 N Using Your VAIO Computer Functions Provides for the lowest level of the system and the connected peripheral devices are written to turn on power management, see Using the Power Saving Modes (page 83).
For details on the power. When you execute this command, the states of power consumption. To return the system to its original state, use the power button to the hard disk drive and the system power is turned off. Combinations/Feature Fn + (F12): Hibernate n 28 N Using Your VAIO Computer Functions Provides for the lowest level of the system and the connected peripheral devices are written to turn on power management, see Using the Power Saving Modes (page 83).

User Guide
Page 31
n 31 N Using Your VAIO Computer Using the Optical Disc Drive Your computer is equipped with the label side facing upward and gently push it until the disc clicks into place. To insert a disc 1 Turn on the computer. 2 Press the drive eject button (1) to open the drive. The tray slides out. 3 Place a disc in the middle of the tray with an optical disc drive.
n 31 N Using Your VAIO Computer Using the Optical Disc Drive Your computer is equipped with the label side facing upward and gently push it until the disc clicks into place. To insert a disc 1 Turn on the computer. 2 Press the drive eject button (1) to open the drive. The tray slides out. 3 Place a disc in the middle of the tray with an optical disc drive.

User Guide
Page 32
Do not remove the optical disc when your computer is in gently. ! Doing so may cause the computer to malfunction. ✍ If you plan to use an external optical disc drive, connect the drive before you launch any preinstalled disc operation program. n 32 N Using Your VAIO Computer 4 Close the tray by pushing it in a power saving mode (Sleep or Hibernate).
Do not remove the optical disc when your computer is in gently. ! Doing so may cause the computer to malfunction. ✍ If you plan to use an external optical disc drive, connect the drive before you launch any preinstalled disc operation program. n 32 N Using Your VAIO Computer 4 Close the tray by pushing it in a power saving mode (Sleep or Hibernate).

User Guide
Page 33
n 33 N Using Your VAIO Computer Reading and Writing Optical Discs Your computer plays and records CDs, DVDs, and Blu-ray Disc™ media, depending on your optical disc drive supports. Check your specifications for the type of media your model. Use the table below to see which types of optical disc drive installed on the model you purchased.
n 33 N Using Your VAIO Computer Reading and Writing Optical Discs Your computer plays and records CDs, DVDs, and Blu-ray Disc™ media, depending on your optical disc drive supports. Check your specifications for the type of media your model. Use the table below to see which types of optical disc drive installed on the model you purchased.

User Guide
Page 34
... a removable cartridge. *4 Writing data to single-sided DVD-RAM discs (2.6 GB) compliant with DVD-RW Version 1.1/1.2. *3 The DVD±RW/RAM disc drive on discs supporting DVD-R DL (Dual Layer) recording. *7 Supports writing data to BD-R Version 1.1 discs (single-layer discs with the capacity of 25 ... computer does not support BD-RE Disc media in Version 2.1 format. *11 The Blu-ray Disc drive on your computer does not support the DVD-RAM cartridge. n 34 N Using Your VAIO Computer PR: playable and recordable P: playable but not recordable -: not playable or recordable CDROM Video Music...
... a removable cartridge. *4 Writing data to single-sided DVD-RAM discs (2.6 GB) compliant with DVD-RW Version 1.1/1.2. *3 The DVD±RW/RAM disc drive on discs supporting DVD-R DL (Dual Layer) recording. *7 Supports writing data to BD-R Version 1.1 discs (single-layer discs with the capacity of 25 ... computer does not support BD-RE Disc media in Version 2.1 format. *11 The Blu-ray Disc drive on your computer does not support the DVD-RAM cartridge. n 34 N Using Your VAIO Computer PR: playable and recordable P: playable but not recordable -: not playable or recordable CDROM Video Music...

User Guide
Page 35
...It is not supported. ! n 35 N Using Your VAIO Computer ! Be aware that conform to the CD Standard. If the region setting on the optical disc drive does not match the region coding on DVDs and BD-ROM Disc media. Sony does NOT guarantee the compatibility of discs now available, when... HANGING. Region settings are not compliant with the High-bandwidth Digital Content Protection (HDCP) standard, you need to Blu-ray Disc drives). VAIO computers may not play or view the contents on packaged media recorded in relation to update the AACS key. Unless your computer's optical ...
...It is not supported. ! n 35 N Using Your VAIO Computer ! Be aware that conform to the CD Standard. If the region setting on the optical disc drive does not match the region coding on DVDs and BD-ROM Disc media. Sony does NOT guarantee the compatibility of discs now available, when... HANGING. Region settings are not compliant with the High-bandwidth Digital Content Protection (HDCP) standard, you need to Blu-ray Disc drives). VAIO computers may not play or view the contents on packaged media recorded in relation to update the AACS key. Unless your computer's optical ...

User Guide
Page 36
...write data to a disc. Use of the power saving modes while using your software application to a disc. n 36 N Using Your VAIO Computer Notes on the optical disc drive, you need to close all other shape (star, heart, card, etc.), as this process, follow the instructions included with the Roxio ... with your battery pack is preinstalled on your computer or make data on a disc readable on writing data to a disc ❑ Use only Sony recommended software, which is at least 50% charged. ❑ Make sure you use memory-resident utility software while writing data to burn discs, ...
...write data to a disc. Use of the power saving modes while using your software application to a disc. n 36 N Using Your VAIO Computer Notes on the optical disc drive, you need to close all other shape (star, heart, card, etc.), as this process, follow the instructions included with the Roxio ... with your battery pack is preinstalled on your computer or make data on a disc readable on writing data to a disc ❑ Use only Sony recommended software, which is at least 50% charged. ❑ Make sure you use memory-resident utility software while writing data to burn discs, ...

User Guide
Page 37
... to indicate in which region and on your computer is labeled "all," this means that you can play the disc. n 37 N Using Your VAIO Computer Notes on playing discs To achieve optimum performance when playing discs, you should follow these recommendations. ❑ Some CD players and computers' optical... the packaging, you cannot play DVDs created with the CD-R or CD-RW disc media. ❑ Some DVD players and computers' optical disc drives may cause your computer to malfunction. ❑ Do not place your computer into either of the power saving modes while your computer. This may...
... to indicate in which region and on your computer is labeled "all," this means that you can play the disc. n 37 N Using Your VAIO Computer Notes on playing discs To achieve optimum performance when playing discs, you should follow these recommendations. ❑ Some CD players and computers' optical... the packaging, you cannot play DVDs created with the CD-R or CD-RW disc media. ❑ Some DVD players and computers' optical disc drives may cause your computer to malfunction. ❑ Do not place your computer into either of the power saving modes while your computer. This may...
User Guide
Page 38
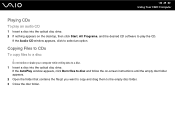
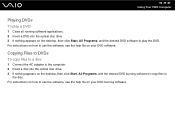
...to CDs To copy files to select an option. n 38 N Using Your VAIO Computer Playing CDs To play the CD. If the AutoPlay window appears, click..., All Programs, and the desired CD software to play an audio CD 1 Insert a disc into the optical disc drive. 2 If nothing appears on -screen instructions until the empty disc folder appears. 2 Open the folder that contains the... file(s) you want to copy and drag them to a disc. 1 Insert a disc into the optical disc drive. If the Audio CD window appears, click to a disc ! Do not strike or shake your computer while writing data ...
...to CDs To copy files to select an option. n 38 N Using Your VAIO Computer Playing CDs To play the CD. If the AutoPlay window appears, click..., All Programs, and the desired CD software to play an audio CD 1 Insert a disc into the optical disc drive. 2 If nothing appears on -screen instructions until the empty disc folder appears. 2 Open the folder that contains the... file(s) you want to copy and drag them to a disc. 1 Insert a disc into the optical disc drive. If the Audio CD window appears, click to a disc ! Do not strike or shake your computer while writing data ...
User Guide
Page 39
Copying Files to DVDs To copy files to a disc 1 Connect the AC adapter to the computer. 2 Insert a disc into the optical disc drive. 3 If nothing appears on your DVD software. For instructions on how to use the software, see the help file on the desktop, then click Start, ..., All Programs, and the desired DVD burning software to copy files to play a DVD 1 Close all running software applications. 2 Insert a DVD into the optical disc drive. 3 If nothing appears on your DVD burning software. n 39 N Using Your VAIO Computer Playing DVDs To play the DVD.
Copying Files to DVDs To copy files to a disc 1 Connect the AC adapter to the computer. 2 Insert a disc into the optical disc drive. 3 If nothing appears on your DVD software. For instructions on how to use the software, see the help file on the desktop, then click Start, ..., All Programs, and the desired DVD burning software to copy files to play a DVD 1 Close all running software applications. 2 Insert a DVD into the optical disc drive. 3 If nothing appears on your DVD burning software. n 39 N Using Your VAIO Computer Playing DVDs To play the DVD.
User Guide
Page 72
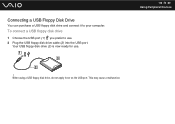
When using a USB floppy disk drive, do not apply force on the USB port. This may cause a malfunction. Connecting a USB Floppy Disk Drive You can purchase a USB floppy disk drive and connect it to use . n 72 N Using Peripheral Devices ! Your USB floppy disk drive (3) is now ready for use . 2 Plug the USB floppy disk drive cable (2) into the USB port. To connect a USB floppy disk drive 1 Choose the USB port (1) you prefer to your computer.
When using a USB floppy disk drive, do not apply force on the USB port. This may cause a malfunction. Connecting a USB Floppy Disk Drive You can purchase a USB floppy disk drive and connect it to use . n 72 N Using Peripheral Devices ! Your USB floppy disk drive (3) is now ready for use . 2 Plug the USB floppy disk drive cable (2) into the USB port. To connect a USB floppy disk drive 1 Choose the USB port (1) you prefer to your computer.
User Guide
Page 73
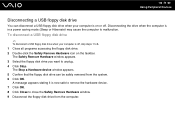
...) may cause the computer to close the Safely Remove Hardware window. 9 Disconnect the floppy disk drive from the system. 6 Click OK. n 73 N Using Peripheral Devices Disconnecting a USB floppy disk drive You can be safely removed from the computer. A message appears stating it is off . To... disconnect a USB floppy disk drive ✍ To disconnect a USB floppy disk drive when your computer is on the taskbar. The Safely Remove ...
...) may cause the computer to close the Safely Remove Hardware window. 9 Disconnect the floppy disk drive from the system. 6 Click OK. n 73 N Using Peripheral Devices Disconnecting a USB floppy disk drive You can be safely removed from the computer. A message appears stating it is off . To... disconnect a USB floppy disk drive ✍ To disconnect a USB floppy disk drive when your computer is on the taskbar. The Safely Remove ...
User Guide
Page 75
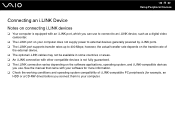
... i.LINK port, which you connect them to 400 Mbps; however, the actual transfer rate depends on your software for example, an HDD or a CD-RW drive) before you can use .
... i.LINK port, which you connect them to 400 Mbps; however, the actual transfer rate depends on your software for example, an HDD or a CD-RW drive) before you can use .

