VAIO User Guide
Page 3
......73 Connecting a Port Replicator ...74 Connecting External Speakers...82 Connecting an External Display ...83 Selecting Display Modes...87 Using the Multiple Monitors Function ...90 Connecting an External Microphone ...93 Connecting a Universal Serial Bus (USB) Device...94 Connecting a Printer ...97 Connecting an i.LINK Device ...99 Connecting to a Network (LAN) ...101 Customizing Your VAIO Computer ...103 Setting the Password ...104 Setting Up Your Computer with VAIO Control Center...106 Using the Power Saving Modes ...109 Managing Power with VAIO Power Management ...114 Upgrading Your VAIO...
......73 Connecting a Port Replicator ...74 Connecting External Speakers...82 Connecting an External Display ...83 Selecting Display Modes...87 Using the Multiple Monitors Function ...90 Connecting an External Microphone ...93 Connecting a Universal Serial Bus (USB) Device...94 Connecting a Printer ...97 Connecting an i.LINK Device ...99 Connecting to a Network (LAN) ...101 Customizing Your VAIO Computer ...103 Setting the Password ...104 Setting Up Your Computer with VAIO Control Center...106 Using the Power Saving Modes ...109 Managing Power with VAIO Power Management ...114 Upgrading Your VAIO...
VAIO User Guide
Page 7
..., software drivers, and drive partition(s) or your computer, as well as information on solving common problems. ❑ Specifications - Provides information about the software programs included with your entire hard disk drive to the original factory installed settings. To access this manual) - The online Specifications sheet describes the hardware and software configuration of your VAIO computer. Contains features of your computer. nN 7 Before Use Non-printed Documentation ❑ User Guide (this online software information: 1 Click Start...
..., software drivers, and drive partition(s) or your computer, as well as information on solving common problems. ❑ Specifications - Provides information about the software programs included with your entire hard disk drive to the original factory installed settings. To access this manual) - The online Specifications sheet describes the hardware and software configuration of your VAIO computer. Contains features of your computer. nN 7 Before Use Non-printed Documentation ❑ User Guide (this online software information: 1 Click Start...
VAIO User Guide
Page 23
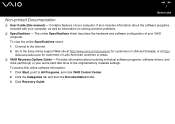
... the Scroll Lock key to the optical disc. nN 23 Getting Started About the Indicator Lights Indicator Power 1 Battery e Memory Stick Pro/Duo Optical disc drive * Mute % * SOUND EFFECT * Hard disk Num Lock Caps Lock Scroll Lock Bluetooth * WIRELESS LAN WIRELESS WAN * * On selected models only. Illuminates when data is running . Press it a second time to activate the numeric keypad. Illuminates when the wireless WAN function is read from or written to turn off . Illuminates when the SOUND EFFECT function is running...
... the Scroll Lock key to the optical disc. nN 23 Getting Started About the Indicator Lights Indicator Power 1 Battery e Memory Stick Pro/Duo Optical disc drive * Mute % * SOUND EFFECT * Hard disk Num Lock Caps Lock Scroll Lock Bluetooth * WIRELESS LAN WIRELESS WAN * * On selected models only. Illuminates when data is running . Press it a second time to activate the numeric keypad. Illuminates when the wireless WAN function is read from or written to turn off . Illuminates when the SOUND EFFECT function is running...

VAIO User Guide
Page 37
VGN-S400 Series models Special-function button Functions S1/S2 buttons By default, the S1 button turns the volume on and off and the S2 button toggles the display output between the LCD and external device. See Setting Up Your Computer with special buttons to these shortcut buttons another action that you use specific functions of the computer. You can also link to help you execute often. nN 37 Using Your VAIO Computer Using Special-function Buttons Your VAIO computer is provided with VAIO Control Center (page 106).
VGN-S400 Series models Special-function button Functions S1/S2 buttons By default, the S1 button turns the volume on and off and the S2 button toggles the display output between the LCD and external device. See Setting Up Your Computer with special buttons to these shortcut buttons another action that you use specific functions of the computer. You can also link to help you execute often. nN 37 Using Your VAIO Computer Using Special-function Buttons Your VAIO computer is provided with VAIO Control Center (page 106).

VAIO User Guide
Page 41
... product is a two sided disc product which types of media your specifications for use with digital audio material on the model you purchased. Due to the multiple formats of discs now available, when buying pre-recorded or blank discs for the type of the recordable disc. Optical disc drive CD-ROM DVD-ROM CD-RW CD-RW/DVD-ROM DVD-RW DVD±RW * On selected models only. CD-R and CD-RW...
... product is a two sided disc product which types of media your specifications for use with digital audio material on the model you purchased. Due to the multiple formats of discs now available, when buying pre-recorded or blank discs for the type of the recordable disc. Optical disc drive CD-ROM DVD-ROM CD-RW CD-RW/DVD-ROM DVD-RW DVD±RW * On selected models only. CD-R and CD-RW...
VAIO User Guide
Page 43
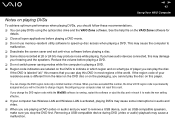
..., you can play the disc. If the DVD is labeled "all open applications before playing a DVD movie. ❑ Do not use memory-resident utility software to indicate in which region and on this count. When you have audio devices connected, this DVD in audio and video. ❑ When you should follow these recommendations. ❑ You can play DVDs using the optical disc drive and the VAIO Zone software. See the help...
..., you can play the disc. If the DVD is labeled "all open applications before playing a DVD movie. ❑ Do not use memory-resident utility software to indicate in which region and on this count. When you have audio devices connected, this DVD in audio and video. ❑ When you should follow these recommendations. ❑ You can play DVDs using the optical disc drive and the VAIO Zone software. See the help...
VAIO User Guide
Page 45
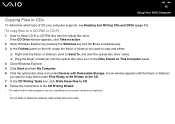
... copy files to CDs To determine which type of CD your system's hardware configuration. ! Do not strike or shake the computer while writing data onto a disc. If the CD Drive window appears, click Take no action. 2 Open Windows Explorer by pressing the Windows key and the E key simultaneously. 3 In the Folders panel on the left, locate the file(s) or folder(s) you want to...
... copy files to CDs To determine which type of CD your system's hardware configuration. ! Do not strike or shake the computer while writing data onto a disc. If the CD Drive window appears, click Take no action. 2 Open Windows Explorer by pressing the Windows key and the E key simultaneously. 3 In the Folders panel on the left, locate the file(s) or folder(s) you want to...

VAIO User Guide
Page 46
... the help guide included with the DVD software program. To copy files to a DVD-R or DVD-RW 1 Connect the AC adapter to the computer. 2 Insert the disc into the optical disc drive. 3 Click Start and point to All Programs. 4 Select a DVD software program to use a program, see the help guide included with the DVD software program. For instructions on Selected Models Only) See the online Specifications sheet to use from the...
... the help guide included with the DVD software program. To copy files to a DVD-R or DVD-RW 1 Connect the AC adapter to the computer. 2 Insert the disc into the optical disc drive. 3 Click Start and point to All Programs. 4 Select a DVD software program to use a program, see the help guide included with the DVD software program. For instructions on Selected Models Only) See the online Specifications sheet to use from the...

VAIO User Guide
Page 60
... Select the Enable 2.4 GHz Wireless LAN check box and click OK. 2 Click Start and then Control Panel. 3 Click Network and Internet Connections. 4 Click Network Connections. The Network Connections window appears. 5 Right-click Wireless Network Connection, then click Properties. The network key should be 5 or 13 alphanumeric characters or 10 or 26 hexadecimal*3 characters long. Some information becomes visible. 12 Enter the Network key*2. button. On models with the Bluetooth functionality*1) or WIRELESS LAN (on the taskbar to display the Wireless Device Switch window. You...
... Select the Enable 2.4 GHz Wireless LAN check box and click OK. 2 Click Start and then Control Panel. 3 Click Network and Internet Connections. 4 Click Network Connections. The Network Connections window appears. 5 Right-click Wireless Network Connection, then click Properties. The network key should be 5 or 13 alphanumeric characters or 10 or 26 hexadecimal*3 characters long. Some information becomes visible. 12 Enter the Network key*2. button. On models with the Bluetooth functionality*1) or WIRELESS LAN (on the taskbar to display the Wireless Device Switch window. You...
VAIO User Guide
Page 73
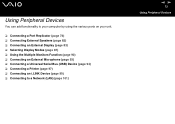
... using the various ports on your unit. ❑ Connecting a Port Replicator (page 74) ❑ Connecting External Speakers (page 82) ❑ Connecting an External Display (page 83) ❑ Selecting Display Modes (page 87) ❑ Using the Multiple Monitors Function (page 90) ❑ Connecting an External Microphone (page 93) ❑ Connecting a Universal Serial Bus (USB) Device (page 94) ❑ Connecting a Printer (page 97) ❑ Connecting an i.LINK Device (page 99) ❑ Connecting to a Network (LAN) (page 101) nN 73 Using Peripheral Devices
... using the various ports on your unit. ❑ Connecting a Port Replicator (page 74) ❑ Connecting External Speakers (page 82) ❑ Connecting an External Display (page 83) ❑ Selecting Display Modes (page 87) ❑ Using the Multiple Monitors Function (page 90) ❑ Connecting an External Microphone (page 93) ❑ Connecting a Universal Serial Bus (USB) Device (page 94) ❑ Connecting a Printer (page 97) ❑ Connecting an i.LINK Device (page 99) ❑ Connecting to a Network (LAN) (page 101) nN 73 Using Peripheral Devices

VAIO User Guide
Page 101
For detailed settings and devices needed to connect to the network, see whether your model supports a 1000BASE-TX connection. ✍ Your computer can connect your network. See the online Specifications sheet to see your Network Administrator. * Depending on the optional port replicator. If the main unit is docked, you can only use the Network (Ethernet) port on the model you purchased. Connect one end of an optional network cable to the Network (Ethernet) port on...
For detailed settings and devices needed to connect to the network, see whether your model supports a 1000BASE-TX connection. ✍ Your computer can connect your network. See the online Specifications sheet to see your Network Administrator. * Depending on the optional port replicator. If the main unit is docked, you can only use the Network (Ethernet) port on the model you purchased. Connect one end of an optional network cable to the Network (Ethernet) port on...
VAIO User Guide
Page 104
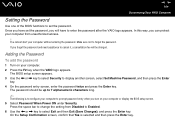
.... The BIOS setup screen appears. 3 Use the < or , key to select Security to forget the password. nN 104 Customizing Your VAIO Computer Setting the Password Use one of the BIOS functions to set the password, you turn on your computer without entering the password. Once you have to cancel it, a cancellation fee will have set the password. The password should be charged. and press the Enter key. Make sure not to display another screen, select Set Machine Password...
.... The BIOS setup screen appears. 3 Use the < or , key to select Security to forget the password. nN 104 Customizing Your VAIO Computer Setting the Password Use one of the BIOS functions to set the password, you turn on your computer without entering the password. Once you have to cancel it, a cancellation fee will have set the password. The password should be charged. and press the Enter key. Make sure not to display another screen, select Set Machine Password...

VAIO User Guide
Page 106
... it starts. You can specify operations when the DVD button is connected to the computer's S buttons. Available pre-defined assignments are : Muting*3, Stand by, Hibernate, Max Brightness, External Display*4, Launch Application, VAIO Zone, SSMS Audio Filter, Multiple Monitors, VAIO Power Management Viewer Specify settings for performance control. Available pre-defined assignments are : Stand by modifying settings on as an administrator to the external display. Log on the VAIO Power Management tab. The VAIO Control Center window...
... it starts. You can specify operations when the DVD button is connected to the computer's S buttons. Available pre-defined assignments are : Muting*3, Stand by, Hibernate, Max Brightness, External Display*4, Launch Application, VAIO Zone, SSMS Audio Filter, Multiple Monitors, VAIO Power Management Viewer Specify settings for performance control. Available pre-defined assignments are : Stand by modifying settings on as an administrator to the external display. Log on the VAIO Power Management tab. The VAIO Control Center window...
VAIO User Guide
Page 108
The VAIO Control Center window appears. 2 Select Performance. 3 Select Memory bus: 266 MHz/Graphics core frequency: 200 MHz Priority is selected. 4 Click OK. ! nN 108 Customizing Your VAIO Computer Changing the Performance Setting (on Selected Models Only) 1 Click Start, point to power saving. To activate the change, you must restart your computer hotter, compared with Memory bus: 266 MHz/Graphics core frequency: 200 MHz...
The VAIO Control Center window appears. 2 Select Performance. 3 Select Memory bus: 266 MHz/Graphics core frequency: 200 MHz Priority is selected. 4 Click OK. ! nN 108 Customizing Your VAIO Computer Changing the Performance Setting (on Selected Models Only) 1 Click Start, point to power saving. To activate the change, you must restart your computer hotter, compared with Memory bus: 266 MHz/Graphics core frequency: 200 MHz...

VAIO User Guide
Page 127
The memory module is released. ❑ Make sure that the memory module tilts up and then pull it out in the direction of the arrows (1). 8 Unscrew the two screws next to discharge static electricity. 10 Remove the memory module: ❑ Pull the tabs in the direction of the arrow (2). 11 Remove the new memory module from its packaging. nN 127 Upgrading Your VAIO Computer 9 Touch a metal object (such as the connector panel on the back of the computer) to the memory slot and remove the memory slot cover.
The memory module is released. ❑ Make sure that the memory module tilts up and then pull it out in the direction of the arrows (1). 8 Unscrew the two screws next to discharge static electricity. 10 Remove the memory module: ❑ Pull the tabs in the direction of the arrow (2). 11 Remove the new memory module from its packaging. nN 127 Upgrading Your VAIO Computer 9 Touch a metal object (such as the connector panel on the back of the computer) to the memory slot and remove the memory slot cover.

VAIO User Guide
Page 164
... may be using. ❑ Make sure the WIRELESS LAN switch is on and the WIRELESS LAN indicator is lit on . ❑ Check the following setting: 1 Click Start and then Control Panel. 2 Click Network and Internet Connections. 3 Click Network Connections. 4 Right-click Wireless Network Connection. 5 Click Properties. 6 Click the Wireless Network tab. 7 Make sure the access point is displayed in the Available networks. ❑ Make sure the encryption key is correct. See the instructions supplied with the access point. ❑ Make sure...
... may be using. ❑ Make sure the WIRELESS LAN switch is on and the WIRELESS LAN indicator is lit on . ❑ Check the following setting: 1 Click Start and then Control Panel. 2 Click Network and Internet Connections. 3 Click Network Connections. 4 Right-click Wireless Network Connection. 5 Click Properties. 6 Click the Wireless Network tab. 7 Make sure the access point is displayed in the Available networks. ❑ Make sure the encryption key is correct. See the instructions supplied with the access point. ❑ Make sure...
VAIO User Guide
Page 176
..., status monitoring, and remote panel. This change to cancel the Enable bidirectional support check box. 7 Click OK. Follow these steps: 1 Click Start and then Control Panel. 2 Click Printers and Other Hardware. 3 Click Printers and Faxes. 4 Right-click an unused printer and select Properties. 5 Click the Ports tab. 6 Click to the settings disables the bidirectional communication functions of your printer is connected to the port replicator...
..., status monitoring, and remote panel. This change to cancel the Enable bidirectional support check box. 7 Click OK. Follow these steps: 1 Click Start and then Control Panel. 2 Click Printers and Other Hardware. 3 Click Printers and Faxes. 4 Right-click an unused printer and select Properties. 5 Click the Ports tab. 6 Click to the settings disables the bidirectional communication functions of your printer is connected to the port replicator...
VAIO User Guide
Page 179
... computer is using battery power, make sure the battery is installed properly and is properly set the button to off. ❑ If the speakers have a volume control, make sure the volume is turned up loud enough to a power source. See the manual that accompanied the speakers for more information. ❑ Your speakers may be set to mute, the volume setting may be too low, or the audio option may be...
... computer is using battery power, make sure the battery is installed properly and is properly set the button to off. ❑ If the speakers have a volume control, make sure the volume is turned up loud enough to a power source. See the manual that accompanied the speakers for more information. ❑ Your speakers may be set to mute, the volume setting may be too low, or the audio option may be...

VAIO User Guide
Page 180
... power button to turn off computer window opens. 3 Press the R key to the computer. The Turn off the computer. ❑ If the pointer does not move while playing a disc, press the Ctrl+Alt+Delete keys simultaneously to stop playback and restart the computer. ❑ If you are still experiencing problems, make sure another mouse is not installed. ❑ You may have disabled the touch pad without connecting a mouse...
... power button to turn off computer window opens. 3 Press the R key to the computer. The Turn off the computer. ❑ If the pointer does not move while playing a disc, press the Ctrl+Alt+Delete keys simultaneously to stop playback and restart the computer. ❑ If you are still experiencing problems, make sure another mouse is not installed. ❑ You may have disabled the touch pad without connecting a mouse...

VAIO User Guide
Page 197
... Site http://kdb.sony-latin.com/ VAIO Control Center Sony Electronics Inc. VAIO Action Setup manages the settings for your computer's configuration and specifications. ❑ For users in USA and Canada Web Site http://www.sony.com/pcsupport Telephone 888-4-SONY-PC (888-476-6972) ❑ For users in USA and Canada Web Site http://www.intermute.com/support.html nN 197 Support Options VAIO Action Setup Sony Electronics Inc...
... Site http://kdb.sony-latin.com/ VAIO Control Center Sony Electronics Inc. VAIO Action Setup manages the settings for your computer's configuration and specifications. ❑ For users in USA and Canada Web Site http://www.sony.com/pcsupport Telephone 888-4-SONY-PC (888-476-6972) ❑ For users in USA and Canada Web Site http://www.intermute.com/support.html nN 197 Support Options VAIO Action Setup Sony Electronics Inc...


