
User Guide
Page 2
... ...12 Getting Started ...14 Locating Controls and Ports...15 About the Indicator Lights ...22 Connecting a Power Source ...23 Using the Battery Pack ...24 Shutting Down Your Computer Safely ...31 Using Your VAIO Computer ...32 Using the Keyboard ...33 Using the Touch Pad ...34 Using the Switch Functionality ...35 Using the Built-in MOTION EYE Camera...36 Using the Optical Disc Drive ...39 Using the ExpressCard Module ...48 Using the Memory Stick Media ...51 Using Other Memory Cards ...57 Using the Internet...60 Using Wireless LAN (WLAN) ...62 Using the Bluetooth Functionality ...69
... ...12 Getting Started ...14 Locating Controls and Ports...15 About the Indicator Lights ...22 Connecting a Power Source ...23 Using the Battery Pack ...24 Shutting Down Your Computer Safely ...31 Using Your VAIO Computer ...32 Using the Keyboard ...33 Using the Touch Pad ...34 Using the Switch Functionality ...35 Using the Built-in MOTION EYE Camera...36 Using the Optical Disc Drive ...39 Using the ExpressCard Module ...48 Using the Memory Stick Media ...51 Using Other Memory Cards ...57 Using the Internet...60 Using Wireless LAN (WLAN) ...62 Using the Bluetooth Functionality ...69
User Guide
Page 3
... Monitors Function ...90 Connecting an External Microphone ...92 Connecting a Universal Serial Bus (USB) Device...93 Connecting a Printer ...96 Connecting an i.LINK Device ...97 Connecting to a Network (LAN) ...99 Customizing Your VAIO Computer ...101 Setting the Password ...102 Using Fingerprint Authentication ...113 Using Trusted Platform Module (TPM)...121 Setting Up Your Computer with VAIO Control Center 128 Using the Power Saving Modes ...129 Managing Power with VAIO Power Management ...134 Protecting the Hard Disk ...136 Upgrading Your VAIO Computer...137 Adding and Removing Memory...
... Monitors Function ...90 Connecting an External Microphone ...92 Connecting a Universal Serial Bus (USB) Device...93 Connecting a Printer ...96 Connecting an i.LINK Device ...97 Connecting to a Network (LAN) ...99 Customizing Your VAIO Computer ...101 Setting the Password ...102 Using Fingerprint Authentication ...113 Using Trusted Platform Module (TPM)...121 Setting Up Your Computer with VAIO Control Center 128 Using the Power Saving Modes ...129 Managing Power with VAIO Power Management ...134 Protecting the Hard Disk ...136 Upgrading Your VAIO Computer...137 Adding and Removing Memory...

User Guide
Page 9
Provides information about restoring individual software programs, hardware drivers, and drive partition(s) or your entire hard disk drive to the original factory installed settings. n9 N Before Use ❑ VAIO Recovery Center User Guide - To access this on-screen guide: 1 Click Start and Help and Support. 2 Click Manuals & Specifications. 3 Click VAIO Recovery Center User Guide.
Provides information about restoring individual software programs, hardware drivers, and drive partition(s) or your entire hard disk drive to the original factory installed settings. n9 N Before Use ❑ VAIO Recovery Center User Guide - To access this on-screen guide: 1 Click Start and Help and Support. 2 Click Manuals & Specifications. 3 Click VAIO Recovery Center User Guide.

User Guide
Page 10
... Start and Help and Support. ❑ Manuals & Specifications Here you will find the on-screen User Guide, warranty information, other Internet sites you might find the answers you need. It can either perform the task for your computer. ❑ VAIO Support Access interactive help you accomplish a task. Run utilities that include VAIO Media Setup and Windows Network and Sharing Center, and access to wireless tutorials. ❑ Security Keep your data safe...
... Start and Help and Support. ❑ Manuals & Specifications Here you will find the on-screen User Guide, warranty information, other Internet sites you might find the answers you need. It can either perform the task for your computer. ❑ VAIO Support Access interactive help you accomplish a task. Run utilities that include VAIO Media Setup and Windows Network and Sharing Center, and access to wireless tutorials. ❑ Security Keep your data safe...
User Guide
Page 22
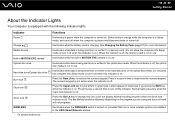
... Network window. See Charging the Battery Pack (page 27) for more wireless options are using and does not work with the following indicator lights. Illuminates while data is being read from or written to a memory card. (Do not place the computer into Sleep mode or turn it off when this indicator is off . Press it off . Normal typing resumes when the Caps lock indicator is on . The Scr Lk key functions...
... Network window. See Charging the Battery Pack (page 27) for more wireless options are using and does not work with the following indicator lights. Illuminates while data is being read from or written to a memory card. (Do not place the computer into Sleep mode or turn it off when this indicator is off . Press it off . Normal typing resumes when the Caps lock indicator is on . The Scr Lk key functions...
User Guide
Page 33
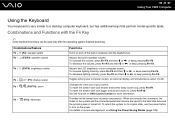
... keep pressing Fn+F4. Combinations/Feature Fn + % (F2): speaker switch Fn + 2 (F3/F4): speaker volume Fn + 8 (F5/F6): brightness control Fn + /T (F7): display output Fn + / (F9/F10): zoom Fn + (F12): hibernate Functions Turns on and off the built-in speaker volume. n 33 N Using Your VAIO Computer Using the Keyboard Your keyboard is very similar to a desktop computer keyboard, but has additional keys that perform model-specific tasks.
... keep pressing Fn+F4. Combinations/Feature Fn + % (F2): speaker switch Fn + 2 (F3/F4): speaker volume Fn + 8 (F5/F6): brightness control Fn + /T (F7): display output Fn + / (F9/F10): zoom Fn + (F12): hibernate Functions Turns on and off the built-in speaker volume. n 33 N Using Your VAIO Computer Using the Keyboard Your keyboard is very similar to a desktop computer keyboard, but has additional keys that perform model-specific tasks.

User Guide
Page 41
Check your specifications for the type of media your model. Use the table below to see which types of optical disc drive installed on the model you purchased. n 41 N Using Your VAIO Computer Reading and Writing Optical Discs Your computer plays and records CDs, DVDs, and Blu-ray Disc™ media, depending on your optical disc drive supports.
Check your specifications for the type of media your model. Use the table below to see which types of optical disc drive installed on the model you purchased. n 41 N Using Your VAIO Computer Reading and Writing Optical Discs Your computer plays and records CDs, DVDs, and Blu-ray Disc™ media, depending on your optical disc drive supports.
User Guide
Page 50
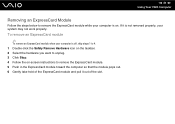
n 50 N Using Your VAIO Computer Removing an ExpressCard Module Follow the steps below to remove the ExpressCard module while your computer is not removed properly, your computer is off, skip steps 1 to 4. 1 Double-click the Safely Remove Hardware icon on the taskbar. 2 Select the hardware you want to unplug. 3 Click Stop. 4 Follow the on-screen instructions to remove the ExpressCard module. 5 Push in the ExpressCard module toward...
n 50 N Using Your VAIO Computer Removing an ExpressCard Module Follow the steps below to remove the ExpressCard module while your computer is not removed properly, your computer is off, skip steps 1 to 4. 1 Double-click the Safely Remove Hardware icon on the taskbar. 2 Select the hardware you want to unplug. 3 Click Stop. 4 Follow the on-screen instructions to remove the ExpressCard module. 5 Push in the ExpressCard module toward...
User Guide
Page 74
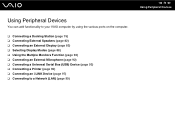
... various ports on the computer. ❑ Connecting a Docking Station (page 75) ❑ Connecting External Speakers (page 82) ❑ Connecting an External Display (page 83) ❑ Selecting Display Modes (page 88) ❑ Using the Multiple Monitors Function (page 90) ❑ Connecting an External Microphone (page 92) ❑ Connecting a Universal Serial Bus (USB) Device (page 93) ❑ Connecting a Printer (page 96) ❑ Connecting an i.LINK Device (page 97) ❑ Connecting to a Network (LAN) (page 99) n 74 N Using Peripheral Devices
... various ports on the computer. ❑ Connecting a Docking Station (page 75) ❑ Connecting External Speakers (page 82) ❑ Connecting an External Display (page 83) ❑ Selecting Display Modes (page 88) ❑ Using the Multiple Monitors Function (page 90) ❑ Connecting an External Microphone (page 92) ❑ Connecting a Universal Serial Bus (USB) Device (page 93) ❑ Connecting a Printer (page 96) ❑ Connecting an i.LINK Device (page 97) ❑ Connecting to a Network (LAN) (page 99) n 74 N Using Peripheral Devices
User Guide
Page 75
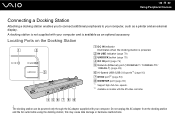
... button (page 79) D DC IN port (page 76) E Network (Ethernet) port (1000BASE-T / 100BASE-TX / 10BASE-T) (page 99) F Hi-Speed USB (USB 2.0) ports*1 (page 93) G DVI-D port*2 (page 83) H MONITOR port (page 83) *1 Support high-/full-/low- n 75 N Using Peripheral Devices Connecting a Docking Station Attaching a docking station enables you to connect additional peripherals to your computer, such as an optional accessory. Locating Ports on models with your computer and is powered. Do...
... button (page 79) D DC IN port (page 76) E Network (Ethernet) port (1000BASE-T / 100BASE-TX / 10BASE-T) (page 99) F Hi-Speed USB (USB 2.0) ports*1 (page 93) G DVI-D port*2 (page 83) H MONITOR port (page 83) *1 Support high-/full-/low- n 75 N Using Peripheral Devices Connecting a Docking Station Attaching a docking station enables you to connect additional peripherals to your computer, such as an optional accessory. Locating Ports on models with your computer and is powered. Do...

User Guide
Page 91
... Multiple Monitors mode ! Models with the ATI video controller 1 Click Start and Control Panel. 2 Click Adjust screen resolution under Appearance and Personalization. 3 Click the monitor icon marked 2. 4 Select the Extend the desktop onto this monitor option. 5 Click Apply and then OK. If the Monitor Settings window appears, click Yes. ✍ Additionally, you can set the display colors and resolution for each display and customize the Multiple Monitors mode. The monitor port on -screen instructions to...
... Multiple Monitors mode ! Models with the ATI video controller 1 Click Start and Control Panel. 2 Click Adjust screen resolution under Appearance and Personalization. 3 Click the monitor icon marked 2. 4 Select the Extend the desktop onto this monitor option. 5 Click Apply and then OK. If the Monitor Settings window appears, click Yes. ✍ Additionally, you can set the display colors and resolution for each display and customize the Multiple Monitors mode. The monitor port on -screen instructions to...
User Guide
Page 102
... have set the hard disk password, other people. The machine password is installed in conjunction with administrator rights on the computer to change all the setup options in the BIOS setup screen, as well as starting the computer. Write down your password and keep it , a password reset fee will not be able to access the data without entering the password. n 102 N Customizing Your VAIO Computer Setting the Password In addition to the Windows password...
... have set the hard disk password, other people. The machine password is installed in conjunction with administrator rights on the computer to change all the setup options in the BIOS setup screen, as well as starting the computer. Write down your password and keep it , a password reset fee will not be able to access the data without entering the password. n 102 N Customizing Your VAIO Computer Setting the Password In addition to the Windows password...

User Guide
Page 127
... your data maintenance and management. Sony assumes no liabilities for detailed information. n 127 N Customizing Your VAIO Computer To install the Infineon TPM Professional Package Read the Readme.txt in the C:\Infineon folder to restore any defects arising out of your own risk. Then, double-click setup.exe in the C:\Infineon\Readme folder. To open the documentation, click Start, All...
... your data maintenance and management. Sony assumes no liabilities for detailed information. n 127 N Customizing Your VAIO Computer To install the Infineon TPM Professional Package Read the Readme.txt in the C:\Infineon folder to restore any defects arising out of your own risk. Then, double-click setup.exe in the C:\Infineon\Readme folder. To open the documentation, click Start, All...
User Guide
Page 136
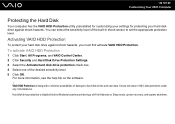
... desired sensitivity level. 5 Click OK. VAIO HDD Protection is disabled before Windows launches and during a shift to set the appropriate protection level. To activate VAIO HDD Protection 1 Click Start, All Programs, and VAIO Control Center. 2 Click Security and Hard Disk Drive Protection Settings. 3 Select the Activate hard disk drive protection check box. 4 Select one of the built-in shock sensor to Hibernate or Sleep mode, system recovery, and system shutdown. It does...
... desired sensitivity level. 5 Click OK. VAIO HDD Protection is disabled before Windows launches and during a shift to set the appropriate protection level. To activate VAIO HDD Protection 1 Click Start, All Programs, and VAIO Control Center. 2 Click Security and Hard Disk Drive Protection Settings. 3 Select the Activate hard disk drive protection check box. 4 Select one of the built-in shock sensor to Hibernate or Sleep mode, system recovery, and system shutdown. It does...

User Guide
Page 172
... the problem persists, you are using the built-in MOTION EYE camera cannot be shared by more than one software application. What should I use ? ❑ Do not place your camera and click Update Driver Software. For changing the setting, see Using the Power Saving Modes (page 129). Follow these steps: 1 Click Start, Control Panel, Hardware and Sound, and Device Manager. 2 Double-click Imaging devices. 3 Right-click the device name for your computer into Sleep...
... the problem persists, you are using the built-in MOTION EYE camera cannot be shared by more than one software application. What should I use ? ❑ Do not place your camera and click Update Driver Software. For changing the setting, see Using the Power Saving Modes (page 129). Follow these steps: 1 Click Start, Control Panel, Hardware and Sound, and Device Manager. 2 Double-click Imaging devices. 3 Right-click the device name for your computer into Sleep...

User Guide
Page 192
... from a power saving mode (Sleep or Hibernate), then restart the computer. ❑ If the bidirectional communication functions are provided with the Windows operating system installed on your computer may need to install the printer driver software before you use your printer. Follow these steps: 1 Click Start and Control Panel. 2 Click Printer under Hardware and Sound. 3 Right-click the printer icon and select Properties. 4 Click the Ports tab. 5 Click...
... from a power saving mode (Sleep or Hibernate), then restart the computer. ❑ If the bidirectional communication functions are provided with the Windows operating system installed on your computer may need to install the printer driver software before you use your printer. Follow these steps: 1 Click Start and Control Panel. 2 Click Printer under Hardware and Sound. 3 Right-click the printer icon and select Properties. 4 Click the Ports tab. 5 Click...
User Guide
Page 197
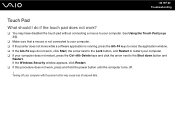
... of unsaved data. Turning off . ! See Using the Touch Pad (page 34). ❑ Make sure that a mouse is not connected to the Shut down button and Restart. If the Windows Security window appears, click Restart. ❑ If this procedure does not work, press and hold the power button until the computer turns off your computer with the power button may have disabled the touch pad without connecting a mouse to your computer...
... of unsaved data. Turning off . ! See Using the Touch Pad (page 34). ❑ Make sure that a mouse is not connected to the Shut down button and Restart. If the Windows Security window appears, click Restart. ❑ If this procedure does not work, press and hold the power button until the computer turns off your computer with the power button may have disabled the touch pad without connecting a mouse to your computer...

User Guide
Page 212
... operate under reduced-functionality mode, limiting end-user options and operations. Microsoft Corp. ❑ For customers in USA and Canada Web site http://support.microsoft.com This software has an expiration date of 60 days from the date of first use, at which time the software will work only for evaluation purposes only. activation requires Internet access. You can activate the software by following the conversion instructions...
... operate under reduced-functionality mode, limiting end-user options and operations. Microsoft Corp. ❑ For customers in USA and Canada Web site http://support.microsoft.com This software has an expiration date of 60 days from the date of first use, at which time the software will work only for evaluation purposes only. activation requires Internet access. You can activate the software by following the conversion instructions...
VGN-SRxx Series Hard Disk Drive Replacement Intructions
Page 1
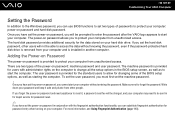
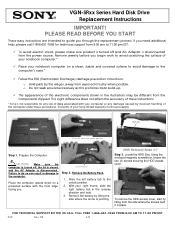
CAUTION: Make sure the computer is turned off and AC Adaptor is pointing. (HDD Removal) Steps 3-7 Step 3. Using the enclosed magnetic screwdriver, loosen the two (2) screws securing the HDD access cover. VGN-SRxx Series Hard Disk Drive Replacement Instructions IMPORTANT! HDD Bay Push left battery tab to remove Step 2. Place the computer upside down on a clean, stable and covered surface to avoid damage to guide you need additional help, please call 1-866...
CAUTION: Make sure the computer is turned off and AC Adaptor is pointing. (HDD Removal) Steps 3-7 Step 3. Using the enclosed magnetic screwdriver, loosen the two (2) screws securing the HDD access cover. VGN-SRxx Series Hard Disk Drive Replacement Instructions IMPORTANT! HDD Bay Push left battery tab to remove Step 2. Place the computer upside down on a clean, stable and covered surface to avoid damage to guide you need additional help, please call 1-866...
Safety
Page 2
... prohibited. Model Number: Serial Number: Notice © 2008 Sony Electronics Inc. SONY CANNOT WARRANT THAT THE FUNCTIONS DESCRIBED IN THIS GUIDE WILL BE UNINTERRUPTED OR ERROR-FREE. Sony Electronics Inc. The software described herein is subject to the model and serial numbers when you call your Sony VAIO® computer. Software specifications are located on the bottom or back panel of a separate user license agreement. Reproduction in whole or in part without notice...
... prohibited. Model Number: Serial Number: Notice © 2008 Sony Electronics Inc. SONY CANNOT WARRANT THAT THE FUNCTIONS DESCRIBED IN THIS GUIDE WILL BE UNINTERRUPTED OR ERROR-FREE. Sony Electronics Inc. The software described herein is subject to the model and serial numbers when you call your Sony VAIO® computer. Software specifications are located on the bottom or back panel of a separate user license agreement. Reproduction in whole or in part without notice...


