
User Guide
Page 2
... Getting Started ...13 Locating Controls and Ports...14 About the Indicator Lights ...21 Connecting a Power Source ...22 Using the Battery Pack ...23 Shutting Down Your Computer Safely ...30 Using Your VAIO Computer ...31 Using the Keyboard ...32 Using the Touch Pad ...33 Using the Switch Function ...34 Using the Built-in MOTION EYE Camera...35 Using the Optical Disc Drive ...38 Using the ExpressCard Module ...47 Using the Memory Stick ...50 Using the SD Memory Card ...56 Using the Internet...59 Using Wireless LAN (WLAN) ...60 Using the Bluetooth Function ...63
... Getting Started ...13 Locating Controls and Ports...14 About the Indicator Lights ...21 Connecting a Power Source ...22 Using the Battery Pack ...23 Shutting Down Your Computer Safely ...30 Using Your VAIO Computer ...31 Using the Keyboard ...32 Using the Touch Pad ...33 Using the Switch Function ...34 Using the Built-in MOTION EYE Camera...35 Using the Optical Disc Drive ...38 Using the ExpressCard Module ...47 Using the Memory Stick ...50 Using the SD Memory Card ...56 Using the Internet...59 Using Wireless LAN (WLAN) ...60 Using the Bluetooth Function ...63
User Guide
Page 3
... Monitors Function ...87 Connecting an External Microphone ...89 Connecting a Universal Serial Bus (USB) Device...90 Connecting a Printer ...93 Connecting an i.LINK Device ...94 Connecting to a Network (LAN) ...96 Customizing Your VAIO Computer ...98 Setting the Password ...99 Using Fingerprint Authentication ...111 Using Trusted Platform Module (TPM)...119 Setting Up Your Computer with VAIO Control Center 129 Using the Power Saving Modes ...130 Managing Power with VAIO Power Management ...135 Protecting the Hard Disk ...137 Upgrading Your VAIO Computer...138 Adding and Removing Memory...
... Monitors Function ...87 Connecting an External Microphone ...89 Connecting a Universal Serial Bus (USB) Device...90 Connecting a Printer ...93 Connecting an i.LINK Device ...94 Connecting to a Network (LAN) ...96 Customizing Your VAIO Computer ...98 Setting the Password ...99 Using Fingerprint Authentication ...111 Using Trusted Platform Module (TPM)...119 Setting Up Your Computer with VAIO Control Center 129 Using the Power Saving Modes ...130 Managing Power with VAIO Power Management ...135 Protecting the Hard Disk ...137 Upgrading Your VAIO Computer...138 Adding and Removing Memory...

User Guide
Page 9
...Connection Utility Help. * The Bluetooth function is available on -screen guide: 1 Click Start and Help and Support. 2 Click Use my VAIO. 3 Click VAIO Recovery Center User Guide. ❑ SmartWi™ Connection Utility Help - To access this on selected models only. Provides information about setting up Bluetooth* and wireless LAN functions. Provides information about restoring individual software programs, hardware drivers, and drive partition(s) or your entire hard disk drive to find out whether your model supports the function. n9 N Before Use ❑ VAIO Recovery Center User...
...Connection Utility Help. * The Bluetooth function is available on -screen guide: 1 Click Start and Help and Support. 2 Click Use my VAIO. 3 Click VAIO Recovery Center User Guide. ❑ SmartWi™ Connection Utility Help - To access this on selected models only. Provides information about setting up Bluetooth* and wireless LAN functions. Provides information about restoring individual software programs, hardware drivers, and drive partition(s) or your entire hard disk drive to find out whether your model supports the function. n9 N Before Use ❑ VAIO Recovery Center User...
User Guide
Page 32
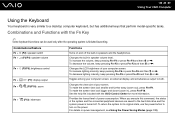
... VAIO Computer Using the Keyboard Your keyboard is finished launching. Combinations/Feature Fn + % (F2): speaker switch Fn + 2 (F3/F4): speaker volume Fn + 8 (F5/F6): brightness control Fn + /T (F7): display output Fn + / (F9/F10): zoom Fn + (F12): hibernate Functions Turns on and off the built-in speaker volume level. To increase the volume, keep pressing Fn+F3 or press Fn+F3 and then m or Changes...
... VAIO Computer Using the Keyboard Your keyboard is finished launching. Combinations/Feature Fn + % (F2): speaker switch Fn + 2 (F3/F4): speaker volume Fn + 8 (F5/F6): brightness control Fn + /T (F7): display output Fn + / (F9/F10): zoom Fn + (F12): hibernate Functions Turns on and off the built-in speaker volume level. To increase the volume, keep pressing Fn+F3 or press Fn+F3 and then m or Changes...

User Guide
Page 40
n 40 N Using Your VAIO Computer Reading and Writing Optical Discs Your computer plays and records CDs, DVDs, and Blu-ray Disc™ media, depending on your optical disc drive supports. Use the table below to see which types of optical disc drive installed on the model you purchased. Check your specifications for the type of media your model.
n 40 N Using Your VAIO Computer Reading and Writing Optical Discs Your computer plays and records CDs, DVDs, and Blu-ray Disc™ media, depending on your optical disc drive supports. Use the table below to see which types of optical disc drive installed on the model you purchased. Check your specifications for the type of media your model.
User Guide
Page 49
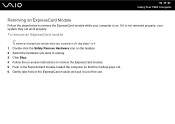
... it is on -screen instructions to remove the ExpressCard module while your computer is not removed properly, your computer is off, skip steps 1 to 4. 1 Double-click the Safely Remove Hardware icon on the taskbar. 2 Select the hardware you want to unplug. 3 Click Stop. 4 Follow the on . To remove an ExpressCard module ✍ To remove an ExpressCard module when your system may not work properly.
... it is on -screen instructions to remove the ExpressCard module while your computer is not removed properly, your computer is off, skip steps 1 to 4. 1 Double-click the Safely Remove Hardware icon on the taskbar. 2 Select the hardware you want to unplug. 3 Click Stop. 4 Follow the on . To remove an ExpressCard module ✍ To remove an ExpressCard module when your system may not work properly.

User Guide
Page 63
... between your model supports the Bluetooth function. You can establish wireless communication between these devices without cables at a range of up to set up the Bluetooth function with the SmartWi Connection Utility. See the online specifications to turn on the WIRELESS switch before starting the SmartWi Connection Utility. To use the Bluetooth function You need to 33 feet (10 meters) in an open area. n 63 N Using Your VAIO Computer Using the Bluetooth Function The Bluetooth function is available on -screen guide: 1 Click Start, All...
... between your model supports the Bluetooth function. You can establish wireless communication between these devices without cables at a range of up to set up the Bluetooth function with the SmartWi Connection Utility. See the online specifications to turn on the WIRELESS switch before starting the SmartWi Connection Utility. To use the Bluetooth function You need to 33 feet (10 meters) in an open area. n 63 N Using Your VAIO Computer Using the Bluetooth Function The Bluetooth function is available on -screen guide: 1 Click Start, All...
User Guide
Page 68
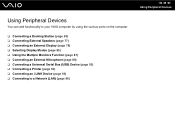
... your VAIO computer by using the various ports on the computer. ❑ Connecting a Docking Station (page 69) ❑ Connecting External Speakers (page 77) ❑ Connecting an External Display (page 78) ❑ Selecting Display Modes (page 85) ❑ Using the Multiple Monitors Function (page 87) ❑ Connecting an External Microphone (page 89) ❑ Connecting a Universal Serial Bus (USB) Device (page 90) ❑ Connecting a Printer (page 93) ❑ Connecting an i.LINK Device (page 94) ❑ Connecting to a Network (LAN...
... your VAIO computer by using the various ports on the computer. ❑ Connecting a Docking Station (page 69) ❑ Connecting External Speakers (page 77) ❑ Connecting an External Display (page 78) ❑ Selecting Display Modes (page 85) ❑ Using the Multiple Monitors Function (page 87) ❑ Connecting an External Microphone (page 89) ❑ Connecting a Universal Serial Bus (USB) Device (page 90) ❑ Connecting a Printer (page 93) ❑ Connecting an i.LINK Device (page 94) ❑ Connecting to a Network (LAN...

User Guide
Page 82
... detailed instructions, see How do I change the device for updates. To connect a TV to your computer is equipped with the HDMI port. Always use the device driver provided by Sony is used, the image will not be displayed and the audio will not be heard. If a device driver other end to the TV. 3 Switch the input channel of the TV to external input. 4 Set up the TV configuration system. ! The HDMI port...
... detailed instructions, see How do I change the device for updates. To connect a TV to your computer is equipped with the HDMI port. Always use the device driver provided by Sony is used, the image will not be displayed and the audio will not be heard. If a device driver other end to the TV. 3 Switch the input channel of the TV to external input. 4 Set up the TV configuration system. ! The HDMI port...

User Guide
Page 88
... Monitors function. Models with the ATI video controller 1 Click Start and Control Panel. 2 Click Adjust screen resolution under Appearance and Personalization. 3 Right-click the number 2 monitor and select Attached. 4 Click OK. To find out which video controller your computer is not accessible when the computer is attached to change the settings. ✍ Additionally, you can set the display colors and resolution for each display and customize the Multiple Monitors function. n 88 N Using Peripheral Devices...
... Monitors function. Models with the ATI video controller 1 Click Start and Control Panel. 2 Click Adjust screen resolution under Appearance and Personalization. 3 Right-click the number 2 monitor and select Attached. 4 Click OK. To find out which video controller your computer is not accessible when the computer is attached to change the settings. ✍ Additionally, you can set the display colors and resolution for each display and customize the Multiple Monitors function. n 88 N Using Peripheral Devices...
User Guide
Page 99
... your hard disk drive. The hard disk password provides additional security for the data stored on your computer: the power-on password allows you can use BIOS functions to set the hard disk password, other users will be able to access the data without knowing the password, even if the password-protected hard disk drive is removed from unauthorized access. If you will not be prompted to enter the password after the VAIO logo appears to start your...
... your hard disk drive. The hard disk password provides additional security for the data stored on your computer: the power-on password allows you can use BIOS functions to set the hard disk password, other users will be able to access the data without knowing the password, even if the password-protected hard disk drive is removed from unauthorized access. If you will not be prompted to enter the password after the VAIO logo appears to start your...
User Guide
Page 100
... set the power-on password in the BIOS setup screen, as well as starting the computer. The machine password is provided for service to reset the password. ✍ If your computer is equipped with the fingerprint authentication function, you have set the machine password. ! Once you can substitute fingerprint authentication for changing some of the power-on passwords: the machine password and the user password. There are two types of the BIOS setup options...
... set the power-on password in the BIOS setup screen, as well as starting the computer. The machine password is provided for service to reset the password. ✍ If your computer is equipped with the fingerprint authentication function, you have set the machine password. ! Once you can substitute fingerprint authentication for changing some of the power-on passwords: the machine password and the user password. There are two types of the BIOS setup options...
User Guide
Page 127
... key to change the boot device order so that Internal Hard Disk is listed higher than External Device. ! n 127 N Customizing Your VAIO Computer To unlock the encrypted data with a recovery key stored on a USB flash memory device To unlock the encrypted data with a recovery key stored on a USB flash memory device, your computer. 2 Press the F2 key when the VAIO logo appears. The encryption process will start. The BIOS setup screen appears. You need to move Internal Optical Drive to the top of the list to recover...
... key to change the boot device order so that Internal Hard Disk is listed higher than External Device. ! n 127 N Customizing Your VAIO Computer To unlock the encrypted data with a recovery key stored on a USB flash memory device To unlock the encrypted data with a recovery key stored on a USB flash memory device, your computer. 2 Press the F2 key when the VAIO logo appears. The encryption process will start. The BIOS setup screen appears. You need to move Internal Optical Drive to the top of the list to recover...
User Guide
Page 137
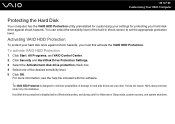
... Hibernate or Sleep mode, system recovery, and system shutdown. You can select the sensitivity level of the desired sensitivity level. 5 Click OK. The VAIO HDD Protection is disabled before Windows launches, and during a shift to hard disk drives and user data. n 137 N Customizing Your VAIO Computer Protecting the Hard Disk Your computer has the VAIO HDD Protection utility preinstalled for customizing your settings for protecting your hard disk drive against shock...
... Hibernate or Sleep mode, system recovery, and system shutdown. You can select the sensitivity level of the desired sensitivity level. 5 Click OK. The VAIO HDD Protection is disabled before Windows launches, and during a shift to hard disk drives and user data. n 137 N Customizing Your VAIO Computer Protecting the Hard Disk Your computer has the VAIO HDD Protection utility preinstalled for customizing your settings for protecting your hard disk drive against shock...

User Guide
Page 174
... Sleep or Hibernate mode while you must reinstall the driver software for your computer automatically enters Sleep or Hibernate mode, change the setting, see Using the Power Saving Modes (page 130). To change the corresponding power saving mode setting. Follow these steps: 1 Click Start, Control Panel, Hardware and Sound, and Device Manager. 2 Double-click Imaging devices. 3 Right-click the device name for the camera. n 174 N Troubleshooting Why can't I do if my computer becomes unstable when it enters a power saving mode...
... Sleep or Hibernate mode while you must reinstall the driver software for your computer automatically enters Sleep or Hibernate mode, change the setting, see Using the Power Saving Modes (page 130). To change the corresponding power saving mode setting. Follow these steps: 1 Click Start, Control Panel, Hardware and Sound, and Device Manager. 2 Double-click Imaging devices. 3 Right-click the device name for the camera. n 174 N Troubleshooting Why can't I do if my computer becomes unstable when it enters a power saving mode...

User Guide
Page 188
... which DVD recordable format is compatible with your optical disc drive. You may not be connected to the Internet. To play Blu-ray Disc media? ! Using a disc with an affixed adhesive label could cause a write error or other damage. This Q & A entry applies to selected models only. What should I do if I cannot play such contents, download and install the latest updates for WinDVD BD using VAIO Update. n 188 N Troubleshooting What...
... which DVD recordable format is compatible with your optical disc drive. You may not be connected to the Internet. To play Blu-ray Disc media? ! Using a disc with an affixed adhesive label could cause a write error or other damage. This Q & A entry applies to selected models only. What should I do if I cannot play such contents, download and install the latest updates for WinDVD BD using VAIO Update. n 188 N Troubleshooting What...

User Guide
Page 189
See the online specifications to find out the type of your optical disc drive, and then Reading and Writing Optical Discs (page 40) to Blu-ray Disc media? ! n 189 N Troubleshooting Why can't I write data to find out about the supported disc media. ❑ Make sure your optical disc drive supports the Blu-ray Disc writing function. You cannot add or erase data to selected models only. The DVD±RW/±R DL/RAM drive does not support it. ❑ BD-R Disc media are not rewritable. This Q & A entry applies to or from the BD-R Disc media.
See the online specifications to find out the type of your optical disc drive, and then Reading and Writing Optical Discs (page 40) to Blu-ray Disc media? ! n 189 N Troubleshooting Why can't I write data to find out about the supported disc media. ❑ Make sure your optical disc drive supports the Blu-ray Disc writing function. You cannot add or erase data to selected models only. The DVD±RW/±R DL/RAM drive does not support it. ❑ BD-R Disc media are not rewritable. This Q & A entry applies to or from the BD-R Disc media.

User Guide
Page 195
...: 1 Click Start and Control Panel. 2 Click Printer under Hardware and Sound. 3 Right-click the printer icon and select Properties. 4 Click the Ports tab. 5 Click to cancel the Enable bidirectional support check box. 6 Click OK. When your printer is connected to the optional docking station, check to see if the docking station is not functioning after your computer resumes from a power saving mode (Sleep or...
...: 1 Click Start and Control Panel. 2 Click Printer under Hardware and Sound. 3 Right-click the printer icon and select Properties. 4 Click the Ports tab. 5 Click to cancel the Enable bidirectional support check box. 6 Click OK. When your printer is connected to the optional docking station, check to see if the docking station is not functioning after your computer resumes from a power saving mode (Sleep or...
User Guide
Page 210
.... Click the VAIO Update notice to information on -screen help menu for the corresponding solutions online. You can visit the Sony online support web site at : http://support.microsoft.com/directory/. 4 Sony Computing Support This service provides instant access to open the VAIO Support web site and view the information. These guides are stored on the hard disk drive as on commonly encountered problems. Type a description of the problem and the...
.... Click the VAIO Update notice to information on -screen help menu for the corresponding solutions online. You can visit the Sony online support web site at : http://support.microsoft.com/directory/. 4 Sony Computing Support This service provides instant access to open the VAIO Support web site and view the information. These guides are stored on the hard disk drive as on commonly encountered problems. Type a description of the problem and the...

User Guide
Page 217
..., you must activate the software before you want to use it. Product activation procedures will work only for evaluation purposes only. You can activate the software by following the conversion instructions presented during initial launch of the software; You will operate under reduced-functionality mode, limiting end-user options and operations. If you can convert online by Internet: Internet service charges may apply. The software has been installed and you use , at...
..., you must activate the software before you want to use it. Product activation procedures will work only for evaluation purposes only. You can activate the software by following the conversion instructions presented during initial launch of the software; You will operate under reduced-functionality mode, limiting end-user options and operations. If you can convert online by Internet: Internet service charges may apply. The software has been installed and you use , at...


