User Guide
Page 4
n4 N Precautions ...155 On Handling the LCD Screen ...156 On Using the Power Source ...157 On Handling Your Computer...158 On Using the Built-in MOTION EYE Camera...160 On Handling Floppy Disks ......
n4 N Precautions ...155 On Handling the LCD Screen ...156 On Using the Power Source ...157 On Handling Your Computer...158 On Using the Built-in MOTION EYE Camera...160 On Handling Floppy Disks ......
User Guide
Page 6
Printed Documentation ❑ Welcome mat - Documentation Your documentation includes printed information and user guides to the on your VAIO computer. Contains safety guidelines and owner information. n6 N Before Use Before Use Congratulations on your purchase of this Sony VAIO® computer, and welcome to read on -screen User Guide. Sony has combined leading-edge technology in audio, video, computing, and communications to provide state-of connections, setting up information, etc. ❑ Safety Information - Contains an overview of -the-art personal computing.
Printed Documentation ❑ Welcome mat - Documentation Your documentation includes printed information and user guides to the on your VAIO computer. Contains safety guidelines and owner information. n6 N Before Use Before Use Congratulations on your purchase of this Sony VAIO® computer, and welcome to read on -screen User Guide. Sony has combined leading-edge technology in audio, video, computing, and communications to provide state-of connections, setting up information, etc. ❑ Safety Information - Contains an overview of -the-art personal computing.

User Guide
Page 7
... the software programs included with your VAIO computer. To access this on-screen guide: 1 Click Start, point to the Sony online support Web site at http://esupport.sony.com/EN/VAIO/ for customers in USA, at http://www.sony.ca/support for customers in Canada, at http://esupport.sony.com/ES/VAIO/ for customers in Latin American countries...
... the software programs included with your VAIO computer. To access this on-screen guide: 1 Click Start, point to the Sony online support Web site at http://esupport.sony.com/EN/VAIO/ for customers in USA, at http://www.sony.ca/support for customers in Canada, at http://esupport.sony.com/ES/VAIO/ for customers in Latin American countries...
User Guide
Page 9
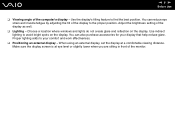
... also purchase accessories for your comfort and work effectiveness. ❑ Positioning an external display - Proper lighting adds to the proper position. Make sure the display screen is at a comfortable viewing distance. Choose a location where windows and lights do not create glare and reflection on the display. Use indirect lighting to find...
... also purchase accessories for your comfort and work effectiveness. ❑ Positioning an external display - Proper lighting adds to the proper position. Make sure the display screen is at a comfortable viewing distance. Choose a location where windows and lights do not create glare and reflection on the display. Use indirect lighting to find...

User Guide
Page 11
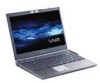
Please note that the illustrations in speakers F Keyboard (page 27) G Touch pad (page 29) H Fingerprint sensor* (page 114) * On selected models only. n 11 N Getting Started Locating Controls and Ports Take a moment to your model. Front A Built-in MOTION EYE camera* (page 31) B Built-in MOTION EYE camera indicator* (page 17) C Built-in microphone (monaural)* D LCD screen (page 156) E Built-in this manual may not necessarily apply to identify the controls and ports shown on the following pages. !
Please note that the illustrations in speakers F Keyboard (page 27) G Touch pad (page 29) H Fingerprint sensor* (page 114) * On selected models only. n 11 N Getting Started Locating Controls and Ports Take a moment to your model. Front A Built-in MOTION EYE camera* (page 31) B Built-in MOTION EYE camera indicator* (page 17) C Built-in microphone (monaural)* D LCD screen (page 156) E Built-in this manual may not necessarily apply to identify the controls and ports shown on the following pages. !
User Guide
Page 20
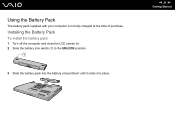
n 20 N Getting Started Installing the Battery Pack To install the battery pack 1 Turn off the computer and close the LCD screen lid. 2 Slide the battery lock switch (1) to the UNLOCK position. 3 Slide the battery pack into the battery compartment until it clicks into place. Using the Battery Pack The battery pack supplied with your computer is not fully charged at the time of purchase.
n 20 N Getting Started Installing the Battery Pack To install the battery pack 1 Turn off the computer and close the LCD screen lid. 2 Slide the battery lock switch (1) to the UNLOCK position. 3 Slide the battery pack into the battery compartment until it clicks into place. Using the Battery Pack The battery pack supplied with your computer is not fully charged at the time of purchase.
User Guide
Page 24
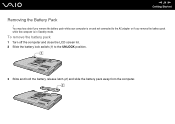
n 24 N Getting Started Removing the Battery Pack ! To remove the battery pack 1 Turn off the computer and close the LCD screen lid. 2 Slide the battery lock switch (1) to the AC adapter or if you remove the battery pack while the computer is on and not connected to the UNLOCK position. 3 Slide and hold the battery release latch (2) and slide the battery pack away from the computer. You may lose data if you remove the battery pack while your computer is in Standby mode.
n 24 N Getting Started Removing the Battery Pack ! To remove the battery pack 1 Turn off the computer and close the LCD screen lid. 2 Slide the battery lock switch (1) to the AC adapter or if you remove the battery pack while the computer is on and not connected to the UNLOCK position. 3 Slide and hold the battery release latch (2) and slide the battery pack away from the computer. You may lose data if you remove the battery pack while your computer is in Standby mode.
User Guide
Page 27
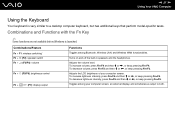
... + 2 (F3/F4): volume Fn + 8 (F5/F6): brightness control Fn + /T (F7): display output Functions Toggles among Bluetooth, Wireless LAN, and Wireless WAN functionalities. n 27 N Using Your VAIO Computer Using the Keyboard Your keyboard is launched. To increase volume, press Fn+F4 and then M or ,, or keep pressing Fn+F4.
... + 2 (F3/F4): volume Fn + 8 (F5/F6): brightness control Fn + /T (F7): display output Functions Toggles among Bluetooth, Wireless LAN, and Wireless WAN functionalities. n 27 N Using Your VAIO Computer Using the Keyboard Your keyboard is launched. To increase volume, press Fn+F4 and then M or ,, or keep pressing Fn+F4.
User Guide
Page 28
...Hibernate * On selected models only. The location and size of power consumption. When you execute this key combination changes the resolution. When your computer's screen view. ✍ The magnified view is not as clear as the standard view, as it is magnified, switching the view to turn on power ...its original state, use the power button to the external display disables the function and restores the standard view. n 28 N Using Your VAIO Computer Functions Changes the screen resolution to magnify/restore your computer's screen view is implemented by changing the resolution.
...Hibernate * On selected models only. The location and size of power consumption. When you execute this key combination changes the resolution. When your computer's screen view. ✍ The magnified view is not as clear as the standard view, as it is magnified, switching the view to turn on power ...its original state, use the power button to the external display disables the function and restores the standard view. n 28 N Using Your VAIO Computer Functions Changes the screen resolution to magnify/restore your computer's screen view is implemented by changing the resolution.
User Guide
Page 29
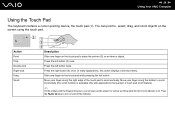
n 29 N Using Your VAIO Computer Using the Touch Pad The keyboard contains a cursor-pointing device, the touch pad (1). Move your finger along the bottom to scroll horizontally (the scroll ... pointer (2) on the touch pad while pressing the left button. Move your finger along the right edge of the touch pad to turn on the screen using the touch pad.
n 29 N Using Your VAIO Computer Using the Touch Pad The keyboard contains a cursor-pointing device, the touch pad (1). Move your finger along the bottom to scroll horizontally (the scroll ... pointer (2) on the touch pad while pressing the left button. Move your finger along the right edge of the touch pad to turn on the screen using the touch pad.
User Guide
Page 37
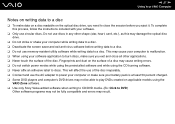
... this may damage the optical disc drive. ❑ Do not strike or shake your computer while writing data to a disc. ❑ Deactivate the screen saver and exit anti-virus software before you need to close all other shape (star, heart, card, etc.), as this process, follow the instructions included...charged. ❑ Some DVD players and computer's DVD drives may not be able to play DVDs created on applicable models using the VAIO Zone software. ❑ Use only Sony Value-added software when writing to CD/DVD media. (Ex: Click to DVD) Other software programs may not be fully compatible ...
... this may damage the optical disc drive. ❑ Do not strike or shake your computer while writing data to a disc. ❑ Deactivate the screen saver and exit anti-virus software before you need to close all other shape (star, heart, card, etc.), as this process, follow the instructions included...charged. ❑ Some DVD players and computer's DVD drives may not be able to play DVDs created on applicable models using the VAIO Zone software. ❑ Use only Sony Value-added software when writing to CD/DVD media. (Ex: Click to DVD) Other software programs may not be fully compatible ...
User Guide
Page 38
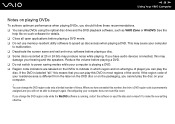
...packaging, you cannot play the disc. Reconfiguring your computer. ! When you have audio devices connected, this count. n 38 N Using Your VAIO Computer Notes on playing DVDs To achieve optimum performance when playing DVDs, you should follow these recommendations. ❑ You can change the DVD ...region code only a limited number of times. This may cause your computer to malfunction. ❑ Deactivate the screen saver and exit anti-virus software before playing a DVD movie. ❑ Do not use memory-resident utility software to make the new setting ...
...packaging, you cannot play the disc. Reconfiguring your computer. ! When you have audio devices connected, this count. n 38 N Using Your VAIO Computer Notes on playing DVDs To achieve optimum performance when playing DVDs, you should follow these recommendations. ❑ You can change the DVD ...region code only a limited number of times. This may cause your computer to malfunction. ❑ Deactivate the screen saver and exit anti-virus software before playing a DVD movie. ❑ Do not use memory-resident utility software to make the new setting ...
User Guide
Page 58
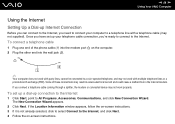
...may result in excess electrical current and could cause a malfunction in the internal modem. If the Location Information window appears, follow the on-screen instructions. 3 If it is not already selected, click to select Connect to the Internet. Once you have set up a dial-up connection...branch exchange (PBX). To set up your computer to All Programs, Accessories, Communications, and click New Connection Wizard. n 58 N Using Your VAIO Computer Using the Internet Setting Up a Dial-up Internet Connection Before you can connect to the Internet, you need to connect your telephone cable ...
...may result in excess electrical current and could cause a malfunction in the internal modem. If the Location Information window appears, follow the on-screen instructions. 3 If it is not already selected, click to select Connect to the Internet. Once you have set up a dial-up connection...branch exchange (PBX). To set up your computer to All Programs, Accessories, Communications, and click New Connection Wizard. n 58 N Using Your VAIO Computer Using the Internet Setting Up a Dial-up Internet Connection Before you can connect to the Internet, you need to connect your telephone cable ...
User Guide
Page 67
... lights up . On models that came with your access point for more information. 2 Turn on the WIRELESS or WIRELESS LAN switch. n 67 N Using Your VAIO Computer To connect to see whether your desired wireless option(s) and click OK. 3 Click Start and then Control Panel. 4 Click Network and Internet Connections. 5 ...display the Wireless Device Switch window. See the manual that support the Bluetooth functionality* and/or the IEEE 802.11a/b/g standard*, double-click ( / ) on -screen instructions. * See the online Specifications to a wireless network 1 Make sure an access point is set up .
... lights up . On models that came with your access point for more information. 2 Turn on the WIRELESS or WIRELESS LAN switch. n 67 N Using Your VAIO Computer To connect to see whether your desired wireless option(s) and click OK. 3 Click Start and then Control Panel. 4 Click Network and Internet Connections. 5 ...display the Wireless Device Switch window. See the manual that support the Bluetooth functionality* and/or the IEEE 802.11a/b/g standard*, double-click ( / ) on -screen instructions. * See the online Specifications to a wireless network 1 Make sure an access point is set up .
User Guide
Page 68
n 68 N Using Your VAIO Computer To connect to a wireless network (models with more information. 2 Turn on -screen instructions. * See the online Specifications to see whether your desired wireless option(s) and click OK. 3 Click Start, point to All Programs, and click Wireless Setup ...
n 68 N Using Your VAIO Computer To connect to a wireless network (models with more information. 2 Turn on -screen instructions. * See the online Specifications to see whether your desired wireless option(s) and click OK. 3 Click Start, point to All Programs, and click Wireless Setup ...
User Guide
Page 87
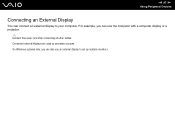
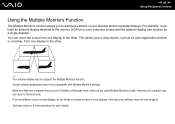
n 87 N Using Peripheral Devices Connecting an External Display You can connect an external display to set up multiple monitors. For example, you can use an external display to your computer. On Windows systems only, you can also use the computer with a computer display or a projector. ✍ Connect the power cord after connecting all other cables. Connected external displays are used as secondary screens.
n 87 N Using Peripheral Devices Connecting an External Display You can connect an external display to set up multiple monitors. For example, you can use an external display to your computer. On Windows systems only, you can also use the computer with a computer display or a projector. ✍ Connect the power cord after connecting all other cables. Connected external displays are used as secondary screens.
User Guide
Page 91
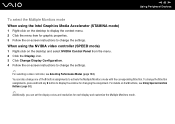
...Control Panel from the menu. 2 Click the Display icon. 3 Click Change Display Configuration. 4 Follow the on-screen instructions to display the same contents on your computer screen and the external display or projector at the same time, see Using the Multiple Monitors Function (page 92) for... graphic properties. 3 Follow the on-screen instructions to change the settings. ✍ For selecting a video controller, see Selecting Performance Modes (page 104). If you want to your computer...
...Control Panel from the menu. 2 Click the Display icon. 3 Click Change Display Configuration. 4 Follow the on-screen instructions to display the same contents on your computer screen and the external display or projector at the same time, see Using the Multiple Monitors Function (page 92) for... graphic properties. 3 Follow the on-screen instructions to change the settings. ✍ For selecting a video controller, see Selecting Performance Modes (page 104). If you want to your computer...
User Guide
Page 92
... one display to the other . Certain software applications may not return to the other . ✍ Your external display may not work properly. otherwise your computer screen and the external display can move the cursor from one display to Normal mode.
... one display to the other . Certain software applications may not return to the other . ✍ Your external display may not work properly. otherwise your computer screen and the external display can move the cursor from one display to Normal mode.
User Guide
Page 93
... the desktop and select NVIDIA Control Panel from the menu. 2 Click the Display icon. 3 Click Change Display Configuration. 4 Follow the on -screen instructions to change the S button assignments, press and hold any S button to activate the Multiple Monitors mode with the corresponding S button. To ... mode) 1 Right-click on the desktop to display the context menu. 2 Click the menu item for graphic properties. 3 Follow the on -screen instructions to change the settings. ✍ For selecting a video controller, see Using Special-function Buttons (page 30). ✍ Additionally, you can...
... the desktop and select NVIDIA Control Panel from the menu. 2 Click the Display icon. 3 Click Change Display Configuration. 4 Follow the on -screen instructions to change the S button assignments, press and hold any S button to activate the Multiple Monitors mode with the corresponding S button. To ... mode) 1 Right-click on the desktop to display the context menu. 2 Click the menu item for graphic properties. 3 Follow the on -screen instructions to change the settings. ✍ For selecting a video controller, see Using Special-function Buttons (page 30). ✍ Additionally, you can...
User Guide
Page 101
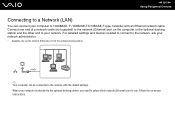
... end to your computer is attached to the optional docking station, you need to select which network (Ethernet) port to the network (Ethernet) port on -screen instructions.
... end to your computer is attached to the optional docking station, you need to select which network (Ethernet) port to the network (Ethernet) port on -screen instructions.

