
User Guide
Page 4
n4 N Precautions ...167 On Handling the LCD Screen ...168 On Using the Power Source ...169 On Handling Your Computer...170 On Using the Built-in MOTION EYE Camera...172 On Handling Floppy ...
n4 N Precautions ...167 On Handling the LCD Screen ...168 On Using the Power Source ...169 On Handling Your Computer...170 On Using the Built-in MOTION EYE Camera...172 On Handling Floppy ...
User Guide
Page 13
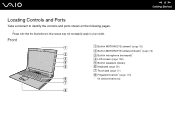
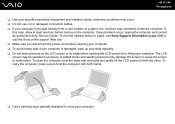
Please note that the illustrations in speakers (stereo) F Keyboard (page 29) G Touch pad (page 31) H Fingerprint sensor* (page 116) * On selected models only. Front A Built-in MOTION EYE camera* (page 33) B Built-in MOTION EYE camera indicator* (page 19) C Built-in microphone (monaural)* D LCD screen (page 168) E Built-in this manual may not necessarily apply to identify the controls and ports shown on the following pages. ! n 13 N Getting Started Locating Controls and Ports Take a moment to your model.
Please note that the illustrations in speakers (stereo) F Keyboard (page 29) G Touch pad (page 31) H Fingerprint sensor* (page 116) * On selected models only. Front A Built-in MOTION EYE camera* (page 33) B Built-in MOTION EYE camera indicator* (page 19) C Built-in microphone (monaural)* D LCD screen (page 168) E Built-in this manual may not necessarily apply to identify the controls and ports shown on the following pages. ! n 13 N Getting Started Locating Controls and Ports Take a moment to your model.

User Guide
Page 22
Using the Battery Pack The battery pack supplied with your computer is not fully charged at the time of purchase. Installing the Battery Pack To install the battery pack 1 Turn off the computer and close the LCD screen lid. 2 Slide the battery lock switch (1) to the UNLOCK position. 3 Slide the battery pack into the battery compartment until it clicks into place. n 22 N Getting Started
Using the Battery Pack The battery pack supplied with your computer is not fully charged at the time of purchase. Installing the Battery Pack To install the battery pack 1 Turn off the computer and close the LCD screen lid. 2 Slide the battery lock switch (1) to the UNLOCK position. 3 Slide the battery pack into the battery compartment until it clicks into place. n 22 N Getting Started

User Guide
Page 26
n 26 N Getting Started Removing the Battery Pack ! You may lose data if you remove the battery pack while your computer is in Sleep mode. To remove the battery pack 1 Turn off the computer and close the LCD screen lid. 2 Slide the battery lock switch (1) to the AC adapter or if you remove the battery pack while the computer is on and not connected to the UNLOCK position. 3 Slide and hold the battery release latch (2) and slide the battery pack away from the computer.
n 26 N Getting Started Removing the Battery Pack ! You may lose data if you remove the battery pack while your computer is in Sleep mode. To remove the battery pack 1 Turn off the computer and close the LCD screen lid. 2 Slide the battery lock switch (1) to the AC adapter or if you remove the battery pack while the computer is on and not connected to the UNLOCK position. 3 Slide and hold the battery release latch (2) and slide the battery pack away from the computer.
User Guide
Page 29
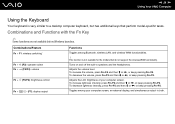
... launches. Turns on and off the built-in speakers and the headphones. To decrease the volume, press Fn+F3 and then m or n 29 N Using Your VAIO Computer Using the Keyboard Your keyboard is not available for the models that perform model-specific tasks. To increase the volume, press Fn+F4 and...
... launches. Turns on and off the built-in speakers and the headphones. To decrease the volume, press Fn+F3 and then m or n 29 N Using Your VAIO Computer Using the Keyboard Your keyboard is not available for the models that perform model-specific tasks. To increase the volume, press Fn+F4 and...

User Guide
Page 89
To connect a projector 1 Connect the power cord (1) of your computer or via the optional docking station. n 89 N Using Peripheral Devices Connecting a Projector You can connect a projector (for example, the Sony LCD projector) directly to your projector into an AC outlet. 2 Plug an RGB signal cable (2) (not supplied) into the monitor (VGA) port (3) a on the computer or on the docking station. 3 Plug an audio cable (4) (not supplied) into the headphones jack (5) i. 4 Plug the RGB signal cable and the audio cable into the jack and port on the projector (6).
To connect a projector 1 Connect the power cord (1) of your computer or via the optional docking station. n 89 N Using Peripheral Devices Connecting a Projector You can connect a projector (for example, the Sony LCD projector) directly to your projector into an AC outlet. 2 Plug an RGB signal cable (2) (not supplied) into the monitor (VGA) port (3) a on the computer or on the docking station. 3 Plug an audio cable (4) (not supplied) into the headphones jack (5) i. 4 Plug the RGB signal cable and the audio cable into the jack and port on the projector (6).

User Guide
Page 150
..., you can turn off a specific device such as the power source for your computer and install a fully charged battery pack. n 150 N Customizing Your VAIO Computer Using the Power Saving Modes When you use . When using battery power, you should either attach the AC adapter to conserve battery life. If... Hibernate mode if the remaining battery charge becomes short, regardless of the computer when it is on in use a battery pack as the LCD screen or the hard disk. In addition to turn off specific devices, your computer has two distinct power saving modes: Sleep and Hibernate.
..., you can turn off a specific device such as the power source for your computer and install a fully charged battery pack. n 150 N Customizing Your VAIO Computer Using the Power Saving Modes When you use . When using battery power, you should either attach the AC adapter to conserve battery life. If... Hibernate mode if the remaining battery charge becomes short, regardless of the computer when it is on in use a battery pack as the LCD screen or the hard disk. In addition to turn off specific devices, your computer has two distinct power saving modes: Sleep and Hibernate.
User Guide
Page 151
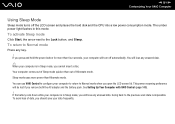
The umber power light flashes in Sleep mode, you open the LCD screen lid. See Setting Up Your Computer with VAIO Central (page 149). ! Going back to the Lock button, and Sleep. n 151 N Customizing Your VAIO Computer Using Sleep Mode Sleep mode turns off automatically. To activate Sleep mode Click Start, ...four seconds, your computer to return to Normal mode Press any unsaved data. ✍ When your data frequently. You will turn off the LCD screen and places the hard disk and the CPU into a low power consumption mode. Your computer comes out of Hibernate mode. You can use...
The umber power light flashes in Sleep mode, you open the LCD screen lid. See Setting Up Your Computer with VAIO Central (page 149). ! Going back to the Lock button, and Sleep. n 151 N Customizing Your VAIO Computer Using Sleep Mode Sleep mode turns off automatically. To activate Sleep mode Click Start, ...four seconds, your computer to return to Normal mode Press any unsaved data. ✍ When your data frequently. You will turn off the LCD screen and places the hard disk and the CPU into a low power consumption mode. Your computer comes out of Hibernate mode. You can use...

User Guide
Page 154
... ✍ If you do not use VAIO Central to configure your computer before its power indicator light turns off. When your computer is in Hibernate mode, you open the LCD screen lid. This power saving mode saves you the time of time, place the computer into Hibernate mode. This power ...resuming preference will be activated. Hibernate mode uses less power than from Sleep mode. See Setting Up Your Computer with VAIO Central (page 149). ! You...
... ✍ If you do not use VAIO Central to configure your computer before its power indicator light turns off. When your computer is in Hibernate mode, you open the LCD screen lid. This power saving mode saves you the time of time, place the computer into Hibernate mode. This power ...resuming preference will be activated. Hibernate mode uses less power than from Sleep mode. See Setting Up Your Computer with VAIO Central (page 149). ! You...

User Guide
Page 167
n 167 N Precautions Precautions This section describes safety guidelines and precautions to help you protect your VAIO computer from potential damage. ❑ On Handling the LCD Screen (page 168) ❑ On Using the Power Source (page 169) ❑ On Handling Your Computer (page 170) ❑ On Using the Built-in MOTION ...
n 167 N Precautions Precautions This section describes safety guidelines and precautions to help you protect your VAIO computer from potential damage. ❑ On Handling the LCD Screen (page 168) ❑ On Using the Power Source (page 169) ❑ On Handling Your Computer (page 170) ❑ On Using the Built-in MOTION ...

User Guide
Page 168
... is a normal result of the manufacturing process and does not indicate a malfunction. ❑ Avoid rubbing the LCD screen. Sony assumes no liabilities for a long period of the change the LCD screen orientation setting in the Tablet PC Settings window even when another option is not a malfunction. This could cause a malfunction. ❑ Using your...
... is a normal result of the manufacturing process and does not indicate a malfunction. ❑ Avoid rubbing the LCD screen. Sony assumes no liabilities for a long period of the change the LCD screen orientation setting in the Tablet PC Settings window even when another option is not a malfunction. This could cause a malfunction. ❑ Using your...
User Guide
Page 171
... To find the nearest center or agent, see Sony Support Information (page 224) or visit the Sony online support Web site. ❑ Make sure you disconnect the power cord before turning on the LCD screen or its edges when opening the LCD screen lid or lifting your computer is brought directly... from a cold location to malfunction. If any problems occur, unplug the computer and contact an authorized Sony Service Center. The LCD screen may be sensitive to pressure or added stress and exerting pressure may damage the screen or cause the screen to a warm ...
... To find the nearest center or agent, see Sony Support Information (page 224) or visit the Sony online support Web site. ❑ Make sure you disconnect the power cord before turning on the LCD screen or its edges when opening the LCD screen lid or lifting your computer is brought directly... from a cold location to malfunction. If any problems occur, unplug the computer and contact an authorized Sony Service Center. The LCD screen may be sensitive to pressure or added stress and exerting pressure may damage the screen or cause the screen to a warm ...

User Guide
Page 192
... Built-in MOTION EYE camera. If another software application is using the camera, exit the application before using . ❑ The power management function of the LCD screen might help file on your software application may have caused dropped frames. Lowering the resolution or reducing the colors of your computer may show...
... Built-in MOTION EYE camera. If another software application is using the camera, exit the application before using . ❑ The power management function of the LCD screen might help file on your software application may have caused dropped frames. Lowering the resolution or reducing the colors of your computer may show...
User Guide
Page 208
... is on . See Combinations and Functions with the Fn Key (page 29) for more information. Make sure the power indicator shows the power is in LCD (Video) Sleep mode, press any key to the external display, press the Fn+F7 keys. n 208 N Troubleshooting Display Why did my screen go blank? ❑...
... is on . See Combinations and Functions with the Fn Key (page 29) for more information. Make sure the power indicator shows the power is in LCD (Video) Sleep mode, press any key to the external display, press the Fn+F7 keys. n 208 N Troubleshooting Display Why did my screen go blank? ❑...

User Guide
Page 209
... is dark? Alternatively, you cannot display a video on your computer. What should I do if my screen is disconnected, you can confirm the value of the LCD screen. You can press the Fn+F7 keys to increase the screen resolution. ! Right-click on the desktop, select Personalize from the shortcut menu. 2 Click...
... is dark? Alternatively, you cannot display a video on your computer. What should I do if my screen is disconnected, you can confirm the value of the LCD screen. You can press the Fn+F7 keys to increase the screen resolution. ! Right-click on the desktop, select Personalize from the shortcut menu. 2 Click...


