User Guide
Page 3
... an External Microphone ...94 Connecting a Universal Serial Bus (USB) Device...95 Connecting a Printer ...98 Connecting an i.LINK Device ...99 Connecting to a Network (LAN) ...101 Customizing Your VAIO Computer ...103 Selecting Performance Modes ...104 Setting the Password ...105 Using Fingerprint Authentication ...116 Using Trusted Platform Module (TPM)...142 Setting Up Your Computer with VAIO Central ...149 Using the Power Saving Modes ...150 Managing Power with VAIO Power Management ...155 Protecting the Hard Disk ...158 Upgrading Your VAIO Computer...159 Adding and Removing Memory...160
... an External Microphone ...94 Connecting a Universal Serial Bus (USB) Device...95 Connecting a Printer ...98 Connecting an i.LINK Device ...99 Connecting to a Network (LAN) ...101 Customizing Your VAIO Computer ...103 Selecting Performance Modes ...104 Setting the Password ...105 Using Fingerprint Authentication ...116 Using Trusted Platform Module (TPM)...142 Setting Up Your Computer with VAIO Central ...149 Using the Power Saving Modes ...150 Managing Power with VAIO Power Management ...155 Protecting the Hard Disk ...158 Upgrading Your VAIO Computer...159 Adding and Removing Memory...160

User Guide
Page 7
... customers in Brazil. ❑ VAIO Recovery Guide - Provides information about the software programs included with your VAIO computer. To view the online Specifications: 1 Connect to the Internet. 2 Go to the original factory installed settings. Contains features of your computer, as well as information on -screen guide: 1 Click Start and Help and Support. 2 Click Manuals & Specifications. 3 Click VAIO Recovery Guide. n7 N Before Use Non-printed Documentation ❑ User Guide (this on solving common problems. ❑ Specifications -
... customers in Brazil. ❑ VAIO Recovery Guide - Provides information about the software programs included with your VAIO computer. To view the online Specifications: 1 Connect to the Internet. 2 Go to the original factory installed settings. Contains features of your computer, as well as information on -screen guide: 1 Click Start and Help and Support. 2 Click Manuals & Specifications. 3 Click VAIO Recovery Guide. n7 N Before Use Non-printed Documentation ❑ User Guide (this on solving common problems. ❑ Specifications -
User Guide
Page 9
...; Backup & Recovery Find information on -screen User Guide, warranty information, other Internet sites you might find the answers you need. n9 N Before Use Help and Support Help and Support is easy to find interesting and useful. To access Help and Support, click Start and Help and Support. ❑ Manuals & Specifications Here you will find the on how to back up and restore your operating system, system software, and your VAIO computer...
...; Backup & Recovery Find information on -screen User Guide, warranty information, other Internet sites you might find the answers you need. n9 N Before Use Help and Support Help and Support is easy to find interesting and useful. To access Help and Support, click Start and Help and Support. ❑ Manuals & Specifications Here you will find the on how to back up and restore your operating system, system software, and your VAIO computer...
User Guide
Page 13
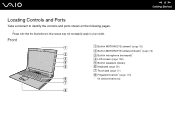
Please note that the illustrations in speakers (stereo) F Keyboard (page 29) G Touch pad (page 31) H Fingerprint sensor* (page 116) * On selected models only. Front A Built-in MOTION EYE camera* (page 33) B Built-in MOTION EYE camera indicator* (page 19) C Built-in microphone (monaural)* D LCD screen (page 168) E Built-in this manual may not necessarily apply to identify the controls and ports shown on the following pages. ! n 13 N Getting Started Locating Controls and Ports Take a moment to your model.
Please note that the illustrations in speakers (stereo) F Keyboard (page 29) G Touch pad (page 31) H Fingerprint sensor* (page 116) * On selected models only. Front A Built-in MOTION EYE camera* (page 33) B Built-in MOTION EYE camera indicator* (page 19) C Built-in microphone (monaural)* D LCD screen (page 168) E Built-in this manual may not necessarily apply to identify the controls and ports shown on the following pages. ! n 13 N Getting Started Locating Controls and Ports Take a moment to your model.
User Guide
Page 30
n 30 N Using Your VAIO Computer Functions Changes the screen resolution to the external display disables the function and restores the standard view. When you execute this key combination changes the resolution. Provides for the lowest level of the system and the peripheral devices are written to the hard disk and the system power is not as clear as the standard view, as it is magnified, switching the view to...
n 30 N Using Your VAIO Computer Functions Changes the screen resolution to the external display disables the function and restores the standard view. When you execute this key combination changes the resolution. Provides for the lowest level of the system and the peripheral devices are written to the hard disk and the system power is not as clear as the standard view, as it is magnified, switching the view to...

User Guide
Page 36
... recordable CDROM Video Music CD CD-R/ DVD- Use non-cartridge discs or discs with removable cartridge. *4 Writing data to DVD-RW discs compliant with DVD-R for the type of media your model. DVD-ROM P P P P P P P P P P P - *1 Supports writing data to DVD-R discs compliant with DVD-RW Version 1.1/1.2. *3 The DVD±RW/RAM disc drive on your optical disc drive supports. n 36 N Using Your VAIO Computer Reading and Writing Optical Discs Your computer plays and records CDs and DVDs, depending on discs supporting DVD-R DL...
... recordable CDROM Video Music CD CD-R/ DVD- Use non-cartridge discs or discs with removable cartridge. *4 Writing data to DVD-RW discs compliant with DVD-R for the type of media your model. DVD-ROM P P P P P P P P P P P - *1 Supports writing data to DVD-R discs compliant with DVD-RW Version 1.1/1.2. *3 The DVD±RW/RAM disc drive on your optical disc drive supports. n 36 N Using Your VAIO Computer Reading and Writing Optical Discs Your computer plays and records CDs and DVDs, depending on discs supporting DVD-R DL...
User Guide
Page 65
... Control Panel. 3 Click View network status and tasks under Network and Internet. 4 Click Set up a connection or network on the left pane. n 65 N Using Your VAIO Computer To communicate without an access point (ad-hoc) ! You cannot select the 5 GHz bandwidth, which is used for the IEEE 802.11a standard, on ad-hoc networks. 1 Turn on -screen instructions. * See the online Specifications to display the Wireless Device Switch window. The Wireless LAN indicator lights up a connection or network window...
... Control Panel. 3 Click View network status and tasks under Network and Internet. 4 Click Set up a connection or network on the left pane. n 65 N Using Your VAIO Computer To communicate without an access point (ad-hoc) ! You cannot select the 5 GHz bandwidth, which is used for the IEEE 802.11a standard, on ad-hoc networks. 1 Turn on -screen instructions. * See the online Specifications to display the Wireless Device Switch window. The Wireless LAN indicator lights up a connection or network window...

User Guide
Page 67
The Wireless LAN indicator lights up . Turning off the WIRELESS or WIRELESS LAN switch. ! On models that came with your model supports the Bluetooth functionality and/or the IEEE 802.11a/b/g standard. Select your desired wireless option(s) and click OK. 3 Click Start and Control Panel. 4 Click View network status and tasks under Network and Internet. 5 Click Manage wireless networks. 6 Click Add. 7 Follow the on-screen instructions. * See the online Specifications to see whether your access point for more information. 2 Turn on...
The Wireless LAN indicator lights up . Turning off the WIRELESS or WIRELESS LAN switch. ! On models that came with your model supports the Bluetooth functionality and/or the IEEE 802.11a/b/g standard. Select your desired wireless option(s) and click OK. 3 Click Start and Control Panel. 4 Click View network status and tasks under Network and Internet. 5 Click Manage wireless networks. 6 Click Add. 7 Follow the on-screen instructions. * See the online Specifications to see whether your access point for more information. 2 Turn on...

User Guide
Page 68
.... For instructions on how to access the SmartWi Connection Utility Guide, see Non-printed Documentation (page 7). ❑ Other model users Please see the following for setting up Bluetooth functionality. To connect to a Bluetooth device 1 Turn on the WIRELESS switch. 2 Double-click ( / ) on selected models only. See the online Specifications to see the SmartWi Connection Utility Guide for setting up Bluetooth functionality. You can transfer data between your model supports the Bluetooth functionality. n 68 N Using Your VAIO Computer Using the Bluetooth Functionality The...
.... For instructions on how to access the SmartWi Connection Utility Guide, see Non-printed Documentation (page 7). ❑ Other model users Please see the following for setting up Bluetooth functionality. To connect to a Bluetooth device 1 Turn on the WIRELESS switch. 2 Double-click ( / ) on selected models only. See the online Specifications to see the SmartWi Connection Utility Guide for setting up Bluetooth functionality. You can transfer data between your model supports the Bluetooth functionality. n 68 N Using Your VAIO Computer Using the Bluetooth Functionality The...
User Guide
Page 75
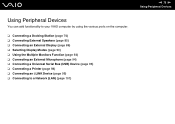
... your VAIO computer by using the various ports on the computer. ❑ Connecting a Docking Station (page 76) ❑ Connecting External Speakers (page 85) ❑ Connecting an External Display (page 86) ❑ Selecting Display Modes (page 90) ❑ Using the Multiple Monitors Function (page 92) ❑ Connecting an External Microphone (page 94) ❑ Connecting a Universal Serial Bus (USB) Device (page 95) ❑ Connecting a Printer (page 98) ❑ Connecting an i.LINK Device (page 99) ❑ Connecting to a Network (LAN...
... your VAIO computer by using the various ports on the computer. ❑ Connecting a Docking Station (page 76) ❑ Connecting External Speakers (page 85) ❑ Connecting an External Display (page 86) ❑ Selecting Display Modes (page 90) ❑ Using the Multiple Monitors Function (page 92) ❑ Connecting an External Microphone (page 94) ❑ Connecting a Universal Serial Bus (USB) Device (page 95) ❑ Connecting a Printer (page 98) ❑ Connecting an i.LINK Device (page 99) ❑ Connecting to a Network (LAN...
User Guide
Page 76
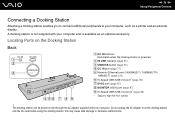
... optional accessory. Locating Ports on the Docking Station Back A DC IN indicator Illuminates when the docking station is available as a printer and an external display. B IN USE indicator (page 81) C UNDOCK button (page 81) D DC IN port (page 77) E Network (Ethernet) port (1000BASE-T / 100BASE-TX / 10BASE-T) (page 101) F Hi-Speed USB (USB 2.0) port* (page 95) G DVI-D port (page 87) H MONITOR (VGA) port (page 87) I Hi-Speed USB (USB 2.0) ports* (page 95) * Supports...
... optional accessory. Locating Ports on the Docking Station Back A DC IN indicator Illuminates when the docking station is available as a printer and an external display. B IN USE indicator (page 81) C UNDOCK button (page 81) D DC IN port (page 77) E Network (Ethernet) port (1000BASE-T / 100BASE-TX / 10BASE-T) (page 101) F Hi-Speed USB (USB 2.0) port* (page 95) G DVI-D port (page 87) H MONITOR (VGA) port (page 87) I Hi-Speed USB (USB 2.0) ports* (page 95) * Supports...
User Guide
Page 105
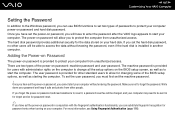
... to change all the setup options on the BIOS setup screen, as well as starting the computer. The hard disk password provides additional security for the data stored on your computer: power-on password and hard disk password. The machine password is provided to protect the computer from unauthorized access. Make sure not to start your computer. The user password is installed in for depot service for password reset. ✍ If you have set the machine password...
... to change all the setup options on the BIOS setup screen, as well as starting the computer. The hard disk password provides additional security for the data stored on your computer: power-on password and hard disk password. The machine password is provided to protect the computer from unauthorized access. Make sure not to start your computer. The user password is installed in for depot service for password reset. ✍ If you have set the machine password...
User Guide
Page 109
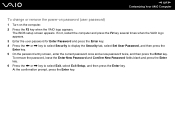
The BIOS setup screen appears. At the confirmation prompt, press the Enter key. To remove the password, leave the Enter New Password and Confirm New Password fields blank and press the Enter key. 6 Press the < or , key to display the Security tab, select Set User Password, and then press the Enter key. 5 On the password entry screen, enter the current password once and a new password twice, and then press the Enter key. If not, restart the computer and press the...
The BIOS setup screen appears. At the confirmation prompt, press the Enter key. To remove the password, leave the Enter New Password and Confirm New Password fields blank and press the Enter key. 6 Press the < or , key to display the Security tab, select Set User Password, and then press the Enter key. 5 On the password entry screen, enter the current password once and a new password twice, and then press the Enter key. If not, restart the computer and press the...

User Guide
Page 148
... maintenance and management. The restore process using the backup files may fail if you must be able to restore any defects arising out of TPM-protected data must have administrator rights on the taskbar and select Manage Security Platform with the Windows logo from other people. You need to set a few passwords while installing Infineon TPM Professional Package. n 148 N Customizing Your VAIO Computer Installing...
... maintenance and management. The restore process using the backup files may fail if you must be able to restore any defects arising out of TPM-protected data must have administrator rights on the taskbar and select Manage Security Platform with the Windows logo from other people. You need to set a few passwords while installing Infineon TPM Professional Package. n 148 N Customizing Your VAIO Computer Installing...
User Guide
Page 160
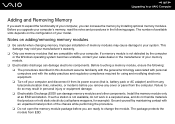
...; Only use memory modules that is, battery pack or AC adapter) and from any cover or panel from the computer. n 160 N Upgrading Your VAIO Computer Adding and Removing Memory If you want to your system. Before touching a memory module, ensure the following pages. Install the memory module only at an ESD workstation. Ground yourself by maintaining contact with an unpainted metal portion of your model. Failure to change the module...
...; Only use memory modules that is, battery pack or AC adapter) and from any cover or panel from the computer. n 160 N Upgrading Your VAIO Computer Adding and Removing Memory If you want to your system. Before touching a memory module, ensure the following pages. Install the memory module only at an ESD workstation. Ground yourself by maintaining contact with an unpainted metal portion of your model. Failure to change the module...
User Guide
Page 187
... patches or updates to turn -off . What should I do if I do if my game software does not work or it . Why does it take some VAIO models, the graphics memory is not guaranteed. The originally selected VAIO's screen saver disables the timer setting, which you have forgotten the BIOS password, contact an authorized Sony Service Center to security checks at computer startup. Change the originally selected VAIO's screen saver...
... patches or updates to turn -off . What should I do if I do if my game software does not work or it . Why does it take some VAIO models, the graphics memory is not guaranteed. The originally selected VAIO's screen saver disables the timer setting, which you have forgotten the BIOS password, contact an authorized Sony Service Center to security checks at computer startup. Change the originally selected VAIO's screen saver...

User Guide
Page 194
... setting, see Using the Power Saving Modes (page 150). n 194 N Troubleshooting Why can't I do if my computer becomes unstable when it enters a power saving mode while the built-in MOTION EYE camera is using the camera, exit the application before using the built-in MOTION EYE camera. ❑ If your computer automatically enters Sleep or Hibernate mode, change the corresponding power saving mode setting. Follow these steps: 1 Click Start, Control Panel, Hardware and Sound, and Device Manager...
... setting, see Using the Power Saving Modes (page 150). n 194 N Troubleshooting Why can't I do if my computer becomes unstable when it enters a power saving mode while the built-in MOTION EYE camera is using the camera, exit the application before using the built-in MOTION EYE camera. ❑ If your computer automatically enters Sleep or Hibernate mode, change the corresponding power saving mode setting. Follow these steps: 1 Click Start, Control Panel, Hardware and Sound, and Device Manager...

User Guide
Page 211
... a power saving mode (Sleep or Hibernate), then restart the computer. ❑ If the bidirectional communication functions are provided with the Windows operating system installed on your computer may need to install the printer driver software before you use your computer. ❑ You may enable printing. This change to cancel the Enable bidirectional support check box. 6 Click OK. Follow these steps: 1 Click Start and Control Panel. 2 Click Printer under Hardware and Sound...
... a power saving mode (Sleep or Hibernate), then restart the computer. ❑ If the bidirectional communication functions are provided with the Windows operating system installed on your computer may need to install the printer driver software before you use your computer. ❑ You may enable printing. This change to cancel the Enable bidirectional support check box. 6 Click OK. Follow these steps: 1 Click Start and Control Panel. 2 Click Printer under Hardware and Sound...

User Guide
Page 215
... the power button until the computer turns off your computer with the power button may have disabled the touch pad without connecting a mouse to your computer does not restart, press the Ctrl+Alt+Delete keys and click the arrow next to restart your computer. ❑ If your computer. Turning off . ! n 215 N Troubleshooting Touch Pad What should I do not work, click Start, the arrow next to the Lock button, and...
... the power button until the computer turns off your computer with the power button may have disabled the touch pad without connecting a mouse to your computer does not restart, press the Ctrl+Alt+Delete keys and click the arrow next to restart your computer. ❑ If your computer. Turning off . ! n 215 N Troubleshooting Touch Pad What should I do not work, click Start, the arrow next to the Lock button, and...

User Guide
Page 218
... these steps: 1 Click Start and Control Panel. 2 Click System and Maintenance. 3 Click System. 4 Click Device Manager on your computer. ❑ See the manual that came with your PC Card, which worked normally before, does not work ? ❑ Make sure the PC Card is compatible with the Microsoft Windows operating system installed on the left pane. You may need to display the properties window. 6 Select the Driver tab and click Update Driver.
... these steps: 1 Click Start and Control Panel. 2 Click System and Maintenance. 3 Click System. 4 Click Device Manager on your computer. ❑ See the manual that came with your PC Card, which worked normally before, does not work ? ❑ Make sure the PC Card is compatible with the Microsoft Windows operating system installed on the left pane. You may need to display the properties window. 6 Select the Driver tab and click Update Driver.


