User Guide
Page 3
... Multiple Monitors Function ...90 Connecting an External Microphone ...92 Connecting a Universal Serial Bus (USB) Device...93 Connecting a Printer ...96 Connecting an i.LINK Device ...97 Connecting to a Network (LAN) ...99 Customizing Your VAIO Computer ...101 Selecting Performance Modes ...102 Setting the Password ...103 Using Fingerprint Authentication ...112 Using Trusted Platform Module (TPM)...120 Setting Up Your Computer with VAIO Central ...127 Using VAIO Status Monitor ...128 Using the Power Saving Modes ...129 Managing Power with VAIO Power Management ...134 Protecting the Hard Disk...
... Multiple Monitors Function ...90 Connecting an External Microphone ...92 Connecting a Universal Serial Bus (USB) Device...93 Connecting a Printer ...96 Connecting an i.LINK Device ...97 Connecting to a Network (LAN) ...99 Customizing Your VAIO Computer ...101 Selecting Performance Modes ...102 Setting the Password ...103 Using Fingerprint Authentication ...112 Using Trusted Platform Module (TPM)...120 Setting Up Your Computer with VAIO Central ...127 Using VAIO Status Monitor ...128 Using the Power Saving Modes ...129 Managing Power with VAIO Power Management ...134 Protecting the Hard Disk...

User Guide
Page 7
... as information on your computer must be connected to the Internet. ❑ Specifications - Non-printed Documentation ❑ User Guide (this manual by clicking their respective URLs beginning with http://, your VAIO computer. n7 N Before Use Documentation Your documentation includes printed information and user guides to read on solving common problems. User Guide is provided in the PDF format, which you can easily browse through and...
... as information on your computer must be connected to the Internet. ❑ Specifications - Non-printed Documentation ❑ User Guide (this manual by clicking their respective URLs beginning with http://, your VAIO computer. n7 N Before Use Documentation Your documentation includes printed information and user guides to read on solving common problems. User Guide is provided in the PDF format, which you can easily browse through and...
User Guide
Page 8
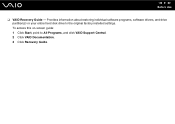
n8 N Before Use ❑ VAIO Recovery Guide - To access this on-screen guide: 1 Click Start, point to the original factory installed settings. Provides information about restoring individual software programs, software drivers, and drive partition(s) or your entire hard disk drive to All Programs, and click VAIO Support Central. 2 Click VAIO Documentation. 3 Click Recovery Guide.
n8 N Before Use ❑ VAIO Recovery Guide - To access this on-screen guide: 1 Click Start, point to the original factory installed settings. Provides information about restoring individual software programs, software drivers, and drive partition(s) or your entire hard disk drive to All Programs, and click VAIO Support Central. 2 Click VAIO Documentation. 3 Click Recovery Guide.
User Guide
Page 29
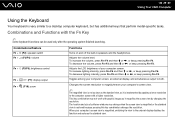
... then M or ,, or keep pressing Fn+F4. To decrease the volume, press Fn+F3 and then m or n 29 N Using Your VAIO Computer Using the Keyboard Your keyboard is very similar to a desktop computer keyboard, but has additional keys that perform model-specific tasks. Adjusts the volume level. Combinations and Functions with the Fn Key ✍ Some keyboard functions can be used only after the operating system finished launching.
... then M or ,, or keep pressing Fn+F4. To decrease the volume, press Fn+F3 and then m or n 29 N Using Your VAIO Computer Using the Keyboard Your keyboard is very similar to a desktop computer keyboard, but has additional keys that perform model-specific tasks. Adjusts the volume level. Combinations and Functions with the Fn Key ✍ Some keyboard functions can be used only after the operating system finished launching.

User Guide
Page 35
Use the table below to see which types of optical disc drive installed on the model you purchased. n 35 N Using Your VAIO Computer Reading and Writing Optical Discs Your computer plays and records CDs, DVDs, and Blu-ray Disc™ media, depending on your optical disc drive supports. Check your specifications for the type of media your model.
Use the table below to see which types of optical disc drive installed on the model you purchased. n 35 N Using Your VAIO Computer Reading and Writing Optical Discs Your computer plays and records CDs, DVDs, and Blu-ray Disc™ media, depending on your optical disc drive supports. Check your specifications for the type of media your model.
User Guide
Page 41
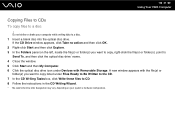
...Using Your VAIO Computer Copying Files to CDs To copy files to copy listed under Devices with Removable Storage. A new window appears with the file(s) or folder(s) you want to a disc ! If the CD Drive window appears, click Take no action and then click OK. 2 Right-click Start and then click Explore. 3 In the Folders panel on the left, locate... disc drive* name. 4 Close the window. 5 Click Start and then My Computer. 6 Click the optical disc drive icon under Files Ready to Be Written to the CD. 7 In the CD Writing Tasks box, click Write these files to CD. 8 Follow the instructions ...
...Using Your VAIO Computer Copying Files to CDs To copy files to copy listed under Devices with Removable Storage. A new window appears with the file(s) or folder(s) you want to a disc ! If the CD Drive window appears, click Take no action and then click OK. 2 Right-click Start and then click Explore. 3 In the Folders panel on the left, locate... disc drive* name. 4 Close the window. 5 Click Start and then My Computer. 6 Click the optical disc drive icon under Files Ready to Be Written to the CD. 7 In the CD Writing Tasks box, click Write these files to CD. 8 Follow the instructions ...
User Guide
Page 55
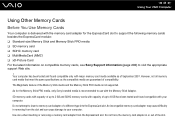
... of the Memory Stick media and the Memory Stick PRO media is delivered with the memory card adapter for the Memory Stick PRO media, only Sony branded media is recommended to your computer. SD memory cards with capacity of up to insert a memory card adapter of September 2007. Do not force the memory card adapter in removing from the ExpressCard slot. n 55 N Using Your VAIO Computer Using Other Memory Cards Before You Use Memory Cards Your computer is not supported. Your computer...
... of the Memory Stick media and the Memory Stick PRO media is delivered with the memory card adapter for the Memory Stick PRO media, only Sony branded media is recommended to your computer. SD memory cards with capacity of up to insert a memory card adapter of September 2007. Do not force the memory card adapter in removing from the ExpressCard slot. n 55 N Using Your VAIO Computer Using Other Memory Cards Before You Use Memory Cards Your computer is not supported. Your computer...

User Guide
Page 63
Select your model supports the Bluetooth functionality, the IEEE 802.11a/b/g standard, and/or the draft form of the IEEE 802.11n standard. button. The Wireless LAN indicator lights up. 2 Double-click ( / ) on -screen instructions. ✍ See the online Specifications to display the Wireless Device Switch window. The Network Connections window appears. 6 Right-click Wireless Network Connection, then click Properties. The Wireless Network Connection Properties window appears. 7 Select the Wireless Networks tab. 8 Click the Add... You cannot select the 5 GHz...
Select your model supports the Bluetooth functionality, the IEEE 802.11a/b/g standard, and/or the draft form of the IEEE 802.11n standard. button. The Wireless LAN indicator lights up. 2 Double-click ( / ) on -screen instructions. ✍ See the online Specifications to display the Wireless Device Switch window. The Network Connections window appears. 6 Right-click Wireless Network Connection, then click Properties. The Wireless Network Connection Properties window appears. 7 Select the Wireless Networks tab. 8 Click the Add... You cannot select the 5 GHz...
User Guide
Page 65
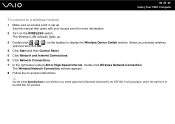
... display the Wireless Device Switch window. The Wireless LAN indicator lights up. 3 Double-click ( / ) on the taskbar to a wireless network 1 Make sure an access point is set up. The Wireless Network Connection window appears. 8 Follow the on the WIRELESS switch. Select your model supports the Bluetooth functionality, the IEEE 802.11a/b/g standard, and/or the draft form of the IEEE 802.11n standard. See the manual that came with your access point for more information. 2 Turn on -screen instructions...
... display the Wireless Device Switch window. The Wireless LAN indicator lights up. 3 Double-click ( / ) on the taskbar to a wireless network 1 Make sure an access point is set up. The Wireless Network Connection window appears. 8 Follow the on the WIRELESS switch. Select your model supports the Bluetooth functionality, the IEEE 802.11a/b/g standard, and/or the draft form of the IEEE 802.11n standard. See the manual that came with your access point for more information. 2 Turn on -screen instructions...

User Guide
Page 74
... your VAIO computer by using the various ports on the computer. ❑ Connecting a Docking Station (page 75) ❑ Connecting External Speakers (page 83) ❑ Connecting an External Display (page 84) ❑ Selecting Display Modes (page 88) ❑ Using the Multiple Monitors Function (page 90) ❑ Connecting an External Microphone (page 92) ❑ Connecting a Universal Serial Bus (USB) Device (page 93) ❑ Connecting a Printer (page 96) ❑ Connecting an i.LINK Device (page 97) ❑ Connecting to a Network (LAN...
... your VAIO computer by using the various ports on the computer. ❑ Connecting a Docking Station (page 75) ❑ Connecting External Speakers (page 83) ❑ Connecting an External Display (page 84) ❑ Selecting Display Modes (page 88) ❑ Using the Multiple Monitors Function (page 90) ❑ Connecting an External Microphone (page 92) ❑ Connecting a Universal Serial Bus (USB) Device (page 93) ❑ Connecting a Printer (page 96) ❑ Connecting an i.LINK Device (page 97) ❑ Connecting to a Network (LAN...
User Guide
Page 75
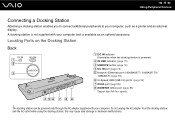
... damage or hardware malfunctions. n 75 N Using Peripheral Devices Connecting a Docking Station Attaching a docking station enables you to connect additional peripherals to your computer, such as an optional accessory. A docking station is not supplied with your computer and is powered. Locating Ports on the Docking Station Back A DC IN indicator Illuminates when the docking station is available as a printer and an external display. The...
... damage or hardware malfunctions. n 75 N Using Peripheral Devices Connecting a Docking Station Attaching a docking station enables you to connect additional peripherals to your computer, such as an optional accessory. A docking station is not supplied with your computer and is powered. Locating Ports on the Docking Station Back A DC IN indicator Illuminates when the docking station is available as a printer and an external display. The...
User Guide
Page 99
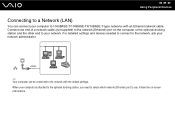
n 99 N Using Peripheral Devices Connecting to a Network (LAN) You can be connected to the network with an Ethernet network cable. Connect one end of a network cable (not supplied) to 1000BASE-T/100BASE-TX/10BASE-T-type networks with the default settings. When your computer to the network (Ethernet) port on -screen instructions. Follow the on the computer or the optional docking station and the other end to use. For detailed settings and devices needed to connect to the network, ask...
n 99 N Using Peripheral Devices Connecting to a Network (LAN) You can be connected to the network with an Ethernet network cable. Connect one end of a network cable (not supplied) to 1000BASE-T/100BASE-TX/10BASE-T-type networks with the default settings. When your computer to the network (Ethernet) port on -screen instructions. Follow the on the computer or the optional docking station and the other end to use. For detailed settings and devices needed to connect to the network, ask...
User Guide
Page 103
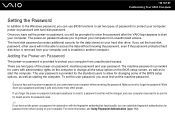
... access. Make sure not to access the data without entering the password. The hard disk password provides additional security for users with the fingerprint authentication functionality, you set the power-on password in conjunction with administrator rights on the computer to change all the setup options in for depot service for changing some of the power-on your hard disk drive. The power-on password allows you can substitute fingerprint authentication for password entry when turning...
... access. Make sure not to access the data without entering the password. The hard disk password provides additional security for users with the fingerprint authentication functionality, you set the power-on password in conjunction with administrator rights on the computer to change all the setup options in for depot service for changing some of the power-on your hard disk drive. The power-on password allows you can substitute fingerprint authentication for password entry when turning...

User Guide
Page 110
... add the Windows password 1 Click Start and then Control Panel. 2 Click the User Accounts icon. 3 Click your user account under or pick an account to change. 4 Click Create a password. 5 In the Type a new password and Type the new password again to forget the password. By setting the Windows password, you select your computer. Write down your password and keep it safe and private from unauthorized access. Make sure not to confirm fields, enter the password for...
... add the Windows password 1 Click Start and then Control Panel. 2 Click the User Accounts icon. 3 Click your user account under or pick an account to change. 4 Click Create a password. 5 In the Type a new password and Type the new password again to forget the password. By setting the Windows password, you select your computer. Write down your password and keep it safe and private from unauthorized access. Make sure not to confirm fields, enter the password for...

User Guide
Page 126
... need to install the package. Then, double-click C:\Infineon\setup.exe to set a few passwords while installing Infineon TPM Professional Package. Be sure to All Programs and Infineon Security Platform Solution, and click Help on -screen documentation for any TPM-protected data or backup files. The maintenance and management of your own risk. Without these passwords, you must be able to restore...
... need to install the package. Then, double-click C:\Infineon\setup.exe to set a few passwords while installing Infineon TPM Professional Package. Be sure to All Programs and Infineon Security Platform Solution, and click Help on -screen documentation for any TPM-protected data or backup files. The maintenance and management of your own risk. Without these passwords, you must be able to restore...
User Guide
Page 138
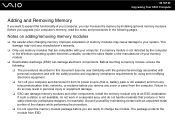
... do not work in personal injury or equipment damage. ❑ ESD can damage electronic components. If such a station is not detected by installing optional memory modules. n 138 N Upgrading Your VAIO Computer Adding and Removing Memory If you want to expand the functionality of your computer, you are compatible with your computer. Notes on adding/removing memory modules ❑ Be careful when changing memory. This damage...
... do not work in personal injury or equipment damage. ❑ ESD can damage electronic components. If such a station is not detected by installing optional memory modules. n 138 N Upgrading Your VAIO Computer Adding and Removing Memory If you want to expand the functionality of your computer, you are compatible with your computer. Notes on adding/removing memory modules ❑ Be careful when changing memory. This damage...
User Guide
Page 164
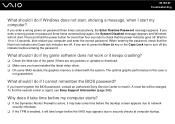
If any patches or updates to download. ❑ Make sure you have installed the latest video driver. ❑ On some time before the desktop screen appears due to network security checkups. ❑ If the TPM is enabled, it will be charged. If you enter a wrong power-on password three times consecutively again, the System Disabled message appears and Windows will not start my computer? A reset fee will take...
If any patches or updates to download. ❑ Make sure you have installed the latest video driver. ❑ On some time before the desktop screen appears due to network security checkups. ❑ If the TPM is enabled, it will be charged. If you enter a wrong power-on password three times consecutively again, the System Disabled message appears and Windows will not start my computer? A reset fee will take...
User Guide
Page 185
... is using battery power, make sure the battery pack is installed properly and is charged. Stop video playback, change the display output. Why doesn't my screen display a video? ❑ If the external display is selected for more information. See Selecting Display Modes (page 88). n 185 N Troubleshooting Display Why did my screen go blank? ❑ Your computer screen may be insufficient for more information. ❑ If the display mode is set to brighten your computer screen.
... is using battery power, make sure the battery pack is installed properly and is charged. Stop video playback, change the display output. Why doesn't my screen display a video? ❑ If the external display is selected for more information. See Selecting Display Modes (page 88). n 185 N Troubleshooting Display Why did my screen go blank? ❑ Your computer screen may be insufficient for more information. ❑ If the display mode is set to brighten your computer screen.

User Guide
Page 187
... the bidirectional communication functions are provided with the Windows operating system installed on your computer may need to install the printer driver software before you use your printer. Follow these steps: 1 Click Start and then Control Panel. 2 Click Printers and Other Hardware. 3 Click Printers and Faxes. 4 Right-click the printer icon and select Properties. 5 Click the Ports tab. 6 Click to the settings disables the bidirectional communication...
... the bidirectional communication functions are provided with the Windows operating system installed on your computer may need to install the printer driver software before you use your printer. Follow these steps: 1 Click Start and then Control Panel. 2 Click Printers and Other Hardware. 3 Click Printers and Faxes. 4 Right-click the printer icon and select Properties. 5 Click the Ports tab. 6 Click to the settings disables the bidirectional communication...

User Guide
Page 198
... device. ❑ See the manual that came with your USB device for more information. The driver could be installed to the AC outlet. ❑ Try using another USB port on and using a digital camera, check if the battery is charged. For example, if you are using a printer, check if the power cable is connected properly to the specific port you used the first time you are using its own power supply. n 198 N Troubleshooting...
... device. ❑ See the manual that came with your USB device for more information. The driver could be installed to the AC outlet. ❑ Try using another USB port on and using a digital camera, check if the battery is charged. For example, if you are using a printer, check if the power cable is connected properly to the specific port you used the first time you are using its own power supply. n 198 N Troubleshooting...


