
User Guide
Page 4
n4 N Precautions ...145 On Handling the LCD Screen ...146 On Using the Power Source ...147 On Handling Your Computer...148 On Handling Floppy Disks ...150 On Handling Discs ...151 On Using the Battery Pack...152 On Using Headphones...154 On Handling Memory Stick Media...155 On Handling the Hard Disk ...156 On Handling the Memory Card Adapter...157 Troubleshooting ...158 Computer ...160 System Security ...167 Battery...169 Internet ...171 Networking ...173 Bluetooth Technology ...176 Optical Discs ...181 Display ...185 Printing ...187 Microphone ...188 Mouse ...189 Speakers ...190
n4 N Precautions ...145 On Handling the LCD Screen ...146 On Using the Power Source ...147 On Handling Your Computer...148 On Handling Floppy Disks ...150 On Handling Discs ...151 On Using the Battery Pack...152 On Using Headphones...154 On Handling Memory Stick Media...155 On Handling the Hard Disk ...156 On Handling the Memory Card Adapter...157 Troubleshooting ...158 Computer ...160 System Security ...167 Battery...169 Internet ...171 Networking ...173 Bluetooth Technology ...176 Optical Discs ...181 Display ...185 Printing ...187 Microphone ...188 Mouse ...189 Speakers ...190
User Guide
Page 6
External views illustrated in audio, video, computing, and communications to the on your computer. n6 N Before Use Before Use Congratulations on -screen User Guide. Sony has combined leading-edge technology in this Sony VAIO® computer, and welcome to provide state-of this manual may look slightly different from those of your purchase of -the-art personal computing experience. !
External views illustrated in audio, video, computing, and communications to the on your computer. n6 N Before Use Before Use Congratulations on -screen User Guide. Sony has combined leading-edge technology in this Sony VAIO® computer, and welcome to provide state-of this manual may look slightly different from those of your purchase of -the-art personal computing experience. !
User Guide
Page 8
Provides information about restoring individual software programs, software drivers, and drive partition(s) or your entire hard disk drive to All Programs, and click VAIO Support Central. 2 Click VAIO Documentation. 3 Click Recovery Guide. To access this on-screen guide: 1 Click Start, point to the original factory installed settings. n8 N Before Use ❑ VAIO Recovery Guide -
Provides information about restoring individual software programs, software drivers, and drive partition(s) or your entire hard disk drive to All Programs, and click VAIO Support Central. 2 Click VAIO Documentation. 3 Click Recovery Guide. To access this on-screen guide: 1 Click Start, point to the original factory installed settings. n8 N Before Use ❑ VAIO Recovery Guide -
User Guide
Page 10
... tilt of the computer's display - Use the display's tilting feature to your comfort and work efficiency. ❑ Positioning an external display - Make sure the display screen is at a comfortable viewing distance. n 10 N Before Use ❑ Viewing angle of the display to the proper position. When using an external display, set the...
... tilt of the computer's display - Use the display's tilting feature to your comfort and work efficiency. ❑ Positioning an external display - Make sure the display screen is at a comfortable viewing distance. n 10 N Before Use ❑ Viewing angle of the display to the proper position. When using an external display, set the...
User Guide
Page 12
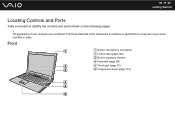
Front A Built-in microphone (monaural) B LCD screen (page 146) C Built-in some countries or areas. n 12 N Getting Started Locating Controls and Ports Take a moment to variations in specifications. It may be different from those illustrated in this manual due to identify the controls and ports shown on the following pages. ! The appearance of your computer may also vary in speakers (stereo) D Keyboard (page 29) E Touch pad (page 31) F Fingerprint sensor (page 112)
Front A Built-in microphone (monaural) B LCD screen (page 146) C Built-in some countries or areas. n 12 N Getting Started Locating Controls and Ports Take a moment to variations in specifications. It may be different from those illustrated in this manual due to identify the controls and ports shown on the following pages. ! The appearance of your computer may also vary in speakers (stereo) D Keyboard (page 29) E Touch pad (page 31) F Fingerprint sensor (page 112)

User Guide
Page 21
Installing the Battery Pack To install the battery pack 1 Turn off the computer and close the LCD screen lid. 2 Slide the battery lock switch (1) inward. 3 Slide the battery pack into the battery compartment until it clicks into place. n 21 N Getting Started Using the Battery Pack The battery pack supplied with your computer is not fully charged at the time of delivery.
Installing the Battery Pack To install the battery pack 1 Turn off the computer and close the LCD screen lid. 2 Slide the battery lock switch (1) inward. 3 Slide the battery pack into the battery compartment until it clicks into place. n 21 N Getting Started Using the Battery Pack The battery pack supplied with your computer is not fully charged at the time of delivery.
User Guide
Page 26
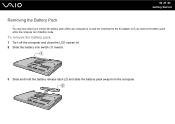
n 26 N Getting Started Removing the Battery Pack ! You may lose data if you remove the battery pack while your computer is on and not connected to the AC adapter or if you remove the battery pack while the computer is in Standby mode. To remove the battery pack 1 Turn off the computer and close the LCD screen lid. 2 Slide the battery lock switch (1) inward. 3 Slide and hold the battery release latch (2) and slide the battery pack away from the computer.
n 26 N Getting Started Removing the Battery Pack ! You may lose data if you remove the battery pack while your computer is on and not connected to the AC adapter or if you remove the battery pack while the computer is in Standby mode. To remove the battery pack 1 Turn off the computer and close the LCD screen lid. 2 Slide the battery lock switch (1) inward. 3 Slide and hold the battery release latch (2) and slide the battery pack away from the computer.
User Guide
Page 29
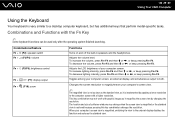
n 29 N Using Your VAIO Computer Using the Keyboard Your keyboard is very similar to a desktop computer keyboard, but has additional keys that perform model-specific tasks. Combinations/Feature Fn + % (...
n 29 N Using Your VAIO Computer Using the Keyboard Your keyboard is very similar to a desktop computer keyboard, but has additional keys that perform model-specific tasks. Combinations/Feature Fn + % (...
User Guide
Page 31
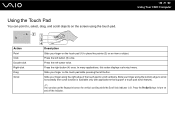
Slide your finger on the touch pad (1) to turn on the screen using the touch pad. Slide your finger on an item or object. In many applications, this action displays a shortcut menu. Press the left button (3) once. .... Slide your finger along the right edge of the touch pad to , select, drag, and scroll objects on and off the indicator. n 31 N Using Your VAIO Computer Action Point Click Double-click Right-click Drag Scroll Description Slide your finger along the bottom edge to scroll horizontally (the scroll function is...
Slide your finger on the touch pad (1) to turn on the screen using the touch pad. Slide your finger on an item or object. In many applications, this action displays a shortcut menu. Press the left button (3) once. .... Slide your finger along the right edge of the touch pad to , select, drag, and scroll objects on and off the indicator. n 31 N Using Your VAIO Computer Action Point Click Double-click Right-click Drag Scroll Description Slide your finger along the bottom edge to scroll horizontally (the scroll function is...

User Guide
Page 32
..., press and hold either button or launch and navigate through VAIO Central. Special-function button S1/S2 buttons Functions By default, the S1 button turns the volume on and off and the S2 button toggles among your computer screen, an external display, and simultaneous output to help file on... VAIO Central for changing the S button assignments. In such a case, you use specific functions of the computer. See...
..., press and hold either button or launch and navigate through VAIO Central. Special-function button S1/S2 buttons Functions By default, the S1 button turns the volume on and off and the S2 button toggles among your computer screen, an external display, and simultaneous output to help file on... VAIO Central for changing the S button assignments. In such a case, you use specific functions of the computer. See...
User Guide
Page 38
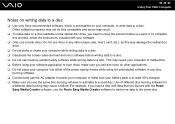
... data burning may damage the optical disc drive. ❑ Do not strike or shake your computer while writing data to a disc. ❑ Deactivate the screen saver and exit anti-virus software before you use the same disc burning software to add data to a used disc. n 38 N Using Your... VAIO Computer Notes on writing data to a disc ❑ Use only Sony recommended software, which is at least 50% charged. ❑ Make sure you eject it. Use of the power saving modes...
... data burning may damage the optical disc drive. ❑ Do not strike or shake your computer while writing data to a disc. ❑ Deactivate the screen saver and exit anti-virus software before you use the same disc burning software to add data to a used disc. n 38 N Using Your... VAIO Computer Notes on writing data to a disc ❑ Use only Sony recommended software, which is at least 50% charged. ❑ Make sure you eject it. Use of the power saving modes...
User Guide
Page 59
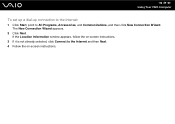
n 59 N Using Your VAIO Computer To set up a dial-up connection to the Internet 1 Click Start, point to the Internet and then Next. 4 Follow the on -screen instructions. 3 If it is not already selected, click Connect to All Programs, Accessories, and Communications, and then click New Connection Wizard. The New Connection Wizard appears. 2 Click Next. If the Location Information window appears, follow the on -screen instructions.
n 59 N Using Your VAIO Computer To set up a dial-up connection to the Internet 1 Click Start, point to the Internet and then Next. 4 Follow the on -screen instructions. 3 If it is not already selected, click Connect to All Programs, Accessories, and Communications, and then click New Connection Wizard. The New Connection Wizard appears. 2 Click Next. If the Location Information window appears, follow the on -screen instructions.

User Guide
Page 63
... the draft form of the IEEE 802.11n standard. You cannot select the 5 GHz bandwidth, which is not available on ad-hoc networks. 1 Turn on -screen instructions. ✍ See the online Specifications to display the Wireless Device Switch window. The Network Connections window appears. 6 Right-click Wireless Network Connection, then click... whether your desired wireless option(s) and click OK. 3 Click Start and then Control Panel. 4 Click Network and Internet Connections. 5 Click Network Connections. n 63 N Using Your VAIO Computer To communicate without an access point (ad-hoc) !
... the draft form of the IEEE 802.11n standard. You cannot select the 5 GHz bandwidth, which is not available on ad-hoc networks. 1 Turn on -screen instructions. ✍ See the online Specifications to display the Wireless Device Switch window. The Network Connections window appears. 6 Right-click Wireless Network Connection, then click... whether your desired wireless option(s) and click OK. 3 Click Start and then Control Panel. 4 Click Network and Internet Connections. 5 Click Network Connections. n 63 N Using Your VAIO Computer To communicate without an access point (ad-hoc) !
User Guide
Page 65
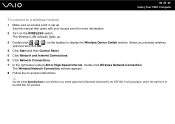
The Wireless Network Connection window appears. 8 Follow the on-screen instructions. ✍ See the online Specifications to display the Wireless Device Switch window. Select your model supports the Bluetooth functionality, the IEEE 802.11a/b/g standard, ... Wireless LAN indicator lights up . See the manual that came with your access point for more information. 2 Turn on the WIRELESS switch. n 65 N Using Your VAIO Computer To connect to a wireless network 1 Make sure an access point is set up . 3 Double-click ( / ) on the taskbar to see whether your desired wireless...
The Wireless Network Connection window appears. 8 Follow the on-screen instructions. ✍ See the online Specifications to display the Wireless Device Switch window. Select your model supports the Bluetooth functionality, the IEEE 802.11a/b/g standard, ... Wireless LAN indicator lights up . See the manual that came with your access point for more information. 2 Turn on the WIRELESS switch. n 65 N Using Your VAIO Computer To connect to a wireless network 1 Make sure an access point is set up . 3 Double-click ( / ) on the taskbar to see whether your desired wireless...

User Guide
Page 84
For example, you can use an external display to your computer. On the Windows operating system, you can also use the computer with a computer display or a projector. ✍ Connect the power cord after connecting all other cables. n 84 N Using Peripheral Devices Connecting an External Display You can connect an external display (not supplied) to set up multiple monitors. Connected external displays are used as secondary screens.
For example, you can use an external display to your computer. On the Windows operating system, you can also use the computer with a computer display or a projector. ✍ Connect the power cord after connecting all other cables. n 84 N Using Peripheral Devices Connecting an External Display You can connect an external display (not supplied) to set up multiple monitors. Connected external displays are used as secondary screens.
User Guide
Page 88
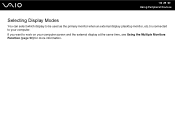
If you want to your computer screen and the external display at the same time, see Using the Multiple Monitors Function (page 90) for more information. n 88 N Using Peripheral Devices Selecting Display Modes You can select which display to be used as the primary monitor when an external display (desktop monitor, etc.) is connected to work on your computer.
If you want to your computer screen and the external display at the same time, see Using the Multiple Monitors Function (page 90) for more information. n 88 N Using Peripheral Devices Selecting Display Modes You can select which display to be used as the primary monitor when an external display (desktop monitor, etc.) is connected to work on your computer.
User Guide
Page 89
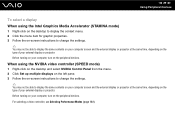
...menu. 2 Click Set up multiple displays on the left pane. 3 Follow the on-screen instructions to change the settings. ✍ You may not be able to display the same contents on your computer... screen and the external display or projector at the same time, depending on the peripheral devices. Before... the context menu. 2 Click the menu item for graphic properties. 3 Follow the on-screen instructions to change the settings. ✍ You may not be able to display the same contents on your computer...
...menu. 2 Click Set up multiple displays on the left pane. 3 Follow the on-screen instructions to change the settings. ✍ You may not be able to display the same contents on your computer... screen and the external display or projector at the same time, depending on the peripheral devices. Before... the context menu. 2 Click the menu item for graphic properties. 3 Follow the on-screen instructions to change the settings. ✍ You may not be able to display the same contents on your computer...
User Guide
Page 90
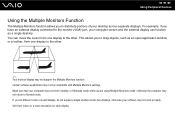
... on each display. Set fewer colors or a lower resolution for each display, do not expand a single window across separate displays. Make sure that your computer screen and the external display can move the cursor from one display to the other . ✍ Your external display may not be compatible with Multiple Monitors...
... on each display. Set fewer colors or a lower resolution for each display, do not expand a single window across separate displays. Make sure that your computer screen and the external display can move the cursor from one display to the other . ✍ Your external display may not be compatible with Multiple Monitors...

User Guide
Page 91
... NVIDIA Control Panel from the menu. 2 Click Set up multiple displays on the left pane. 3 Follow the on-screen instructions to activate the Multiple Monitors mode with the corresponding S button. For details on -screen instructions to display the window for each display and customize the Multiple Monitors mode. To change the S button...
... NVIDIA Control Panel from the menu. 2 Click Set up multiple displays on the left pane. 3 Follow the on-screen instructions to activate the Multiple Monitors mode with the corresponding S button. For details on -screen instructions to display the window for each display and customize the Multiple Monitors mode. To change the S button...
User Guide
Page 99
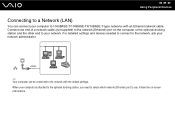
... network administrator. ✍ Your computer can connect your computer to use. Connect one end of a network cable (not supplied) to the network (Ethernet) port on -screen instructions.
... network administrator. ✍ Your computer can connect your computer to use. Connect one end of a network cable (not supplied) to the network (Ethernet) port on -screen instructions.

