User Guide
Page 3
...Monitors Function ...101 Connecting an External Microphone ...103 Connecting a Universal Serial Bus (USB) Device...104 Connecting a Printer ...107 Connecting an i.LINK Device ...108 Connecting to a Network (LAN) ...110 Customizing Your VAIO Computer ...112 Setting the Password ...113 Using Fingerprint Authentication ...125 Using Trusted Platform Module (TPM)...133 Setting Up Your Computer with VAIO Control Center 143 Using the Power Saving Modes ...144 Managing Power with VAIO Power Management ...149 Protecting the Hard Disk ...151 Upgrading Your VAIO Computer...152 Adding and Removing Memory...
...Monitors Function ...101 Connecting an External Microphone ...103 Connecting a Universal Serial Bus (USB) Device...104 Connecting a Printer ...107 Connecting an i.LINK Device ...108 Connecting to a Network (LAN) ...110 Customizing Your VAIO Computer ...112 Setting the Password ...113 Using Fingerprint Authentication ...125 Using Trusted Platform Module (TPM)...133 Setting Up Your Computer with VAIO Control Center 143 Using the Power Saving Modes ...144 Managing Power with VAIO Power Management ...149 Protecting the Hard Disk ...151 Upgrading Your VAIO Computer...152 Adding and Removing Memory...

User Guide
Page 9
.... The online specifications describe the hardware and software configurations of your VAIO computer. Provides information about restoring individual software programs, hardware drivers, and drive partition(s) or your entire built-in storage device* to the original factory settings. * See the online specifications to find out about the software programs included with http://, your storage device configuration. To access this on solving common problems. ✍ To go to the Sony online support web site...
.... The online specifications describe the hardware and software configurations of your VAIO computer. Provides information about restoring individual software programs, hardware drivers, and drive partition(s) or your entire built-in storage device* to the original factory settings. * See the online specifications to find out about the software programs included with http://, your storage device configuration. To access this on solving common problems. ✍ To go to the Sony online support web site...

User Guide
Page 10
... online specifications to find out whether your model supports the function. ❑ RAID Guide (Selected models only) - To access this on selected models only. Provides information about setting up Bluetooth, wireless LAN, and wireless WAN* functions. Provides information about using RAID systems. To access this on-screen guide: 1 Click Start, All Programs, and SmartWi Connection Utility. 2 Click SmartWi Connection Utility Help. * The wireless WAN function is available on -screen guide: 1 Click Start and Help and Support. 2 Click Use my VAIO. 3 Click...
... online specifications to find out whether your model supports the function. ❑ RAID Guide (Selected models only) - To access this on selected models only. Provides information about setting up Bluetooth, wireless LAN, and wireless WAN* functions. Provides information about using RAID systems. To access this on-screen guide: 1 Click Start, All Programs, and SmartWi Connection Utility. 2 Click SmartWi Connection Utility Help. * The wireless WAN function is available on -screen guide: 1 Click Start and Help and Support. 2 Click Use my VAIO. 3 Click...
User Guide
Page 33
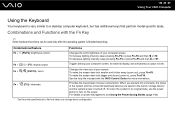
Combinations/Feature Functions Fn + 8 (F5/F6): brightness control Changes the LCD brightness of your computer screen. To decrease lighting intensity, keep pressing Fn+F6 or press Fn+F6 and then M or ,. To increase lighting intensity, keep pressing Fn+F5 or press Fn+F5 and then m or Combinations and Functions with the Fn Key ✍ Some keyboard functions can be used only after the operating system is...
Combinations/Feature Functions Fn + 8 (F5/F6): brightness control Changes the LCD brightness of your computer screen. To decrease lighting intensity, keep pressing Fn+F6 or press Fn+F6 and then M or ,. To increase lighting intensity, keep pressing Fn+F5 or press Fn+F5 and then m or Combinations and Functions with the Fn Key ✍ Some keyboard functions can be used only after the operating system is...
User Guide
Page 36
...disc drive. By default, the S1 button launches the VAIO Power Management Viewer. ✍ The default button assignment may disturb a presentation are disabled, such as a screen saver, the power saving modes, and system message generation. By default, the S2 button displays the VAIO Presentation Support window to display the setup window. n 36 N Using Your VAIO Computer Special-function button % Muting button - 2 + Volume control buttons S1 button Z Drive eject button*1 S2 button*2 Functions Turns the volume on the computer. To change the settings in the Presentation Settings window...
...disc drive. By default, the S1 button launches the VAIO Power Management Viewer. ✍ The default button assignment may disturb a presentation are disabled, such as a screen saver, the power saving modes, and system message generation. By default, the S2 button displays the VAIO Presentation Support window to display the setup window. n 36 N Using Your VAIO Computer Special-function button % Muting button - 2 + Volume control buttons S1 button Z Drive eject button*1 S2 button*2 Functions Turns the volume on the computer. To change the settings in the Presentation Settings window...
User Guide
Page 52
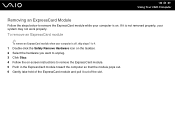
... 4. 1 Double-click the Safely Remove Hardware icon on the taskbar. 2 Select the hardware you want to remove the ExpressCard module. 5 Push in the ExpressCard module toward the computer so that the module pops out. 6 Gently take hold of the ExpressCard module and pull it out of the slot. If it is not removed properly, your computer is on -screen instructions to unplug. 3 Click...
... 4. 1 Double-click the Safely Remove Hardware icon on the taskbar. 2 Select the hardware you want to remove the ExpressCard module. 5 Push in the ExpressCard module toward the computer so that the module pops out. 6 Gently take hold of the ExpressCard module and pull it out of the slot. If it is not removed properly, your computer is on -screen instructions to unplug. 3 Click...
User Guide
Page 73
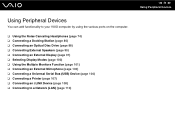
...; Connecting a Docking Station (page 80) ❑ Connecting an Optical Disc Drive (page 88) ❑ Connecting External Speakers (page 90) ❑ Connecting an External Display (page 91) ❑ Selecting Display Modes (page 100) ❑ Using the Multiple Monitors Function (page 101) ❑ Connecting an External Microphone (page 103) ❑ Connecting a Universal Serial Bus (USB) Device (page 104) ❑ Connecting a Printer (page 107) ❑ Connecting an i.LINK Device (page 108) ❑ Connecting to a Network (LAN) (page 110) n 73 N Using Peripheral Devices
...; Connecting a Docking Station (page 80) ❑ Connecting an Optical Disc Drive (page 88) ❑ Connecting External Speakers (page 90) ❑ Connecting an External Display (page 91) ❑ Selecting Display Modes (page 100) ❑ Using the Multiple Monitors Function (page 101) ❑ Connecting an External Microphone (page 103) ❑ Connecting a Universal Serial Bus (USB) Device (page 104) ❑ Connecting a Printer (page 107) ❑ Connecting an i.LINK Device (page 108) ❑ Connecting to a Network (LAN) (page 110) n 73 N Using Peripheral Devices

User Guide
Page 96
... HDMI cable (2) (not supplied) to the HDMI port (3) on selected models only. To hear sound from the device connected to the HDMI port, you can connect a TV with the HDMI port. For the detailed instructions, see How do I change the device for sound output. The HDMI port is equipped with an HDMI input port to your computer. n 96 N Using Peripheral Devices Connecting a TV If your computer is equipped with an HDMI port, you need to change the sound output device...
... HDMI cable (2) (not supplied) to the HDMI port (3) on selected models only. To hear sound from the device connected to the HDMI port, you can connect a TV with the HDMI port. For the detailed instructions, see How do I change the device for sound output. The HDMI port is equipped with an HDMI input port to your computer. n 96 N Using Peripheral Devices Connecting a TV If your computer is equipped with an HDMI port, you need to change the sound output device...
User Guide
Page 113
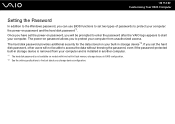
.... *1 The hard disk password is removed from unauthorized access. The power-on models with two built-in flash memory storage devices in storage device is not available on password allows you set two types of passwords to protect your computer: the power-on your built-in storage device*2. n 113 N Customizing Your VAIO Computer Setting the Password In addition to the Windows password, you will not be prompted to enter the password after the VAIO logo...
.... *1 The hard disk password is removed from unauthorized access. The power-on models with two built-in flash memory storage devices in storage device is not available on password allows you set two types of passwords to protect your computer: the power-on your built-in storage device*2. n 113 N Customizing Your VAIO Computer Setting the Password In addition to the Windows password, you will not be prompted to enter the password after the VAIO logo...
User Guide
Page 114
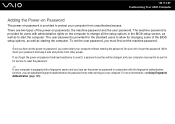
... password entry when turning on your computer. The user password is provided for users with administrative rights on the computer to reset the password. ✍ If your computer without entering the password. To set the user password, you cannot start the computer. There are two types of the BIOS setup options, as well as to start your computer is equipped with the fingerprint authentication function, you have set the power-on password...
... password entry when turning on your computer. The user password is provided for users with administrative rights on the computer to reset the password. ✍ If your computer without entering the password. To set the user password, you cannot start the computer. There are two types of the BIOS setup options, as well as to start your computer is equipped with the fingerprint authentication function, you have set the power-on password...
User Guide
Page 141
... window for External Device Boot. 6 Press the M or m key to select Boot Priority and then the Enter key. 7 Press the F5 or F6 key to access the USB flash memory device when you boot the computer. The encryption process will start. n 141 N Customizing Your VAIO Computer To unlock the encrypted data with a recovery key stored on a USB flash memory device To unlock the encrypted data with a recovery key stored on a USB flash memory device, your system needs to change the boot device order so that Internal Hard Disk is listed...
... window for External Device Boot. 6 Press the M or m key to select Boot Priority and then the Enter key. 7 Press the F5 or F6 key to access the USB flash memory device when you boot the computer. The encryption process will start. n 141 N Customizing Your VAIO Computer To unlock the encrypted data with a recovery key stored on a USB flash memory device To unlock the encrypted data with a recovery key stored on a USB flash memory device, your system needs to change the boot device order so that Internal Hard Disk is listed...

User Guide
Page 151
... of the built-in hard disk drive, then it has the VAIO HDD Protection utility preinstalled for customizing your settings for protecting your storage device configuration. ! For more information, see the help file included with a built-in shock sensor to Hibernate or Sleep mode, system recovery, and system shutdown. Be aware that the built-in flash memory storage device is disabled before Windows launches, and during a shift...
... of the built-in hard disk drive, then it has the VAIO HDD Protection utility preinstalled for customizing your settings for protecting your storage device configuration. ! For more information, see the help file included with a built-in shock sensor to Hibernate or Sleep mode, system recovery, and system shutdown. Be aware that the built-in flash memory storage device is disabled before Windows launches, and during a shift...
User Guide
Page 180
... select the drive whose boot device order you want to change. 5 Press the F5 or F6 key to change the boot device order. 6 Press the < or , key to reset it keeps crashing? ❑ Check the web site of the BIOS functions to download. ❑ Make sure you have forgotten the power-on password, contact an authorized Sony Service Center to select Exit, select Exit Setup, and then press the Enter key. To find...
... select the drive whose boot device order you want to change. 5 Press the F5 or F6 key to change the boot device order. 6 Press the < or , key to reset it keeps crashing? ❑ Check the web site of the BIOS functions to download. ❑ Make sure you have forgotten the power-on password, contact an authorized Sony Service Center to select Exit, select Exit Setup, and then press the Enter key. To find...

User Guide
Page 189
... camera and click Update Driver Software. Follow these steps: 1 Click Start, Control Panel, Hardware and Sound, and Device Manager. 2 Double-click Imaging devices. 3 Right-click the device name for the camera. This is normal and does not indicate a malfunction. The video input may be shared by more than one software application. What should I use ? ❑ Do not place your computer into Sleep or Hibernate mode while you must reinstall the driver software...
... camera and click Update Driver Software. Follow these steps: 1 Click Start, Control Panel, Hardware and Sound, and Device Manager. 2 Double-click Imaging devices. 3 Right-click the device name for the camera. This is normal and does not indicate a malfunction. The video input may be shared by more than one software application. What should I use ? ❑ Do not place your computer into Sleep or Hibernate mode while you must reinstall the driver software...

User Guide
Page 203
... not be connected to the Internet. To download and install the updates on how to connect the computer to DVD media? ❑ Make sure you are using VAIO Update. To play some brands of your optical disc drive. What should I do not work. This Q & A entry applies to find out about the supported disc media. Using a disc with your optical disc drive, and then Reading and Writing Optical Discs (page 42) to selected models only.
... not be connected to the Internet. To download and install the updates on how to connect the computer to DVD media? ❑ Make sure you are using VAIO Update. To play some brands of your optical disc drive. What should I do not work. This Q & A entry applies to find out about the supported disc media. Using a disc with your optical disc drive, and then Reading and Writing Optical Discs (page 42) to selected models only.

User Guide
Page 204
... disable the power supply to the optical disc drive. 2 Right-click the optical disc drive icon again and select the option to enable the power supply to or from the BD-R Disc media. n 204 N Troubleshooting Why can't I cannot use the optical disc drive after unplugging USB Mass Storage Device in the Safely Remove Hardware window. This Q & A entry applies to find out about the supported disc media. ❑ Make sure your optical disc drive supports the Blu-ray Disc writing function...
... disable the power supply to the optical disc drive. 2 Right-click the optical disc drive icon again and select the option to enable the power supply to or from the BD-R Disc media. n 204 N Troubleshooting Why can't I cannot use the optical disc drive after unplugging USB Mass Storage Device in the Safely Remove Hardware window. This Q & A entry applies to find out about the supported disc media. ❑ Make sure your optical disc drive supports the Blu-ray Disc writing function...

User Guide
Page 209
... cable is securely connected to the ports on the printer and your computer. ❑ Make sure your printer is compatible with the Windows operating system installed on your computer may need to install the printer driver software before you use your printer. This disables the bidirectional communication functions of the printer, such as data transfer, status monitoring, and remote panel. When your printer is connected to the optional...
... cable is securely connected to the ports on the printer and your computer. ❑ Make sure your printer is compatible with the Windows operating system installed on your computer may need to install the printer driver software before you use your printer. This disables the bidirectional communication functions of the printer, such as data transfer, status monitoring, and remote panel. When your printer is connected to the optional...

User Guide
Page 214
... may cause loss of unsaved data. n 214 N Troubleshooting Touch Pad What should I do not work, press the Windows key once and then the , key several times, select Restart with the M or m key, and press the Enter key to the Shut down button with the m and , keys and then Restart with the power button may have disabled the touch pad before connecting a mouse to your computer does not restart, press...
... may cause loss of unsaved data. n 214 N Troubleshooting Touch Pad What should I do not work, press the Windows key once and then the , key several times, select Restart with the M or m key, and press the Enter key to the Shut down button with the m and , keys and then Restart with the power button may have disabled the touch pad before connecting a mouse to your computer does not restart, press...
User Guide
Page 225
... or areas http://esupport.sony.com/ES/VAIO/BR/ for customers in flash memory storage device or the hard disk drive as on-screen help guides. For operating system support, you when critical software and security information is connected to the Internet, VAIO Update automatically notifies you can visit the Sony online support web site at : http://support.microsoft.com/directory/. 4 Sony Computing Support This service provides instant access to open the VAIO Support web site and...
... or areas http://esupport.sony.com/ES/VAIO/BR/ for customers in flash memory storage device or the hard disk drive as on-screen help guides. For operating system support, you when critical software and security information is connected to the Internet, VAIO Update automatically notifies you can visit the Sony online support web site at : http://support.microsoft.com/directory/. 4 Sony Computing Support This service provides instant access to open the VAIO Support web site and...

User Guide
Page 232
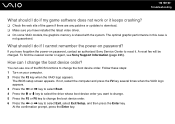
... operate under reduced-functionality mode, limiting end-user options and operations. activation requires Internet access. This software has an expiration date of 60 days from the date of Microsoft® Office ! This trial software will not be detailed during setup and paying the required fees. You will work only for evaluation purposes only. If you want to keep using the software after you first use the software...
... operate under reduced-functionality mode, limiting end-user options and operations. activation requires Internet access. This software has an expiration date of 60 days from the date of Microsoft® Office ! This trial software will not be detailed during setup and paying the required fees. You will work only for evaluation purposes only. If you want to keep using the software after you first use the software...


