
User Guide
Page 3
...76 Connecting External Speakers ...84 Connecting an External Display ...85 Selecting Display Modes...91 Using the Multiple Monitors Function ...92 Connecting an External Microphone ...94 Connecting a Universal Serial Bus (USB) Device...95 Connecting a Printer ...98 Connecting an i.LINK Device ...100 Connecting to a Network (LAN) ...102 Customizing Your VAIO Computer ...104 Setting the Password ...105 Setting Up Your Computer with VAIO Central ...107 Using the Power Saving Modes ...108 Managing Power with VAIO Power Management ...113 Upgrading Your VAIO Computer...116 Adding and Removing Memory...
...76 Connecting External Speakers ...84 Connecting an External Display ...85 Selecting Display Modes...91 Using the Multiple Monitors Function ...92 Connecting an External Microphone ...94 Connecting a Universal Serial Bus (USB) Device...95 Connecting a Printer ...98 Connecting an i.LINK Device ...100 Connecting to a Network (LAN) ...102 Customizing Your VAIO Computer ...104 Setting the Password ...105 Setting Up Your Computer with VAIO Central ...107 Using the Power Saving Modes ...108 Managing Power with VAIO Power Management ...113 Upgrading Your VAIO Computer...116 Adding and Removing Memory...

User Guide
Page 7
... restoring individual software programs, software drivers, and drive partition(s) or your VAIO computer. To access this online guide: 1 Click Start, point to the original factory installed settings. To view the online Specifications: 1 Connect to the Internet. 2 Go to All Programs, and click VAIO Support Central. 2 Click VAIO Documentation. 3 Click VAIO Recovery Guide. ❑ VAIO SmartWi Connection Utility Guide (VGN-TX700 Series models only) - To access this manual) - Contains features of your entire hard disk drive to All Programs, and click VAIO Support Central. 2 Click VAIO...
... restoring individual software programs, software drivers, and drive partition(s) or your VAIO computer. To access this online guide: 1 Click Start, point to the original factory installed settings. To view the online Specifications: 1 Connect to the Internet. 2 Go to All Programs, and click VAIO Support Central. 2 Click VAIO Documentation. 3 Click VAIO Recovery Guide. ❑ VAIO SmartWi Connection Utility Guide (VGN-TX700 Series models only) - To access this manual) - Contains features of your entire hard disk drive to All Programs, and click VAIO Support Central. 2 Click VAIO...
User Guide
Page 24
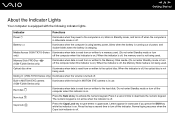
... Lk key to deactivate the numeric keypad. n 24 N Getting Started About the Indicator Lights Your computer is charging. Battery e Illuminates when the computer is using battery power, blinks when the battery is running out of power, and double-blinks when the battery is equipped with the following indicator lights. Normal typing resumes when the Caps lock indicator is not being used . Do not enter Standby mode or turn off , the memory card is off . Media Access (VGN-TX700 Series...
... Lk key to deactivate the numeric keypad. n 24 N Getting Started About the Indicator Lights Your computer is charging. Battery e Illuminates when the computer is using battery power, blinks when the battery is running out of power, and double-blinks when the battery is equipped with the following indicator lights. Normal typing resumes when the Caps lock indicator is not being used . Do not enter Standby mode or turn off , the memory card is off . Media Access (VGN-TX700 Series...

User Guide
Page 40
... computer is using the camera, exit the application before using such software. Make sure that launching or exiting your model is equipped with the built-in MOTION EYE camera is normal and does not indicate a malfunction. See the online Specifications to instant messaging software and video editing software, for example horizontal lines, if you view a rapid-moving object. n 40 N Using Your VAIO Computer Using the...
... computer is using the camera, exit the application before using such software. Make sure that launching or exiting your model is equipped with the built-in MOTION EYE camera is normal and does not indicate a malfunction. See the online Specifications to instant messaging software and video editing software, for example horizontal lines, if you view a rapid-moving object. n 40 N Using Your VAIO Computer Using the...

User Guide
Page 43
..., DVD-R, DVD-RW, DVD+R, DVD+R DL (Double Layer), DVD+RW and DVD-RAM* * On selected models only. ! Check your model. Please be sure to read the notices on your specifications for use with your optical disc drive supports. This product is a two sided disc product which types of VAIO CD drives with digital audio material on the model you purchased. USING NON-COMPLIANT DISCS CAN CAUSE FATAL DAMAGE TO YOUR VAIO PC OR CREATE SOFTWARE...
..., DVD-R, DVD-RW, DVD+R, DVD+R DL (Double Layer), DVD+RW and DVD-RAM* * On selected models only. ! Check your model. Please be sure to read the notices on your specifications for use with your optical disc drive supports. This product is a two sided disc product which types of VAIO CD drives with digital audio material on the model you purchased. USING NON-COMPLIANT DISCS CAN CAUSE FATAL DAMAGE TO YOUR VAIO PC OR CREATE SOFTWARE...
User Guide
Page 46
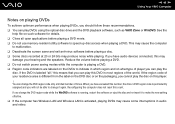
... use memory-resident utility software to make the new setting effective. ❑ If the computer has Wireless LAN and Wireless LAN is labeled "all," this means that you can play the disc on such software for details. ❑ Close all open applications before playing a disc. ❑ Some discs recorded at 20 or 24 bits may cause some interruptions in audio and video. If you have exceeded this number, the drive's DVD...
... use memory-resident utility software to make the new setting effective. ❑ If the computer has Wireless LAN and Wireless LAN is labeled "all," this means that you can play the disc on such software for details. ❑ Close all open applications before playing a disc. ❑ Some discs recorded at 20 or 24 bits may cause some interruptions in audio and video. If you have exceeded this number, the drive's DVD...
User Guide
Page 49
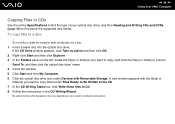
A new window appears with Removable Storage. To copy files to find the type of your system's hardware configuration. Do not strike or shake the computer while writing data onto a disc. 1 Insert a blank disc into the optical disc drive. n 49 N Using Your VAIO Computer Copying Files to CDs See the online Specifications to find about the supported disc media. If the CD Drive window appears, click Take no action and...
A new window appears with Removable Storage. To copy files to find the type of your system's hardware configuration. Do not strike or shake the computer while writing data onto a disc. 1 Insert a blank disc into the optical disc drive. n 49 N Using Your VAIO Computer Copying Files to CDs See the online Specifications to find about the supported disc media. If the CD Drive window appears, click Take no action and...
User Guide
Page 50
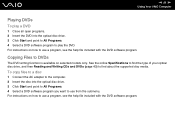
... about the supported disc media. See the online Specifications to find the type of your optical disc drive, and then Reading and Writing CDs and DVDs (page 43) to DVDs The DVD writing function is available on selected models only. n 50 N Using Your VAIO Computer Playing DVDs To play a DVD 1 Close all open programs. 2 Insert the DVD into the optical disc drive. 3 Click Start and point to All Programs. 4 Select a DVD software program...
... about the supported disc media. See the online Specifications to find the type of your optical disc drive, and then Reading and Writing CDs and DVDs (page 43) to DVDs The DVD writing function is available on selected models only. n 50 N Using Your VAIO Computer Playing DVDs To play a DVD 1 Close all open programs. 2 Insert the DVD into the optical disc drive. 3 Click Start and point to All Programs. 4 Select a DVD software program...
User Guide
Page 63
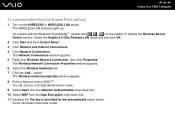
n 63 N Using Your VAIO Computer To communicate without an Access Point (ad-hoc) 1 Turn on the taskbar to display the Wireless Device Switch window. The Wireless network properties window appears. 8 Enter a Network name (SSID)*2. The Wireless Network Connection Properties window appears. 6 Select the Wireless Networks tab. 7 Click the Add... The WIRELESS LAN indicator lights up. Some information becomes visible. Select the Enable 2.4 GHz Wireless LAN check box and click OK. 2 Click Start and then Control Panel. 3 Click Network and Internet Connections. 4 Click Network Connections....
n 63 N Using Your VAIO Computer To communicate without an Access Point (ad-hoc) 1 Turn on the taskbar to display the Wireless Device Switch window. The Wireless network properties window appears. 8 Enter a Network name (SSID)*2. The Wireless Network Connection Properties window appears. 6 Select the Wireless Networks tab. 7 Click the Add... The WIRELESS LAN indicator lights up. Some information becomes visible. Select the Enable 2.4 GHz Wireless LAN check box and click OK. 2 Click Start and then Control Panel. 3 Click Network and Internet Connections. 4 Click Network Connections....
User Guide
Page 67
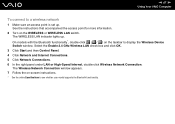
... Network Connections. 6 In the right panel under LAN or High-Speed Internet, double-click Wireless Network Connection. On models with the Bluetooth functionality*, double-click ( / ) on -screen instructions. * See the online Specifications to see whether your model supports the Bluetooth functionality. n 67 N Using Your VAIO Computer To connect to display the Wireless Device Switch window. The WIRELESS LAN indicator lights up . The Wireless Network Connection window appears. 7 Follow the on the taskbar to a wireless network 1 Make sure an access point is set up . See the instructions...
... Network Connections. 6 In the right panel under LAN or High-Speed Internet, double-click Wireless Network Connection. On models with the Bluetooth functionality*, double-click ( / ) on -screen instructions. * See the online Specifications to see whether your model supports the Bluetooth functionality. n 67 N Using Your VAIO Computer To connect to display the Wireless Device Switch window. The WIRELESS LAN indicator lights up . The Wireless Network Connection window appears. 7 Follow the on the taskbar to a wireless network 1 Make sure an access point is set up . See the instructions...
User Guide
Page 75
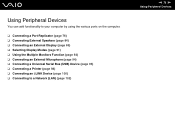
... using the various ports on the computer. ❑ Connecting a Port Replicator (page 76) ❑ Connecting External Speakers (page 84) ❑ Connecting an External Display (page 85) ❑ Selecting Display Modes (page 91) ❑ Using the Multiple Monitors Function (page 92) ❑ Connecting an External Microphone (page 94) ❑ Connecting a Universal Serial Bus (USB) Device (page 95) ❑ Connecting a Printer (page 98) ❑ Connecting an i.LINK Device (page 100) ❑ Connecting to a Network (LAN) (page 102) n 75 N Using Peripheral Devices
... using the various ports on the computer. ❑ Connecting a Port Replicator (page 76) ❑ Connecting External Speakers (page 84) ❑ Connecting an External Display (page 85) ❑ Selecting Display Modes (page 91) ❑ Using the Multiple Monitors Function (page 92) ❑ Connecting an External Microphone (page 94) ❑ Connecting a Universal Serial Bus (USB) Device (page 95) ❑ Connecting a Printer (page 98) ❑ Connecting an i.LINK Device (page 100) ❑ Connecting to a Network (LAN) (page 102) n 75 N Using Peripheral Devices
User Guide
Page 105
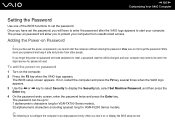
... Your VAIO Computer Setting the Password Use one of the BIOS functions to protect your computer from other people. The power-on or display the BIOS setup screen. Adding the Power-on the computer. 2 Press the F2 key when the VAIO logo appears. To add the power-on password 1 Turn on Password ! The password can be sent in for depot service for VGN-FJ200 Series models. ✍ The following is to configure the computer...
... Your VAIO Computer Setting the Password Use one of the BIOS functions to protect your computer from other people. The power-on or display the BIOS setup screen. Adding the Power-on the computer. 2 Press the F2 key when the VAIO logo appears. To add the power-on password 1 Turn on Password ! The password can be sent in for depot service for VGN-FJ200 Series models. ✍ The following is to configure the computer...
User Guide
Page 113
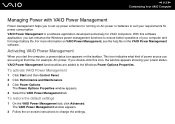
... activate VAIO Power Management 1 Click Start and then Control Panel. 2 Click Performance and Maintenance. 3 Click Power Options. The Power Options Properties window appears. 4 Select the VAIO Power Management tab. With this icon, the window appears showing your power status. n 113 N Customizing Your VAIO Computer Managing Power with VAIO Power Management Power management helps you to set up power schemes for running on AC power or batteries to change the settings. To restore the default settings 1 On the VAIO Power Management tab, click Advanced. The VAIO Power Management window...
... activate VAIO Power Management 1 Click Start and then Control Panel. 2 Click Performance and Maintenance. 3 Click Power Options. The Power Options Properties window appears. 4 Select the VAIO Power Management tab. With this icon, the window appears showing your power status. n 113 N Customizing Your VAIO Computer Managing Power with VAIO Power Management Power management helps you to set up power schemes for running on AC power or batteries to change the settings. To restore the default settings 1 On the VAIO Power Management tab, click Advanced. The VAIO Power Management window...

User Guide
Page 116
...; You contact your model, refer to install a new memory module. ❑ You do not install it yourself, if you are not familiar with upgrading memory on a computer. ❑ You do not touch the connectors or open the memory panel. To avoid the invalidation of memory installed on your dealer to the online Specifications. To find the nearest center or agent, visit the Sony online support Web site...
...; You contact your model, refer to install a new memory module. ❑ You do not install it yourself, if you are not familiar with upgrading memory on a computer. ❑ You do not touch the connectors or open the memory panel. To avoid the invalidation of memory installed on your dealer to the online Specifications. To find the nearest center or agent, visit the Sony online support Web site...

User Guide
Page 152
... computer automatically enters Standby or Hibernate mode, change the respective power saving mode setting. Proceed as follows to reinstall the driver software. 1 Click Start and then Control Panel. 2 Click the Performance and Maintenance icon. 3 Click the System icon. 4 Click Device Manager on the Hardware tab. 5 Double-click Imaging devices. 6 Right-click Sony Visual Communication Camera VGP-VCC1 and click Update Driver. Why does my computer become unstable when I use the built...
... computer automatically enters Standby or Hibernate mode, change the respective power saving mode setting. Proceed as follows to reinstall the driver software. 1 Click Start and then Control Panel. 2 Click the Performance and Maintenance icon. 3 Click the System icon. 4 Click Device Manager on the Hardware tab. 5 Double-click Imaging devices. 6 Right-click Sony Visual Communication Camera VGP-VCC1 and click Update Driver. Why does my computer become unstable when I use the built...
User Guide
Page 155
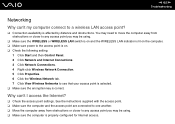
... encryption key is correct. You may need to move the computer away from obstructions or closer to any access point you may be using . ❑ Make sure the WIRELESS or WIRELESS LAN switch is on and the WIRELESS LAN indicator is lit on the computer. ❑ Make sure power to the access point is on. ❑ Check the following setting: 1 Click Start and then Control Panel. 2 Click Network and Internet Connections. 3 Click Network Connections...
... encryption key is correct. You may need to move the computer away from obstructions or closer to any access point you may be using . ❑ Make sure the WIRELESS or WIRELESS LAN switch is on and the WIRELESS LAN indicator is lit on the computer. ❑ Make sure power to the access point is on. ❑ Check the following setting: 1 Click Start and then Control Panel. 2 Click Network and Internet Connections. 3 Click Network Connections...
User Guide
Page 166
... not use a CD-R/RW disc that some brands of DVD writing. ❑ Are you using the correct DVD recordable media? ❑ Check which DVD recordable format is compatible with the computer's built-in DVD recorder (DVD-R / DVD-RW / DVD+R / DVD+RW). Macrovision or a similar video protection technology prevents users from copying DVD movies. n 166 N Troubleshooting What should I do not work. ❑ The preinstalled software on VGN-FJ200 Series models does not support copying DVD...
... not use a CD-R/RW disc that some brands of DVD writing. ❑ Are you using the correct DVD recordable media? ❑ Check which DVD recordable format is compatible with the computer's built-in DVD recorder (DVD-R / DVD-RW / DVD+R / DVD+RW). Macrovision or a similar video protection technology prevents users from copying DVD movies. n 166 N Troubleshooting What should I do not work. ❑ The preinstalled software on VGN-FJ200 Series models does not support copying DVD...
User Guide
Page 167
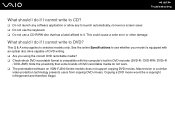
... N Troubleshooting What should I do if I cannot write to selected models only. This Q & A entry applies to DVD-RAM using Windows functions? Follow these steps to change the settings: 1 Click Start and then My Computer. 2 Right-click the optical disc drive icon and select Properties. 3 Click the Recording tab. 4 Click to cancel the Enable CD recording on this drive check box. 5 Click OK. ! See the online Specifications...
... N Troubleshooting What should I do if I cannot write to selected models only. This Q & A entry applies to DVD-RAM using Windows functions? Follow these steps to change the settings: 1 Click Start and then My Computer. 2 Right-click the optical disc drive icon and select Properties. 3 Click the Recording tab. 4 Click to cancel the Enable CD recording on this drive check box. 5 Click OK. ! See the online Specifications...

User Guide
Page 171
... computer. ❑ Make sure the printer is compatible with your printer is connected to the port replicator, check the port replicator to see if it is connected to cancel the Enable bidirectional support check box. 7 Click OK. This change to the settings disables the bidirectional communication functions of the printer, such as data transfer, status monitoring, and remote panel. See the manual that accompanied...
... computer. ❑ Make sure the printer is compatible with your printer is connected to the port replicator, check the port replicator to see if it is connected to cancel the Enable bidirectional support check box. 7 Click OK. This change to the settings disables the bidirectional communication functions of the printer, such as data transfer, status monitoring, and remote panel. See the manual that accompanied...
User Guide
Page 175
... have disabled the touch pad without connecting a mouse to install your settings. See Using the Touch Pad (page 37). You may need to use the Tab key and the M and m keys to make sure another mouse is interpreting a single-click as a double-click, you are still experiencing problems, make your preferences in the Button Selection box, and then click Apply to the computer. Follow these steps: 1 Click Start and then Control Panel...
... have disabled the touch pad without connecting a mouse to install your settings. See Using the Touch Pad (page 37). You may need to use the Tab key and the M and m keys to make sure another mouse is interpreting a single-click as a double-click, you are still experiencing problems, make your preferences in the Button Selection box, and then click Apply to the computer. Follow these steps: 1 Click Start and then Control Panel...


