
User Guide
Page 2
... and Ports...11 About the Indicator Lights ...24 Connecting a Power Source ...26 Using the Battery Pack ...27 Shutting Down Your Computer Safely ...33 Using Your VAIO Computer ...34 Using the Keyboard ...35 Using the Touch Pad ...37 Using Special-function Buttons ...38 Using the Built-in MOTION EYE Camera...40 Using...
... and Ports...11 About the Indicator Lights ...24 Connecting a Power Source ...26 Using the Battery Pack ...27 Shutting Down Your Computer Safely ...33 Using Your VAIO Computer ...34 Using the Keyboard ...35 Using the Touch Pad ...37 Using Special-function Buttons ...38 Using the Built-in MOTION EYE Camera...40 Using...
User Guide
Page 3
... External Microphone ...94 Connecting a Universal Serial Bus (USB) Device...95 Connecting a Printer ...98 Connecting an i.LINK Device ...100 Connecting to a Network (LAN) ...102 Customizing Your VAIO Computer ...104 Setting the Password ...105 Setting Up Your Computer with VAIO Central ...107 Using the Power Saving Modes ...108 Managing Power with...
... External Microphone ...94 Connecting a Universal Serial Bus (USB) Device...95 Connecting a Printer ...98 Connecting an i.LINK Device ...100 Connecting to a Network (LAN) ...102 Customizing Your VAIO Computer ...104 Setting the Password ...105 Setting Up Your Computer with VAIO Central ...107 Using the Power Saving Modes ...108 Managing Power with...
User Guide
Page 6
... computing. Documentation Your documentation includes printed information and user guides to read on your purchase of this Sony VAIO® computer, and welcome to the on your VAIO computer. Provides a guide to provide state-of connections, setting up information, etc. ❑ Safety... information - n6 N Before Use Before Use Congratulations on -screen User Guide. Sony has combined leading-edge technology in audio, video, computing, and communications to use Instant Mode. Contains safety guidelines and owner information. ❑ Instant Mode (VGN-TX700 Series models only) -
... computing. Documentation Your documentation includes printed information and user guides to read on your purchase of this Sony VAIO® computer, and welcome to the on your VAIO computer. Provides a guide to provide state-of connections, setting up information, etc. ❑ Safety... information - n6 N Before Use Before Use Congratulations on -screen User Guide. Sony has combined leading-edge technology in audio, video, computing, and communications to use Instant Mode. Contains safety guidelines and owner information. ❑ Instant Mode (VGN-TX700 Series models only) -

User Guide
Page 7
...Specifications - To access this online guide: 1 Click Start, point to All Programs, and click VAIO Support Central. 2 Click VAIO Documentation. 3 Click VAIO Recovery Guide. ❑ VAIO SmartWi Connection Utility Guide (VGN-TX700 Series models only) - Provides information about restoring individual software programs, software drivers, and ... the Sony online support Web site at http://www.sony.com/pcsupport for customers in USA, at http://www.sony.ca/support for customers in Canada, or at http://esupport.sony.com/ES/ for customers in Latin American countries or areas. ❑ VAIO Recovery...
...Specifications - To access this online guide: 1 Click Start, point to All Programs, and click VAIO Support Central. 2 Click VAIO Documentation. 3 Click VAIO Recovery Guide. ❑ VAIO SmartWi Connection Utility Guide (VGN-TX700 Series models only) - Provides information about restoring individual software programs, software drivers, and ... the Sony online support Web site at http://www.sony.com/pcsupport for customers in USA, at http://www.sony.ca/support for customers in Canada, or at http://esupport.sony.com/ES/ for customers in Latin American countries or areas. ❑ VAIO Recovery...

User Guide
Page 10
... Down Your Computer Safely (page 33) Make sure to get started with only the supplied accessories connected and set up your computer with using your VAIO computer. ! n 10 N Getting Started Getting Started This section describes how to start up your system. Before the first computer startup, do not connect any new...
... Down Your Computer Safely (page 33) Make sure to get started with only the supplied accessories connected and set up your computer with using your VAIO computer. ! n 10 N Getting Started Getting Started This section describes how to start up your system. Before the first computer startup, do not connect any new...
User Guide
Page 34
Using Your VAIO Computer This section describes how to get the most out of using your computer. ❑ Using the Keyboard (page 35) ❑ Using the Touch Pad (... (page 57) ❑ Using the Internet (page 59) ❑ Using Wireless LAN (WLAN) (page 60) ❑ Using the Bluetooth Functionality (page 70) n 34 N Using Your VAIO Computer
Using Your VAIO Computer This section describes how to get the most out of using your computer. ❑ Using the Keyboard (page 35) ❑ Using the Touch Pad (... (page 57) ❑ Using the Internet (page 59) ❑ Using Wireless LAN (WLAN) (page 60) ❑ Using the Bluetooth Functionality (page 70) n 34 N Using Your VAIO Computer
User Guide
Page 35
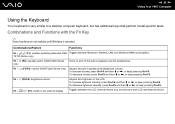
Combinations/Feature Functions Fn + (F1): wireless switching (Selected VGN- TX700 Series only) Fn + % (F2): speaker switch (VGN-FJ200 Series only) Turns on and off the built-in speaker and headphone volume. n 35 N Using Your VAIO Computer Using the Keyboard Your keyboard is launched. Combinations and ...additional keys that perform model-specific tasks. Toggles between Bluetooth, Wireless LAN, and Wireless WAN functionalities. Fn + 2 (F3/F4): volume (VGN-FJ200 Series only) Adjusts the built-in speakers and the headphones. To increase volume, press Fn+F4 and then M or ,, or keep ...
Combinations/Feature Functions Fn + (F1): wireless switching (Selected VGN- TX700 Series only) Fn + % (F2): speaker switch (VGN-FJ200 Series only) Turns on and off the built-in speaker and headphone volume. n 35 N Using Your VAIO Computer Using the Keyboard Your keyboard is launched. Combinations and ...additional keys that perform model-specific tasks. Toggles between Bluetooth, Wireless LAN, and Wireless WAN functionalities. Fn + 2 (F3/F4): volume (VGN-FJ200 Series only) Adjusts the built-in speakers and the headphones. To increase volume, press Fn+F4 and then M or ,, or keep ...

User Guide
Page 36
... power button to the external display disables the function and restores the standard view. Combinations/Feature Fn + (F10): zoom Fn + (F12): Hibernate n 36 N Using Your VAIO Computer Functions Changes the screen resolution to magnify/restore the screen view. ✍ The magnified view is not as clear as the standard view, as...
... power button to the external display disables the function and restores the standard view. Combinations/Feature Fn + (F10): zoom Fn + (F12): Hibernate n 36 N Using Your VAIO Computer Functions Changes the screen resolution to magnify/restore the screen view. ✍ The magnified view is not as clear as the standard view, as...
User Guide
Page 37
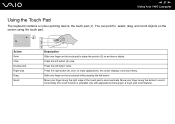
n 37 N Using Your VAIO Computer Using the Touch Pad The keyboard contains a cursor-pointing device, the touch pad (1). Press the left button. Action Point Click Double-click Right-click ...
n 37 N Using Your VAIO Computer Using the Touch Pad The keyboard contains a cursor-pointing device, the touch pad (1). Press the left button. Action Point Click Double-click Right-click ...

User Guide
Page 38
...AV MODE button assignment. Previous track button This button is enabled in Instant Mode as well as when Windows is launched and running . On VGN-TX700 Series models, the AV MODE, Play/Pause, Stop, Previous track, Next track, and Disc drive eject buttons support Instant Mode. ...when Windows is launched and running : Launches the WinDVD software by default. When Windows is launched and running . n 38 N Using Your VAIO Computer Using Special-function Buttons Your computer is equipped with special buttons to help file on the AV Mode Button Settings utility for more information...
...AV MODE button assignment. Previous track button This button is enabled in Instant Mode as well as when Windows is launched and running . On VGN-TX700 Series models, the AV MODE, Play/Pause, Stop, Previous track, Next track, and Disc drive eject buttons support Instant Mode. ...when Windows is launched and running : Launches the WinDVD software by default. When Windows is launched and running . n 38 N Using Your VAIO Computer Using Special-function Buttons Your computer is equipped with special buttons to help file on the AV Mode Button Settings utility for more information...

User Guide
Page 39
...during playback with the Sonic Stage software. Turns the speaker and microphone volume on and off . Ejects the drive tray. n 39 N Using Your VAIO Computer Special-function button Next track button Disc drive eject button Muting button Volume buttons (Volume up and Volume down) Functions This button is enabled... Mode as well as when Windows is launched and running. If this window, press and hold either button or launch and navigate through VAIO Central. VGN-FJ200 Series models Special-function button S1/S2 buttons Functions By default, the S1 button turns the volume on and off and the S2...
...during playback with the Sonic Stage software. Turns the speaker and microphone volume on and off . Ejects the drive tray. n 39 N Using Your VAIO Computer Special-function button Next track button Disc drive eject button Muting button Volume buttons (Volume up and Volume down) Functions This button is enabled... Mode as well as when Windows is launched and running. If this window, press and hold either button or launch and navigate through VAIO Central. VGN-FJ200 Series models Special-function button S1/S2 buttons Functions By default, the S1 button turns the volume on and off and the S2...

User Guide
Page 40
n 40 N Using Your VAIO Computer Using the Built-in MOTION EYE Camera The built-in MOTION EYE camera, so the computer is ready for a video conference using such software. ... show some noises, for example Windows Messenger and Windows MovieMaker. Turning on the computer activates the built-in MOTION EYE camera is available on selected VGN-FJ200 Series models only. This is using the camera, exit the application before using the built-in MOTION EYE camera cannot be shared by more...
n 40 N Using Your VAIO Computer Using the Built-in MOTION EYE Camera The built-in MOTION EYE camera, so the computer is ready for a video conference using such software. ... show some noises, for example Windows Messenger and Windows MovieMaker. Turning on the computer activates the built-in MOTION EYE camera is available on selected VGN-FJ200 Series models only. This is using the camera, exit the application before using the built-in MOTION EYE camera cannot be shared by more...

User Guide
Page 41
The tray slides out. ✍ On VGN-TX700 Series models, if power supply to the optical disc drive is disabled by VAIO Power Management, it will take a while to open the drive. Insert your system, turn on the computer. 2 Press the drive eject button (1) to eject the ... optical disc drive is equipped with an optical disc drive. See Locating Controls and Ports (page 11). 1 Turn on the computer again to launch the VAIO Recovery Wizard. When recovering your Recovery Disc into the optical disc drive, turn off the computer, and then turn on the computer and press the...
The tray slides out. ✍ On VGN-TX700 Series models, if power supply to the optical disc drive is disabled by VAIO Power Management, it will take a while to open the drive. Insert your system, turn on the computer. 2 Press the drive eject button (1) to eject the ... optical disc drive is equipped with an optical disc drive. See Locating Controls and Ports (page 11). 1 Turn on the computer again to launch the VAIO Recovery Wizard. When recovering your Recovery Disc into the optical disc drive, turn off the computer, and then turn on the computer and press the...

User Guide
Page 42
n 42 N Using Your VAIO Computer 3 Place a disc in the middle of the tray with the label side facing up and gently push until the disc clicks into place. 4 Close the tray by pushing it in a power saving mode (Standby or Hibernate). Doing so may cause the computer to malfunction. ✍ If you plan to use an external optical disc drive, connect the drive before you launch any preinstalled CD/DVD program. Do not remove the optical disc when the computer is in gently. !
n 42 N Using Your VAIO Computer 3 Place a disc in the middle of the tray with the label side facing up and gently push until the disc clicks into place. 4 Close the tray by pushing it in a power saving mode (Standby or Hibernate). Doing so may cause the computer to malfunction. ✍ If you plan to use an external optical disc drive, connect the drive before you launch any preinstalled CD/DVD program. Do not remove the optical disc when the computer is in gently. !

User Guide
Page 43
...the type of a DualDisc may not play on this product because it does not conform to DVD drives). Sony does NOT guarantee the compatibility of the recordable disc. n 43 N Using Your VAIO Computer Reading and Writing CDs and DVDs Your computer plays and records CDs and DVDs, depending on the ...DVD-R, DVD-RW, DVD+R, DVD+RW - For inquiries about disc formats, contact the individual publisher of the pre-recorded disc or the manufacturer of VAIO CD drives with discs that conform to see which mates DVD recorded material on one side with your specifications for use with the official "CD...
...the type of a DualDisc may not play on this product because it does not conform to DVD drives). Sony does NOT guarantee the compatibility of the recordable disc. n 43 N Using Your VAIO Computer Reading and Writing CDs and DVDs Your computer plays and records CDs and DVDs, depending on the ...DVD-R, DVD-RW, DVD+R, DVD+RW - For inquiries about disc formats, contact the individual publisher of the pre-recorded disc or the manufacturer of VAIO CD drives with discs that conform to see which mates DVD recorded material on one side with your specifications for use with the official "CD...

User Guide
Page 44
n 44 N Using Your VAIO Computer ✍ Supports writing to DVD-RW discs compliant with DVD-RAM version 1.0 is available only on your computer does not support the DVD-RAM ...
n 44 N Using Your VAIO Computer ✍ Supports writing to DVD-RW discs compliant with DVD-RAM version 1.0 is available only on your computer does not support the DVD-RAM ...

User Guide
Page 45
...card, etc.), as this process, follow the instructions included with your battery is at least 50 percent charged. ❑ Some DVD players and the VGN-FJ200 Series model's DVD drives may cause writing errors. ❑ Do not switch power modes while using the pre-installed software and while using the... VAIO Zone software. Do not use discs in any other applications. ❑ Never touch the surface of the disc. To complete this may damage ...
...card, etc.), as this process, follow the instructions included with your battery is at least 50 percent charged. ❑ Some DVD players and the VGN-FJ200 Series model's DVD drives may cause writing errors. ❑ Do not switch power modes while using the pre-installed software and while using the... VAIO Zone software. Do not use discs in any other applications. ❑ Never touch the surface of the disc. To complete this may damage ...
User Guide
Page 46
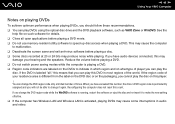
... open applications before playing a disc. ❑ Some discs recorded at 20 or 24 bits may cause some interruptions in audio and video. n 46 N Using Your VAIO Computer Notes on playing DVDs To achieve optimum performance when playing DVDs, you should follow these recommendations. ❑ You can play the disc on this... Wireless LAN and Wireless LAN is permanently assigned and you cannot play DVDs using the optical disc drive and the DVD playback software, such as VAIO Zone or WinDVD.
... open applications before playing a disc. ❑ Some discs recorded at 20 or 24 bits may cause some interruptions in audio and video. n 46 N Using Your VAIO Computer Notes on playing DVDs To achieve optimum performance when playing DVDs, you should follow these recommendations. ❑ You can play the disc on this... Wireless LAN and Wireless LAN is permanently assigned and you cannot play DVDs using the optical disc drive and the DVD playback software, such as VAIO Zone or WinDVD.

User Guide
Page 47
n 47 N Using Your VAIO Computer ❑ When you are playing a DVD (video or audio) and you want to remove a USB device, such as USB-compatible speakers, make sure you stop the DVD first. Removing a USB-compatible device during DVD (video or audio) playback may cause a malfunction.
n 47 N Using Your VAIO Computer ❑ When you are playing a DVD (video or audio) and you want to remove a USB device, such as USB-compatible speakers, make sure you stop the DVD first. Removing a USB-compatible device during DVD (video or audio) playback may cause a malfunction.
User Guide
Page 48
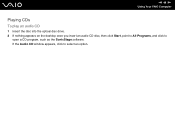
n 48 N Using Your VAIO Computer Playing CDs To play an audio CD 1 Insert the disc into the optical disc drive. 2 If nothing appears on the desktop once you insert an audio CD disc, then click Start, point to All Programs, and click to select an option. If the Audio CD window appears, click to open a CD program, such as the SonicStage software.
n 48 N Using Your VAIO Computer Playing CDs To play an audio CD 1 Insert the disc into the optical disc drive. 2 If nothing appears on the desktop once you insert an audio CD disc, then click Start, point to All Programs, and click to select an option. If the Audio CD window appears, click to open a CD program, such as the SonicStage software.

