
User Guide
Page 2
...Ports...11 About the Indicator Lights ...24 Connecting a Power Source ...26 Using the Battery Pack ...27 Shutting Down Your Computer Safely ...33 Using Your VAIO Computer ...34 Using the Keyboard ...35 Using the Touch Pad ...37 Using Special-function Buttons ...38 Using the Built-in MOTION EYE Camera...40 Using... the Optical Disc Drive ...41 Using PC Cards ...51 Using the Memory Stick Media ...54 Using Other Memory Cards ...57 Using the Internet...59 Using Wireless LAN (WLAN) ...60 Using the Bluetooth Functionality ...70
...Ports...11 About the Indicator Lights ...24 Connecting a Power Source ...26 Using the Battery Pack ...27 Shutting Down Your Computer Safely ...33 Using Your VAIO Computer ...34 Using the Keyboard ...35 Using the Touch Pad ...37 Using Special-function Buttons ...38 Using the Built-in MOTION EYE Camera...40 Using... the Optical Disc Drive ...41 Using PC Cards ...51 Using the Memory Stick Media ...54 Using Other Memory Cards ...57 Using the Internet...59 Using Wireless LAN (WLAN) ...60 Using the Bluetooth Functionality ...70
User Guide
Page 3
...) Device...95 Connecting a Printer ...98 Connecting an i.LINK Device ...100 Connecting to a Network (LAN) ...102 Customizing Your VAIO Computer ...104 Setting the Password ...105 Setting Up Your Computer with VAIO Central ...107 Using the Power Saving Modes ...108 Managing Power with VAIO Power Management ...113 Upgrading Your VAIO Computer...116 Adding and Removing Memory...117
...) Device...95 Connecting a Printer ...98 Connecting an i.LINK Device ...100 Connecting to a Network (LAN) ...102 Customizing Your VAIO Computer ...104 Setting the Password ...105 Setting Up Your Computer with VAIO Central ...107 Using the Power Saving Modes ...108 Managing Power with VAIO Power Management ...113 Upgrading Your VAIO Computer...116 Adding and Removing Memory...117
User Guide
Page 4
... MOTION EYE Camera...131 On Handling Floppy Disks ...131 On Handling Discs ...132 On Using the Battery Pack...133 On Using Headphones...134 On Handling Memory Stick Media...134 On Handling the Hard Disk ...135 Troubleshooting ...136 Computer ...138 System Security ...146 Battery...148 Built-in MOTION EYE Camera...150 Internet...
... MOTION EYE Camera...131 On Handling Floppy Disks ...131 On Handling Discs ...132 On Using the Battery Pack...133 On Using Headphones...134 On Handling Memory Stick Media...134 On Handling the Hard Disk ...135 Troubleshooting ...136 Computer ...138 System Security ...146 Battery...148 Built-in MOTION EYE Camera...150 Internet...
User Guide
Page 12
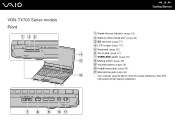
VGN-TX700 Series models Front n 12 N Getting Started A Media Access indicator (page 24) B Memory Stick media slot* (page 54) C SD card slot (page 57) D LCD screen (page 127) E Keyboard (page 35) F Touch pad (page 37) G WIRELESS switch (page 60) H Muting button (page 38) I Volume buttons (page 38) J Headphones jack (page 84) K Microphone jack (page 94) * Your computer supports Memory Stick Duo media and Memory Stick PRO high speed and high capacity capabilities.
VGN-TX700 Series models Front n 12 N Getting Started A Media Access indicator (page 24) B Memory Stick media slot* (page 54) C SD card slot (page 57) D LCD screen (page 127) E Keyboard (page 35) F Touch pad (page 37) G WIRELESS switch (page 60) H Muting button (page 38) I Volume buttons (page 38) J Headphones jack (page 84) K Microphone jack (page 94) * Your computer supports Memory Stick Duo media and Memory Stick PRO high speed and high capacity capabilities.
User Guide
Page 18
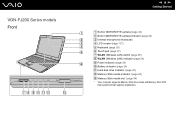
VGN-FJ200 Series models Front n 18 N Getting Started A Built-in MOTION EYE camera (page 40) B Built-in MOTION EYE camera indicator (page 24) C Internal microphone (monaural) D ... (Wireless LAN) switch (page 60) H WLAN (Wireless LAN) indicator (page 24) I Power indicator (page 24) J Battery indicator (page 24) K Hard disk drive indicator (page 24) L Memory Stick media indicator (page 24) M Memory Stick media slot* (page 54) * Your computer supports Memory Stick Duo media and Memory Stick PRO high speed and high capacity capabilities.
VGN-FJ200 Series models Front n 18 N Getting Started A Built-in MOTION EYE camera (page 40) B Built-in MOTION EYE camera indicator (page 24) C Internal microphone (monaural) D ... (Wireless LAN) switch (page 60) H WLAN (Wireless LAN) indicator (page 24) I Power indicator (page 24) J Battery indicator (page 24) K Hard disk drive indicator (page 24) L Memory Stick media indicator (page 24) M Memory Stick media slot* (page 54) * Your computer supports Memory Stick Duo media and Memory Stick PRO high speed and high capacity capabilities.
User Guide
Page 24
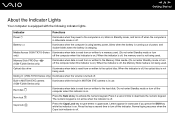
...from or written to the hard disk. Muting % (VGN-TX700 Series only) Illuminates when the volume is turned off , the memory card is read from or written to turn off the computer when this indicator is on . Press the key a second time to the Memory Stick media. (Do not enter Standby mode or... being used. Num lock Press the Num Lk key to deactivate the numeric keypad. Indicator Functions Power 1 Illuminates when the power to the optical disc. Memory Stick PRO/Duo (VGN-FJ200 Series only) Illuminates when data is read from or written to the computer is on .
...from or written to the hard disk. Muting % (VGN-TX700 Series only) Illuminates when the volume is turned off , the memory card is read from or written to turn off the computer when this indicator is on . Press the key a second time to the Memory Stick media. (Do not enter Standby mode or... being used. Num lock Press the Num Lk key to deactivate the numeric keypad. Indicator Functions Power 1 Illuminates when the power to the optical disc. Memory Stick PRO/Duo (VGN-FJ200 Series only) Illuminates when data is read from or written to the computer is on .
User Guide
Page 34
Using Your VAIO Computer This section describes how to get the most out of using your computer. ❑ Using the Keyboard (page 35) ❑ Using the Touch Pad (... MOTION EYE Camera (page 40) ❑ Using the Optical Disc Drive (page 41) ❑ Using PC Cards (page 51) ❑ Using the Memory Stick Media (page 54) ❑ Using Other Memory Cards (page 57) ❑ Using the Internet (page 59) ❑ Using Wireless LAN (WLAN) (page 60) ❑ Using the Bluetooth Functionality...
Using Your VAIO Computer This section describes how to get the most out of using your computer. ❑ Using the Keyboard (page 35) ❑ Using the Touch Pad (... MOTION EYE Camera (page 40) ❑ Using the Optical Disc Drive (page 41) ❑ Using PC Cards (page 51) ❑ Using the Memory Stick Media (page 54) ❑ Using Other Memory Cards (page 57) ❑ Using the Internet (page 59) ❑ Using Wireless LAN (WLAN) (page 60) ❑ Using the Bluetooth Functionality...

User Guide
Page 38
... media or SD card, without launching Windows. Previous track button This button is enabled in the memory card, such as when Windows is launched and running . VGN-TX700 Series models Special-function button Functions AV MODE button Play/Pause button When Windows is NOT launched: Activates Instant ...button assignment. This button is enabled in Instant Mode as well as when Windows is launched and running . n 38 N Using Your VAIO Computer Using Special-function Buttons Your computer is equipped with special buttons to help file on the AV Mode Button Settings utility for more ...
... media or SD card, without launching Windows. Previous track button This button is enabled in the memory card, such as when Windows is launched and running . VGN-TX700 Series models Special-function button Functions AV MODE button Play/Pause button When Windows is NOT launched: Activates Instant ...button assignment. This button is enabled in Instant Mode as well as when Windows is launched and running . n 38 N Using Your VAIO Computer Using Special-function Buttons Your computer is equipped with special buttons to help file on the AV Mode Button Settings utility for more ...

User Guide
Page 45
...use the AC adapter to power the computer or make sure your battery is at least 50 percent charged. ❑ Some DVD players and the VGN-FJ200 Series model's DVD drives may cause writing errors. ❑ Do not switch power modes while using the pre-installed software and while using ... Connect and use circular discs. Fingerprints and dust on the surface of the disc. Do not use memory-resident utility software while writing data to close the session when you eject it. n 45 N Using Your VAIO Computer Notes on writing data onto a disc ❑ To make sure you exit and close all...
...use the AC adapter to power the computer or make sure your battery is at least 50 percent charged. ❑ Some DVD players and the VGN-FJ200 Series model's DVD drives may cause writing errors. ❑ Do not switch power modes while using the pre-installed software and while using ... Connect and use circular discs. Fingerprints and dust on the surface of the disc. Do not use memory-resident utility software while writing data to close the session when you eject it. n 45 N Using Your VAIO Computer Notes on writing data onto a disc ❑ To make sure you exit and close all...
User Guide
Page 46
...code only a limited number of the world. If the DVD is labeled "all open applications before playing a DVD movie. ❑ Do not use memory-resident utility software to malfunction. ❑ Deactivate the screen saver and exit anti-virus software before playing a DVD. ❑ Do not switch power ...interruptions in which region and on what type of player you can play this DVD in most regions of times. n 46 N Using Your VAIO Computer Notes on playing DVDs To achieve optimum performance when playing DVDs, you should follow these recommendations. ❑ You can play the disc ...
...code only a limited number of the world. If the DVD is labeled "all open applications before playing a DVD movie. ❑ Do not use memory-resident utility software to malfunction. ❑ Deactivate the screen saver and exit anti-virus software before playing a DVD. ❑ Do not switch power ...interruptions in which region and on what type of player you can play this DVD in most regions of times. n 46 N Using Your VAIO Computer Notes on playing DVDs To achieve optimum performance when playing DVDs, you should follow these recommendations. ❑ You can play the disc ...
User Guide
Page 54
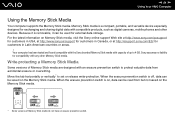
...customers in USA, at http://www.sony.ca/support for customers in Canada, or at http://esupport.sony.com/ES/ for external data storage. n 54 N Using Your VAIO Computer Using the Memory Stick Media Your computer supports the Memory Stick media. Sony assumes no liability for exchanging and ...sharing digital data with any other devices. For the latest information on the Memory Stick media. * Some versions of up to...
...customers in USA, at http://www.sony.ca/support for customers in Canada, or at http://esupport.sony.com/ES/ for external data storage. n 54 N Using Your VAIO Computer Using the Memory Stick Media Your computer supports the Memory Stick media. Sony assumes no liability for exchanging and ...sharing digital data with any other devices. For the latest information on the Memory Stick media. * Some versions of up to...
User Guide
Page 55
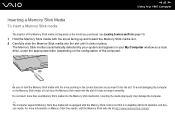
... the correct direction as a local drive, under the appropriate letter (depending on the configuration of the Memory Stick media slot depends on Memory Stick Duo media, visit the Memory Stick web site at http://www.memorystick.com/en/. Inserting the media improperly may damage the computer.... or the Memory Stick media, do not force the Memory Stick media into the slot if it into the Memory Stick media slot. and duosize media. Be sure to hold the Memory Stick media with both standard- n 55 N Using Your VAIO Computer Inserting a Memory Stick Media To insert a Memory Stick media ...
... the correct direction as a local drive, under the appropriate letter (depending on the configuration of the Memory Stick media slot depends on Memory Stick Duo media, visit the Memory Stick web site at http://www.memorystick.com/en/. Inserting the media improperly may damage the computer.... or the Memory Stick media, do not force the Memory Stick media into the slot if it into the Memory Stick media slot. and duosize media. Be sure to hold the Memory Stick media with both standard- n 55 N Using Your VAIO Computer Inserting a Memory Stick Media To insert a Memory Stick media ...
User Guide
Page 56
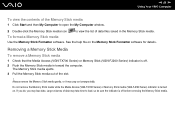
...Memory Stick Formatter software. Removing a Memory Stick Media To remove a Memory Stick media 1 Check that the Media Access (VGN-TX700 Series) or Memory Stick (VGN-FJ200 Series) indicator is turned on the Memory Stick Formatter software for details. Do not remove the Memory Stick media while the Media Access (VGN-TX700 Series) or Memory Stick media (VGN... take time to view the list of data files saved in toward the computer. n 56 N Using Your VAIO Computer To view the contents of the Memory Stick media 1 Click Start and then My Computer to open the My Computer window. 2 Double-click the...
...Memory Stick Formatter software. Removing a Memory Stick Media To remove a Memory Stick media 1 Check that the Media Access (VGN-TX700 Series) or Memory Stick (VGN-FJ200 Series) indicator is turned on the Memory Stick Formatter software for details. Do not remove the Memory Stick media while the Media Access (VGN-TX700 Series) or Memory Stick media (VGN... take time to view the list of data files saved in toward the computer. n 56 N Using Your VAIO Computer To view the contents of the Memory Stick media 1 Click Start and then My Computer to open the My Computer window. 2 Double-click the...

User Guide
Page 57
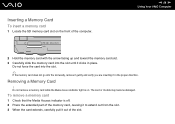
... Your VAIO Computer Using Other Memory Cards In addition to the Memory Stick media slot, VGN-TX700 Series are equipped with the following memory cards: ❑ Multi Media Card (MMC) ❑ Secure Digital (SD) For the latest information on your computer. Always insert the correct memory card into a different memory card...the high-speed data transfer feature of the slot. An incompatible memory card or adapter may be difficult to remove from the slot. The SD memory card slot on compatible memory cards, visit the Sony online support Web site regularly. ! You can cause damage to...
... Your VAIO Computer Using Other Memory Cards In addition to the Memory Stick media slot, VGN-TX700 Series are equipped with the following memory cards: ❑ Multi Media Card (MMC) ❑ Secure Digital (SD) For the latest information on your computer. Always insert the correct memory card into a different memory card...the high-speed data transfer feature of the slot. An incompatible memory card or adapter may be difficult to remove from the slot. The SD memory card slot on compatible memory cards, visit the Sony online support Web site regularly. ! You can cause damage to...
User Guide
Page 58
... while the Media Access indicator light is off. 2 Press the extended part of the memory card, causing it to extend out from the slot. 3 When the card extends, carefully pull it in place. The card or its data may become ... does not go into the slot until it clicks in the proper direction. n 58 N Using Your VAIO Computer 2 Hold the memory card with the arrow facing up and toward the memory card slot. 3 Carefully slide the memory card into the slot easily, remove it gently and verify you are inserting it out of the...
... while the Media Access indicator light is off. 2 Press the extended part of the memory card, causing it to extend out from the slot. 3 When the card extends, carefully pull it in place. The card or its data may become ... does not go into the slot until it clicks in the proper direction. n 58 N Using Your VAIO Computer 2 Hold the memory card with the arrow facing up and toward the memory card slot. 3 Carefully slide the memory card into the slot easily, remove it gently and verify you are inserting it out of the...
User Guide
Page 101
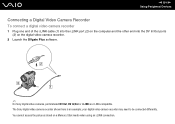
...end of the i.LINK cable (1) into the i.LINK port (2) on the computer and the other end into the DV In/Out ports (3) on a Memory Stick media when using an i.LINK connection. You cannot access the pictures stored on the digital video camera recorder. 2 Launch the DVgate Plus software. &#...9997; On Sony digital video cameras, ports labeled DV Out, DV In/Out or i.LINK are i.LINK-compatible. The Sony digital video camera recorder shown here is an example;
...end of the i.LINK cable (1) into the i.LINK port (2) on the computer and the other end into the DV In/Out ports (3) on a Memory Stick media when using an i.LINK connection. You cannot access the pictures stored on the digital video camera recorder. 2 Launch the DVgate Plus software. &#...9997; On Sony digital video cameras, ports labeled DV Out, DV In/Out or i.LINK are i.LINK-compatible. The Sony digital video camera recorder shown here is an example;

User Guide
Page 116
...or agent, visit the Sony online support Web site. For assistance, contact an authorized Sony Service Center. To avoid the invalidation of memory installed on a computer. ❑ You do not install it yourself, if you are not familiar with upgrading memory on your dealer to ...that: ❑ You contact your model, refer to install a new memory module. ❑ You do not touch the connectors or open the memory panel. n 116 N Upgrading Your VAIO Computer Upgrading Your VAIO Computer Your computer and memory modules use high precision components and electronic connectors technology.
...or agent, visit the Sony online support Web site. For assistance, contact an authorized Sony Service Center. To avoid the invalidation of memory installed on a computer. ❑ You do not install it yourself, if you are not familiar with upgrading memory on your dealer to ...that: ❑ You contact your model, refer to install a new memory module. ❑ You do not touch the connectors or open the memory panel. n 116 N Upgrading Your VAIO Computer Upgrading Your VAIO Computer Your computer and memory modules use high precision components and electronic connectors technology.

User Guide
Page 117
...with an unpainted metal portion of your computer, you can increase the memory by installing optional memory modules. Before touching a memory module, ensure the following pages. n 117 N Upgrading Your VAIO Computer Adding and Removing Memory If you want to do not handle materials that is, battery or ...AC adapter) and from ESD. Install the memory module only at an ESD workstation. Before you upgrade your model. This ...
...with an unpainted metal portion of your computer, you can increase the memory by installing optional memory modules. Before touching a memory module, ensure the following pages. n 117 N Upgrading Your VAIO Computer Adding and Removing Memory If you want to do not handle materials that is, battery or ...AC adapter) and from ESD. Install the memory module only at an ESD workstation. Before you upgrade your model. This ...
User Guide
Page 118
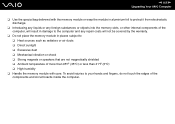
n 118 N Upgrading Your VAIO Computer ❑ Use the special bag delivered with the memory module or wrap the module in aluminium foil to protect it from electrostatic discharge. ❑ Introducing any liquids or any foreign substances or objects into the memory slots, or other internal components of the ... touch the edges of more than 95°F (35°C) or less than 41°F (5°C) ❑ High humidity ❑ Handle the memory module with care. To avoid injuries to ❑ Heat sources such as radiators or air ducts ❑ Direct sunlight ❑ Excessive dust ❑...
n 118 N Upgrading Your VAIO Computer ❑ Use the special bag delivered with the memory module or wrap the module in aluminium foil to protect it from electrostatic discharge. ❑ Introducing any liquids or any foreign substances or objects into the memory slots, or other internal components of the ... touch the edges of more than 95°F (35°C) or less than 41°F (5°C) ❑ High humidity ❑ Handle the memory module with care. To avoid injuries to ❑ Heat sources such as radiators or air ducts ❑ Direct sunlight ❑ Excessive dust ❑...
User Guide
Page 119
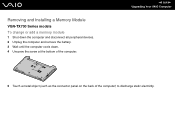
n 119 N Upgrading Your VAIO Computer 5 Touch a metal object (such as the connector panel on the back of the computer. Removing and Installing a Memory Module VGN-TX700 Series models To change or add a memory module 1 Shut down the computer and disconnect all peripheral devices. 2 Unplug the computer and remove the battery. 3 Wait until the computer cools down. 4 Unscrew the screw at the bottom of the computer) to discharge static electricity.
n 119 N Upgrading Your VAIO Computer 5 Touch a metal object (such as the connector panel on the back of the computer. Removing and Installing a Memory Module VGN-TX700 Series models To change or add a memory module 1 Shut down the computer and disconnect all peripheral devices. 2 Unplug the computer and remove the battery. 3 Wait until the computer cools down. 4 Unscrew the screw at the bottom of the computer) to discharge static electricity.


