
User Guide
Page 9
... lighting to find the best position. You can also purchase accessories for your comfort and work effectiveness. ❑ Positioning an external display - Choose a location where windows and lights do not create glare and reflection on the display. You can reduce eye strain and muscle fatigue by adjusting the tilt of the...
... lighting to find the best position. You can also purchase accessories for your comfort and work effectiveness. ❑ Positioning an external display - Choose a location where windows and lights do not create glare and reflection on the display. You can reduce eye strain and muscle fatigue by adjusting the tilt of the...
User Guide
Page 33
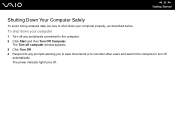
The power indicator light turns off computer window appears. 3 Click Turn Off. 4 Respond to any peripherals connected to turn off automatically. n 33 N Getting Started Shutting Down Your Computer Safely To avoid losing unsaved data, be sure to shut down your computer properly, as described below. To shut down your computer 1 Turn off any prompts warning you to save documents or to consider other users and wait for the computer to the computer. 2 Click Start and then Turn Off Computer. The Turn off .
The power indicator light turns off computer window appears. 3 Click Turn Off. 4 Respond to any peripherals connected to turn off automatically. n 33 N Getting Started Shutting Down Your Computer Safely To avoid losing unsaved data, be sure to shut down your computer properly, as described below. To shut down your computer 1 Turn off any prompts warning you to save documents or to consider other users and wait for the computer to the computer. 2 Click Start and then Turn Off Computer. The Turn off .
User Guide
Page 35
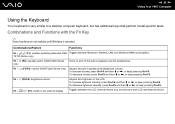
... the Fn Key ✍ Some functions are not available until Windows is very similar to a desktop computer keyboard, but has additional keys that perform model-specific tasks. TX700 Series only) Fn + % (F2): speaker switch (VGN-FJ200 Series only) Turns on and off the built-in speaker...Feature Functions Fn + (F1): wireless switching (Selected VGN- To increase volume, press Fn+F4 and then M or ,, or keep pressing Fn+F4. n 35 N Using Your VAIO Computer Using the Keyboard Your keyboard is launched. Fn + 2 (F3/F4): volume (VGN-FJ200 Series only) Adjusts the built-in speakers and ...
... the Fn Key ✍ Some functions are not available until Windows is very similar to a desktop computer keyboard, but has additional keys that perform model-specific tasks. TX700 Series only) Fn + % (F2): speaker switch (VGN-FJ200 Series only) Turns on and off the built-in speaker...Feature Functions Fn + (F1): wireless switching (Selected VGN- To increase volume, press Fn+F4 and then M or ,, or keep pressing Fn+F4. n 35 N Using Your VAIO Computer Using the Keyboard Your keyboard is launched. Fn + 2 (F3/F4): volume (VGN-FJ200 Series only) Adjusts the built-in speakers and ...

User Guide
Page 36
For details on the power. Combinations/Feature Fn + (F10): zoom Fn + (F12): Hibernate n 36 N Using Your VAIO Computer Functions Changes the screen resolution to magnify/restore the screen view. ✍ The magnified view is not as clear as the standard view,... screen with graphic images as it is implemented by changing the resolution. This key combination is turned off. Provides for the lowest level of software windows may not work with a higher resolution. When you execute this key combination changes the resolution. When the LCD screen view is restored because pressing...
For details on the power. Combinations/Feature Fn + (F10): zoom Fn + (F12): Hibernate n 36 N Using Your VAIO Computer Functions Changes the screen resolution to magnify/restore the screen view. ✍ The magnified view is not as clear as the standard view,... screen with graphic images as it is implemented by changing the resolution. This key combination is turned off. Provides for the lowest level of software windows may not work with a higher resolution. When you execute this key combination changes the resolution. When the LCD screen view is restored because pressing...

User Guide
Page 38
.... When the computer is off or in Instant Mode as well as a Memory Stick media or SD card, without launching Windows. When Windows is launched and running . On VGN-TX700 Series models, the AV MODE, Play/Pause, Stop, Previous track, Next track, and Disc drive eject buttons support ...change the AV MODE button assignment. See the printed Instant Mode booklet for more information on the Instant Mode. n 38 N Using Your VAIO Computer Using Special-function Buttons Your computer is equipped with special buttons to help file on the AV Mode Button Settings utility for more information...
.... When the computer is off or in Instant Mode as well as a Memory Stick media or SD card, without launching Windows. When Windows is launched and running . On VGN-TX700 Series models, the AV MODE, Play/Pause, Stop, Previous track, Next track, and Disc drive eject buttons support ...change the AV MODE button assignment. See the printed Instant Mode booklet for more information on the Instant Mode. n 38 N Using Your VAIO Computer Using Special-function Buttons Your computer is equipped with special buttons to help file on the AV Mode Button Settings utility for more information...

User Guide
Page 39
... launched and running. Ejects the drive tray. VGN-FJ200 Series models Special-function button S1/S2 buttons Functions By default, the S1 button turns the volume on the optical disc drive. If this window, press and hold either button or launch and navigate through VAIO Central. You can change these button assignments on...
... launched and running. Ejects the drive tray. VGN-FJ200 Series models Special-function button S1/S2 buttons Functions By default, the S1 button turns the volume on the optical disc drive. If this window, press and hold either button or launch and navigate through VAIO Central. You can change these button assignments on...

User Guide
Page 40
...with the built-in MOTION EYE camera. ! Turning on the computer activates the built-in MOTION EYE camera is available on selected VGN-FJ200 Series models only. The viewer window may show some noises, for example horizontal lines, if you view a rapid-moving object. Note that the camera is activated ...before using the built-in MOTION EYE camera. n 40 N Using Your VAIO Computer Using the Built-in MOTION EYE Camera The built-in ...
...with the built-in MOTION EYE camera. ! Turning on the computer activates the built-in MOTION EYE camera is available on selected VGN-FJ200 Series models only. The viewer window may show some noises, for example horizontal lines, if you view a rapid-moving object. Note that the camera is activated ...before using the built-in MOTION EYE camera. n 40 N Using Your VAIO Computer Using the Built-in MOTION EYE Camera The built-in ...
User Guide
Page 48
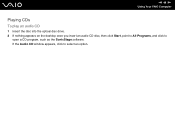
If the Audio CD window appears, click to open a CD program, such as the SonicStage software. n 48 N Using Your VAIO Computer Playing CDs To play an audio CD 1 Insert the disc into the optical disc drive. 2 If nothing appears on the desktop once you insert an audio CD disc, then click Start, point to All Programs, and click to select an option.
If the Audio CD window appears, click to open a CD program, such as the SonicStage software. n 48 N Using Your VAIO Computer Playing CDs To play an audio CD 1 Insert the disc into the optical disc drive. 2 If nothing appears on the desktop once you insert an audio CD disc, then click Start, point to All Programs, and click to select an option.
User Guide
Page 49
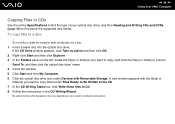
...you want to copy, right-click the file(s) or folder(s), point to Send To, and then click the optical disc drive* name. 4 Close the window. 5 Click Start and then My Computer. 6 Click the optical disc drive icon under Devices with the file(s) or folder(s) you want to copy listed... media. Do not strike or shake the computer while writing data onto a disc. 1 Insert a blank disc into the optical disc drive. A new window appears with Removable Storage. n 49 N Using Your VAIO Computer Copying Files to CDs See the online Specifications to find the type of your system's hardware configuration.
...you want to copy, right-click the file(s) or folder(s), point to Send To, and then click the optical disc drive* name. 4 Close the window. 5 Click Start and then My Computer. 6 Click the optical disc drive icon under Devices with the file(s) or folder(s) you want to copy listed... media. Do not strike or shake the computer while writing data onto a disc. 1 Insert a blank disc into the optical disc drive. A new window appears with Removable Storage. n 49 N Using Your VAIO Computer Copying Files to CDs See the online Specifications to find the type of your system's hardware configuration.

User Guide
Page 52
...function properly if you remove the card before the computer enters Hibernate mode. Make sure you are inserting the PC Card in the System Properties window, remove the software driver and then reinstall it. Do not force a PC Card into the slot. ✍ Some devices may enter Standby ... recognized. We recommend that a device connected to protect against debris entering the slot when not using a PC Card. n 52 N Using Your VAIO Computer ! On VGN-TX700 Series models, insert the PC Card slot protector to your system is inserted, the computer may damage the connector pins. If an "!" It...
...function properly if you remove the card before the computer enters Hibernate mode. Make sure you are inserting the PC Card in the System Properties window, remove the software driver and then reinstall it. Do not force a PC Card into the slot. ✍ Some devices may enter Standby ... recognized. We recommend that a device connected to protect against debris entering the slot when not using a PC Card. n 52 N Using Your VAIO Computer ! On VGN-TX700 Series models, insert the PC Card slot protector to your system is inserted, the computer may damage the connector pins. If an "!" It...
User Guide
Page 53
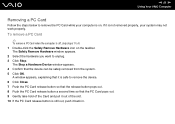
... If the PC Card release button is still out, push it is not removed properly, your computer is on the taskbar. The Safely Remove Hardware window appears. 2 Select the hardware you want to remove the device. 6 Click Close. 7 Push the PC Card release button so that the release button pops ... the device can be safely removed from the system. 5 Click OK. If it back in. A window appears, explaining that it is off, skip steps 1 to 6. 1 Double-click the Safely Remove Hardware icon on . n 53 N Using Your VAIO Computer Removing a PC Card Follow the steps below to remove the PC Card while your...
... If the PC Card release button is still out, push it is not removed properly, your computer is on the taskbar. The Safely Remove Hardware window appears. 2 Select the hardware you want to remove the device. 6 Click Close. 7 Push the PC Card release button so that the release button pops ... the device can be safely removed from the system. 5 Click OK. If it back in. A window appears, explaining that it is off, skip steps 1 to 6. 1 Double-click the Safely Remove Hardware icon on . n 53 N Using Your VAIO Computer Removing a PC Card Follow the steps below to remove the PC Card while your...
User Guide
Page 55
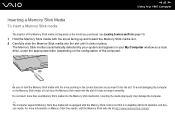
...http://www.memorystick.com/en/. Do not insert more information on the model you insert it into the Memory Stick media slot. n 55 N Using Your VAIO Computer Inserting a Memory Stick Media To insert a Memory Stick media ! Be sure to hold the Memory Stick media with both standard- and duosize media...facing up and toward the Memory Stick media slot. 2 Carefully slide the Memory Stick media into the slot if it clicks in your My Computer window as you purchased. See Locating Controls and Ports (page 11). 1 Hold the Memory Stick media with the Memory Stick combo slot that is ...
...http://www.memorystick.com/en/. Do not insert more information on the model you insert it into the Memory Stick media slot. n 55 N Using Your VAIO Computer Inserting a Memory Stick Media To insert a Memory Stick media ! Be sure to hold the Memory Stick media with both standard- and duosize media...facing up and toward the Memory Stick media slot. 2 Carefully slide the Memory Stick media into the slot if it clicks in your My Computer window as you purchased. See Locating Controls and Ports (page 11). 1 Hold the Memory Stick media with the Memory Stick combo slot that is ...
User Guide
Page 56
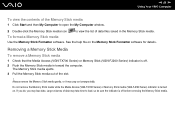
...remove the Memory Stick media gently, or it may lose data. n 56 N Using Your VAIO Computer To view the contents of the Memory Stick media 1 Click Start and then My Computer to open the My Computer window. 2 Double-click the Memory Stick media icon to load, so be sure the indicator ...Stick media in the Memory Stick media. Removing a Memory Stick Media To remove a Memory Stick media 1 Check that the Media Access (VGN-TX700 Series) or Memory Stick (VGN-FJ200 Series) indicator is turned on the Memory Stick Formatter software for details. Do not remove the Memory Stick media while the Media...
...remove the Memory Stick media gently, or it may lose data. n 56 N Using Your VAIO Computer To view the contents of the Memory Stick media 1 Click Start and then My Computer to open the My Computer window. 2 Double-click the Memory Stick media icon to load, so be sure the indicator ...Stick media in the Memory Stick media. Removing a Memory Stick Media To remove a Memory Stick media 1 Check that the Media Access (VGN-TX700 Series) or Memory Stick (VGN-FJ200 Series) indicator is turned on the Memory Stick Formatter software for details. Do not remove the Memory Stick media while the Media...
User Guide
Page 59
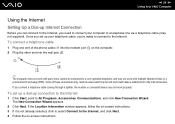
... branch exchange (PBX). To set up your computer to a telephone line via a telephone cable (may not supplied). If the Location Information window appears, follow the on -screen instructions. To connect a telephone cable 1 Plug one end of these connections may not work properly. The ...New Connection Wizard appears. 2 Click Next. n 59 N Using Your VAIO Computer Using the Internet Setting Up a Dial-up connection to the Internet 1 Click Start, point to All Programs, Accessories, Communications, and click ...
... branch exchange (PBX). To set up your computer to a telephone line via a telephone cable (may not supplied). If the Location Information window appears, follow the on -screen instructions. To connect a telephone cable 1 Plug one end of these connections may not work properly. The ...New Connection Wizard appears. 2 Click Next. n 59 N Using Your VAIO Computer Using the Internet Setting Up a Dial-up connection to the Internet 1 Click Start, point to All Programs, Accessories, Communications, and click ...
User Guide
Page 63
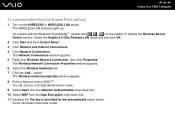
... functionality*1, double-click ( / ) on the WIRELESS or WIRELESS LAN switch. The Wireless network properties window appears. 8 Enter a Network name (SSID)*2. n 63 N Using Your VAIO Computer To communicate without an Access Point (ad-hoc) 1 Turn on the taskbar to display the ...window. Some information becomes visible. button. You can choose a 32-digit alphanumeric name. 9 Select Open from the Network Authentication drop-down box. 10 Select WEP from the Data Encryption drop-down box. 11 Deselect the The key is provided for me automatically option button. Select the Enable 2.4 GHz...
... functionality*1, double-click ( / ) on the WIRELESS or WIRELESS LAN switch. The Wireless network properties window appears. 8 Enter a Network name (SSID)*2. n 63 N Using Your VAIO Computer To communicate without an Access Point (ad-hoc) 1 Turn on the taskbar to display the ...window. Some information becomes visible. button. You can choose a 32-digit alphanumeric name. 9 Select Open from the Network Authentication drop-down box. 10 Select WEP from the Data Encryption drop-down box. 11 Deselect the The key is provided for me automatically option button. Select the Enable 2.4 GHz...
User Guide
Page 64
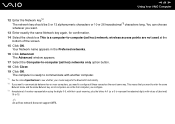
n 64 N Using Your VAIO Computer 12 Enter the Network key*2. You can choose whatever you need to enter the same Network name and the same Network key on all ... in the Preferred networks. 16 Click Advanced. The network key should be 5 or 13 alphanumeric characters or 10 or 26 hexadecimal*3 characters long. The Advanced window appears. 17 Select the Computer-to configure all these computers the exact same way. This means that you need to -computer (ad hoc) networks only...
n 64 N Using Your VAIO Computer 12 Enter the Network key*2. You can choose whatever you need to enter the same Network name and the same Network key on all ... in the Preferred networks. 16 Click Advanced. The network key should be 5 or 13 alphanumeric characters or 10 or 26 hexadecimal*3 characters long. The Advanced window appears. 17 Select the Computer-to configure all these computers the exact same way. This means that you need to -computer (ad hoc) networks only...
User Guide
Page 65
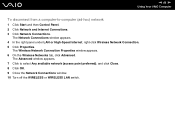
... and Internet Connections. 3 Click Network Connections. The Network Connections window appears. 4 In the right panel under LAN or High-Speed Internet, right-click Wireless Network Connection. 5 Click Properties. n 65 N Using Your VAIO Computer To disconnect from a computer-to select Any available network ...(access point preferred), and click Close. 8 Click OK. 9 Close the Network Connections window. 10 Turn off the WIRELESS or WIRELESS LAN switch.
... and Internet Connections. 3 Click Network Connections. The Network Connections window appears. 4 In the right panel under LAN or High-Speed Internet, right-click Wireless Network Connection. 5 Click Properties. n 65 N Using Your VAIO Computer To disconnect from a computer-to select Any available network ...(access point preferred), and click Close. 8 Click OK. 9 Close the Network Connections window. 10 Turn off the WIRELESS or WIRELESS LAN switch.
User Guide
Page 67
... access point for more information. 2 Turn on -screen instructions. * See the online Specifications to display the Wireless Device Switch window. Select the Enable 2.4 GHz Wireless LAN check box and click OK. 3 Click Start and then Control Panel. 4 Click Network and Internet Connections. 5 Click...to see whether your model supports the Bluetooth functionality. The Wireless Network Connection window appears. 7 Follow the on the WIRELESS or WIRELESS LAN switch. The WIRELESS LAN indicator lights up . n 67 N Using Your VAIO Computer To connect to a wireless network 1 Make sure an access point ...
... access point for more information. 2 Turn on -screen instructions. * See the online Specifications to display the Wireless Device Switch window. Select the Enable 2.4 GHz Wireless LAN check box and click OK. 3 Click Start and then Control Panel. 4 Click Network and Internet Connections. 5 Click...to see whether your model supports the Bluetooth functionality. The Wireless Network Connection window appears. 7 Follow the on the WIRELESS or WIRELESS LAN switch. The WIRELESS LAN indicator lights up . n 67 N Using Your VAIO Computer To connect to a wireless network 1 Make sure an access point ...
User Guide
Page 68
...while accessing remote documents, files, or resources may result in data loss. ✍ The WPA key needs to All Programs, and click VAIO Wireless Utility. On models with more information. 2 Turn on -screen instructions. * See the online Specifications to see whether your model supports...Models with the VAIO Wireless Utility software only) Use the VAIO Wireless Utility software to guide you through the set up process and provide you with the Bluetooth functionality*, double-click ( / ) on the taskbar to display the Wireless Device Switch window. Select the Enable 2.4 GHz Wireless LAN check ...
...while accessing remote documents, files, or resources may result in data loss. ✍ The WPA key needs to All Programs, and click VAIO Wireless Utility. On models with more information. 2 Turn on -screen instructions. * See the online Specifications to see whether your model supports...Models with the VAIO Wireless Utility software only) Use the VAIO Wireless Utility software to guide you through the set up process and provide you with the Bluetooth functionality*, double-click ( / ) on the taskbar to display the Wireless Device Switch window. Select the Enable 2.4 GHz Wireless LAN check ...
User Guide
Page 70
...Bluetooth functionality is available on the taskbar to 33 feet (10 meters) range in open space. ❑ Users in USA Please see the VAIO SmartWi Connection Utility Guide for setting up Bluetooth functionality. ❑ Users in Canada and Latin American countries or areas Please see the following for... setting up to display the Wireless Device Switch window. 3 Select the Enable Bluetooth Device option. 4 Click OK. To connect to a Bluetooth device 1 Turn on the WIRELESS switch. 2 Double-click ( /...
...Bluetooth functionality is available on the taskbar to 33 feet (10 meters) range in open space. ❑ Users in USA Please see the VAIO SmartWi Connection Utility Guide for setting up Bluetooth functionality. ❑ Users in Canada and Latin American countries or areas Please see the following for... setting up to display the Wireless Device Switch window. 3 Select the Enable Bluetooth Device option. 4 Click OK. To connect to a Bluetooth device 1 Turn on the WIRELESS switch. 2 Double-click ( /...


