

User Guide
Page 10
... so on) at a time, following the manufacturer's instructions. ❑ Locating Controls and Ports (page 11) ❑ About the Indicator Lights (page 24) ❑ Connecting a Power Source (page 26) ❑ Using the Battery Pack (page 27) ❑ Shutting Down Your Computer Safely (page 33) n 10 N Getting Started Getting Started This section describes how to start up... first computer startup, do not connect any new hardware that did not normally come with using your computer. Make sure to get started with your VAIO computer. !
... so on) at a time, following the manufacturer's instructions. ❑ Locating Controls and Ports (page 11) ❑ About the Indicator Lights (page 24) ❑ Connecting a Power Source (page 26) ❑ Using the Battery Pack (page 27) ❑ Shutting Down Your Computer Safely (page 33) n 10 N Getting Started Getting Started This section describes how to start up... first computer startup, do not connect any new hardware that did not normally come with using your computer. Make sure to get started with your VAIO computer. !

User Guide
Page 11
n 11 N Getting Started Locating Controls and Ports Take a moment to identify the controls and ports shown on the following pages.
n 11 N Getting Started Locating Controls and Ports Take a moment to identify the controls and ports shown on the following pages.
User Guide
Page 12
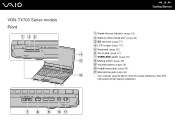
VGN-TX700 Series models Front n 12 N Getting Started A Media Access indicator (page 24) B Memory Stick media slot* (page 54) C SD card slot (page 57) D LCD screen (page 127) E Keyboard (page 35) F Touch pad (page 37) G WIRELESS switch (page 60) H Muting button (page 38) I Volume buttons (page 38) J Headphones jack (page 84) K Microphone jack (page 94) * Your computer supports Memory Stick Duo media and Memory Stick PRO high speed and high capacity capabilities.
VGN-TX700 Series models Front n 12 N Getting Started A Media Access indicator (page 24) B Memory Stick media slot* (page 54) C SD card slot (page 57) D LCD screen (page 127) E Keyboard (page 35) F Touch pad (page 37) G WIRELESS switch (page 60) H Muting button (page 38) I Volume buttons (page 38) J Headphones jack (page 84) K Microphone jack (page 94) * Your computer supports Memory Stick Duo media and Memory Stick PRO high speed and high capacity capabilities.
User Guide
Page 13
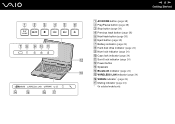
n 13 N Getting Started A AV MODE button (page 38) B Play/Pause button (page 38) C Stop button (page 38) D Previous track button (page 38) E Next track button (page 38) F Eject button (page 38) G Battery indicator (page 24) H Hard disk drive indicator (page 24) I Num lock indicator (page 24) J Caps lock indicator (page 24) K Scroll lock indicator (page 24) L Power button M Speakers N Bluetooth indicator (page 24) O WIRELESS LAN indicator (page 24) P WWAN indicator* (page 24) Q Muting indicator (page 24) * On selected models only.
n 13 N Getting Started A AV MODE button (page 38) B Play/Pause button (page 38) C Stop button (page 38) D Previous track button (page 38) E Next track button (page 38) F Eject button (page 38) G Battery indicator (page 24) H Hard disk drive indicator (page 24) I Num lock indicator (page 24) J Caps lock indicator (page 24) K Scroll lock indicator (page 24) L Power button M Speakers N Bluetooth indicator (page 24) O WIRELESS LAN indicator (page 24) P WWAN indicator* (page 24) Q Muting indicator (page 24) * On selected models only.
User Guide
Page 14
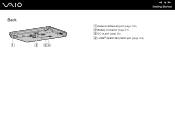
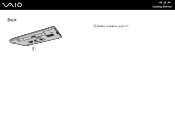
Back n 14 N Getting Started A Network (Ethernet) port (page 102) B Battery connector (page 27) C DC In port (page 26) D i.LINK® (IEEE1394) S400 port (page 100)
Back n 14 N Getting Started A Network (Ethernet) port (page 102) B Battery connector (page 27) C DC In port (page 26) D i.LINK® (IEEE1394) S400 port (page 100)

User Guide
Page 15
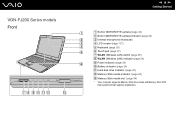
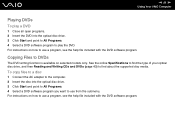
Right n 15 N Getting Started A Optical disc drive (page 41) B Optical disc drive indicator (page 24) C Manual eject hole (page 163) D Drive eject button (page 41) E Monitor (VGA) port (page 86) F WWAN antenna* (page 60) * On selected models only.
Right n 15 N Getting Started A Optical disc drive (page 41) B Optical disc drive indicator (page 24) C Manual eject hole (page 163) D Drive eject button (page 41) E Monitor (VGA) port (page 86) F WWAN antenna* (page 60) * On selected models only.

User Guide
Page 16
speeds. Left n 16 N Getting Started A Hi-Speed USB (USB 2.0) ports* (page 95) B PC Card slot (page 51) C PC Card eject button (page 53) D Air vent E Modem port (page 59) * Supports high-/full-/low-
speeds. Left n 16 N Getting Started A Hi-Speed USB (USB 2.0) ports* (page 95) B PC Card slot (page 51) C PC Card eject button (page 53) D Air vent E Modem port (page 59) * Supports high-/full-/low-

User Guide
Page 17
Bottom n 17 N Getting Started A Air vent B Port replicator connector (page 78) C Release latch (page 31)
Bottom n 17 N Getting Started A Air vent B Port replicator connector (page 78) C Release latch (page 31)
User Guide
Page 18
VGN-FJ200 Series models Front n 18 N Getting Started A Built-in MOTION EYE camera (page 40) B Built-in MOTION EYE camera indicator (page 24) C Internal microphone (monaural) D LCD screen (page 127) E Keyboard (page 35) F Touch pad (page 37) G WLAN (Wireless LAN) switch (page 60) H WLAN (Wireless LAN) indicator (page 24) I Power indicator (page 24) J Battery indicator (page 24) K Hard disk drive indicator...
VGN-FJ200 Series models Front n 18 N Getting Started A Built-in MOTION EYE camera (page 40) B Built-in MOTION EYE camera indicator (page 24) C Internal microphone (monaural) D LCD screen (page 127) E Keyboard (page 35) F Touch pad (page 37) G WLAN (Wireless LAN) switch (page 60) H WLAN (Wireless LAN) indicator (page 24) I Power indicator (page 24) J Battery indicator (page 24) K Hard disk drive indicator...

User Guide
Page 19
A Speakers B Num lock indicator (page 24) C Caps lock indicator (page 24) D Scroll lock indicator (page 24) E S1/S2 buttons (page 38) F Power button n 19 N Getting Started
A Speakers B Num lock indicator (page 24) C Caps lock indicator (page 24) D Scroll lock indicator (page 24) E S1/S2 buttons (page 38) F Power button n 19 N Getting Started
User Guide
Page 20
Back A Battery connector (page 27) n 20 N Getting Started
Back A Battery connector (page 27) n 20 N Getting Started

User Guide
Page 21
speeds. Right n 21 N Getting Started A Headphones jack (page 84) B Microphone jack (page 94) C AV Out jack (page 88) D Hi-Speed USB (USB 2.0) ports* (page 95) E Optical disc drive indicator (page 24) F Drive eject button (page 41) G Manual eject hole (page 163) H Security slot I DC In port (page 26) * Supports high-/full-/low-
speeds. Right n 21 N Getting Started A Headphones jack (page 84) B Microphone jack (page 94) C AV Out jack (page 88) D Hi-Speed USB (USB 2.0) ports* (page 95) E Optical disc drive indicator (page 24) F Drive eject button (page 41) G Manual eject hole (page 163) H Security slot I DC In port (page 26) * Supports high-/full-/low-

User Guide
Page 22
Left n 22 N Getting Started A Network (Ethernet) port *1 (page 102) B Modem port (page 59) C i.LINK® (IEEE1394) S400 port (page 100) D Air vent E Monitor (VGA) port *1(page 86) F Hi-Speed USB (USB 2.0) port*1 *2 (page 95) G PC Card slot (page 51) H PC Card eject button (page 53) *1 Disabled when the computer is attached to the optional port replicator. *2 Supports high-/full-/low- Obstructed and unavailable when the computer is attached to the optional port replicator. speeds.
Left n 22 N Getting Started A Network (Ethernet) port *1 (page 102) B Modem port (page 59) C i.LINK® (IEEE1394) S400 port (page 100) D Air vent E Monitor (VGA) port *1(page 86) F Hi-Speed USB (USB 2.0) port*1 *2 (page 95) G PC Card slot (page 51) H PC Card eject button (page 53) *1 Disabled when the computer is attached to the optional port replicator. *2 Supports high-/full-/low- Obstructed and unavailable when the computer is attached to the optional port replicator. speeds.

User Guide
Page 23
Bottom n 23 N Getting Started A Port replicator connector (page 78) B Air vents
Bottom n 23 N Getting Started A Port replicator connector (page 78) B Air vents
User Guide
Page 26
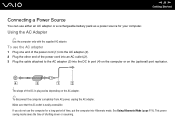
The shape of time, put the computer into Hibernate mode. See Using Hibernate Mode (page 111). n 26 N Getting Started Connecting a Power Source You can use either an AC adapter or a rechargeable battery pack as a power source for a long period of ...
The shape of time, put the computer into Hibernate mode. See Using Hibernate Mode (page 111). n 26 N Getting Started Connecting a Power Source You can use either an AC adapter or a rechargeable battery pack as a power source for a long period of ...
User Guide
Page 34
... MOTION EYE Camera (page 40) ❑ Using the Optical Disc Drive (page 41) ❑ Using PC Cards (page 51) ❑ Using the Memory Stick Media (page 54) ❑ Using Other Memory Cards (page 57) ❑ Using the Internet (page 59) ❑ Using Wireless LAN (WLAN) (page 60) ❑ Using the Bluetooth Functionality (page 70) n 34 N Using Your VAIO Computer
... MOTION EYE Camera (page 40) ❑ Using the Optical Disc Drive (page 41) ❑ Using PC Cards (page 51) ❑ Using the Memory Stick Media (page 54) ❑ Using Other Memory Cards (page 57) ❑ Using the Internet (page 59) ❑ Using Wireless LAN (WLAN) (page 60) ❑ Using the Bluetooth Functionality (page 70) n 34 N Using Your VAIO Computer

User Guide
Page 36
...not work with a higher resolution. For details on the power. Combinations/Feature Fn + (F10): zoom Fn + (F12): Hibernate n 36 N Using Your VAIO Computer Functions Changes the screen resolution to magnify/restore the screen view. ✍ The magnified view is not as clear as the standard view, as...disabled during video playback. This key combination is magnified, switching the view to turn on power management, see Using the Power Saving Modes (page 108). To return the system to its original state, use the power button to the external display disables the function and restores the ...
...not work with a higher resolution. For details on the power. Combinations/Feature Fn + (F10): zoom Fn + (F12): Hibernate n 36 N Using Your VAIO Computer Functions Changes the screen resolution to magnify/restore the screen view. ✍ The magnified view is not as clear as the standard view, as...disabled during video playback. This key combination is magnified, switching the view to turn on power management, see Using the Power Saving Modes (page 108). To return the system to its original state, use the power button to the external display disables the function and restores the ...

User Guide
Page 41
See Locating Controls and Ports (page 11). 1 Turn on the computer again to the optical disc drive is not powered. The tray slides out. ✍ On VGN-TX700 Series models, if power supply to launch the VAIO Recovery Wizard. Insert your system, turn on the computer. 2 Press the drive eject button... a disc ! Note that the substitute drive eject button is disabled when the optical disc drive is disabled by VAIO Power Management, it will take a while to open the drive. n 41 N Using Your VAIO Computer Using the Optical Disc Drive Your computer is equipped with an optical disc drive.
See Locating Controls and Ports (page 11). 1 Turn on the computer again to the optical disc drive is not powered. The tray slides out. ✍ On VGN-TX700 Series models, if power supply to launch the VAIO Recovery Wizard. Insert your system, turn on the computer. 2 Press the drive eject button... a disc ! Note that the substitute drive eject button is disabled when the optical disc drive is disabled by VAIO Power Management, it will take a while to open the drive. n 41 N Using Your VAIO Computer Using the Optical Disc Drive Your computer is equipped with an optical disc drive.
User Guide
Page 49
A new window appears with Removable Storage. n 49 N Using Your VAIO Computer Copying Files to CDs See the online Specifications to find about the supported disc media. To copy files to Send To, and then click ... CD Writing Tasks box, click Write these files to find the type of your optical disc drive, and then Reading and Writing CDs and DVDs (page 43) to CD. 8 Follow the instructions in the CD Writing Wizard. * The read/write drive letter designation may vary, depending on your system's hardware configuration...
A new window appears with Removable Storage. n 49 N Using Your VAIO Computer Copying Files to CDs See the online Specifications to find about the supported disc media. To copy files to Send To, and then click ... CD Writing Tasks box, click Write these files to find the type of your optical disc drive, and then Reading and Writing CDs and DVDs (page 43) to CD. 8 Follow the instructions in the CD Writing Wizard. * The read/write drive letter designation may vary, depending on your system's hardware configuration...
User Guide
Page 50
... file included with the DVD software program. For instructions on how to use from the submenu. For instructions on selected models only. n 50 N Using Your VAIO Computer Playing DVDs To play the DVD. Copying Files to find the type of your optical disc drive, and then Reading and Writing CDs and... DVDs (page 43) to DVDs The DVD writing function is available on how to play a DVD 1 Close all open programs. 2 Insert the DVD into the optical disc...
... file included with the DVD software program. For instructions on how to use from the submenu. For instructions on selected models only. n 50 N Using Your VAIO Computer Playing DVDs To play the DVD. Copying Files to find the type of your optical disc drive, and then Reading and Writing CDs and... DVDs (page 43) to DVDs The DVD writing function is available on how to play a DVD 1 Close all open programs. 2 Insert the DVD into the optical disc...