User Guide
Page 9
...the following categories to wireless tutorials. ❑ Security Keep your data safe and your VAIO computer. Choose from Microsoft and Sony. ❑ VAIO Sites Contains links to other Internet sites you might find the on how to back up... and restore your operating system, system software, and your personal data. ❑ Wireless & Network Learn about wireless connections including Bluetooth Wireless technology and Wireless LAN. Run utilities that include VAIO Media Setup and Windows...
...the following categories to wireless tutorials. ❑ Security Keep your data safe and your VAIO computer. Choose from Microsoft and Sony. ❑ VAIO Sites Contains links to other Internet sites you might find the on how to back up... and restore your operating system, system software, and your personal data. ❑ Wireless & Network Learn about wireless connections including Bluetooth Wireless technology and Wireless LAN. Run utilities that include VAIO Media Setup and Windows...

User Guide
Page 11
... fatigue by adjusting the tilt of the monitor. Use indirect lighting to your comfort and work effectiveness. ❑ Positioning an external display - Choose a location where windows and lights do not create glare and reflection on the display. Adjust the brightness setting of the computer's display - Make sure the display screen is...
... fatigue by adjusting the tilt of the monitor. Use indirect lighting to your comfort and work effectiveness. ❑ Positioning an external display - Choose a location where windows and lights do not create glare and reflection on the display. Adjust the brightness setting of the computer's display - Make sure the display screen is...

User Guide
Page 29
... Bluetooth, wireless LAN, and wireless WAN functionalities. To increase lightness intensity, press Fn+F6 and then M or ,, or keep pressing Fn+F6. n 29 N Using Your VAIO Computer Using the Keyboard Your keyboard is very similar to a desktop computer keyboard, but has additional keys that perform model-specific tasks. Combinations and Functions...
... Bluetooth, wireless LAN, and wireless WAN functionalities. To increase lightness intensity, press Fn+F6 and then M or ,, or keep pressing Fn+F6. n 29 N Using Your VAIO Computer Using the Keyboard Your keyboard is very similar to a desktop computer keyboard, but has additional keys that perform model-specific tasks. Combinations and Functions...

User Guide
Page 32
... playback with the WinDVD software or the next song in the CD during playback with the SonicStage software. n 32 N Using Your VAIO Computer Using Special-function Buttons Your computer is launched and running. See the printed Instant Mode booklet for more information on the Instant ...buttons support Instant Mode. Special-function button AV MODE button Play/Pause button Stop button Previous track button Next track button Functions When Windows is launched and running . You need administrator rights on the AV Mode Button Settings utility for more information. This button is ...
... playback with the WinDVD software or the next song in the CD during playback with the SonicStage software. n 32 N Using Your VAIO Computer Using Special-function Buttons Your computer is launched and running. See the printed Instant Mode booklet for more information on the Instant ...buttons support Instant Mode. Special-function button AV MODE button Play/Pause button Stop button Previous track button Next track button Functions When Windows is launched and running . You need administrator rights on the AV Mode Button Settings utility for more information. This button is ...

User Guide
Page 42
n 42 N Using Your VAIO Computer Playing CDs To play an audio CD 1 Insert a disc into the optical disc drive. 2 If nothing... them to select an option. Do not strike or shake your computer while writing data to play the CD. If the AutoPlay window appears, click Burn files to disc and follow the on the desktop, then click Start, All Programs, and the desired CD software... to a disc. 1 Insert a disc into the optical disc drive. If the Audio CD window appears, click to the empty disc folder. 3 Close the disc folder. Copying Files to CDs To copy files to a disc !
n 42 N Using Your VAIO Computer Playing CDs To play an audio CD 1 Insert a disc into the optical disc drive. 2 If nothing... them to select an option. Do not strike or shake your computer while writing data to play the CD. If the AutoPlay window appears, click Burn files to disc and follow the on the desktop, then click Start, All Programs, and the desired CD software... to a disc. 1 Insert a disc into the optical disc drive. If the Audio CD window appears, click to the empty disc folder. 3 Close the disc folder. Copying Files to CDs To copy files to a disc !

User Guide
Page 46
If it is still out, push it back in all the way to the end. n 46 N Using Your VAIO Computer Removing a PC Card Follow the steps below to remove the PC Card while your computer is on the taskbar. A message appears stating it out ... from the system. 5 Click OK. To remove a PC Card ✍ To remove a PC Card when your system may not work properly. The Stop a Hardware device window appears. 4 Confirm that the PC Card pops out. 10 Gently take hold of the Card and pull it is now safe to remove the hardware...
If it is still out, push it back in all the way to the end. n 46 N Using Your VAIO Computer Removing a PC Card Follow the steps below to remove the PC Card while your computer is on the taskbar. A message appears stating it out ... from the system. 5 Click OK. To remove a PC Card ✍ To remove a PC Card when your system may not work properly. The Stop a Hardware device window appears. 4 Confirm that the PC Card pops out. 10 Gently take hold of the Card and pull it is now safe to remove the hardware...
User Guide
Page 48
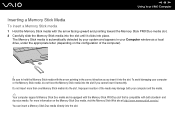
... both standard- You can insert a Memory Stick Duo media directly into place. n 48 N Using Your VAIO Computer Inserting a Memory Stick Media To insert a Memory Stick media 1 Hold the Memory Stick media with both your Computer window as you cannot insert it smoothly. Improper insertion of the computer). ! To avoid damaging your system...
... both standard- You can insert a Memory Stick Duo media directly into place. n 48 N Using Your VAIO Computer Inserting a Memory Stick Media To insert a Memory Stick media 1 Hold the Memory Stick media with both your Computer window as you cannot insert it smoothly. Improper insertion of the computer). ! To avoid damaging your system...

User Guide
Page 49
The size of your computer, follow these steps. ! n 49 N Using Your VAIO Computer To view the contents of the Memory Stick media 1 Click Start and Computer to open the Computer window. 3 Right-click the Memory Stick media icon and select Format. 4 Click Restore device defaults. ! If you select ...malfunction. 1 Carefully slide the Memory Stick media into the slot until it clicks into place. 2 Click Start and Computer to open the Computer window. 2 Double-click the Memory Stick media icon to reformat the media with your valuable data. Be sure to format the media and supports the...
The size of your computer, follow these steps. ! n 49 N Using Your VAIO Computer To view the contents of the Memory Stick media 1 Click Start and Computer to open the Computer window. 3 Right-click the Memory Stick media icon and select Format. 4 Click Restore device defaults. ! If you select ...malfunction. 1 Carefully slide the Memory Stick media into the slot until it clicks into place. 2 Click Start and Computer to open the Computer window. 2 Double-click the Memory Stick media icon to reformat the media with your valuable data. Be sure to format the media and supports the...

User Guide
Page 55
n 55 N Using Your VAIO Computer Using the Internet Setting Up a Dial-up Internet Connection Before you can connect to the Internet, you 're ready to connect to the Internet. ... device may not work with a telephone cable (not supplied). To set up your telephone cable connection, you need to connect your computer to the Internet window appears. 3 Click Dial-up connection to the Internet 1 Click Start and Control Panel 2 Click Connect to a coin-operated telephone, and may result in excess electrical...
n 55 N Using Your VAIO Computer Using the Internet Setting Up a Dial-up Internet Connection Before you can connect to the Internet, you 're ready to connect to the Internet. ... device may not work with a telephone cable (not supplied). To set up your telephone cable connection, you need to connect your computer to the Internet window appears. 3 Click Dial-up connection to the Internet 1 Click Start and Control Panel 2 Click Connect to a coin-operated telephone, and may result in excess electrical...

User Guide
Page 60
n 60 N Using Your VAIO Computer To communicate without an access point (ad-hoc) ! Select your model supports the Bluetooth functionality and/or the IEEE 802.11a/b/g standard. The Set up a connection or network window appears. 5 Select an option to specify the ad-hoc network settings and click Next...LAN indicator lights up a connection or network on -screen instructions. * See the online Specifications to display the Wireless Device Switch window. You cannot select the 5 GHz bandwidth, which is used for the IEEE 802.11a standard, on ad-hoc networks. 1 Turn on the taskbar to see whether...
n 60 N Using Your VAIO Computer To communicate without an access point (ad-hoc) ! Select your model supports the Bluetooth functionality and/or the IEEE 802.11a/b/g standard. The Set up a connection or network window appears. 5 Select an option to specify the ad-hoc network settings and click Next...LAN indicator lights up a connection or network on -screen instructions. * See the online Specifications to display the Wireless Device Switch window. You cannot select the 5 GHz bandwidth, which is used for the IEEE 802.11a standard, on ad-hoc networks. 1 Turn on the taskbar to see whether...

User Guide
Page 62
... Bluetooth functionality* and/or the IEEE 802.11a/b/g standard*, double-click ( / ) on the WIRELESS or WIRELESS LAN switch. n 62 N Using Your VAIO Computer To connect to a wireless network 1 Make sure an access point is set up . To disconnect from a wireless network Turn off the wireless LAN ...result in data loss. ✍ For WPA-PSK or WPA2-PSK authentication, you must enter a network key of 8 to display the Wireless Device Switch window. Select your desired wireless option(s) and click OK. 3 Click Start and Control Panel. 4 Click View network status and tasks under Network and Internet....
... Bluetooth functionality* and/or the IEEE 802.11a/b/g standard*, double-click ( / ) on the WIRELESS or WIRELESS LAN switch. n 62 N Using Your VAIO Computer To connect to a wireless network 1 Make sure an access point is set up . To disconnect from a wireless network Turn off the wireless LAN ...result in data loss. ✍ For WPA-PSK or WPA2-PSK authentication, you must enter a network key of 8 to display the Wireless Device Switch window. Select your desired wireless option(s) and click OK. 3 Click Start and Control Panel. 4 Click View network status and tasks under Network and Internet....
User Guide
Page 63
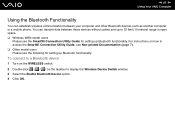
n 63 N Using Your VAIO Computer Using the Bluetooth Functionality You can transfer data between your computer and other Bluetooth devices such as another computer or a mobile phone. To connect ...-printed Documentation (page 7). ❑ Other model users Please see the SmartWi Connection Utility Guide for setting up Bluetooth functionality. For instructions on the taskbar to 33 feet (10 meters) range in open space. ❑ Wireless WAN model users Please see the following for setting up to display the Wireless Device Switch...
n 63 N Using Your VAIO Computer Using the Bluetooth Functionality You can transfer data between your computer and other Bluetooth devices such as another computer or a mobile phone. To connect ...-printed Documentation (page 7). ❑ Other model users Please see the SmartWi Connection Utility Guide for setting up Bluetooth functionality. For instructions on the taskbar to 33 feet (10 meters) range in open space. ❑ Wireless WAN model users Please see the following for setting up to display the Wireless Device Switch...

User Guide
Page 68
...that came with your Bluetooth headset. The Bluetooth Manager-Bluetooth Security window appears when a connection is established. 7 Enter "0000" for Bluetooth Passkey (PIN) and then click OK. 8 Click Next. n 68 N Using Your VAIO Computer Using the Bluetooth Headset The Bluetooth headset (not supplied) will... come in range and lists available devices, if any. 6 Select the device name for your Bluetooth headset and then click Next. The Add New Connection Wizard window appears. 5 Select Express Mode...
...that came with your Bluetooth headset. The Bluetooth Manager-Bluetooth Security window appears when a connection is established. 7 Enter "0000" for Bluetooth Passkey (PIN) and then click OK. 8 Click Next. n 68 N Using Your VAIO Computer Using the Bluetooth Headset The Bluetooth headset (not supplied) will... come in range and lists available devices, if any. 6 Select the device name for your Bluetooth headset and then click Next. The Add New Connection Wizard window appears. 5 Select Express Mode...

User Guide
Page 69
n 69 N Using Your VAIO Computer To disconnect the headset from your computer 1 Right-click the Bluetooth icon on the taskbar and select Bluetooth Settings from the menu. 3 Click Yes. The Bluetooth Settings window appears. 2 Right-click the headset icon and select Disconnect from the menu.
n 69 N Using Your VAIO Computer To disconnect the headset from your computer 1 Right-click the Bluetooth icon on the taskbar and select Bluetooth Settings from the menu. 3 Click Yes. The Bluetooth Settings window appears. 2 Right-click the headset icon and select Disconnect from the menu.

User Guide
Page 76
On the Windows operating system, you want to connect a VGA monitor, plug the display cable (2) (not supplied) into an AC outlet. 2 If you can use an external display ...
On the Windows operating system, you want to connect a VGA monitor, plug the display cable (2) (not supplied) into an AC outlet. 2 If you can use an external display ...

User Guide
Page 79
To select a display 1 Right-click on the type of your external display or projector. The Display Settings window appears. 3 Follow the on-screen instructions to change the settings. ✍ You may not be used as the primary monitor when an external display (desktop ...
To select a display 1 Right-click on the type of your external display or projector. The Display Settings window appears. 3 Follow the on-screen instructions to change the settings. ✍ You may not be used as the primary monitor when an external display (desktop ...

User Guide
Page 80
... properly. Certain software applications may not support the Multiple Monitors function. Set fewer colors or a lower resolution for each display, do not divide one single window on two displays; If you are using Multiple Monitors mode; otherwise your desktop across separate displays. Make sure that your computer screen and the external...) port, your computer does not enter Sleep or Hibernate mode while you set different colors on each display. You can function as an open application window or a toolbar, from one display to the other .
... properly. Certain software applications may not support the Multiple Monitors function. Set fewer colors or a lower resolution for each display, do not divide one single window on two displays; If you are using Multiple Monitors mode; otherwise your desktop across separate displays. Make sure that your computer screen and the external...) port, your computer does not enter Sleep or Hibernate mode while you set different colors on each display. You can function as an open application window or a toolbar, from one display to the other .

User Guide
Page 81
n 81 N Using Peripheral Devices To select the Multiple Monitors mode 1 Right-click on -screen instructions to change the settings. ✍ Additionally, you can set the display colors and resolution for each display and customize the Multiple Monitors mode. The Display Settings window appears. 3 Follow the on the desktop and select Personalize from the shortcut menu. 2 Click Display Settings.
n 81 N Using Peripheral Devices To select the Multiple Monitors mode 1 Right-click on -screen instructions to change the settings. ✍ Additionally, you can set the display colors and resolution for each display and customize the Multiple Monitors mode. The Display Settings window appears. 3 Follow the on the desktop and select Personalize from the shortcut menu. 2 Click Display Settings.

User Guide
Page 85
... the floppy disk drive. 2 Double-click the Safely Remove Hardware icon on or off , you want to unplug. 4 Click Stop. The Safely Remove Hardware window appears. 3 Select the floppy disk drive you can unplug the USB cable directly from the system. 6 Click OK. n 85 N Using Peripheral Devices Disconnecting ...a USB floppy disk drive You can disconnect a USB floppy disk drive when your computer is on the taskbar. The Stop a Hardware device window appears. 5 Confirm that the floppy disk drive can be safely removed from the computer. If the computer is now safe to remove the hardware...
... the floppy disk drive. 2 Double-click the Safely Remove Hardware icon on or off , you want to unplug. 4 Click Stop. The Safely Remove Hardware window appears. 3 Select the floppy disk drive you can unplug the USB cable directly from the system. 6 Click OK. n 85 N Using Peripheral Devices Disconnecting ...a USB floppy disk drive You can disconnect a USB floppy disk drive when your computer is on the taskbar. The Stop a Hardware device window appears. 5 Confirm that the floppy disk drive can be safely removed from the computer. If the computer is now safe to remove the hardware...

User Guide
Page 86
To connect a printer using the USB port 1 Plug the power cord (1) of your printer into an AC outlet. 2 Choose the USB port (3) you prefer to use. 3 Plug one end of Windows to the computer. Connecting a Printer Using the USB Port You can connect a Windows-compatible printer to your computer to print documents. n 86 N Using Peripheral Devices Connecting a Printer You can connect a USB printer compatible with your version of a USB printer cable (2) (not supplied) into the USB port and the other end to your printer.
To connect a printer using the USB port 1 Plug the power cord (1) of your printer into an AC outlet. 2 Choose the USB port (3) you prefer to use. 3 Plug one end of Windows to the computer. Connecting a Printer Using the USB Port You can connect a Windows-compatible printer to your computer to print documents. n 86 N Using Peripheral Devices Connecting a Printer You can connect a USB printer compatible with your version of a USB printer cable (2) (not supplied) into the USB port and the other end to your printer.


