
User Guide
Page 2
......16 About the Indicator Lights ...22 Connecting a Power Source ...24 Using the Battery Pack ...25 Shutting Down Your Computer Safely ...32 Using Your VAIO Computer ...33 Using the Keyboard ...34 Using the Touch Pad ...36 Using Special-function Buttons ...37 Using the Built-in MOTION EYE Camera...39... Using the Optical Disc Drive ...40 Using the ExpressCard Module ...49 Using the Memory Stick Media ...53 Using Other Memory Cards ...60 Using the Internet...64 Using Wireless LAN...
......16 About the Indicator Lights ...22 Connecting a Power Source ...24 Using the Battery Pack ...25 Shutting Down Your Computer Safely ...32 Using Your VAIO Computer ...33 Using the Keyboard ...34 Using the Touch Pad ...36 Using Special-function Buttons ...37 Using the Built-in MOTION EYE Camera...39... Using the Optical Disc Drive ...40 Using the ExpressCard Module ...49 Using the Memory Stick Media ...53 Using Other Memory Cards ...60 Using the Internet...64 Using Wireless LAN...
User Guide
Page 3
n3 N Using Peripheral Devices...81 Connecting a Docking Station...82 Connecting an Optical Disc Drive ...90 Connecting External Speakers ...92 Connecting an External Display ...93 Selecting Display Modes...97 Using the Multiple Monitors Function ...98 ...Using Fingerprint Authentication ...122 Using Trusted Platform Module (TPM)...130 Setting Up Your Computer with VAIO Control Center 137 Using VAIO Status Monitor ...138 Using the Power Saving Modes ...139 Managing Power with VAIO Power Management ...144 Changing the Performance Setting ...146 Protecting Data from Unauthorized Use ...147 ...
n3 N Using Peripheral Devices...81 Connecting a Docking Station...82 Connecting an Optical Disc Drive ...90 Connecting External Speakers ...92 Connecting an External Display ...93 Selecting Display Modes...97 Using the Multiple Monitors Function ...98 ...Using Fingerprint Authentication ...122 Using Trusted Platform Module (TPM)...130 Setting Up Your Computer with VAIO Control Center 137 Using VAIO Status Monitor ...138 Using the Power Saving Modes ...139 Managing Power with VAIO Power Management ...144 Changing the Performance Setting ...146 Protecting Data from Unauthorized Use ...147 ...
User Guide
Page 8
Contains an overview of components connection, set-up information, etc. ❑ Safety Information - n8 N Before Use Provides a guide to read on your VAIO computer. Contains safety guidelines and owner information. ❑ Instant Mode* - Documentation Your documentation includes printed information and user guides to use Instant Mode. * On models with the built-in optical disc drive only. Printed Documentation ❑ Welcome mat -
Contains an overview of components connection, set-up information, etc. ❑ Safety Information - n8 N Before Use Provides a guide to read on your VAIO computer. Contains safety guidelines and owner information. ❑ Instant Mode* - Documentation Your documentation includes printed information and user guides to use Instant Mode. * On models with the built-in optical disc drive only. Printed Documentation ❑ Welcome mat -

User Guide
Page 9
... about the software programs included with your entire hard disk drive to the Sony online support Web site at the following URLs: http://esupport.sony.com/EN/VAIO/ for customers in USA http://sony.ca/view/Computers_Bulletins.htm for customers in Canada http://esupport.sony.com/ES/VAIO/ for customers in Spanish speaking Latin American countries or...
... about the software programs included with your entire hard disk drive to the Sony online support Web site at the following URLs: http://esupport.sony.com/EN/VAIO/ for customers in USA http://sony.ca/view/Computers_Bulletins.htm for customers in Canada http://esupport.sony.com/ES/VAIO/ for customers in Spanish speaking Latin American countries or...

User Guide
Page 15
... do not connect any other hardware that did not originally come with your computer. Before starting your computer for example, a printer, an external hard disk drive, a scanner, and so on) at a time, following the manufacturers' instructions. ❑ Locating Controls and Ports (page 16) ❑ About the ...; Using the Battery Pack (page 25) ❑ Shutting Down Your Computer Safely (page 32) Be sure to get started with using your VAIO computer. ! n 15 N Getting Started Getting Started This section describes how to start up your computer with only the supplied accessories connected and ...
... do not connect any other hardware that did not originally come with your computer. Before starting your computer for example, a printer, an external hard disk drive, a scanner, and so on) at a time, following the manufacturers' instructions. ❑ Locating Controls and Ports (page 16) ❑ About the ...; Using the Battery Pack (page 25) ❑ Shutting Down Your Computer Safely (page 32) Be sure to get started with using your VAIO computer. ! n 15 N Getting Started Getting Started This section describes how to start up your computer with only the supplied accessories connected and ...
User Guide
Page 17
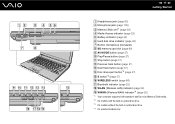
... jack (page 100) C Memory Stick slot*1 (page 55) D Media Access indicator (page 22) E Battery indicator (page 22) F Hard disk drive indicator (page 22) G Built-in optical disc drive. *4 On selected models only. and Duo-size Memory Stick media. *2 On models with the built-in optical disc...MODE button (page 37) J Play/Pause button (page 37) K Stop button (page 37) L Previous track button (page 37) M Next track button (page 37) N Disc drive eject button*2 (page 37) O S button*3 (page 37) P WIRELESS switch (page 66) Q Bluetooth indicator (page 22) R WLAN (Wireless LAN) indicator (page 22) ...
... jack (page 100) C Memory Stick slot*1 (page 55) D Media Access indicator (page 22) E Battery indicator (page 22) F Hard disk drive indicator (page 22) G Built-in optical disc drive. *4 On selected models only. and Duo-size Memory Stick media. *2 On models with the built-in optical disc...MODE button (page 37) J Play/Pause button (page 37) K Stop button (page 37) L Previous track button (page 37) M Next track button (page 37) N Disc drive eject button*2 (page 37) O S button*3 (page 37) P WIRELESS switch (page 66) Q Bluetooth indicator (page 22) R WLAN (Wireless LAN) indicator (page 22) ...
User Guide
Page 19
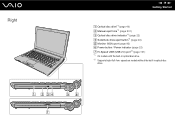
Right n 19 N Getting Started A Optical disc drive*1 (page 40) B Manual eject hole*1 (page 201) C Optical disc drive indicator*1 (page 22) D Substitute drive eject button*1 (page 40) E Monitor (VGA) port (page 93) F Power button / Power indicator (page 22) G Hi-Speed USB (USB 2.0) port*2 (page 101) *1 On models with the built-in optical disc drive. speeds on models without the built-in optical disc drive. *2 Supports high-/full-/low-
Right n 19 N Getting Started A Optical disc drive*1 (page 40) B Manual eject hole*1 (page 201) C Optical disc drive indicator*1 (page 22) D Substitute drive eject button*1 (page 40) E Monitor (VGA) port (page 93) F Power button / Power indicator (page 22) G Hi-Speed USB (USB 2.0) port*2 (page 101) *1 On models with the built-in optical disc drive. speeds on models without the built-in optical disc drive. *2 Supports high-/full-/low-
User Guide
Page 22
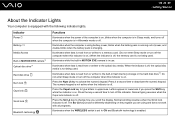
... switch is set to ON and Bluetooth technology is enabled. Indicator Power 1 Battery e Media Access Built-in MOTION EYE camera*1 Optical disc drive*1 Hard disk drive Num lock Caps lock Scroll lock Bluetooth technology Functions Illuminates when the power of power, and double-blinks when the battery pack is charging... is not active when the indicator is on . Press the Caps Lock key to the built-in flash memory storage or the hard disk drive*2. Illuminates when data is on . Illuminates when the computer is using and does not work with the following indicator lights. The Scr Lk ...
... switch is set to ON and Bluetooth technology is enabled. Indicator Power 1 Battery e Media Access Built-in MOTION EYE camera*1 Optical disc drive*1 Hard disk drive Num lock Caps lock Scroll lock Bluetooth technology Functions Illuminates when the power of power, and double-blinks when the battery pack is charging... is not active when the indicator is on . Press the Caps Lock key to the built-in flash memory storage or the hard disk drive*2. Illuminates when data is on . Illuminates when the computer is using and does not work with the following indicator lights. The Scr Lk ...
User Guide
Page 23
See the online specifications to find out about your storage device configuration. Wireless WAN*1 Illuminates when the wireless WAN functionality is enabled. *1 On selected models only. *2 Your computer is enabled. n 23 N Getting Started Indicator Functions Wireless LAN Illuminates when the wireless LAN functionality is equipped with a built-in flash memory storage and/or a hard disk drive, depending on the model you purchased.
See the online specifications to find out about your storage device configuration. Wireless WAN*1 Illuminates when the wireless WAN functionality is enabled. *1 On selected models only. *2 Your computer is enabled. n 23 N Getting Started Indicator Functions Wireless LAN Illuminates when the wireless LAN functionality is equipped with a built-in flash memory storage and/or a hard disk drive, depending on the model you purchased.
User Guide
Page 33
... get the most out of using your VAIO computer. ❑ Using the Keyboard (page 34) ❑ Using the Touch Pad (page 36) ❑ Using Special-function Buttons (page 37) ❑ Using the Built-in MOTION EYE Camera (page 39) ❑ Using the Optical Disc Drive (page 40) ❑ Using the ExpressCard Module...
... get the most out of using your VAIO computer. ❑ Using the Keyboard (page 34) ❑ Using the Touch Pad (page 36) ❑ Using Special-function Buttons (page 37) ❑ Using the Built-in MOTION EYE Camera (page 39) ❑ Using the Optical Disc Drive (page 40) ❑ Using the ExpressCard Module...

User Guide
Page 35
... as it is magnified, switching the view to the computer screen with either a built-in flash memory storage or a hard disk drive as it magnifies the screen view by applying a lower resolution to the external display disables the function and restores the standard view. ...When you purchased. For details on the power. n 35 N Using Your VAIO Computer Combinations/Feature Functions Fn + (F10): zoom Changes the screen resolution to magnify/restore your computer's screen view. ✍ The magnified view...
... as it is magnified, switching the view to the computer screen with either a built-in flash memory storage or a hard disk drive as it magnifies the screen view by applying a lower resolution to the external display disables the function and restores the standard view. ...When you purchased. For details on the power. n 35 N Using Your VAIO Computer Combinations/Feature Functions Fn + (F10): zoom Changes the screen resolution to magnify/restore your computer's screen view. ✍ The magnified view...
User Guide
Page 37
The AV MODE, Play/Pause, Stop, Previous track, and Next track buttons support Instant Mode*. See the printed Instant Mode booklet for more information on Instant Mode. * On models with special buttons to help you use specific functions of the computer. n 37 N Using Your VAIO Computer Using Special-function Buttons Your computer is equipped with the built-in Hibernate mode. To activate Instant Mode, the computer must be off or in optical disc drive only.
The AV MODE, Play/Pause, Stop, Previous track, and Next track buttons support Instant Mode*. See the printed Instant Mode booklet for more information on Instant Mode. * On models with special buttons to help you use specific functions of the computer. n 37 N Using Your VAIO Computer Using Special-function Buttons Your computer is equipped with the built-in Hibernate mode. To activate Instant Mode, the computer must be off or in optical disc drive only.

User Guide
Page 38
...press and hold the button or launch and navigate through VAIO Control Center. *1 On models with the built-in optical disc drive. *2 Your computer is equipped with a built-in flash memory storage and/or a hard disk drive, depending on the built-in VAIO Launcher. See the online specifications to display the setup... and hold the AV MODE button to find out about your storage device configuration. *3 On models without the built-in optical disc drive. In such a case, you purchased. n 38 N Using Your VAIO Computer Special-function button Functions AV MODE button Launches...
...press and hold the button or launch and navigate through VAIO Control Center. *1 On models with the built-in optical disc drive. *2 Your computer is equipped with a built-in flash memory storage and/or a hard disk drive, depending on the built-in VAIO Launcher. See the online specifications to display the setup... and hold the AV MODE button to find out about your storage device configuration. *3 On models without the built-in optical disc drive. In such a case, you purchased. n 38 N Using Your VAIO Computer Special-function button Functions AV MODE button Launches...
User Guide
Page 40
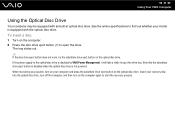
Note that the substitute drive eject button is disabled when the optical disc drive is disabled by VAIO Power Management, it will take a while to eject the drive tray. If the power supply to open the drive. To insert a disc 1 Turn on the optical disc drive. When recovering your system, turn on your recovery disc into the...
Note that the substitute drive eject button is disabled when the optical disc drive is disabled by VAIO Power Management, it will take a while to eject the drive tray. If the power supply to open the drive. To insert a disc 1 Turn on the optical disc drive. When recovering your system, turn on your recovery disc into the...
User Guide
Page 41
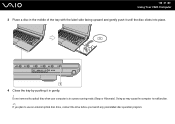
Doing so may cause the computer to malfunction. ✍ If you plan to use an external optical disc drive, connect the drive before you launch any preinstalled disc operation program. n 41 N Using Your VAIO Computer 3 Place a disc in the middle of the tray with the label side facing upward and gently push it until the disc clicks into place. 4 Close the tray by pushing it in a power saving mode (Sleep or Hibernate). Do not remove the optical disc when your computer is in gently. !
Doing so may cause the computer to malfunction. ✍ If you plan to use an external optical disc drive, connect the drive before you launch any preinstalled disc operation program. n 41 N Using Your VAIO Computer 3 Place a disc in the middle of the tray with the label side facing upward and gently push it until the disc clicks into place. 4 Close the tray by pushing it in a power saving mode (Sleep or Hibernate). Do not remove the optical disc when your computer is in gently. !

User Guide
Page 42
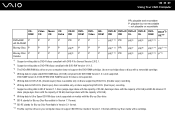
Use the table below to see which types of media your specifications for the type of optical disc drive installed on the model you purchased. n 42 N Using Your VAIO Computer Reading and Writing Optical Discs Your computer plays and records CDs, DVDs, and Blu-ray Disc™ media, depending on your model. Check your optical disc drive supports.
Use the table below to see which types of media your specifications for the type of optical disc drive installed on the model you purchased. n 42 N Using Your VAIO Computer Reading and Writing Optical Discs Your computer plays and records CDs, DVDs, and Blu-ray Disc™ media, depending on your model. Check your optical disc drive supports.
User Guide
Page 43
... discs with the capacity of 50 GB). *8 Writing data to Ultra Speed CD-RW discs is not supported on models with the Blu-ray Disc drive. *9 BD-R stands for Blu-ray Disc-Recordable in Version 1.1 format. *10 BD-RE stands for General Version 2.0/2.1. *2 Supports writing data to DVD-RW discs... your computer does not support BD-RE Disc media in Version 1.0 format and Blu-ray Disc media with a cartridge. n 43 N Using Your VAIO Computer PR: playable and recordable P: playable but not recordable -: not playable or recordable CDROM Video Music CD CD-R/ DVD- PR*1 *2 PR PR*5 PR*6 PR*3 *4 - &#...
... discs with the capacity of 50 GB). *8 Writing data to Ultra Speed CD-RW discs is not supported on models with the Blu-ray Disc drive. *9 BD-R stands for Blu-ray Disc-Recordable in Version 1.1 format. *10 BD-RE stands for General Version 2.0/2.1. *2 Supports writing data to DVD-RW discs... your computer does not support BD-RE Disc media in Version 1.0 format and Blu-ray Disc media with a cartridge. n 43 N Using Your VAIO Computer PR: playable and recordable P: playable but not recordable -: not playable or recordable CDROM Video Music CD CD-R/ DVD- PR*1 *2 PR PR*5 PR*6 PR*3 *4 - &#...

User Guide
Page 44
...of discs now available, when buying pre-recorded or blank discs for use with discs that the AACS key update requires Internet access. Sony does NOT guarantee the compatibility of a DualDisc may limit compatibility or prevent Blu-ray Disc media playback. If the region setting on the...ray Disc" standard in AVC or VC1 format at all. n 44 N Using Your VAIO Computer ! This product is not supported. ! Be aware that the audio side (non-DVD side) of VAIO CD drives with a VAIO computer, be implemented for some contents on packaged media recorded in relation to the Compact ...
...of discs now available, when buying pre-recorded or blank discs for use with discs that the AACS key update requires Internet access. Sony does NOT guarantee the compatibility of a DualDisc may limit compatibility or prevent Blu-ray Disc media playback. If the region setting on the...ray Disc" standard in AVC or VC1 format at all. n 44 N Using Your VAIO Computer ! This product is not supported. ! Be aware that the audio side (non-DVD side) of VAIO CD drives with a VAIO computer, be implemented for some contents on packaged media recorded in relation to the Compact ...

User Guide
Page 45
... you have a disc with data that you burned with your computer, to write data to the same disc. n 45 N Using Your VAIO Computer Notes on the optical disc drive, you eject it. This may cause your computer to malfunction. ❑ Before using the preinstalled software or any other applications. ❑ ...❑ Only use the AC adapter to power your computer or make data on a disc readable on writing data to a disc ❑ Use only Sony recommended software, which is at least 50% charged. ❑ Make sure you use the same disc burning software to add data to close all other...
... you have a disc with data that you burned with your computer, to write data to the same disc. n 45 N Using Your VAIO Computer Notes on the optical disc drive, you eject it. This may cause your computer to malfunction. ❑ Before using the preinstalled software or any other applications. ❑ ...❑ Only use the AC adapter to power your computer or make data on a disc readable on writing data to a disc ❑ Use only Sony recommended software, which is at least 50% charged. ❑ Make sure you use the same disc burning software to add data to close all other...
User Guide
Page 46
... may cause your computer to malfunction. ❑ Do not place your computer into either of the power saving modes while your computer. n 46 N Using Your VAIO Computer Notes on playing discs To achieve optimum performance when playing discs, you should follow these recommendations. ❑ Some CD players and computers' optical disc... not be able to speed up disc access when playing a disc. RW media. ❑ Some DVD players and computers' optical disc drives may not be able to play the disc. If the region code for your residence area is different from the label on the DVD disc ...
... may cause your computer to malfunction. ❑ Do not place your computer into either of the power saving modes while your computer. n 46 N Using Your VAIO Computer Notes on playing discs To achieve optimum performance when playing discs, you should follow these recommendations. ❑ Some CD players and computers' optical disc... not be able to speed up disc access when playing a disc. RW media. ❑ Some DVD players and computers' optical disc drives may not be able to play the disc. If the region code for your residence area is different from the label on the DVD disc ...

