User Guide
Page 4
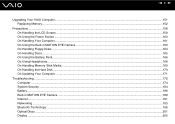
n4 N Upgrading Your VAIO Computer...151 Replacing Memory ...152 Precautions ...158 On Handling the LCD Screen ...159 On Using the Power Source ...160 On Handling Your Computer...161 On Using the Built-in MOTION EYE Camera...163 On Handling Floppy Disks ......
n4 N Upgrading Your VAIO Computer...151 Replacing Memory ...152 Precautions ...158 On Handling the LCD Screen ...159 On Using the Power Source ...160 On Handling Your Computer...161 On Using the Built-in MOTION EYE Camera...163 On Handling Floppy Disks ......

User Guide
Page 6
n6 N Before Use Before Use Congratulations on -screen User Guide. External views illustrated in audio, video, computing, and communications to the on your purchase of your computer. Sony has combined leading-edge technology in this manual may look slightly different from those of this Sony VAIO® computer, and welcome to provide state-of-the-art personal computing experience. !
n6 N Before Use Before Use Congratulations on -screen User Guide. External views illustrated in audio, video, computing, and communications to the on your purchase of your computer. Sony has combined leading-edge technology in this manual may look slightly different from those of this Sony VAIO® computer, and welcome to provide state-of-the-art personal computing experience. !

User Guide
Page 9
...following URLs: http://esupport.sony.com/EN/VAIO/ for customers in USA http://sony.ca/view/Computers_Bulletins.htm for customers in Canada http://esupport.sony.com/ES/VAIO/ for customers in Spanish speaking Latin American countries or areas http://esupport.sony.com/ES/VAIO/BR/ for customers in ... manual by clicking their respective URLs beginning with your computer, as well as information on -screen guide: 1 Click Start and Help and Support. 2 Click Manuals & Specifications. 3 Click VAIO Recovery Center User Guide. Explains features of your computer must be connected to Web sites described...
...following URLs: http://esupport.sony.com/EN/VAIO/ for customers in USA http://sony.ca/view/Computers_Bulletins.htm for customers in Canada http://esupport.sony.com/ES/VAIO/ for customers in Spanish speaking Latin American countries or areas http://esupport.sony.com/ES/VAIO/BR/ for customers in ... manual by clicking their respective URLs beginning with your computer, as well as information on -screen guide: 1 Click Start and Help and Support. 2 Click Manuals & Specifications. 3 Click VAIO Recovery Center User Guide. Explains features of your computer must be connected to Web sites described...
User Guide
Page 10
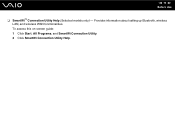
Provides information about setting up Bluetooth, wireless LAN, and wireless WAN functionalities. To access this on-screen guide: 1 Click Start, All Programs, and SmartWi Connection Utility. 2 Click SmartWi Connection Utility Help. n 10 N Before Use ❑ SmartWi™ Connection Utility Help (Selected models only) -
Provides information about setting up Bluetooth, wireless LAN, and wireless WAN functionalities. To access this on-screen guide: 1 Click Start, All Programs, and SmartWi Connection Utility. 2 Click SmartWi Connection Utility Help. n 10 N Before Use ❑ SmartWi™ Connection Utility Help (Selected models only) -
User Guide
Page 11
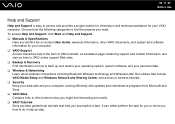
... and Wireless LAN. It can either perform the task for your VAIO computer. Choose from the following categories to find interesting and useful. ❑ VAIO Tutorials Sony provides guided help tutorials that include VAIO Media Setup and Windows Network and Sharing Center, and access to ... task. Run utilities that help in the form of VAIO tutorials, an escalation page containing support and contact information, and various links to VAIO online support Web sites. ❑ Backup & Recovery Find information on -screen User Guide, warranty information, other Internet sites you might...
... and Wireless LAN. It can either perform the task for your VAIO computer. Choose from the following categories to find interesting and useful. ❑ VAIO Tutorials Sony provides guided help tutorials that include VAIO Media Setup and Windows Network and Sharing Center, and access to ... task. Run utilities that help in the form of VAIO tutorials, an escalation page containing support and contact information, and various links to VAIO online support Web sites. ❑ Backup & Recovery Find information on -screen User Guide, warranty information, other Internet sites you might...
User Guide
Page 14
... display at eye level or slightly lower when you are sitting in front of the display to find the best position. Make sure the display screen is at a comfortable viewing distance. Use indirect lighting to your comfort and work efficiency. ❑ Positioning an external display - You can reduce eye strain and...
... display at eye level or slightly lower when you are sitting in front of the display to find the best position. Make sure the display screen is at a comfortable viewing distance. Use indirect lighting to your comfort and work efficiency. ❑ Positioning an external display - You can reduce eye strain and...
User Guide
Page 16
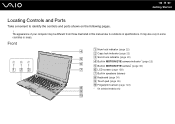
... lock indicator (page 22) C Scroll lock indicator (page 22) D Built-in MOTION EYE camera indicator* (page 22) E Built-in MOTION EYE camera* (page 39) F LCD screen (page 159) G Built-in specifications. It may be different from those illustrated in this manual due to identify the controls and ports shown on the...
... lock indicator (page 22) C Scroll lock indicator (page 22) D Built-in MOTION EYE camera indicator* (page 22) E Built-in MOTION EYE camera* (page 39) F LCD screen (page 159) G Built-in specifications. It may be different from those illustrated in this manual due to identify the controls and ports shown on the...
User Guide
Page 25
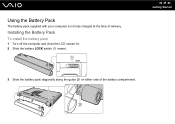
n 25 N Getting Started 3 Slide the battery pack diagonally along the guide (2) on either side of delivery. Installing the Battery Pack To install the battery pack 1 Turn off the computer and close the LCD screen lid. 2 Slide the battery LOCK switch (1) inward. Using the Battery Pack The battery pack supplied with your computer is not fully charged at the time of the battery compartment.
n 25 N Getting Started 3 Slide the battery pack diagonally along the guide (2) on either side of delivery. Installing the Battery Pack To install the battery pack 1 Turn off the computer and close the LCD screen lid. 2 Slide the battery LOCK switch (1) inward. Using the Battery Pack The battery pack supplied with your computer is not fully charged at the time of the battery compartment.
User Guide
Page 30
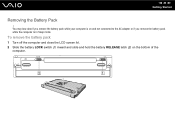
n 30 N Getting Started Removing the Battery Pack ! You may lose data if you remove the battery pack while the computer is on the bottom of the computer. To remove the battery pack 1 Turn off the computer and close the LCD screen lid. 2 Slide the battery LOCK switch (1) inward and slide and hold the battery RELEASE latch (2) on and not connected to the AC adapter or if you remove the battery pack while your computer is in Sleep mode.
n 30 N Getting Started Removing the Battery Pack ! You may lose data if you remove the battery pack while the computer is on the bottom of the computer. To remove the battery pack 1 Turn off the computer and close the LCD screen lid. 2 Slide the battery LOCK switch (1) inward and slide and hold the battery RELEASE latch (2) on and not connected to the AC adapter or if you remove the battery pack while your computer is in Sleep mode.
User Guide
Page 34
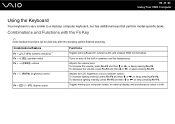
... functionalities. Turns on and off the built-in speakers and the headphones. To decrease the volume, press Fn+F3 and then m or n 34 N Using Your VAIO Computer Using the Keyboard Your keyboard is very similar to a desktop computer keyboard, but has additional keys that perform model-specific tasks.
... functionalities. Turns on and off the built-in speakers and the headphones. To decrease the volume, press Fn+F3 and then m or n 34 N Using Your VAIO Computer Using the Keyboard Your keyboard is very similar to a desktop computer keyboard, but has additional keys that perform model-specific tasks.

User Guide
Page 35
... view is magnified, switching the view to the external display disables the function and restores the standard view. When your computer's screen view is restored because pressing this command, the states of the system and the connected peripheral devices are written to the primary storage... power is turned off. The location and size of power consumption. n 35 N Using Your VAIO Computer Combinations/Feature Functions Fn + (F10): zoom Changes the screen resolution to magnify/restore your computer's screen view. ✍ The magnified view is not as clear as the standard view, as it ...
... view is magnified, switching the view to the external display disables the function and restores the standard view. When your computer's screen view is restored because pressing this command, the states of the system and the connected peripheral devices are written to the primary storage... power is turned off. The location and size of power consumption. n 35 N Using Your VAIO Computer Combinations/Feature Functions Fn + (F10): zoom Changes the screen resolution to magnify/restore your computer's screen view. ✍ The magnified view is not as clear as the standard view, as it ...
User Guide
Page 36
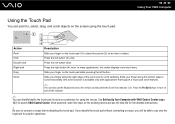
... the pointing device and see the help file for the detailed instructions. ! Once launched, select the topic on the screen using the mouse. Be sure to launch VAIO Control Center. If you disable the touch pad without connecting a mouse, you will be able to use the fingerprint ...sensor for vertical scrolling while the Scroll lock indicator is lit. n 36 N Using Your VAIO Computer Action Description Point Click Double-click Right-click Drag Scroll Slide your finger along the bottom edge to scroll horizontally (the scroll function ...
... the pointing device and see the help file for the detailed instructions. ! Once launched, select the topic on the screen using the mouse. Be sure to launch VAIO Control Center. If you disable the touch pad without connecting a mouse, you will be able to use the fingerprint ...sensor for vertical scrolling while the Scroll lock indicator is lit. n 36 N Using Your VAIO Computer Action Description Point Click Double-click Right-click Drag Scroll Slide your finger along the bottom edge to scroll horizontally (the scroll function ...

User Guide
Page 45
...burning may damage the optical disc drive. ❑ Do not strike or shake your computer while writing data to a disc. ❑ Deactivate the screen saver and exit anti-virus software before you eject it. This may result. ❑ To make sure your battery pack is preinstalled on the ...used disc. For example, if you have a disc with data that you burned with your computer, to write data to a disc. n 45 N Using Your VAIO Computer Notes on writing data to a disc ❑ Use only Sony recommended software, which is at least 50% charged. ❑ Make sure you use circular discs.
...burning may damage the optical disc drive. ❑ Do not strike or shake your computer while writing data to a disc. ❑ Deactivate the screen saver and exit anti-virus software before you eject it. This may result. ❑ To make sure your battery pack is preinstalled on the ...used disc. For example, if you have a disc with data that you burned with your computer, to write data to a disc. n 45 N Using Your VAIO Computer Notes on writing data to a disc ❑ Use only Sony recommended software, which is at least 50% charged. ❑ Make sure you use circular discs.
User Guide
Page 47
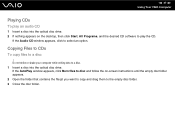
n 47 N Using Your VAIO Computer Playing CDs To play the CD. If the Audio CD window appears, click to a disc. 1 Insert a disc into the optical disc drive. 2 If nothing appears on -screen instructions until the empty disc folder appears. 2 Open the folder that contains the file(s) you want to copy and drag them...
n 47 N Using Your VAIO Computer Playing CDs To play the CD. If the Audio CD window appears, click to a disc. 1 Insert a disc into the optical disc drive. 2 If nothing appears on -screen instructions until the empty disc folder appears. 2 Open the folder that contains the file(s) you want to copy and drag them...
User Guide
Page 65
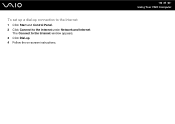
To set up a dial-up connection to the Internet 1 Click Start and Control Panel. 2 Click Connect to the Internet window appears. 3 Click Dial-up. 4 Follow the on-screen instructions. The Connect to the Internet under Network and Internet. n 65 N Using Your VAIO Computer
To set up a dial-up connection to the Internet 1 Click Start and Control Panel. 2 Click Connect to the Internet window appears. 3 Click Dial-up. 4 Follow the on-screen instructions. The Connect to the Internet under Network and Internet. n 65 N Using Your VAIO Computer
User Guide
Page 70
The IEEE 802.11n draft standard, using the 2.4 or 5 GHz bandwidth, is not available on ad-hoc networks. 1 Turn on -screen instructions. ✍ See the online specifications to see the help file on the software. 2 Click the button next to specify the ad-... on the desktop, follow these steps: 1 Click Start, All Programs, and VAIO Control Center. 2 Double-click Network Connections and VAIO Smart Network. ✍ For information on the VAIO Smart Network software, see whether your desired wireless option(s) in the VAIO Smart Network window. 3 Click Start and Control Panel. 4 Click View network...
The IEEE 802.11n draft standard, using the 2.4 or 5 GHz bandwidth, is not available on ad-hoc networks. 1 Turn on -screen instructions. ✍ See the online specifications to see the help file on the software. 2 Click the button next to specify the ad-... on the desktop, follow these steps: 1 Click Start, All Programs, and VAIO Control Center. 2 Double-click Network Connections and VAIO Smart Network. ✍ For information on the VAIO Smart Network software, see whether your desired wireless option(s) in the VAIO Smart Network window. 3 Click Start and Control Panel. 4 Click View network...
User Guide
Page 80
... Devices window appears. 2 Select the headset icon and select Disconnect. 3 Click OK. n 80 N Using Your VAIO Computer Using the Bluetooth Headset The Bluetooth headset (not supplied) will come in the Bluetooth Devices window. 9 Follow the on-screen instructions when the settings window for the headset appears. For details on the Devices tab.
... Devices window appears. 2 Select the headset icon and select Disconnect. 3 Click OK. n 80 N Using Your VAIO Computer Using the Bluetooth Headset The Bluetooth headset (not supplied) will come in the Bluetooth Devices window. 9 Follow the on-screen instructions when the settings window for the headset appears. For details on the Devices tab.

User Guide
Page 85
n 85 N Using Peripheral Devices 6 Gently push down the computer until it clicks into place. 7 Lift open the LCD screen lid and turn on the computer.
n 85 N Using Peripheral Devices 6 Gently push down the computer until it clicks into place. 7 Lift open the LCD screen lid and turn on the computer.
User Guide
Page 97
... Modes You can select which display to be able to display the same contents on your computer screen and the external display or projector at the same time, depending on your computer screen and the external display at the same time, see Using the Multiple Monitors Function (page 98)... for more information. The Display Settings window appears. 3 Follow the on-screen instructions to change the settings. ✍ You may not be used as the primary monitor when an external display (desktop monitor, etc.) is attached...
... Modes You can select which display to be able to display the same contents on your computer screen and the external display or projector at the same time, depending on your computer screen and the external display at the same time, see Using the Multiple Monitors Function (page 98)... for more information. The Display Settings window appears. 3 Follow the on-screen instructions to change the settings. ✍ You may not be used as the primary monitor when an external display (desktop monitor, etc.) is attached...
User Guide
Page 98
... expand a single window across separate displays. You can function as an open application window or a toolbar, from one display to distribute portions of your computer screen and the external display can move the cursor from one display to the monitor (VGA) port, your desktop across two displays; otherwise your computer does...
... expand a single window across separate displays. You can function as an open application window or a toolbar, from one display to distribute portions of your computer screen and the external display can move the cursor from one display to the monitor (VGA) port, your desktop across two displays; otherwise your computer does...


