

User Guide
Page 10
... and maintenance programs from the following categories to other VAIO documents, and system and software information for your VAIO computer. Choose from Microsoft and Sony. ❑ VAIO Sites Contains links to find interesting and useful. ❑ VAIO Tutorials Sony provides guided help tutorials that include VAIO Media Setup and Windows Network and Sharing Center, and access to wireless...
... and maintenance programs from the following categories to other VAIO documents, and system and software information for your VAIO computer. Choose from Microsoft and Sony. ❑ VAIO Sites Contains links to find interesting and useful. ❑ VAIO Tutorials Sony provides guided help tutorials that include VAIO Media Setup and Windows Network and Sharing Center, and access to wireless...
User Guide
Page 13
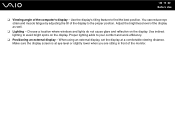
... indirect lighting to the proper position. Use the display's tilting feature to your comfort and work efficiency. ❑ Positioning an external display - Choose a location where windows and lights do not cause glare and reflection on the display.
... indirect lighting to the proper position. Use the display's tilting feature to your comfort and work efficiency. ❑ Positioning an external display - Choose a location where windows and lights do not cause glare and reflection on the display.
User Guide
Page 34
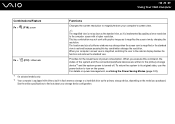
... is magnified, switching the view to the external display disables the function and restores the standard view. The location and size of software windows may not work with a higher resolution. To return the system to its original state, use the power button to turn on the ... the screen view is magnified or the standard view is restored because pressing this command, the states of power consumption. n 34 N Using Your VAIO Computer Combinations/Feature Functions Fn + (F10): zoom Changes the screen resolution to magnify/restore your computer's screen view. ✍ The magnified view...
... is magnified, switching the view to the external display disables the function and restores the standard view. The location and size of software windows may not work with a higher resolution. To return the system to its original state, use the power button to turn on the ... the screen view is magnified or the standard view is restored because pressing this command, the states of power consumption. n 34 N Using Your VAIO Computer Combinations/Feature Functions Fn + (F10): zoom Changes the screen resolution to magnify/restore your computer's screen view. ✍ The magnified view...
User Guide
Page 37
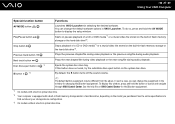
... Special-function button Functions AV MODE button Launches VAIO Launcher for changing the S button assignment. Play/Pause button Starts or pauses playback of a CD or DVD media*1 or a music/video file stored on the built-in the window for selecting the desired software. Next track button ... drive eject button *1 Ejects the optical disc drive tray. If this window, press and hold the AV MODE button to find out about your storage device configuration. *3 On models without a built-in VAIO Launcher. To display this button does not work, try the substitute drive eject button...
... Special-function button Functions AV MODE button Launches VAIO Launcher for changing the S button assignment. Play/Pause button Starts or pauses playback of a CD or DVD media*1 or a music/video file stored on the built-in the window for selecting the desired software. Next track button ... drive eject button *1 Ejects the optical disc drive tray. If this window, press and hold the AV MODE button to find out about your storage device configuration. *3 On models without a built-in VAIO Launcher. To display this button does not work, try the substitute drive eject button...
User Guide
Page 38
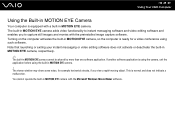
... software application is using the camera, exit the application before using such software. The viewer window may show some noise, for a video conference using the built-in MOTION EYE camera with the Microsoft Windows Movie Maker software. You cannot operate the built-in MOTION EYE camera. ! Turning on the... does not activate or deactivate the built-in MOTION EYE camera, respectively. ✍ The built-in MOTION EYE camera. n 38 N Using Your VAIO Computer Using the Built-in MOTION EYE Camera Your computer is equipped with a built-in MOTION EYE camera cannot be shared by more than one...
... software application is using the camera, exit the application before using such software. The viewer window may show some noise, for a video conference using the built-in MOTION EYE camera with the Microsoft Windows Movie Maker software. You cannot operate the built-in MOTION EYE camera. ! Turning on the... does not activate or deactivate the built-in MOTION EYE camera, respectively. ✍ The built-in MOTION EYE camera. n 38 N Using Your VAIO Computer Using the Built-in MOTION EYE Camera Your computer is equipped with a built-in MOTION EYE camera cannot be shared by more than one...
User Guide
Page 39
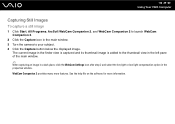
See the help file on the software for more features. WebCam Companion 2 provides many more information. The current image in the properties window. n 39 N Using Your VAIO Computer Capturing Still Images To capture a still image 1 Click Start, All Programs, ArcSoft WebCam Companion 2, and WebCam Companion 2 to launch WebCam Companion 2. 2 Click the Capture ...
See the help file on the software for more features. WebCam Companion 2 provides many more information. The current image in the properties window. n 39 N Using Your VAIO Computer Capturing Still Images To capture a still image 1 Click Start, All Programs, ArcSoft WebCam Companion 2, and WebCam Companion 2 to launch WebCam Companion 2. 2 Click the Capture ...
User Guide
Page 40
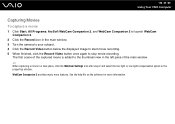
... a dark place, click the WebCam Settings icon after step 2 and select the low light or low light compensation option in the main window. 3 Turn the camera to your subject. 4 Click the Record Video button below the displayed image to start movie recording. 5 When finished..., click the Record Video button once again to launch WebCam Companion 2. 2 Click the Record icon in the properties window. WebCam Companion 2 provides many more information. n 40 N Using Your VAIO Computer Capturing Movies To capture a movie 1 Click Start, All Programs, ArcSoft WebCam Companion 2, and WebCam Companion 2...
... a dark place, click the WebCam Settings icon after step 2 and select the low light or low light compensation option in the main window. 3 Turn the camera to your subject. 4 Click the Record Video button below the displayed image to start movie recording. 5 When finished..., click the Record Video button once again to launch WebCam Companion 2. 2 Click the Record icon in the properties window. WebCam Companion 2 provides many more information. n 40 N Using Your VAIO Computer Capturing Movies To capture a movie 1 Click Start, All Programs, ArcSoft WebCam Companion 2, and WebCam Companion 2...
User Guide
Page 48
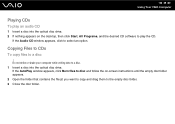
If the AutoPlay window appears, click Burn files to disc and follow the on the desktop, then click Start, All Programs, and the desired CD software to the empty ... the file(s) you want to copy and drag them to play an audio CD 1 Insert a disc into the optical disc drive. If the Audio CD window appears, click to a disc ! n 48 N Using Your VAIO Computer Playing CDs To play the CD. Copying Files to CDs To copy files to select an option.
If the AutoPlay window appears, click Burn files to disc and follow the on the desktop, then click Start, All Programs, and the desired CD software to the empty ... the file(s) you want to copy and drag them to play an audio CD 1 Insert a disc into the optical disc drive. If the Audio CD window appears, click to a disc ! n 48 N Using Your VAIO Computer Playing CDs To play the CD. Copying Files to CDs To copy files to select an option.

User Guide
Page 55
...the Memory Stick slot without prior consent from the respective copyright holders. Accordingly, Memory Stick media with VAIO Power Management (page 146). You cannot use a Memory Stick media if you may not operate ...site at http://www.memorystick.com/en/. ! Your computer has been tested and found compatible with Sony branded Memory Stick media with the MagicGate logo to use any audio and/or image data you recorded... The Memory Stick Micro media in the Power Options window. However, not all Memory Stick media that are guaranteed of the copyright protection technology developed by...
...the Memory Stick slot without prior consent from the respective copyright holders. Accordingly, Memory Stick media with VAIO Power Management (page 146). You cannot use a Memory Stick media if you may not operate ...site at http://www.memorystick.com/en/. ! Your computer has been tested and found compatible with Sony branded Memory Stick media with the MagicGate logo to use any audio and/or image data you recorded... The Memory Stick Micro media in the Power Options window. However, not all Memory Stick media that are guaranteed of the copyright protection technology developed by...
User Guide
Page 57
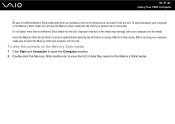
...Before moving your computer, make sure to hold the Memory Stick media with the arrow pointing in the Memory Stick media. n 57 N Using Your VAIO Computer ! Be sure to insert the Memory Stick slot protector into the slot if you insert it smoothly. To avoid damaging your computer and the... media. To view the contents on the Memory Stick media 1 Click Start and Computer to open the Computer window. 2 Double-click the Memory Stick media icon to protect against debris entering the slot when not using a Memory Stick media. Insert the Memory Stick...
...Before moving your computer, make sure to hold the Memory Stick media with the arrow pointing in the Memory Stick media. n 57 N Using Your VAIO Computer ! Be sure to insert the Memory Stick slot protector into the slot if you insert it smoothly. To avoid damaging your computer and the... media. To view the contents on the Memory Stick media 1 Click Start and Computer to open the Computer window. 2 Double-click the Memory Stick media icon to protect against debris entering the slot when not using a Memory Stick media. Insert the Memory Stick...
User Guide
Page 58
If you select Quick Format in the factory default setting and is designed to open the Computer window. 3 Right-click the Memory Stick media icon and select Format. 4 Click Restore device defaults. ! Do not remove the Memory Stick media from the File system ... Stick media into place. 2 Click Start and Computer to format the media and supports the Memory Stick media when formatting the media. n 58 N Using Your VAIO Computer To format a Memory Stick media The Memory Stick media has been formatted in Format options. 5 Click Start. 6 Follow the on-screen instructions. ! Before formatting...
If you select Quick Format in the factory default setting and is designed to open the Computer window. 3 Right-click the Memory Stick media icon and select Format. 4 Click Restore device defaults. ! Do not remove the Memory Stick media from the File system ... Stick media into place. 2 Click Start and Computer to format the media and supports the Memory Stick media when formatting the media. n 58 N Using Your VAIO Computer To format a Memory Stick media The Memory Stick media has been formatted in Format options. 5 Click Start. 6 Follow the on-screen instructions. ! Before formatting...
User Guide
Page 61
...the compatible media are guaranteed of compatibility. Your computer has been tested and found compatible with VAIO Power Management (page 146). SD memory cards with capacity of up to 2 GB and ...data transfer features of January 2008. Do not force the memory card in the Power Options window. However, not all memory card media that meet the same specifications as of the SD ...10065; SDHC memory card ❑ MultiMediaCard (MMC) For the latest information on compatible memory cards, see Sony Support Information (page 222) to insert a memory card or memory card adapter of the slot. An ...
...the compatible media are guaranteed of compatibility. Your computer has been tested and found compatible with VAIO Power Management (page 146). SD memory cards with capacity of up to 2 GB and ...data transfer features of January 2008. Do not force the memory card in the Power Options window. However, not all memory card media that meet the same specifications as of the SD ...10065; SDHC memory card ❑ MultiMediaCard (MMC) For the latest information on compatible memory cards, see Sony Support Information (page 222) to insert a memory card or memory card adapter of the slot. An ...
User Guide
Page 65
n 65 N Using Your VAIO Computer The Connect to the Internet window appears. 3 Click Dial-up connection to the Internet 1 Click Start and Control Panel. 2 Click Connect to the Internet under Network and Internet. To set up a dial-up . 4 Follow the on-screen instructions.
n 65 N Using Your VAIO Computer The Connect to the Internet window appears. 3 Click Dial-up connection to the Internet 1 Click Start and Control Panel. 2 Click Connect to the Internet under Network and Internet. To set up a dial-up . 4 Follow the on-screen instructions.
User Guide
Page 70
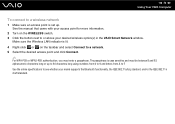
...802.11a/b/g standard, and/or the IEEE 802.11n draft standard. The Set up a connection or network on ad-hoc networks. n 70 N Using Your VAIO Computer To communicate without an access point (ad-hoc) ! Make sure the Wireless LAN indicator is used for the IEEE 802.11a standard, on the... which is lit. 3 Click Start and Control Panel. 4 Click View network status and tasks under Network and Internet. 5 Click Set up a connection or network window appears. 6 Select an option to specify the ad-hoc network settings and click Next. 7 Follow the on the WIRELESS switch. 2 Click the button next to...
...802.11a/b/g standard, and/or the IEEE 802.11n draft standard. The Set up a connection or network on ad-hoc networks. n 70 N Using Your VAIO Computer To communicate without an access point (ad-hoc) ! Make sure the Wireless LAN indicator is used for the IEEE 802.11a standard, on the... which is lit. 3 Click Start and Control Panel. 4 Click View network status and tasks under Network and Internet. 5 Click Set up a connection or network window appears. 6 Select an option to specify the ad-hoc network settings and click Next. 7 Follow the on the WIRELESS switch. 2 Click the button next to...
User Guide
Page 72
....11n draft standard. See the online specifications to a wireless network 1 Make sure an access point is case sensitive and must enter a passphrase. n 72 N Using Your VAIO Computer To connect to see whether your desired wireless option(s) in the...
....11n draft standard. See the online specifications to a wireless network 1 Make sure an access point is case sensitive and must enter a passphrase. n 72 N Using Your VAIO Computer To connect to see whether your desired wireless option(s) in the...
User Guide
Page 73
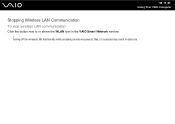
n 73 N Using Your VAIO Computer Stopping Wireless LAN Communication To stop wireless LAN communication Click the button next to or above the WLAN icon in data loss. Turning off the wireless LAN functionality while accessing remote documents, files, or resources may result in the VAIO Smart Network window. !
n 73 N Using Your VAIO Computer Stopping Wireless LAN Communication To stop wireless LAN communication Click the button next to or above the WLAN icon in data loss. Turning off the wireless LAN functionality while accessing remote documents, files, or resources may result in the VAIO Smart Network window. !

User Guide
Page 74
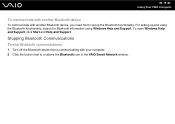
n 74 N Using Your VAIO Computer Using the Bluetooth Functionality You can transfer data between your computer and other Bluetooth devices such as another computer or a mobile phone. To start .... Make sure the Bluetooth indicator is lit. For instructions on the WIRELESS switch. 2 Click the button next to 33 feet (10 meters) range in the VAIO Smart Network window.
n 74 N Using Your VAIO Computer Using the Bluetooth Functionality You can transfer data between your computer and other Bluetooth devices such as another computer or a mobile phone. To start .... Make sure the Bluetooth indicator is lit. For instructions on the WIRELESS switch. 2 Click the button next to 33 feet (10 meters) range in the VAIO Smart Network window.
User Guide
Page 78
... 1 Turn off the Bluetooth device that is communicating with another Bluetooth device, you need first to or above the Bluetooth icon in the VAIO Smart Network window. n 78 N Using Your VAIO Computer To communicate with another Bluetooth device To communicate with your computer. 2 Click the button next to set up and using the...
... 1 Turn off the Bluetooth device that is communicating with another Bluetooth device, you need first to or above the Bluetooth icon in the VAIO Smart Network window. n 78 N Using Your VAIO Computer To communicate with another Bluetooth device To communicate with your computer. 2 Click the button next to set up and using the...
User Guide
Page 79
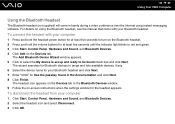
...0000" for Use the passkey found check box and click Next. To connect the headset with your Bluetooth headset. The Add Bluetooth Device Wizard window appears. 5 Click to select the My device is set up and ready to turn on the Devices tab. For details on the Devices ... 2 Select the headset icon and select Disconnect. 3 Click OK. The headset icon appears on using instant messaging software. n 79 N Using Your VAIO Computer Using the Bluetooth Headset The Bluetooth headset (not supplied) will come in handy during a video conference over the Internet using the Bluetooth headset, ...
...0000" for Use the passkey found check box and click Next. To connect the headset with your Bluetooth headset. The Add Bluetooth Device Wizard window appears. 5 Click to select the My device is set up and ready to turn on the Devices tab. For details on the Devices ... 2 Select the headset icon and select Disconnect. 3 Click OK. The headset icon appears on using instant messaging software. n 79 N Using Your VAIO Computer Using the Bluetooth Headset The Bluetooth headset (not supplied) will come in handy during a video conference over the Internet using the Bluetooth headset, ...
User Guide
Page 97
... return to distribute portions of your software may not work properly. If you are using Multiple Monitors mode; You can function as an open application window or a toolbar, from one display to the other . ✍ Your external display may not be compatible with Multiple Monitors settings. Certain software applications may not... set different colors on each display. otherwise your desktop across two displays; Set fewer colors or a lower resolution for each display, do not expand a single window across separate displays.
... return to distribute portions of your software may not work properly. If you are using Multiple Monitors mode; You can function as an open application window or a toolbar, from one display to the other . ✍ Your external display may not be compatible with Multiple Monitors settings. Certain software applications may not... set different colors on each display. otherwise your desktop across two displays; Set fewer colors or a lower resolution for each display, do not expand a single window across separate displays.


