
User Guide
Page 2
... Locating Controls and Ports 12 About the Indicator Lights 18 Connecting a Power Source 19 Using the Battery Pack 20 Shutting Down Your Computer Safely 27 Updating Your Computer 28 Using Your VAIO Computer 29 Using the Keyboard 30 Using the Touch Pad 32 Using the Special-function Button 33 Using the Touch Sensor Buttons 34 Using the Built-in Camera 38 Using the Optical Disc Drive 39 Using the Memory Stick 46 Using Other Modules / Memory Cards 51 Using the Internet 58 Using the Network (LAN 60 Using the Wireless LAN 61 Using the Bluetooth Function...
... Locating Controls and Ports 12 About the Indicator Lights 18 Connecting a Power Source 19 Using the Battery Pack 20 Shutting Down Your Computer Safely 27 Updating Your Computer 28 Using Your VAIO Computer 29 Using the Keyboard 30 Using the Touch Pad 32 Using the Special-function Button 33 Using the Touch Sensor Buttons 34 Using the Built-in Camera 38 Using the Optical Disc Drive 39 Using the Memory Stick 46 Using Other Modules / Memory Cards 51 Using the Internet 58 Using the Network (LAN 60 Using the Wireless LAN 61 Using the Bluetooth Function...

User Guide
Page 8
... number below the barcode. 3 The operating system on your VAIO PC. Sony Style Backstage Technicians can assist with a Sony certified technician at the lower right corner of the display on the computer. 2 Your computer's serial number You can find the contact numbers on the bottom, the back panel, or inside the battery compartment of the problem 5. Sony Style store and get personalized service and support...
... number below the barcode. 3 The operating system on your VAIO PC. Sony Style Backstage Technicians can assist with a Sony certified technician at the lower right corner of the display on the computer. 2 Your computer's serial number You can find the contact numbers on the bottom, the back panel, or inside the battery compartment of the problem 5. Sony Style store and get personalized service and support...

User Guide
Page 11
.... Before starting your computer for example, a printer, an external hard disk drive, a scanner, and so on) at a time, following the manufacturers' instructions. ❑ Locating Controls and Ports (page 12) ❑ About the Indicator Lights (page 18) ❑ Connecting a Power Source (page 19) ❑ Using the Battery Pack (page 20) ❑ Shutting Down Your Computer Safely (page 27) ❑ Updating Your Computer (page 28) Upon completion, connect one device (for...
.... Before starting your computer for example, a printer, an external hard disk drive, a scanner, and so on) at a time, following the manufacturers' instructions. ❑ Locating Controls and Ports (page 12) ❑ About the Indicator Lights (page 18) ❑ Connecting a Power Source (page 19) ❑ Using the Battery Pack (page 20) ❑ Shutting Down Your Computer Safely (page 27) ❑ Updating Your Computer (page 28) Upon completion, connect one device (for...
User Guide
Page 18
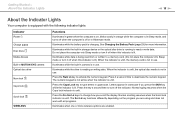
... Hibernate mode. Normal typing resumes when the Caps lock indicator is unlit. The Scr Lk key functions differently depending on , blinks slowly in orange while the computer is in Sleep mode, and turns off when the computer is off the indicator. Getting Started > About the Indicator Lights n 18 N About the Indicator Lights Your computer is equipped with the following indicator lights: Indicator Power 1 Charge Disc drive Media Access Built-in MOTION EYE camera Optical disc drive Num lock Caps lock Scroll lock WIRELESS Functions...
... Hibernate mode. Normal typing resumes when the Caps lock indicator is unlit. The Scr Lk key functions differently depending on , blinks slowly in orange while the computer is in Sleep mode, and turns off when the computer is off the indicator. Getting Started > About the Indicator Lights n 18 N About the Indicator Lights Your computer is equipped with the following indicator lights: Indicator Power 1 Charge Disc drive Media Access Built-in MOTION EYE camera Optical disc drive Num lock Caps lock Scroll lock WIRELESS Functions...

User Guide
Page 30
... LCD brightness of an image or a document displayed on and off the built-in ), press the Fn+F10 keys. To decrease lighting intensity, keep pressing the Fn+F4 keys or press the Fn+F4 keys and then the M or , key. Toggles among your computer screen. Using Your VAIO Computer > Using the Keyboard n 30 N Using the Keyboard Your keyboard has additional keys that perform model-specific tasks. To decrease the volume...
... LCD brightness of an image or a document displayed on and off the built-in ), press the Fn+F10 keys. To decrease lighting intensity, keep pressing the Fn+F4 keys or press the Fn+F4 keys and then the M or , key. Toggles among your computer screen. Using Your VAIO Computer > Using the Keyboard n 30 N Using the Keyboard Your keyboard has additional keys that perform model-specific tasks. To decrease the volume...

User Guide
Page 32
... action displays a shortcut menu. Be sure to connect a mouse before connecting a mouse, you disable the touch pad before disabling the touch pad. Press the left button twice in a row. Slide your finger along the right edge of the touch pad to scroll vertically. If you will be able to use the VAIO Control Center. ! Using Your VAIO Computer > Using the Touch Pad Using the Touch Pad You can disable/enable the touch pad while a mouse is connected to your finger on the touch pad while...
... action displays a shortcut menu. Be sure to connect a mouse before connecting a mouse, you disable the touch pad before disabling the touch pad. Press the left button twice in a row. Slide your finger along the right edge of the touch pad to scroll vertically. If you will be able to use the VAIO Control Center. ! Using Your VAIO Computer > Using the Touch Pad Using the Touch Pad You can disable/enable the touch pad while a mouse is connected to your finger on the touch pad while...
User Guide
Page 53
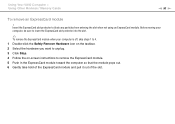
... slot. Using Your VAIO Computer > Using Other Modules / Memory Cards n 53 N To remove an ExpressCard module ! Before moving your computer, be sure to insert the ExpressCard slot protector into the slot. ✍ To remove the ExpressCard module when your computer is off, skip steps 1 to 4. 1 Double-click the Safely Remove Hardware icon on the taskbar. 2 Select the hardware you want to unplug. 3 Click Stop. 4 Follow the on-screen instructions...
... slot. Using Your VAIO Computer > Using Other Modules / Memory Cards n 53 N To remove an ExpressCard module ! Before moving your computer, be sure to insert the ExpressCard slot protector into the slot. ✍ To remove the ExpressCard module when your computer is off, skip steps 1 to 4. 1 Double-click the Safely Remove Hardware icon on the taskbar. 2 Select the hardware you want to unplug. 3 Click Stop. 4 Follow the on-screen instructions...
User Guide
Page 58
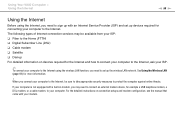
... instructions on connection setups and modem configuration, see the manual that came with your computer to the Internet, be available from your ISP: ❑ Fiber to the Home (FTTH) ❑ Digital Subscriber Line (DSL) ❑ Cable modem ❑ Satellite ❑ Dial-up For detailed information on devices required for more information. ! Using Your VAIO Computer > Using the Internet n 58 N Using the Internet Before using the wireless LAN function, you need...
... instructions on connection setups and modem configuration, see the manual that came with your computer to the Internet, be available from your ISP: ❑ Fiber to the Home (FTTH) ❑ Digital Subscriber Line (DSL) ❑ Cable modem ❑ Satellite ❑ Dial-up For detailed information on devices required for more information. ! Using Your VAIO Computer > Using the Internet n 58 N Using the Internet Before using the wireless LAN function, you need...
User Guide
Page 83
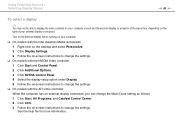
... Personalize. 2 Click Display Settings. 3 Follow the on-screen instructions to change the settings. ❑ On models with the NVIDIA video controller 1 Click Start and Control Panel. 2 Click Additional Options. 3 Click NVIDIA Control Panel. 4 Select the display setup option under Display. 5 Follow the on-screen instructions to change the settings. ❑ On models with the ATI video controller When the computer has an external display connected, you can change the settings. See the help file for more information. Using Peripheral Devices > Selecting Display Modes n 83 N To...
... Personalize. 2 Click Display Settings. 3 Follow the on-screen instructions to change the settings. ❑ On models with the NVIDIA video controller 1 Click Start and Control Panel. 2 Click Additional Options. 3 Click NVIDIA Control Panel. 4 Select the display setup option under Display. 5 Follow the on-screen instructions to change the settings. ❑ On models with the ATI video controller When the computer has an external display connected, you can change the settings. See the help file for more information. Using Peripheral Devices > Selecting Display Modes n 83 N To...

User Guide
Page 92
... set the user password, you must first set the password. For more information, see Using Fingerprint Authentication (page 70). Once you have set the password, you will be charged, and your computer may need assistance to reset it safe and private from unauthorized access. Customizing Your VAIO Computer > Setting the Password n 92 N Setting the Password Use one of the BIOS functions to set the machine password. ! Be sure not to change all the setup options in...
... set the user password, you must first set the password. For more information, see Using Fingerprint Authentication (page 70). Once you have set the password, you will be charged, and your computer may need assistance to reset it safe and private from unauthorized access. Customizing Your VAIO Computer > Setting the Password n 92 N Setting the Password Use one of the BIOS functions to set the machine password. ! Be sure not to change all the setup options in...

User Guide
Page 96
... Setup, and then press the Enter key. The BIOS setup screen appears. To remove the password, leave the Enter New Password and Confirm New Password fields blank and press the Enter key. 6 Press the < or , key to display the Security tab, select Set User Password, and then press the Enter key. 5 On the password entry screen, enter the current password once and a new password twice, and then press the Enter key. Customizing Your VAIO Computer > Setting the Password n 96 N To change or remove the power-on password (user password) 1 Turn...
... Setup, and then press the Enter key. The BIOS setup screen appears. To remove the password, leave the Enter New Password and Confirm New Password fields blank and press the Enter key. 6 Press the < or , key to display the Security tab, select Set User Password, and then press the Enter key. 5 On the password entry screen, enter the current password once and a new password twice, and then press the Enter key. Customizing Your VAIO Computer > Setting the Password n 96 N To change or remove the power-on password (user password) 1 Turn...

User Guide
Page 101
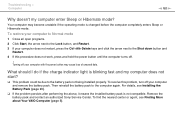
... remove both the AC adapter and the battery pack. If you cannot insert a disc. Your computer comes out of time while it off automatically. See Using the VAIO Control Center (page 99). The orange power indicator light blinks slowly in this mode. ! Customizing Your VAIO Computer > Using the Power Saving Modes n 101 N Using Sleep Mode Sleep mode turns off the LCD screen and places the built-in storage device(s) and the CPU into Hibernate mode or turn off . Sleep mode uses...
... remove both the AC adapter and the battery pack. If you cannot insert a disc. Your computer comes out of time while it off automatically. See Using the VAIO Control Center (page 99). The orange power indicator light blinks slowly in this mode. ! Customizing Your VAIO Computer > Using the Power Saving Modes n 101 N Using Sleep Mode Sleep mode turns off the LCD screen and places the built-in storage device(s) and the CPU into Hibernate mode or turn off . Sleep mode uses...

User Guide
Page 107
... upgrading memory on a computer. ❑ You should not install it yourself, if you purchased. To find out about Your VAIO Computer (page 5). See the specifications to install a new memory module. ❑ You should not touch the connectors or open the memory module compartment cover. Upgrading Your VAIO Computer > n 107 N Upgrading Your VAIO Computer Your VAIO computer and memory modules use high precision components and electronic connectors technology. For assistance, contact an authorized Sony Service...
... upgrading memory on a computer. ❑ You should not install it yourself, if you purchased. To find out about Your VAIO Computer (page 5). See the specifications to install a new memory module. ❑ You should not touch the connectors or open the memory module compartment cover. Upgrading Your VAIO Computer > n 107 N Upgrading Your VAIO Computer Your VAIO computer and memory modules use high precision components and electronic connectors technology. For assistance, contact an authorized Sony Service...
User Guide
Page 132
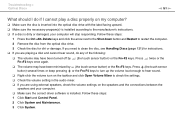
... completely enters Sleep or Hibernate mode. Remove the battery pack and contact an authorized Sony Service Center. To restore your computer to Normal mode 1 Close all open programs. 2 Click Start, the arrow next to the Lock button, and Restart. 3 If your computer does not restart, press the Ctrl+Alt+Delete keys and click the arrow next to the Shut down button and Restart. 4 If this problem, turn...
... completely enters Sleep or Hibernate mode. Remove the battery pack and contact an authorized Sony Service Center. To restore your computer to Normal mode 1 Close all open programs. 2 Click Start, the arrow next to the Lock button, and Restart. 3 If your computer does not restart, press the Ctrl+Alt+Delete keys and click the arrow next to the Shut down button and Restart. 4 If this problem, turn...

User Guide
Page 134
... key to change the boot device order? A reset fee will be charged. To find the nearest center or agent, see Finding More about Your VAIO Computer (page 5). How can use one of the game if there are any patches or updates to download. ❑ Make sure you have installed the latest video driver software. ❑ On some VAIO models, the graphics memory is not guaranteed. Follow these steps: 1 Turn on password...
... key to change the boot device order? A reset fee will be charged. To find the nearest center or agent, see Finding More about Your VAIO Computer (page 5). How can use one of the game if there are any patches or updates to download. ❑ Make sure you have installed the latest video driver software. ❑ On some VAIO models, the graphics memory is not guaranteed. Follow these steps: 1 Turn on password...
User Guide
Page 140
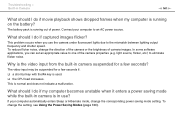
... automatically enters Sleep or Hibernate mode, change the corresponding power saving mode setting. light source, flicker, etc.) to the mismatch between lighting output frequency and shutter speed. The video input may be suspended for a few seconds if: ❑ a shortcut key with the Fn key is normal and does not indicate a malfunction. In some software applications, you use ? What should I do if captured images flicker? The battery...
... automatically enters Sleep or Hibernate mode, change the corresponding power saving mode setting. light source, flicker, etc.) to the mismatch between lighting output frequency and shutter speed. The video input may be suspended for a few seconds if: ❑ a shortcut key with the Fn key is normal and does not indicate a malfunction. In some software applications, you use ? What should I do if captured images flicker? The battery...
User Guide
Page 143
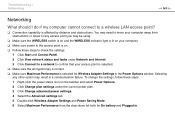
... the settings: 1 Click Start and Control Panel. 2 Click View network status and tasks under the current power plan. 3 Click Change advanced power settings. 4 Select the Advanced settings tab. 5 Double-click Wireless Adapter Settings and Power Saving Mode. 6 Select Maximum Performance from obstructions or closer to any other option may be using. ❑ Make sure the WIRELESS switch is on your computer away from the drop-down list both for Wireless Adapter Settings in the Power Options window.
... the settings: 1 Click Start and Control Panel. 2 Click View network status and tasks under the current power plan. 3 Click Change advanced power settings. 4 Select the Advanced settings tab. 5 Double-click Wireless Adapter Settings and Power Saving Mode. 6 Select Maximum Performance from obstructions or closer to any other option may be using. ❑ Make sure the WIRELESS switch is on your computer away from the drop-down list both for Wireless Adapter Settings in the Power Options window.
User Guide
Page 151
... Restart to check the settings. ❑ Check the volume setting in the audio mixer. ❑ If you need to the manufacturer's instructions. ❑ If a disc is dirty or damaged, your computer. ❑ Make sure the correct driver software is installed. Follow these steps: 1 Click Start and Control Panel. 2 Click System and Maintenance. 3 Click System. If you are playing a disc and cannot hear sound, do any of the...
... Restart to check the settings. ❑ Check the volume setting in the audio mixer. ❑ If you need to the manufacturer's instructions. ❑ If a disc is dirty or damaged, your computer. ❑ Make sure the correct driver software is installed. Follow these steps: 1 Click Start and Control Panel. 2 Click System and Maintenance. 3 Click System. If you are playing a disc and cannot hear sound, do any of the...
User Guide
Page 158
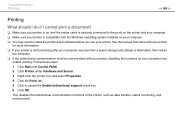
... a power saving mode (Sleep or Hibernate), then restart the computer. ❑ If the bidirectional communication functions are provided with the Windows operating system installed on your printer. Follow these steps: 1 Click Start and Control Panel. 2 Click Printer under Hardware and Sound. 3 Right-click the printer icon and select Properties. 4 Click the Ports tab. 5 Click to install the printer driver software before you use your computer may need to...
... a power saving mode (Sleep or Hibernate), then restart the computer. ❑ If the bidirectional communication functions are provided with the Windows operating system installed on your printer. Follow these steps: 1 Click Start and Control Panel. 2 Click Printer under Hardware and Sound. 3 Right-click the printer icon and select Properties. 4 Click the Ports tab. 5 Click to install the printer driver software before you use your computer may need to...

User Guide
Page 161
... the power button may have disabled the touch pad before connecting a mouse to your computer. See Using the Touch Pad (page 32). ❑ Make sure that a mouse is not connected to your computer. ❑ If the pointer does not move while a software application is running, press the Alt+F4 keys to close the application window. ❑ If the Alt+F4 keys do if the touch pad does not work? ❑...
... the power button may have disabled the touch pad before connecting a mouse to your computer. See Using the Touch Pad (page 32). ❑ Make sure that a mouse is not connected to your computer. ❑ If the pointer does not move while a software application is running, press the Alt+F4 keys to close the application window. ❑ If the Alt+F4 keys do if the touch pad does not work? ❑...


