

User Guide
Page 2
... Using the Battery Pack 21 Shutting Down Your Computer Safely 27 Using the Power Saving Modes 28 Updating Your Computer 30 Using Your VAIO Computer 31 Using the Keyboard 32 Using the Touch Pad 34 Using Special-function Buttons 35 Using the Built-in Camera 36 Using... the Multiple Monitors Function 76 Connecting an External Microphone 78 Connecting a USB Device 79 Connecting an i.LINK Device 81 Customizing Your VAIO Computer 83 Setting the Password 84 Using the VAIO Control Center 89 Using the VAIO Power Management 90 Upgrading Your VAIO Computer 91 Adding and Removing Memory 92
... Using the Battery Pack 21 Shutting Down Your Computer Safely 27 Using the Power Saving Modes 28 Updating Your Computer 30 Using Your VAIO Computer 31 Using the Keyboard 32 Using the Touch Pad 34 Using Special-function Buttons 35 Using the Built-in Camera 36 Using... the Multiple Monitors Function 76 Connecting an External Microphone 78 Connecting a USB Device 79 Connecting an i.LINK Device 81 Customizing Your VAIO Computer 83 Setting the Password 84 Using the VAIO Control Center 89 Using the VAIO Power Management 90 Upgrading Your VAIO Computer 91 Adding and Removing Memory 92

User Guide
Page 3
n3 N Precautions 98 Safety Information 99 Care and Maintenance Information 103 Handling Your Computer 104 Handling the LCD Screen 106 Using the Power Source 107 Handling the Built-in Camera 108 Handling Discs 109 Using the Battery Pack 110 Handling "Memory Stick 111 Handling the Built-in Storage Device 112 Troubleshooting 113 Computer 115 System Security 124 Battery 125 Built-in Camera 127 Networking 129 Bluetooth Technology 132 Optical Discs 136 Display 140 Printing 146 Microphone 147 Speakers 148 Touch Pad 149 Keyboard 150 Floppy Disks 151 Audio/Video 152 "Memory...
n3 N Precautions 98 Safety Information 99 Care and Maintenance Information 103 Handling Your Computer 104 Handling the LCD Screen 106 Using the Power Source 107 Handling the Built-in Camera 108 Handling Discs 109 Using the Battery Pack 110 Handling "Memory Stick 111 Handling the Built-in Storage Device 112 Troubleshooting 113 Computer 115 System Security 124 Battery 125 Built-in Camera 127 Networking 129 Bluetooth Technology 132 Optical Discs 136 Display 140 Printing 146 Microphone 147 Speakers 148 Touch Pad 149 Keyboard 150 Floppy Disks 151 Audio/Video 152 "Memory...

User Guide
Page 4
... find out about the configuration of your computer, visit the Sony online support web site at the following URLs: ❑ For customers in USA http://esupport.sony.com/EN/VAIO/ ❑ For customers in Canada http://sony.ca/support/ ❑ For customers in Spanish-speaking Latin American... countries or areas http://esupport.sony.com/ES/VAIO/LA ❑ For customers in audio, video, computing, ...
... find out about the configuration of your computer, visit the Sony online support web site at the following URLs: ❑ For customers in USA http://esupport.sony.com/EN/VAIO/ ❑ For customers in Canada http://sony.ca/support/ ❑ For customers in Spanish-speaking Latin American... countries or areas http://esupport.sony.com/ES/VAIO/LA ❑ For customers in audio, video, computing, ...

User Guide
Page 5
... categories to find useful documentation such as below: - Printed Documentation ❑ Quick Start Guide - An overview of VAIO tutorials, how-to the original factory settings - Get started with VAIO Care, system restore, backup and recovery, and contact Sony support. Use my VAIO Access interactive help with Internet and wireless setup, security setup, personalizing your...
... categories to find useful documentation such as below: - Printed Documentation ❑ Quick Start Guide - An overview of VAIO tutorials, how-to the original factory settings - Get started with VAIO Care, system restore, backup and recovery, and contact Sony support. Use my VAIO Access interactive help with Internet and wireless setup, security setup, personalizing your...

User Guide
Page 6
Information about Your VAIO Computer n6 N ❑ Program help menu on your computer. To access this on your computer. May be able to find out about configuration of your ...
Information about Your VAIO Computer n6 N ❑ Program help menu on your computer. To access this on your computer. May be able to find out about configuration of your ...

User Guide
Page 7
... problem and the Knowledge Database searches for the corresponding solutions online. ❑ For customers in USA http://esupport.sony.com/EN/VAIO/ ❑ For customers in Canada http://sony.ca/support/ ❑ For customers in Spanish-speaking Latin American countries or areas http://esupport....sony.com/ES/VAIO/LA ❑ For customers in Brazil http://esupport.sony.com/BR/ ❑ Operating system online support web site Your computer comes ...
... problem and the Knowledge Database searches for the corresponding solutions online. ❑ For customers in USA http://esupport.sony.com/EN/VAIO/ ❑ For customers in Canada http://sony.ca/support/ ❑ For customers in Spanish-speaking Latin American countries or areas http://esupport....sony.com/ES/VAIO/LA ❑ For customers in Brazil http://esupport.sony.com/BR/ ❑ Operating system online support web site Your computer comes ...

User Guide
Page 8
...or inside the battery compartment of the problem 5. Before Use > Finding More about Your VAIO Computer n8 N 4. You can assist with a Sony certified technician at our site, you are looking for your new VAIO PC, system optimization, data rescue, and any repair service you might need. In order...do not find the contact numbers on your computer 4 The hardware component or the software program that is the last 7 digits of your VAIO PC. Sony Style store and get personalized service and support for at a U.S. In Store Service & Support (available in USA only) Make an ...
...or inside the battery compartment of the problem 5. Before Use > Finding More about Your VAIO Computer n8 N 4. You can assist with a Sony certified technician at our site, you are looking for your new VAIO PC, system optimization, data rescue, and any repair service you might need. In order...do not find the contact numbers on your computer 4 The hardware component or the software program that is the last 7 digits of your VAIO PC. Sony Style store and get personalized service and support for at a U.S. In Store Service & Support (available in USA only) Make an ...
User Guide
Page 9
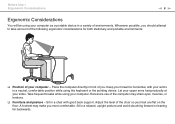
Let your upper arms hang naturally at your feet are flat on the floor. Adjust the level of the chair so your sides. Sit in a chair with your computer - Whenever possible, you should attempt to take account of the following ergonomic considerations for both stationary and portable environments: ❑ Position of you more comfortable. Keep your forearms horizontal, with good back support. Place the computer directly in front of your wrists in a variety of the computer may make you . Before Use > Ergonomic Considerations n9 N Ergonomic Considerations You will be using the ...
Let your upper arms hang naturally at your feet are flat on the floor. Adjust the level of the chair so your sides. Sit in a chair with your computer - Whenever possible, you should attempt to take account of the following ergonomic considerations for both stationary and portable environments: ❑ Position of you more comfortable. Keep your forearms horizontal, with good back support. Place the computer directly in front of your wrists in a variety of the computer may make you . Before Use > Ergonomic Considerations n9 N Ergonomic Considerations You will be using the ...

User Guide
Page 10
Choose a location where windows and lights do not cause glare and reflection on the display. Make sure the display screen is at a comfortable viewing distance. Adjust the brightness level of the display to avoid bright spots on the display. When using an external display, set the display at eye level or slightly lower when you are sitting in front of the computer's display - Use the display's tilting feature to your comfort and work efficiency. ❑ Positioning an external display - You can reduce eye strain and muscle fatigue by adjusting the tilt of the display as well. ...
Choose a location where windows and lights do not cause glare and reflection on the display. Make sure the display screen is at a comfortable viewing distance. Adjust the brightness level of the display to avoid bright spots on the display. When using an external display, set the display at eye level or slightly lower when you are sitting in front of the computer's display - Use the display's tilting feature to your comfort and work efficiency. ❑ Positioning an external display - You can reduce eye strain and muscle fatigue by adjusting the tilt of the display as well. ...

User Guide
Page 11
... Computer (page 30) Upon completion, connect one device (for the first time, do not connect any other hardware that did not originally come with your VAIO computer. !
... Computer (page 30) Upon completion, connect one device (for the first time, do not connect any other hardware that did not originally come with your VAIO computer. !
User Guide
Page 12
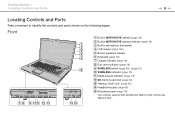
Front A Built-in MOTION EYE camera (page 36) B Built-in MOTION EYE camera indicator (page 18) C Built-in microphone (monaural) D LCD screen (page 106) E Built-in speakers (stereo) F Keyboard (page 32) G Charge indicator (page 18) H Disc drive indicator (page 18) I WIRELESS switch (page 59), (page 62) J WIRELESS indicator (page 18) K Media Access indicator (page 18) L SD memory card slot (page 53) M "Memory Stick" slot* (page 45) N Headphones jack (page 68) O Microphone jack (page 78) * Your computer supports both standard-size "Memory Stick" and Duo-size "Memory Stick". Getting Started > ...
Front A Built-in MOTION EYE camera (page 36) B Built-in MOTION EYE camera indicator (page 18) C Built-in microphone (monaural) D LCD screen (page 106) E Built-in speakers (stereo) F Keyboard (page 32) G Charge indicator (page 18) H Disc drive indicator (page 18) I WIRELESS switch (page 59), (page 62) J WIRELESS indicator (page 18) K Media Access indicator (page 18) L SD memory card slot (page 53) M "Memory Stick" slot* (page 45) N Headphones jack (page 68) O Microphone jack (page 78) * Your computer supports both standard-size "Memory Stick" and Duo-size "Memory Stick". Getting Started > ...
User Guide
Page 13
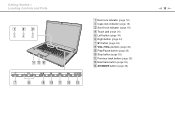
Getting Started > Locating Controls and Ports A Num lock indicator (page 18) B Caps lock indicator (page 18) C Scroll lock indicator (page 18) D Touch pad (page 34) E Left button (page 34) F Right button (page 34) G S1 button (page 35) H VOL-/VOL+ buttons (page 35) I Play/Pause button (page 35) J Stop button (page 35) K Previous track button (page 35) L Next track button (page 35) M AV MODE button (page 35) n 13 N
Getting Started > Locating Controls and Ports A Num lock indicator (page 18) B Caps lock indicator (page 18) C Scroll lock indicator (page 18) D Touch pad (page 34) E Left button (page 34) F Right button (page 34) G S1 button (page 35) H VOL-/VOL+ buttons (page 35) I Play/Pause button (page 35) J Stop button (page 35) K Previous track button (page 35) L Next track button (page 35) M AV MODE button (page 35) n 13 N
User Guide
Page 14
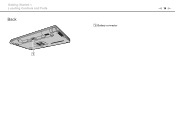
Getting Started > Locating Controls and Ports Back A Battery connector n 14 N
Getting Started > Locating Controls and Ports Back A Battery connector n 14 N

User Guide
Page 15
speeds. Getting Started > Locating Controls and Ports Right n 15 N A Hi-Speed USB (USB 2.0) ports* (page 79) B Optical disc drive (page 37) C Optical disc drive indicator (page 18) D Drive eject button (page 37) E Manual eject hole (page 136) F Power button/Power indicator (page 18) * Support high-/full-/low-
speeds. Getting Started > Locating Controls and Ports Right n 15 N A Hi-Speed USB (USB 2.0) ports* (page 79) B Optical disc drive (page 37) C Optical disc drive indicator (page 18) D Drive eject button (page 37) E Manual eject hole (page 136) F Power button/Power indicator (page 18) * Support high-/full-/low-
User Guide
Page 16
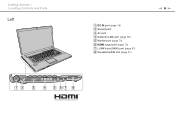
Getting Started > Locating Controls and Ports Left A DC IN port (page 19) B Security slot C Air vent D Network (LAN) port (page 58) E Monitor port (page 70) F HDMI output port (page 73) G i.LINK 4-pin (S400) port (page 81) H ExpressCard/34 slot (page 51) n 16 N
Getting Started > Locating Controls and Ports Left A DC IN port (page 19) B Security slot C Air vent D Network (LAN) port (page 58) E Monitor port (page 70) F HDMI output port (page 73) G i.LINK 4-pin (S400) port (page 81) H ExpressCard/34 slot (page 51) n 16 N
User Guide
Page 17
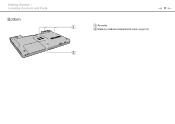
Getting Started > Locating Controls and Ports Bottom n 17 N A Air vents B Memory module compartment cover (page 92)
Getting Started > Locating Controls and Ports Bottom n 17 N A Air vents B Memory module compartment cover (page 92)
User Guide
Page 18
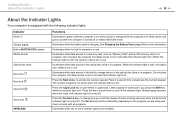
Illuminates while the battery pack is unlit. See Charging the Battery Pack (page 24) for more wireless options are using and does not work with all programs. Illuminates while one or more information. Press it off the indicator light. Press the key a second time to turn it a second time to deactivate the numeric keypad. Normal scrolling resumes when the Scroll lock indicator light is turned off . Illuminates while data access to the built-in storage device or the optical disc drive is in use. Illuminates while data access to a memory card, such as "Memory Stick" and an SD ...
Illuminates while the battery pack is unlit. See Charging the Battery Pack (page 24) for more wireless options are using and does not work with all programs. Illuminates while one or more information. Press it off the indicator light. Press the key a second time to turn it a second time to deactivate the numeric keypad. Normal scrolling resumes when the Scroll lock indicator light is turned off . Illuminates while data access to the built-in storage device or the optical disc drive is in use. Illuminates while data access to a memory card, such as "Memory Stick" and an SD ...
User Guide
Page 19
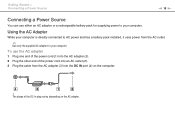
The shape of the power cord into the DC IN port (4) on the AC adapter. Using the AC Adapter While your computer is directly connected to your computer. Getting Started > Connecting a Power Source n 19 N Connecting a Power Source You can use the AC adapter 1 Plug one end of the power cord (1) into the AC adapter (3). 2 Plug the other end of the DC In plug varies depending on the computer. ! To use either an AC adapter or a rechargeable battery pack for supplying power to AC power and has a battery pack installed, it uses power from the AC adapter (3) into an AC outlet (2). 3 ...
The shape of the power cord into the DC IN port (4) on the AC adapter. Using the AC Adapter While your computer is directly connected to your computer. Getting Started > Connecting a Power Source n 19 N Connecting a Power Source You can use the AC adapter 1 Plug one end of the power cord (1) into the AC adapter (3). 2 Plug the other end of the DC In plug varies depending on the computer. ! To use either an AC adapter or a rechargeable battery pack for supplying power to AC power and has a battery pack installed, it uses power from the AC adapter (3) into an AC outlet (2). 3 ...
User Guide
Page 20
See Using Hibernate Mode (page 29). Getting Started > Connecting a Power Source n 20 N ✍ To disconnect your computer for a long period of time, place the computer into Hibernate mode. Make sure that the AC outlet is easily accessible. If you do not intend to use your computer completely from AC power, unplug the AC adapter.
See Using Hibernate Mode (page 29). Getting Started > Connecting a Power Source n 20 N ✍ To disconnect your computer for a long period of time, place the computer into Hibernate mode. Make sure that the AC outlet is easily accessible. If you do not intend to use your computer completely from AC power, unplug the AC adapter.

User Guide
Page 21
n 21 N Getting Started > Using the Battery Pack Using the Battery Pack The battery pack supplied with your computer is not fully charged at the time of delivery. Installing/Removing the Battery Pack To install the battery pack 1 Turn off the computer and close the LCD screen lid. 2 Slide the battery LOCK switch (1) inward.
n 21 N Getting Started > Using the Battery Pack Using the Battery Pack The battery pack supplied with your computer is not fully charged at the time of delivery. Installing/Removing the Battery Pack To install the battery pack 1 Turn off the computer and close the LCD screen lid. 2 Slide the battery LOCK switch (1) inward.