User Guide
Page 3
... Devices ...61 Using the Noise Canceling Headphones ...62 Connecting a Display/LAN Adapter ...68 Connecting an Optical Disc Drive ...70 Connecting External Speakers ...72 Connecting an External Display ...73 Selecting Display Modes...75 Using the Multiple Monitors Function ...76 Connecting a Universal Serial Bus (USB) Device...78 Connecting a Printer ...81 Customizing Your VAIO Computer ...82 Setting the Password ...83 Setting Up Your Computer with the VAIO Control Center 95 Using the Power Saving Modes ...96 Managing Power with the VAIO Power Management 101 Protecting the Hard Disk...
... Devices ...61 Using the Noise Canceling Headphones ...62 Connecting a Display/LAN Adapter ...68 Connecting an Optical Disc Drive ...70 Connecting External Speakers ...72 Connecting an External Display ...73 Selecting Display Modes...75 Using the Multiple Monitors Function ...76 Connecting a Universal Serial Bus (USB) Device...78 Connecting a Printer ...81 Customizing Your VAIO Computer ...82 Setting the Password ...83 Setting Up Your Computer with the VAIO Control Center 95 Using the Power Saving Modes ...96 Managing Power with the VAIO Power Management 101 Protecting the Hard Disk...

User Guide
Page 8
... online specifications describe the hardware and software configurations of your VAIO computer. Explains features of your computer. Provides information about restoring individual software programs, hardware drivers, and drive partition(s) or your computer must be connected to the Internet. ❑ Specifications - To access this on solving common problems. ✍ To go to web sites described in this manual) - To view the online specifications: 1 Connect to the Internet. 2 Go to the Sony online support...
... online specifications describe the hardware and software configurations of your VAIO computer. Explains features of your computer. Provides information about restoring individual software programs, hardware drivers, and drive partition(s) or your computer must be connected to the Internet. ❑ Specifications - To access this on solving common problems. ✍ To go to web sites described in this manual) - To view the online specifications: 1 Connect to the Internet. 2 Go to the Sony online support...
User Guide
Page 9
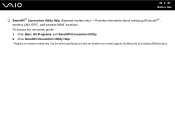
See the online specifications to find out whether your model supports the Bluetooth and wireless WAN functions. Provides information about setting up Bluetooth®*, wireless LAN, GPS*, and wireless WAN* functions. n9 N Before Use ❑ SmartWi™ Connection Utility Help (Selected models only) - To access this on-screen guide: 1 Click Start, All Programs, and SmartWi Connection Utility. 2 Click SmartWi Connection Utility Help. * Available on selected models only.
See the online specifications to find out whether your model supports the Bluetooth and wireless WAN functions. Provides information about setting up Bluetooth®*, wireless LAN, GPS*, and wireless WAN* functions. n9 N Before Use ❑ SmartWi™ Connection Utility Help (Selected models only) - To access this on-screen guide: 1 Click Start, All Programs, and SmartWi Connection Utility. 2 Click SmartWi Connection Utility Help. * Available on selected models only.
User Guide
Page 13
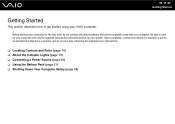
... with your computer. Before starting your computer for example, a printer, an external hard disk drive, a scanner, and so on) at a time, following the manufacturers' instructions. ❑ Locating Controls and Ports (page 14) ❑ About the Indicator Lights (page 19) ❑ Connecting a Power Source (page 20) ❑ Using the Battery Pack (page 21) ❑ Shutting Down Your Computer Safely (page 28) Upon completion, connect one device (for the first...
... with your computer. Before starting your computer for example, a printer, an external hard disk drive, a scanner, and so on) at a time, following the manufacturers' instructions. ❑ Locating Controls and Ports (page 14) ❑ About the Indicator Lights (page 19) ❑ Connecting a Power Source (page 20) ❑ Using the Battery Pack (page 21) ❑ Shutting Down Your Computer Safely (page 28) Upon completion, connect one device (for the first...
User Guide
Page 19
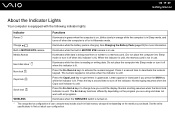
... mode. Hard disk drive* Illuminates while the drive is unlit. Press it off or in use . The Scr Lk key functions differently depending on the program you are using and does not work with the following indicator lights: Indicator Functions Power 1 Illuminates in lowercase if you scroll the display. n 19 N Getting Started About the Indicator Lights Your computer is equipped with all programs. WIRELESS Illuminates when the WIRELESS switch is turned on. * The storage device configuration...
... mode. Hard disk drive* Illuminates while the drive is unlit. Press it off or in use . The Scr Lk key functions differently depending on the program you are using and does not work with the following indicator lights: Indicator Functions Power 1 Illuminates in lowercase if you scroll the display. n 19 N Getting Started About the Indicator Lights Your computer is equipped with all programs. WIRELESS Illuminates when the WIRELESS switch is turned on. * The storage device configuration...
User Guide
Page 25
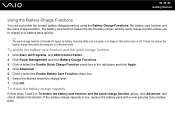
... VAIO Control Center. 2 Click Power Management and then Battery Charge Functions. 3 Click to select the Enable Quick Charge Function check box in the right pane and click Apply. 4 Click Advanced. 5 Click to speed up battery charging while your battery pack quickly. ✍ The quick charge function is in Sleep or Hibernate mode or off. It does not reduce the battery charge time while the computer is low, replace the battery pack with a new genuine Sony battery pack...
... VAIO Control Center. 2 Click Power Management and then Battery Charge Functions. 3 Click to select the Enable Quick Charge Function check box in the right pane and click Apply. 4 Click Advanced. 5 Click to speed up battery charging while your battery pack quickly. ✍ The quick charge function is in Sleep or Hibernate mode or off. It does not reduce the battery charge time while the computer is low, replace the battery pack with a new genuine Sony battery pack...
User Guide
Page 33
... button (4). (The scroll function is available only with one of the supplied spare caps when necessary. The pointer will be able to use only the keyboard for a while. You can disable/enable the pointing stick while a mouse is connected to your computer. Push the pointing stick while pressing the left button or tap on the pointing stick twice. n 33 N Using Your VAIO...
... button (4). (The scroll function is available only with one of the supplied spare caps when necessary. The pointer will be able to use only the keyboard for a while. You can disable/enable the pointing stick while a mouse is connected to your computer. Push the pointing stick while pressing the left button or tap on the pointing stick twice. n 33 N Using Your VAIO...
User Guide
Page 49
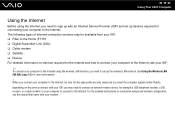
... N Using Your VAIO Computer Using the Internet Before using the wireless LAN function, you need to the Internet. The following types of Internet connection services may need to the Internet, ask your ISP. ✍ To connect your modem. See Using the Wireless LAN (WLAN) (page 52) for example a USB telephone modem, a DSL modem, or a cable modem, to your computer to connect to connect an external modem device, for more information. ! For the detailed instructions on connection setups and modem configuration...
... N Using Your VAIO Computer Using the Internet Before using the wireless LAN function, you need to the Internet. The following types of Internet connection services may need to the Internet, ask your ISP. ✍ To connect your modem. See Using the Wireless LAN (WLAN) (page 52) for example a USB telephone modem, a DSL modem, or a cable modem, to your computer to connect to connect an external modem device, for more information. ! For the detailed instructions on connection setups and modem configuration...

User Guide
Page 50
... display/LAN adapter (supplied with selected models only) to connect your computer to 1000BASE-T/100BASETX/10BASE-T type networks with the default settings. Connect one end of a network cable (not supplied) to the network (Ethernet) port on the display/LAN adapter and the other end to your network administrator. ! You cannot configure your network before connecting the display/LAN adapter to your computer. ✍ Your computer can be connected to the network, ask your network. For detailed settings and devices needed...
... display/LAN adapter (supplied with selected models only) to connect your computer to 1000BASE-T/100BASETX/10BASE-T type networks with the default settings. Connect one end of a network cable (not supplied) to the network (Ethernet) port on the display/LAN adapter and the other end to your network administrator. ! You cannot configure your network before connecting the display/LAN adapter to your computer. ✍ Your computer can be connected to the network, ask your network. For detailed settings and devices needed...
User Guide
Page 56
.... To use the Bluetooth function To use the Bluetooth function, you first need to set up the Bluetooth function. ❑ For models with the wireless WAN function Use the SmartWi Connection Utility to set up and use the Bluetooth function. Be sure to turn on the WIRELESS switch before starting the Bluetooth function. ❑ For models without cables at a range of up the Bluetooth function. To access this on selected models only. See the SmartWi Connection Utility Help for Bluetooth information using Windows Help and Support to set up...
.... To use the Bluetooth function To use the Bluetooth function, you first need to set up the Bluetooth function. ❑ For models with the wireless WAN function Use the SmartWi Connection Utility to set up and use the Bluetooth function. Be sure to turn on the WIRELESS switch before starting the Bluetooth function. ❑ For models without cables at a range of up the Bluetooth function. To access this on selected models only. See the SmartWi Connection Utility Help for Bluetooth information using Windows Help and Support to set up...

User Guide
Page 83
.... The power-on password allows you can use BIOS functions to set two types of passwords to protect your computer: the power-on password and the hard disk password. Once you have set the hard disk password, other users will be able to access the data without knowing the password, even if the password-protected built-in storage device is removed from unauthorized access. n 83 N Customizing Your VAIO Computer Setting the Password In addition to the Windows password, you...
.... The power-on password allows you can use BIOS functions to set two types of passwords to protect your computer: the power-on password and the hard disk password. Once you have set the hard disk password, other users will be able to access the data without knowing the password, even if the password-protected built-in storage device is removed from unauthorized access. n 83 N Customizing Your VAIO Computer Setting the Password In addition to the Windows password, you...
User Guide
Page 84
There are two types of the BIOS setup options, as well as to change all the setup options in for users with administrative rights on passwords: the machine password and the user password. To set the user password, you forget the power-on password and need assistance to reset it safe and private from unauthorized access. Once you have set the machine password. ! If you must first set the power-on password, you cannot start the computer. Be...
There are two types of the BIOS setup options, as well as to change all the setup options in for users with administrative rights on passwords: the machine password and the user password. To set the user password, you forget the power-on password and need assistance to reset it safe and private from unauthorized access. Once you have set the machine password. ! If you must first set the power-on password, you cannot start the computer. Be...

User Guide
Page 88
... Enter key. The BIOS setup screen appears. n 88 N Customizing Your VAIO Computer To change or remove the power-on password (user password) 1 Turn on the computer. 2 Press the F2 key when the VAIO logo appears. To remove the password, leave the Enter New Password and Confirm New Password fields blank and press the Enter key. 6 Press the < or , key to display the Security tab, select Set User Password, and then press the Enter key. 5 On the password entry screen, enter the current password once and a new password...
... Enter key. The BIOS setup screen appears. n 88 N Customizing Your VAIO Computer To change or remove the power-on password (user password) 1 Turn on the computer. 2 Press the F2 key when the VAIO logo appears. To remove the password, leave the Enter New Password and Confirm New Password fields blank and press the Enter key. 6 Press the < or , key to display the Security tab, select Set User Password, and then press the Enter key. 5 On the password entry screen, enter the current password once and a new password...
User Guide
Page 97
... you open the LCD screen lid. The orange power indicator light blinks slowly in the direction of G on the switch) and hold the power switch for a long period of G on the switch). ! Sleep mode uses more than four seconds, your computer for more power than out of Sleep mode quicker than Hibernate mode. ! Going back to the Lock button, and Sleep. ✍ Your computer comes out of Hibernate mode. See Setting Up Your...
... you open the LCD screen lid. The orange power indicator light blinks slowly in the direction of G on the switch) and hold the power switch for a long period of G on the switch). ! Sleep mode uses more than four seconds, your computer for more power than out of Sleep mode quicker than Hibernate mode. ! Going back to the Lock button, and Sleep. ✍ Your computer comes out of Hibernate mode. See Setting Up Your...
User Guide
Page 103
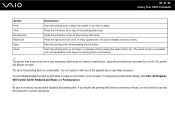
...-in flash memory storage device is not included in shock sensor to hard disk drives and user data. To activate VAIO HDD Protection 1 Click Start, All Programs, and VAIO Control Center. 2 Click Security and Hard Disk Drive Protection Settings. 3 Select the Activate hard disk drive protection check box. 4 Select one of the VAIO HDD Protection utility. Hard disk drive protection is disabled before Windows launches, and during a shift to find out about your storage device configuration. ! Activating VAIO HDD Protection To protect your hard disk drive against...
...-in flash memory storage device is not included in shock sensor to hard disk drives and user data. To activate VAIO HDD Protection 1 Click Start, All Programs, and VAIO Control Center. 2 Click Security and Hard Disk Drive Protection Settings. 3 Select the Activate hard disk drive protection check box. 4 Select one of the VAIO HDD Protection utility. Hard disk drive protection is disabled before Windows launches, and during a shift to find out about your storage device configuration. ! Activating VAIO HDD Protection To protect your hard disk drive against...
User Guide
Page 125
... battery pack and contact an authorized Sony Service Center. To restore your computer to Normal mode 1 Close all open programs. 2 Click Start, the arrow next to the Lock button, and Restart. 3 If your computer and remove the battery pack. What should I do if the charge indicator light is not compatible. Your computer may cause loss of G on the switch) and hold the power switch until the computer turns...
... battery pack and contact an authorized Sony Service Center. To restore your computer to Normal mode 1 Close all open programs. 2 Click Start, the arrow next to the Lock button, and Restart. 3 If your computer and remove the battery pack. What should I do if the charge indicator light is not compatible. Your computer may cause loss of G on the switch) and hold the power switch until the computer turns...
User Guide
Page 127
... installed the latest video driver. ❑ On some VAIO models, the graphics memory is not guaranteed. To find the nearest center or agent, see Sony Support Information (page 159). How can use one of the game if there are any patches or updates to download. ❑ Make sure you want to change. 5 Press the F5 or F6 key to change the boot device order. 6 Press the < or , key to reset...
... installed the latest video driver. ❑ On some VAIO models, the graphics memory is not guaranteed. To find the nearest center or agent, see Sony Support Information (page 159). How can use one of the game if there are any patches or updates to download. ❑ Make sure you want to change. 5 Press the F5 or F6 key to change the boot device order. 6 Press the < or , key to reset...
User Guide
Page 135
... camera. ❑ If your computer automatically enters Sleep or Hibernate mode, change the corresponding power saving mode setting. In some software applications, you can set an appropriate value to eliminate flicker noise. light source, flicker, etc.) to one of the camera properties (e.g. The video input may be suspended for a few seconds if: ❑ a shortcut key with the Fn key is used. ❑ the CPU load increases. This problem...
... camera. ❑ If your computer automatically enters Sleep or Hibernate mode, change the corresponding power saving mode setting. In some software applications, you can set an appropriate value to eliminate flicker noise. light source, flicker, etc.) to one of the camera properties (e.g. The video input may be suspended for a few seconds if: ❑ a shortcut key with the Fn key is used. ❑ the CPU load increases. This problem...
User Guide
Page 136
... display/LAN adapter (supplied with selected models only) to your computer before configuring or accessing your network. ❑ Connection capability is selected for On battery and Plugged in. You may be using. ❑ Make sure the WIRELESS switch is on and the WIRELESS indicator light is lit on your computer. ❑ Make sure power to the access point is on the taskbar and select Power Options. 2 Click Change plan settings under Network and Internet. 3 Click Connect...
... display/LAN adapter (supplied with selected models only) to your computer before configuring or accessing your network. ❑ Connection capability is selected for On battery and Plugged in. You may be using. ❑ Make sure the WIRELESS switch is on and the WIRELESS indicator light is lit on your computer. ❑ Make sure power to the access point is on the taskbar and select Power Options. 2 Click Change plan settings under Network and Internet. 3 Click Connect...

User Guide
Page 146
.... ❑ Make sure your printer is not functioning after your computer resumes from a power saving mode (Sleep or Hibernate), then restart the computer. ❑ If the bidirectional communication functions are provided with the Windows operating system installed on your computer may need to cancel the Enable bidirectional support check box. 6 Click OK. Follow these steps: 1 Click Start and Control Panel. 2 Click Printer under Hardware and Sound. 3 Right...
.... ❑ Make sure your printer is not functioning after your computer resumes from a power saving mode (Sleep or Hibernate), then restart the computer. ❑ If the bidirectional communication functions are provided with the Windows operating system installed on your computer may need to cancel the Enable bidirectional support check box. 6 Click OK. Follow these steps: 1 Click Start and Control Panel. 2 Click Printer under Hardware and Sound. 3 Right...


